Deploying Databases

You should deploy the database with application metadata whenever you add or modify dimensions or perform other structural changes.

For the first deployment of a Profitability and Cost Management database, you should select Replace Database to create the database in its entirety. After the first deployment, when you need to redeploy the calculation database, you can select deployment options to retain data already in the cube or to discard it upon restructure.

Any errors in the deployment are reported.

Caution:

For applications created with duplicate member outlines, data associated with members that are renamed or reparented will not be preserved when the database is deployed with Preserve Data selected.

To deploy a Profitability and Cost Management database:
  1. Click Navigator button, and then Database.

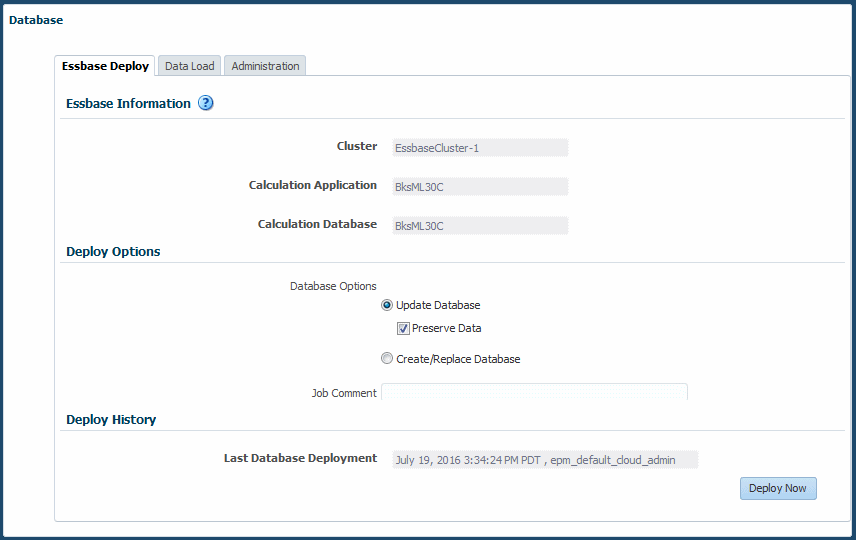
    The Database screen is displayed (Figure 10-1).

    Figure 10-1 Essbase Deploy Screen


    The Deploy screen displays the information described in the following steps.
  2. Confirm that the Essbase Deploy tab is selected.
  3. Under Essbase Information, review the following information:
    • Cluster displays the name of the Oracle Essbase database server that contains the application.

    • Calculation Application displays the name of the application being deployed.

    • Calculation Database displays the name of the Essbase database to which the application is being deployed.

  4. Under Deploy Options, select appropriate Database Options for deploying the database:
    • For the first deployment of a database, all selections are grayed out. This option creates the entire database for the first time.

    • To redeploy an existing database, select Update Database to retain existing artifacts and property settings in the new database, and change the outline to reflect current metadata.

      Note:

      Those with Service Administrator or Power User roles can use this option.

      Optional: Select Preserve Data to build and restructure the Essbase cube while preserving data. This option can be time-consuming, based on the size of the outline and the amount of data present.

    • Alternatively, select Create/Replace Database to remove the database and applications completely, and recreate them.

      Caution:

      Only those with Service Administrator roles can use this option. If you plan to select this option, you must first back up your data and then reload it yourself once the database is recreated.

  5. Optional: Enter a comment in the Job Comment box. The comment will display in the Job Library.
  6. Optional: Under Last Database Deployment, review the date and time of the previous deployment.
  7. Click Deploy Now to deploy the database.

    A confirmation message is displayed, indicating that the job has been submitted.

    Caution:

    Depending on the size and complexity of an application, this operation may take a significant amount of time.

  8. Monitor the progress of the deployment on the Job Status page using the taskflow ID.
    Any validation errors are displayed in the Job Library screen.
  9. Calculate the application (Calculating an Application).