3Setting Up Fees
Setting Up Fee Items
The fee items table lists the fees that will be assessed by your agency. You set up fee items for your agency on the Fee Items page.
The fee items table is used to validate the fees created in the Oracle Autonomous Integration Cloud (OIC) decision model. You define the fee items before setting up decision models and fee schedules.
For information about setting up decision models and fee schedules, see Creating Decision Models for Fees and Setting Up Fee Schedules.
Adding Fee Items
Select .
On the Fee Items page, click Add to add a fee item.
On the Fee Item Details page, enter a name for the fee item.
Enter a description.
In the Department field, you can select a department to associate with the fee.
Note: The department associated with the fee overrides the department specified on the permit type.Verify that the Enabled switch is turned on. The switch is turned on by default for a new fee item.
Click Save.
Modifying Fee Items
Select .
On the Fee Items page, click the row for the fee item that you want to modify.
On the Fee Item Details page you can:
Modify the fee item description. You cannot change the name.
Change the department associated with the fee item.
Click the Enabled switch to enable or disable the fee item.
If you made any changes, click Save.
Deleting Fee Items
Select .
On the Fee Items page, click the row for the fee item that you want to delete.
On the Fee Item Details page, click Delete.
If you want to delete multiple fee items, you can delete them from the Fee Items page:
Click Edit.
Select the check boxes for the fee item rows to delete.
Click Delete.
Setting Up Fee Schedules
Define fee schedules for permits and planning applications to associate with the application types. A fee schedule can be associated with multiple application types.
You set up your fee schedules and fee lines or items on the Fee Schedule page. The fee model defined on the fee items is associated with a decision model set up in the Oracle Autonomous Integration Cloud (OIC).
Before you can set up your fee schedules, you must do the following:
Set up the fee items on the Fee Item page.
You must define the items that require a fee to be displayed in the prompt list for the Default Fee Item field. See Setting Up Fee Items.Set up decision models in OIC. For more information, see Creating Decision Models for Fees in this guide and the documentation for Oracle Autonomous Integration Cloud.
Adding Fee Schedules
Select .
On the Fee Schedule page, click Add to add a new fee schedule.
Enter values on the Fee Schedule Details page:
Page Element
Description
Fee Schedule
Enter an ID for the fee schedule.
Description
Enter a description for the fee schedule.
Default Fee Item
Enter a fee item as the default for this fee schedule.
The default fee item is used for the fee schedule if there is no matching fee item in the decision model.
Effective Start Date
Enter the first day that the fee schedule definition is valid.
Effective End Date
Enter the date, if any, when the definition will no longer be valid. To keep the definition valid indefinitely, do not enter a date.
After a definition is saved, the end date becomes read-only. Although you can’t make manual changes, the system can still update the end date to accommodate new effective-dated entries. For example, if the currently effective definition has an open end date, and you create a new definition with a later start date, the original definition’s end date changes to the day before the new definition goes into effect.
Show All Dates
Click this button to access the effective-dated history of the definition. This button is not available during the creation of a new definition.
On the page that displays the history, use the Add button to add a new effective-dated entry for the fee schedule definition. The new entry inherits the same fee schedule name, description, and default fee item. You provide the new effective start date and other details for the definition.
You can copy the fee item rows by clicking the Copy Previous Effective Date button in the Fee Item section.
Click Save.
Adding Fee Items to the Fee Schedule
You set up fee lines or items for a fee schedule on the Fee Item Details page.
On the Fee Schedule Details page, click Add in the Fee Items section.
Enter values on the Fee Item Details page:
Page Element
Description
Space Name
Enter the space name. The space is where the fee decision model is stored. You share decision models created in OIC at the space-level.
Model Name
Enter the name of the fee decision model.
Version
Enter the version number of the fee decision model you want to activate.
Service Name
Enter a service name to integrate the fee decision model with the fee schedule.
Map Fee Item
Associate the fee with the fee item data object in the fee decision model.
Map Fee Amount
Associate the fee amount with the data object in the fee decision model.
Currency
Displays the default currency that was set up for your agency.
Applies to Type
Select Original. The fee item is used for the fees associated with the original application.
Pay Now
Move the switch to activate the pay now option if you want the fees to be payable upon submission of the application.
Click Save.
The fee item appears as a new row in the Fee Items grid and is automatically assigned the next fee item number.
Modifying Fee Schedules
You can modify fee schedules on the Fee Schedule page. Fee schedules are associated with application types such as permits and planning applications.
Select .
On the Fee Schedule page, select the row for the fee schedule that you want to modify.
On the Fee Schedule Details page you can:
Modify the fee schedule description. You cannot change the fee schedule ID.
Enter a new default fee item.
This default fee item is used for the fee schedule if there is no matching fee defined in the fee decision model.
Note: When adding a new fee item to the fee schedule, you must verify the fee mapping for all affected application types.Change the effective start date. After a definition is saved, the end date becomes read-only. .
If you made any changes, click Save.
You can also add a new effective-dated entry for the fee schedule definition and copy fee items from the previous effective-dated entry.
Note: Fee schedules with multiple effective dates appear only once on the Fee Schedule page.To view the history of effective dates for the fee schedule, click Show All Dates.
The Fee Schedule Details – History Data page displays all effective-dated rows in descending order. From the History Data page you can:
Delete an effective-dated row. Click Delete at the end of the row.
Add an effective-dated row. Click Add.
Copy the fee item rows by clicking the Copy Previous Effective Date button in the Fee Item section.
Deleting Fee Schedules
You can delete fee schedules on the Fee Schedule page.
Select .
On the Fee Schedule page, select the row for the fee schedule that you want to delete.
Click Delete on the Fee Schedule Details page.
Caution: When you delete a fee schedule, all associated fee items are also deleted.If you want to delete multiple fee schedules, you can delete them from the Fee Schedule page:
Click Edit.
Select the check boxes for the fee schedule rows to delete.
Click Delete.
Modifying Fee Items on the Fee Schedule
To modify a fee item on the fee schedule definition:
Select the fee schedule associated with the fee item to open the Fee Schedule Details page.
In the Fee Items section, select the fee item to open the Fee Item Details page.
Select different decision model mapping values for the fee from the drop-down lists.
Click the Pay Now switch to turn it on or off, which indicates whether the fees must be paid upon submission of the application or not.
If you made any changes, click Save.
Deleting Fee Items from the Fee Schedule
To delete a fee item from the fee schedule definition:
Select the fee schedule associated with the fee item to open the Fee Schedule Details page.
In the Fee Items section, select the fee item to open the Fee Item Details page.
To delete the fee item, click Delete.
Note: When you delete a fee item, the decision model mappings are deleted from all associated record types.If you want to delete multiple fee items, you can delete them from the Fee Items section on the Fee Schedule Details page:
Click Edit.
Select the check boxes for the fee item rows to delete.
Click Delete.
Mapping Form Fields to Decision Model Attributes
This topic describes how the fields added to an intake form in the designer are mapped to the fee model defined for the transaction type.
The Fee Mapping page in the designer is used to map attributes in the decision model to the fields added to the intake form.
This image illustrates Step 2 of 2: Fee Mapping in the design of a permit application.
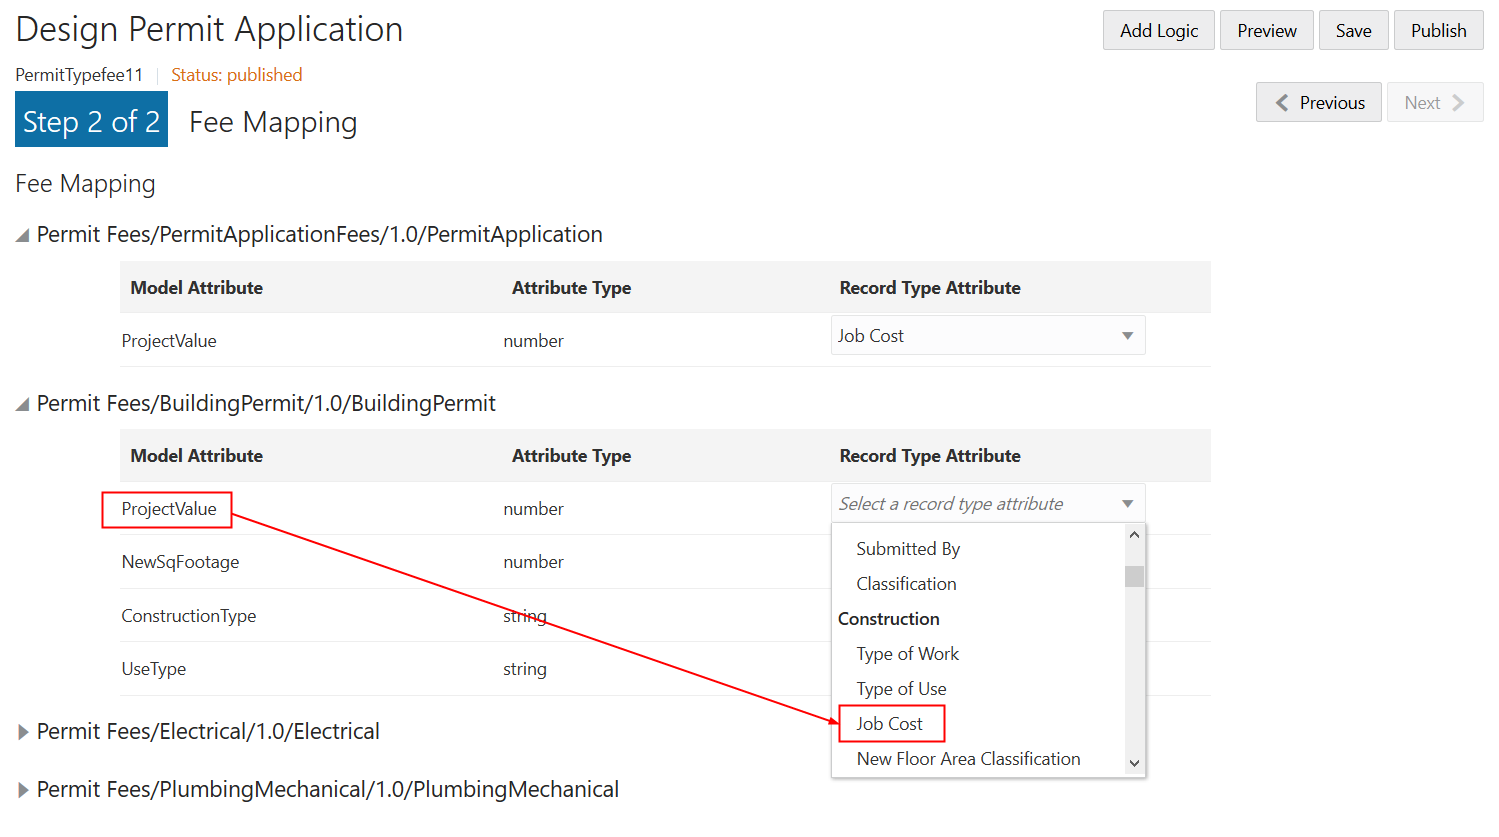
You assign a fee schedule to an application type on the Transaction Type page using the Fee Schedule field. You map attributes from the fee schedule’s underlying decision model created in Oracle Integration Cloud to the fields you have added to your intake form either through predefined elements or by adding fields manually.
For more information on setting up fee schedules, see Setting Up Fee Schedules.
For more information on decision models, see Creating Decision Models for Fees.
Mapping Application Fields to the Fee Item in the Decision Model
To access the Fee Mapping page in the form designer:
Navigate to the Transaction Type page:
Select the permit type or planning application type that you want to view in the designer.
Click the Design Form button.
Click the Next button while in the application form setup step.
The fields on the Fee Mapping page are as follows:
Page Elements
Description
Model Attribute
The name of the attribute as it appears in the decision model in Oracle Autonomous Integration Cloud.
Not all model attributes must be mapped. Because fee schedules can be reused by multiple transaction types, only the model attributes required for fee calculations for the current transaction type need to be mapped. All other model attributes can be left blank.
Attribute Type
The data type of the model attribute, such as string, number, boolean, and so on.
Record Type Attribute
The field added to the intake form layout either contained in a predefined form element or a user-defined element you have added manually.
Select the record type attribute from the drop-down list that you want to map to the decision model attribute.
Click Save.