Ready to create a decision model?

Ever leave the house and wish you’d better prepared for the weather?

Let’s create a process application to fix that. When prompted, you input the temperature and rain forecast, and the application decides whether you should bring:

  • An umbrella, for warm and rainy weather

  • A raincoat, for cold and rainy weather

  • An overcoat, for cold and dry weather

  • Nothing, for warm and dry weather

Using this example, let’s explore the entire decision model development life cycle—from creating a decision model, defining its decision logic, activating it on the DMN server, and using a decision service in a process.

Create a Simple Application

First, let’s create an application for the decision. Its process starts with a web form, which has two input fields where you enter temperature and rain forecast numbers. It then uses a decision element to call the decision service. Lastly, a human task element displays the decision result, which tells you what to bring for the day based on the weather.

  1. Create an application.

    Click Processes and then click Process Applications to go to the Process Applications page, and then click Create.

    Click Create an Application. Enter a name (What To Bring) and click Create.

  2. Create a process.

    On the Processes tab within the application, click Create and then New Process. In the Create Process pane, select Form, enter a process name (Decision Process), and click Create.

  3. Add a decision and human task.

    On the Decision Process tab, expand System on the Elements palette, drag a Decision element to the process, and drop it after the start event.

    Expand Human on the palette, drag a Submit element to the process, and drop it after the decision element.

  4. Rename the flow elements.

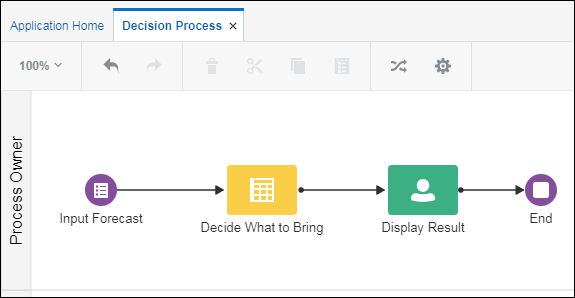
    Double-click the flow elements and rename the start event to Input Forecast, the decision to Decide What to Bring, and the human task to Display Result.

    Description of decision-process.png follows
    Description of the illustration decision-process.png

  5. Add a web form.

    Select the Input Forecast element, click Menu Menu icon, and select Open Properties. In the Title field, enter a name (Forecast) to display for the application.

    Click Create New Form Add icon next to the Form field. Enter InputForecastWebForm in the Name field, select the Open Immediately check box, and click Create.

  6. Add the forecast input fields to the web form.

    From the Basic palette, drag and drop two Number controls and one Input Text control onto the canvas. Select each control and edit its Label field in the Properties pane, changing the number controls to Temperature and Rain, and the text control to What To Bring. Further, edit the Name field of the controls as follows: temperature, rain, and whatToBring.

    Select the What To Bring control, scroll down the General tab, and select the Hide check box. Notice that the control becomes dimmed to indicate it’s hidden.

  7. Add a presentation to display results.

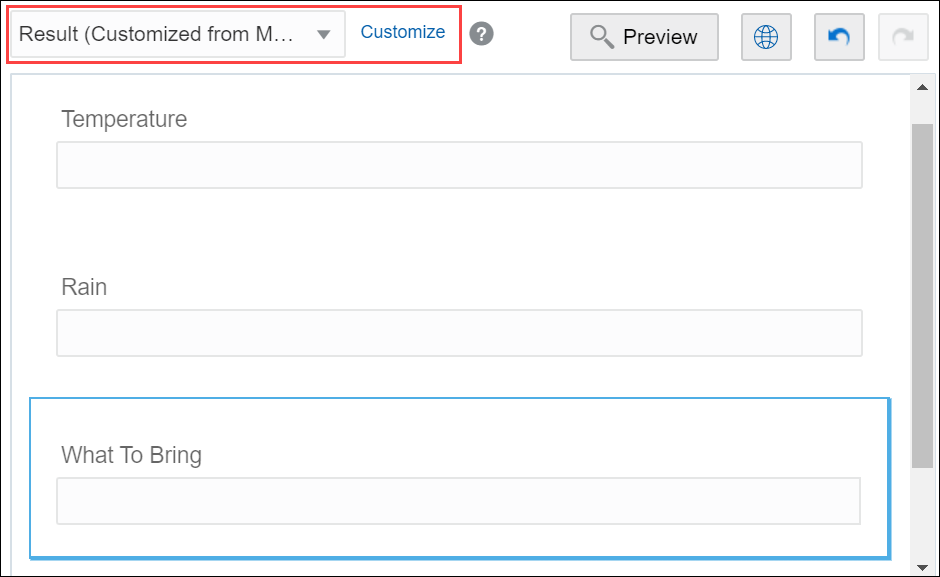
    Click the form outside a control. On the Form tab, click Add Presentation Add Presentation icon next to Presentations. In the Select Presentation Type dialog box, select Customize. In the Create Presentation dialog box, select Main in the Select from Previous Presentation field, enter a name for the new presentation (Result), and click Create. On the new Result presentation, click Customize next to the presentation's name and, in the resulting window, click hidden in the What To Bring control's row to show the control on this presentation. Click Close.

    Want to learn more about web forms? See Create Web Forms.

    Description of webform-presentation.png follows
    Description of the illustration webform-presentation.png

  8. Save the application.

    Want to learn more about working with applications? See Create and Manage Applications.

  9. Return to the process by clicking the Decision Process tab. Open the properties for the Display Result human task. Click Browse Browse icon next to the Form field and select InputForecastWebForm. In the Presentation field, select Result.

Create a Decision Model

A decision model does what its name implies: it lets you define how decisions will work. It contains a collection of decisions, input data, and other definitions.

To create a decision model:
  1. Return to the Process Applications page by clicking Back Back icon on the navigation pane.
  2. On the navigation pane, click Decision Models.

    You can use a decision model in multiple applications.

  3. Click Create.
  4. Click Create a Decision Model.
  5. In the Create Decision Model dialog box, enter a name for the model (What To Bring Decision Model) and click Create.

    The decision model editor opens in the graph view, with the title you entered displayed at the top. Notice that the editor contains a central canvas area on which you construct decisions, with the diagram palette and expandable Services pane on either side.

    See Work with Decision Models.

Add Decisions

Let’s set up our decision model framework. In Decision Model and Notation (DMN), a decision model answers a central question. This model answers the question: what to bring to be prepared for the weather?

  1. Add a result decision.
    1. On the diagram palette, click Expand Expand/Collapse icon next to Decision. Select and drag the Empty Decision element onto the canvas.
    2. Edit the decision's name (What To Bring). You can change its logic type later.
  2. Create two more decisions to act as supporting decisions.

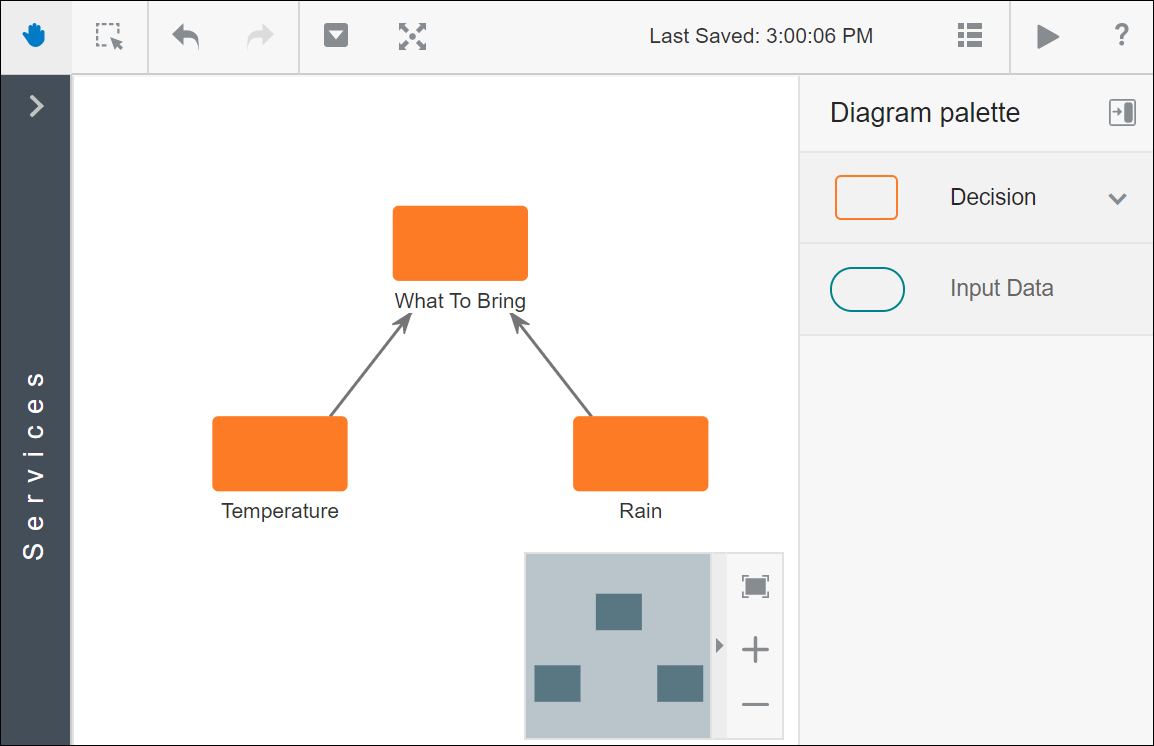
    Most decisions models include supporting decisions that feed into the result decision. Deciding what to bring requires supporting decisions to answer these questions: 1) Will it be warm or cold? 2) Will it rain?

    1. From the diagram palette, drag two more empty decisions onto the canvas and add them below the result decision. Edit the names of these decisions (Temperature and Rain).
    2. Create connections from the supporting decisions to the result decision. Select a supporting decision and click Create New Connection Create New Connection icon and keep the mouse depressed. Move the cursor to the result decision, and then release the click.

    Description of decisions.png follows
    Description of the illustration decisions.png

    Notice that in the example diagram the topmost decision is the main result decision. Supporting decisions are added below the main decision. However, you can order decisions in several ways. For example, you can create a top-down sequence, a left to right flow, and so on.

Define Input

It’s hard to make a good decision without input (or data). For our “What to Bring for the Weather” example, the input will be two numbers: temperature and rain percent forecasts. Let’s set up their definitions.

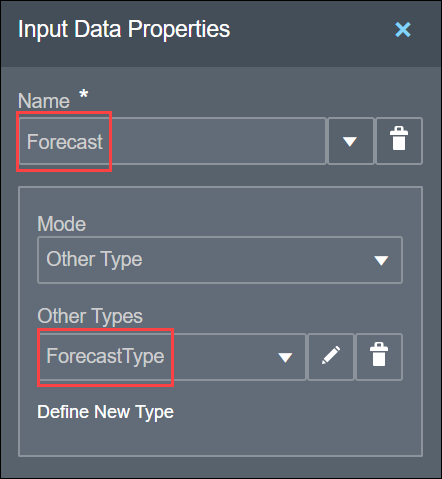
  1. On the diagram palette, select the Input Data element, drag it onto the canvas, and drop it below the supporting decisions. Edit the element's name (Forecast).
  2. Add a complex type definition for the forecasts.
    1. Select the input element and click Open Properties Open Properties icon.
    2. In the properties pane, Select the Mode as Other Type, and then click the Define New Type link that appears in the pane.
      A new type definition is created with a default name and the Add Type Definition panel opens for editing.
    3. In the type definition panel:
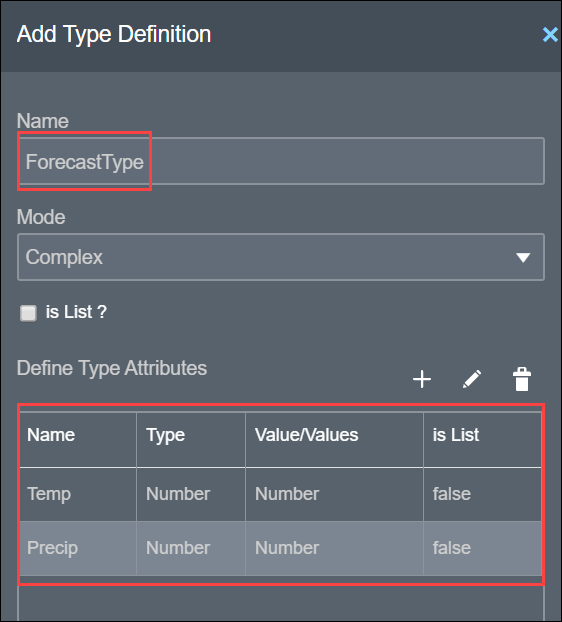
      1. Edit the definition's name (ForecastType) and select the Mode as Complex.

      2. Click Add Component next to Define Type Attributes to add two attributes.

      3. For the first attribute, enter Temp for its name and select Number as its mode. Click Close Close icon to return to the Add Type Definition panel.

      4. For the second attribute, enter Precip for its name and Number as its mode.

      5. Click Close Close icon.

  3. In the Input Data Properties pane, choose the type definition you just defined in the Other Types field to associate it with your Forecast data variable. You can edit or delete the type definition using the buttons next to the field.
  4. Click Close Close icon to collapse the Input Data Properties pane.
  5. Now, create connections from the input data element to the supporting decisions.
    1. Select the element and click Create New Connection Create New Connection icon and keep the mouse depressed.
    2. Move the cursor to the Temperature element, and then release the click.
    3. Repeat the steps to create a connection to the Rain element.

    Want to learn more about input? See Define Decision Input and Type.

Model Decision Logic

Now let’s change the empty logic of the decisions. You can configure decision logic in a variety of ways, but here you’ll create a Boolean expression, an if-then-else expression, and a decision table.

  1. Configure a Boolean expression for the rain forecast.
    1. Select the Rain decision and click Open Properties Open Properties icon to open the Decision Properties pane.
    2. In the Logic field, change the decision type to Expression.

      Notice that the decision’s icon changes to an expression icon. Also, a small red circle indicates a validation error because you haven’t entered an expression yet.

      See Add and Order Decisions for information on other fields in the properties pane.

    3. Enter the expression using the input data you already defined. Double-click the Rain element or click Edit Edit icon next to the Name field in the properties pane and enter this condition:

      Forecast.Precip>80

      Description of decision-logic1.png follows
      Description of the illustration decision-logic1.png

      When the precipitation input value is greater than 80 percent, this Boolean expression will be true (rain is likely); otherwise it will be false (rain is unlikely).

      Want to learn more about the expression language? See Define Expressions with the Friendly Enough Expression Language (FEEL).

    4. Click Close Close icon to return to the canvas. Notice that the validation error no longer displays because the expression is now valid.
  2. Configure an if-then-else decision for the temperature forecast.
    1. Select the Temperature decision and click Open Properties Open Properties icon to open the Decision Properties pane.
    2. In the Logic field, change the decision type to If then Else. The decision element shows a validation error for items you need to complete.
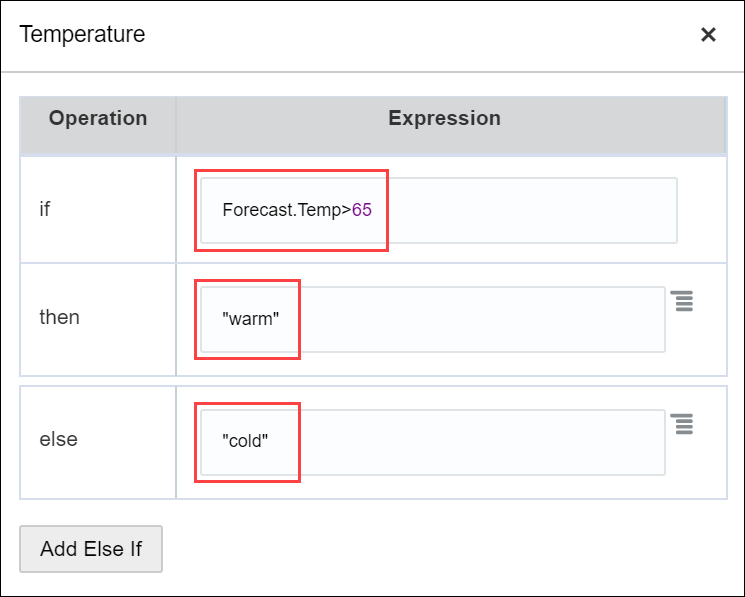
    3. Double-click the Temperature element or click Edit Edit icon next to the Name field in the properties pane and complete the decision’s if, then, and else expression fields as follows:
      • if: Forecast.Temp>65

      • then: "warm"

      • else: "cold"

      Because "warm" and "cold" values are strings, you must include quotation marks around the values. (Depending on your location, you may want to adjust the temperature condition of >65 from degrees in Fahrenheit to >18 in Celsius.)

      Description of decision-logic2.png follows
      Description of the illustration decision-logic2.png

    4. Click Close Close icon to return to the canvas and verify that the validation error no longer displays.
  3. Configure a decision table for the What To Bring decision.

    A decision table lets you model input, output, and rules in a compact way. It derives a final output decision using input data and the results of other decisions.

    In the example, the temperature and rain input decisions each have two possibilities, resulting in a total of four output possibilities.

    Temperature (input) Rain (input) What To Bring (output)
    warm true umbrella
    cold true raincoat
    cold false overcoat
    warm false nothing
    1. Select the What To Bring decision and click Open Properties Open Properties icon to open the Decision Properties pane.
    2. In the Logic field, change the decision type to Decision Table.
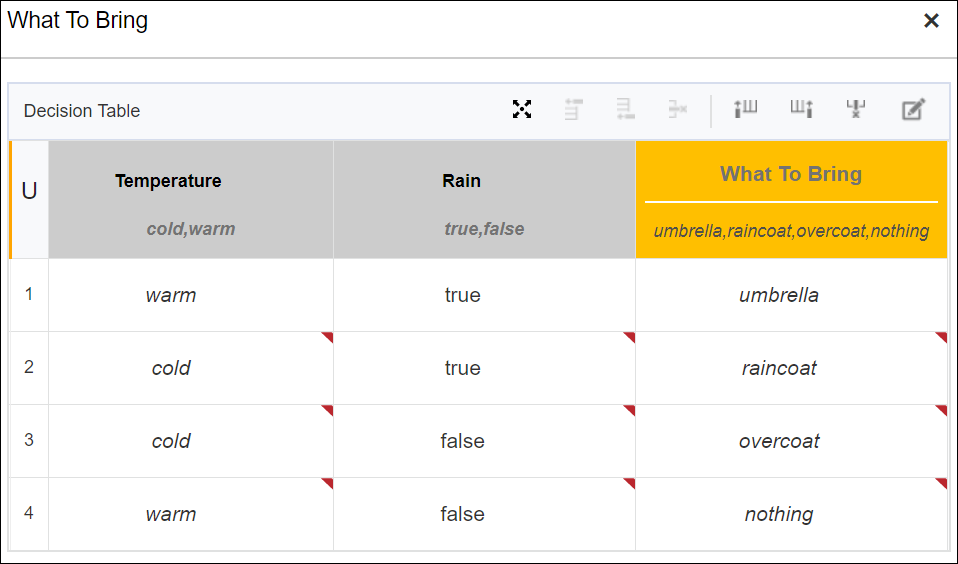
    3. Double-click the decision element and explore the table started for you.
      • The yellow column is for output, and is always the final column of the table. What To Bring is already designated as your output decision.

      • The adjacent gray column is for input. You’ll add a second input column, using one of the controls located above the output column.

      • Rows are for rules. A row labeled 1 is already listed.

      • Above the 1 in rule 1 is a U, indicating that the table uses a unique hit policy. The hit policy determines the output of a decision table when more than one rule matches the input data.

        See Configure a Hit Policy.

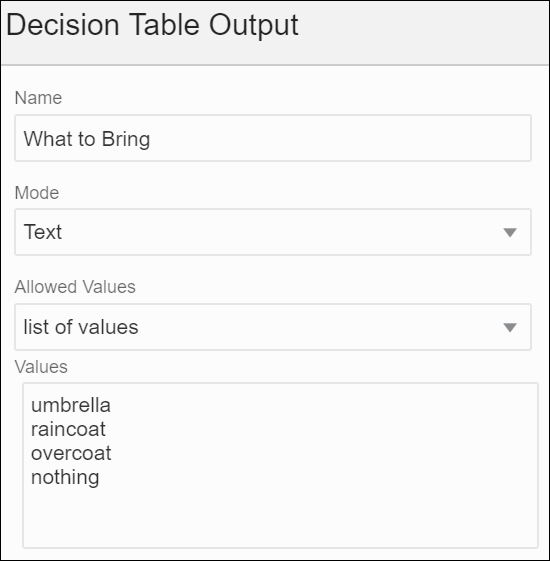
    4. Configure the possible values for the What To Bring output column.
      • In the What To Bring column, click Enter Allowed Values.

      • In the resulting dialog, select Text in the Mode field, select list of values in the Allowed Values field, and enter the following values: umbrella, raincoat,overcoat,nothing.

      • Click Close.

      Description of decision-input-configuration.png follows
      Description of the illustration decision-input-configuration.png

    5. Configure the Temperature input column.

      In the Enter Expression cell of the gray input column, press Ctrl+Space to open a pop-up menu. Select Temperature from the menu. For an input column, the Allowed Value cell is auto-populated based on the input expression.

      To specify a different set of allowed values, see Defining Decision Table Input.

    6. Add and configure the Rain input column.
      • Click the Temperature input column and select Add column after Add column after icon.

      • In the Enter Expression cell, press Ctrl+Space to open a pop-up menu. Select Rain from the menu. The Allowed Value cell is auto-populated with Boolean values.

    7. Add and configure rules.
      • In row 1, click the cell below Temperature and select warm.

        Notice the String mode icon icon in the cell, which stands for text. Clicking this icon, you can toggle between Text Text mode icon, Any Any icon, and Advanced Advanced mode icon modes for all the cells in this column.

        See Configure Rules.

        In the text mode, text strings are automatically italicized and quotation marks aren’t needed.

      • Click the cell below Rain and select true. Notice the Boolean icon icon in the cell, which stands for Boolean. Clicking this icon, you can toggle between Boolean Boolean icon, Any Any icon, and Advanced Advanced mode icon modes for all the cells in this column.

      • Click the cell below What To Bring and select umbrella from the auto-suggest menu. If needed, set the cell’s mode to Text. Quotation marks aren’t needed.

    8. Click Add rule after Add rule after icon three times to add three rows to the table.
    9. Complete rules 2 through 4 of the decision table:
      • For rule 2, select cold, true, and raincoat.

      • For rule 3, select cold, false, and overcoat.

      • For rule 4, select warm, false, and nothing.

      Description of decision-table.png follows
      Description of the illustration decision-table.png

    10. Close the decision.
Want to learn more about decision model types? See Model Decision Logic.

Test Your Decisions

Verify that the model produces the results you want by testing it with input values.

  1. Click Test Test icon.
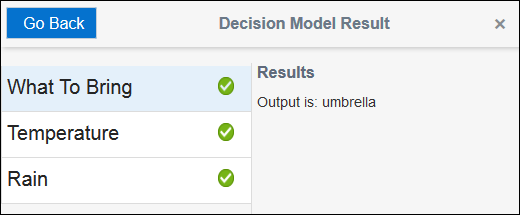
  2. In the Test Decision Model pane, enter values in the Temperature and Rain fields and click Start Test. For example, enter 85 into both fields.

    The Decision Model Result pane displays decision results. Click each green check mark to see the decision’s result.

    Description of decision-model-result.png follows
    Description of the illustration decision-model-result.png

  3. Click Go Back, and repeat step 1 and 2 to test each decision rule’s outcome.
    Temperature (F) Precipitation % Outcome

    85

    85

    • What to Bring: umbrella

    • Temperature: warm

    • Rain: true

    50

    85

    • What to Bring: raincoat

    • Temperature: cold

    • Rain: true

    50

    50

    • What to Bring: overcoat

    • Temperature: cold

    • Rain: false

    85

    50

    • What to Bring: nothing

    • Temperature: warm

    • Rain: false

  4. Save the decision model.

    Want to learn more? See Test Decisions.

Create a Service

After you complete and test the decision logic, create a RESTful service to communicate with Process. The decision service specifies the decision and input data you want to expose.

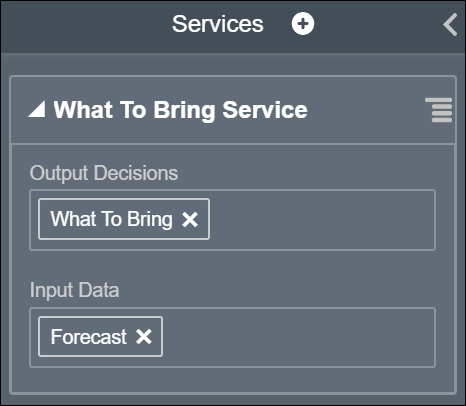
  1. Expand the Services pane, and click Add new service Add icon.
  2. Enter a name for the decision service (What To Bring Service) and click OK.
  3. Click the Output Decisions field and select What To Bring from the list. Validation errors display because you haven’t specified input data yet.
  4. Similarly, click the Input Data field and select Forecast.

    Description of decision-services.png follows
    Description of the illustration decision-services.png

    You can output multiple decisions and input multiple data items in a service. See Expose Decisions as Services.

  5. Click Save on the toolbar.

Activate a Decision Snapshot

To use a decision model, you must create a snapshot of it and activate the snapshot on the DMN server.

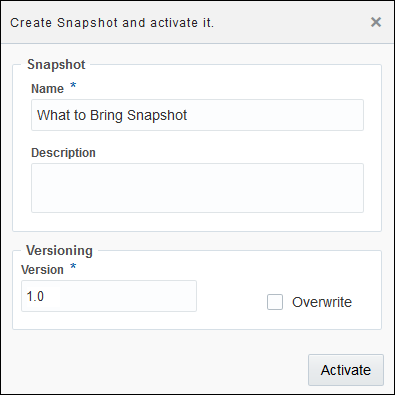
  1. In the decision model editor toolbar, click Activate.
  2. In the Create Snapshot and activate it dialog box, enter a name (What to Bring Snapshot) and click Activate.
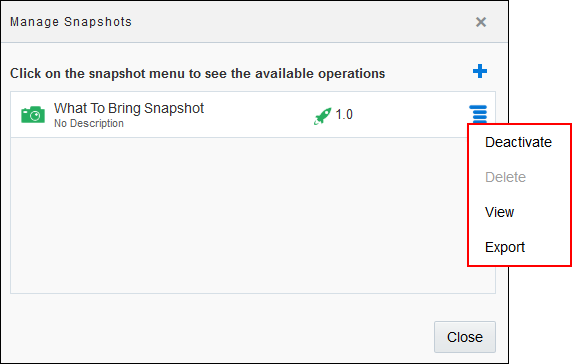
  3. In the decision model editor toolbar, click Snapshots.

    Notice that the snapshot you just activated is listed, along with any other activated snapshots. Here you can:

    • Activate or deactivate a selected snapshot.

    • Delete a snapshot. You must deactivate a snapshot before you can delete it.

    • View a read-only version of the snapshot.

    • Export a snapshot, which you can later import into a new decision model and edit its contents.

    Description of manage-snapshots-dmn.png follows
    Description of the illustration manage-snapshots-dmn.png

    Want to learn more about managing decision model snapshots and their versions? See Manage Decision Model Snapshots.

  4. Click Close.

Use the Decision in Your Application

Now let’s use your activated decision snapshot in a process within an application.
  1. Return to the Decision Models page by clicking Back Back icon.
  2. Click Process Applications in the navigation pane and open the What To Bring application you created.
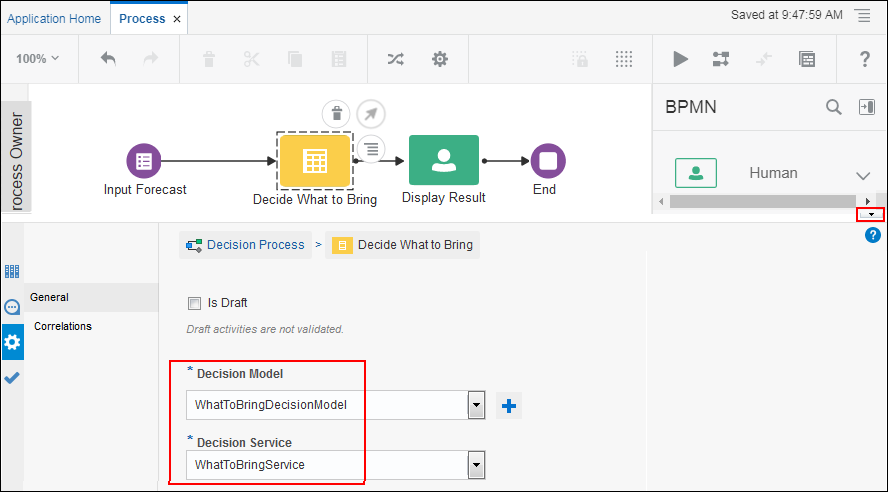
  3. Open the decision process. Select the decision element you added (Decide What to Bring), click Menu Menu icon , and select Open Properties.
  4. On the Properties pane, click Use Decision Model Use Decision Model icon next to the Decision Model field.
  5. In the Use an Activated Decision Model dialog box, select the snapshot you created and activated (What To Bring Snapshot), and click Use.

    Description of activate-decision-model.png follows
    Description of the illustration activate-decision-model.png

    Process brings the activated decision model snapshot into the application and performs behind-the-scenes operations such as importing data types and defining the REST connector to the service. See Add Decisions to Applications and Processes.

    Notice that the Properties pane now lists the decision model and service you selected to use.

    Description of decision-process-properties.png follows
    Description of the illustration decision-process-properties.png

  6. Click Collapse Pane Collapse pane icon to close the properties pane.

Map Data to and from the Decision

Configuring the data mapping is the last key piece in configuring a decision model. The data needs to flow from the web form into the decision and its result must flow out of the decision so the human task can display it.

  1. On the Decision Process tab, let’s view the data association that was automatically configured for the Input Forecast start activity and the Display Result human task.
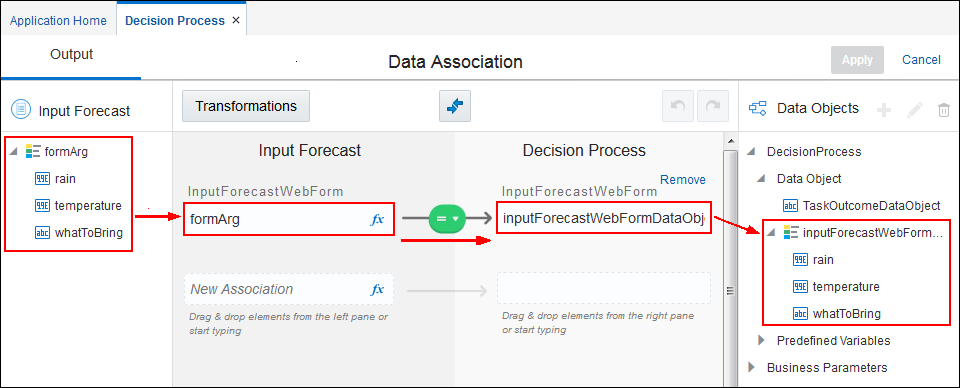
    1. Select the Input Forecast element and click Data Association Data Association icon in the process toolbar. Expand the values in both side panes. Notice that values entered into the web form are written to a data object called inputForecastWebFormDataObject. Click Cancel.
    2. Select the Display Result element and click Data Association Data Association icon in the toolbar. Notice that for input, the same data object—inputForecastWebFormDataObject—is used to write values back to the web form. Click Cancel.
  2. Map input and output data association for the decision element.

    The decision needs to use the input values (rain, temperature) contained in inputForecastWebFormDataObject and output the decision’s result (what to bring) into the data object.

    1. Open data association for the Decide What to Bring element. With the Input tab selected, expand the values in both side panes.
    2. Map the rain and temperature values as follows:

      inputForecastWebFormDataObject.rain to body.forecast.precip

      inputForecastWebFormDataObject.temperature to body.forecast.temp

    3. With the Output tab selected, map the Decide What to Bring value as follows:

      bodyOutput.interpretation to inputForecastWebFormDataObject.whatToBring

  3. Click Apply.

Try Your Decision in Runtime

Let’s try running the application in test mode as an end user.

  1. From the toolbar, click Test.
  2. On the Test Application tab, click Activate. In the Activate to Test dialog box, leave the Add Me to All Roles check box selected and click Activate.
  3. After the application activates successfully, click Try in Test Mode. When the new browser tab opens displaying runtime options, click Forecast from the My Apps pane.
  4. In the form, enter temperature and rain values, and click Submit.
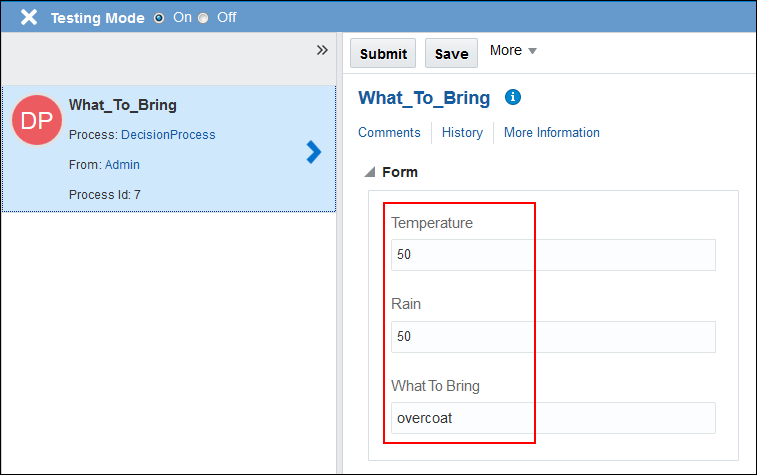
  5. Click My Tasks and open your new task. The What To bring field displays the decision’s result based on the values you entered.