3Setting Up the Landing Pages and Agency Springboard
Landing Pages Overview
The landing pages provide an initial entry point for all types users to access the pages they need.
There are three landing pages that the agency can configure: Agency Springboard, Anonymous User Landing Page, and Registered User Landing Page. This topic summarizes them and their purpose.
| Page |
Description |
|---|---|
| Agency Springboard |
Provides a starting point for agency staff to manage work. The Agency Springboard offers access to task lists and specific pages based on the user’s role in the agency, from supervisors and accounting staff to planners, permit technicians, and inspectors. For more information about the elements on the Agency Springboard, see Setting Up the Agency Springboard. |
| Anonymous User Landing Page |
Also known as guests, anonymous users are residents, business owners, contractors, and so on, who have not signed in or are not registered. From the landing page, users can view an interactive map of the city, browse types of applications, start an application and access the Guide, which is a questionnaire users can fill out to find and save recommended application types for their project. For more information about the elements on the landing page for guests, see Setting Up the Landing Page for Anonymous Users. |
| Registered User Landing Page |
Registered users are residents, business owners, contractors, and so on, who are registered in the system. From the landing page for registered users, applicants can initiate applications, pay fees, view applications and details, request inspections, and manage their own user account. For more information about the elements on the landing page for applicants who are registered in the system, see Setting Up the Landing Page for Registered Users. |
Agencies can configure the look and feel of the landing pages by changing these elements:
Banner Image
Welcome Message
Summary Message
Tile Labels
Tile Image
Color Theme for Background, Image Background, and Text of Each Section
For more information about setting up the landing pages, see Branding Public Sector Cloud Services.
Setting Up the Agency Springboard
You set up the Agency Springboard by defining the different elements on the page.
You can add these elements to the Agency Springboard by configuring the menu navigation attributes:
Alerts banner
Quick actions (I Want To) bar
Task lists element
Springboard area with tiles
For information about setting up the banner image see Applying Branding Images.
For information about the global header and the page footer, see Configuring Header and Footer Navigation Features.
Defining Alerts for Agency Staff
You can display alert messages on the Agency Springboard in an alerts banner.
For more information about setting up alerts messages, see Defining Alerts.
Configuring the Quick Actions Section
The quick actions section includes I Want To actions in a drop-down list on both the Registered User Landing Page and Agency Springboard. Each link provides access to relevant pages and functionality. You can show or hide the I Want To bar and include the link provided in the I Want To Content folder.
This example illustrates the quick actions element on the Agency Springboard.

To show the quick actions section on the Agency Springboard:
Select .
On the Configure Menu Structure page, select the Products menu.
Click Open Menu.
Expand the Agency Springboard Data folder.
Select the I Want To link:
Menu Link
Description
I Want To
Show available actions for agency staff in the quick actions drop-down list. These are the delivered actions that agency staff can access:
Start an Application: Select to start an application behalf of a registered public user.
Estimate Fees: Select to calculate an approximation of actual application fees.
Schedule an Inspection: Select to open the supervisor Inspection List page, where you can schedule an inspection.
Report an Issue: Select to report a code enforcement issue.
Pay Citation Select to pay a code enforcement citation on behalf of a public user.
The actions for agency staff and registered public users are determined by security setup.
Select the desired menu item and click the Edit button.
On the Link Details page, go to the Show On field and select an option:
All devices, Tablets and larger, or Smartphones only - Displays the quick actions (I Want To) bar.
None - Hides the I Want To actions bar.
Note: When you configure the quick actions section to appear on the Agency Springboard, it also appears on the Registered User Landing Page.Click Close.
Configuring the Task List Element
The Task List element provides access to different lists of assigned tasks for agency staff.
This example illustrates the task list element on the Agency Springboard.

To show the Task List element on the Agency Springboard:
Select .
On the Configure Menu Structure page, select the Products menu.
Click Open Menu.
Expand the Agency Springboard Data folder.
Select the Agency Task List link:
Menu Link
Description
Agency Task List
Select to display the element that contains delivered links to the Task Management page, where a predefined filter is applied. The delivered links include:
My Workflow
Group Workflow
My Plan Reviews
My Inspections
A number appears next to the link to display the task count for the applied filter.
Note: The items that appear on the Agency Springboard are determined by the security roles assigned. For example, agency roles specific to the permits service display all of the items above, whereas, roles specific to the planning and zoning service do not display My Inspections or My Plan Reviews.Select the desired menu item and click the Edit button.
On the Link Details page, go to the Show On field and select an option:
All devices, Tablets and larger, or Smartphones only - Displays the Task List element.
None - Hides the Task List element.
Click Close.
Configuring the Tiles on the Springboard
You can show or hide tiles, or modify the tile labels on the springboard, but you cannot delete delivered menu links. For more information about configuring tiles and the menu navigation, see Configuring Menu Structure.
This example illustrates tiles on the Agency Springboard.
To configure the tiles on the springboard area of the Agency Springboard:
Select .
On the Configure Menu Structure page, select the Products menu.
Click Open Menu.
Expand the Agency Springboard Data folder.
To create the springboard area for the tiles, click the Agency Springboard menu link.
Click the Edit button.
On the Link Details page, go to the Show On field and select an option:
None - Hides the springboard area.
All devices, Tablets and larger, or Smartphones only - Shows the springboard area.
To add individual tiles to the springboard, select from delivered menu links in a variety of folders.
Select the desired menu item and click the Edit button.
On the Link Details page, turn on the Show on Springboard switch.
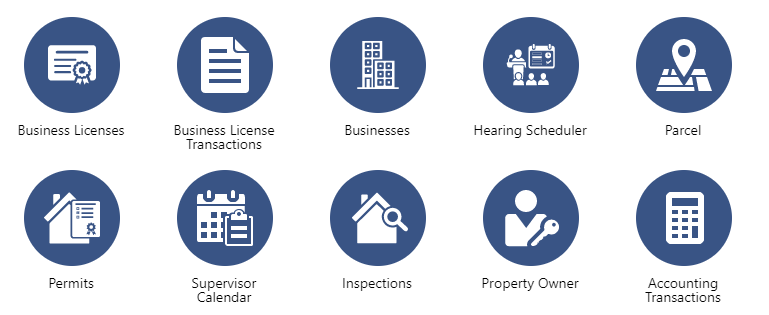
For example, when you enable the Show on Springboard property for the Parcel menu link, the Parcel tile with a link to the associated page—the Parcel page—appears in the springboard area.
Note: The tile appears only on the Agency Springboard and not on any other landing pages when you select this option.You can change the delivered label on the tile by editing the value in the Label field on the Link Details page.
Click Close.
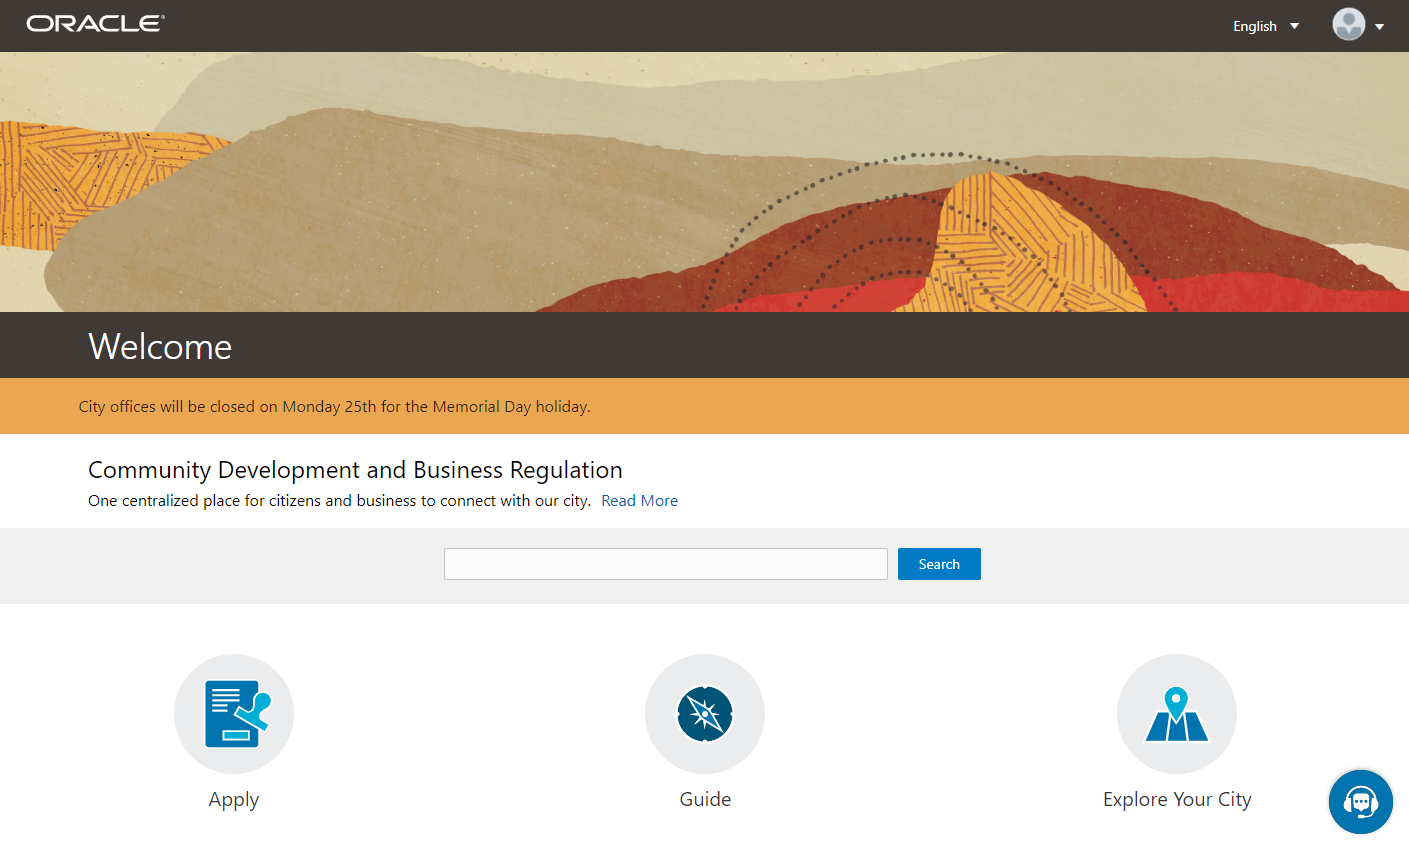
Setting Up the Landing Page for Anonymous Users
You set up the landing page for anonymous or guest users by defining the different elements that help public users get information before they register.
You can configure these elements on the Anonymous User Landing Page:
Banner image
Welcome message
Alerts banner
Banner summary
Search field
Tiles
This example illustrates the elements on the Anonymous User Landing Page.
Setting Up the Banner Image
You use the Oracle Fusion Application Appearance page to upload and store the branding images that you will use for your Public Sector system. For information about setting up the banner image see Applying Branding Images.
Setting Up the Welcome Message
You modify the Welcome Message with the other theme attributes. The Welcome Message is text in a large font and can simply be “Welcome,” as shown in the sample landing page. For more information, see Managing Themes.
You enable the Welcome Message section using the Welcome menu link.
To enable the Welcome Message section in the menu navigation:
Select
On the Configure Menu Structure page, select the Products menu.
Click Open Menu.
Expand the Anonymous Landing Page Data folder.
Select the Welcome menu link:
Menu Link
Description
Welcome
Displays a section for the page title, such as Welcome, below the banner image. You can change the menu link label to display your choice of text.
Click the Edit button.
On the Link Details page, go to the Show On field and select an option:
None - Hides the Welcome Message section.
All devices, Tablets and larger, or Smartphones only - Shows the page title section.
Note: You must select an option to show on a device for the Welcome Message to appear, whether you define it at the branding level or here in the menu navigation configuration.
On the Link Details page, the text Welcome in the Label field is the default only when the Welcome Message hasn’t been defined at the theme level.
Click Close.
Setting Up the Banner Summary
You provide welcome information on the landing page for anonymous users and registered users in the banner summary element. You can also link to an external page from the banner summary.
For information about setting up welcome information, see Defining Summary Details.
Defining Alerts
You display alert messages on the Anonymous User Landing Page in an alerts banner.
For information about setting up alert messages, see Defining Alerts and Working with Ad Hoc Communications.
Setting Up the Global Search
You provide anonymous users with a search field that searches for transactions. This global search option searches for applications and projects by application number, application type, property address, description, or applicant.
To set up the Search element on the Anonymous User Landing Page:
Select
On the Configure Menu Structure page, select the Products menu.
Click Open Menu.
Expand the Anonymous Landing Page Data folder.
Select the Search menu link:
Menu Link
Description
Search
Displays a search element under the banner summary.
Click the Edit button.
On the Link Details page, go to the Show On field and select an option:
None - Hides the search element.
All devices, Tablets and larger, or Smartphones only - Shows the search element.
Click Close.
Managing Tiles on the Anonymous User Landing Page
You can show or make small modifications to tiles on the landing page for anonymous users, but you cannot delete delivered menu links. For more information about modifying tiles, see Configuring Menu Structure.
To manage tiles on the Anonymous User Landing Page:
Select NavigationMenu Configurations
On the Configure Menu Structure page, select the Products menu.
Click Open Menu.
Expand the Anonymous Landing Page Data folder.
You can show or hide the delivered tiles:
Menu Link
Description
Apply
Provides a tile that links to the page where users can search for an application type and initiate an application.
Applications
Provides a tile for users to navigate to their saved applications. From the Anonymous User Landing Page, the user must log in before viewing saved applications.
Guide
Provides a tile that links to a guided questionnaire used to find the type of application that the user needs for a particular project.
This tile links to a questionnaire that you set up with Oracle Intelligent Advisor. See Choosing a Guide Questionnaire.
Note: If your agency is not using Oracle Intelligent Advisor, you must hide this tile by selecting None in the Show On field for this menu link.Explore Your City
Provides a tile that links to a map where the guest user can search for and find property and application details.
On the Link Details page for a tile, you can change the tile image by selecting any delivered image from the Icon drop-down options.
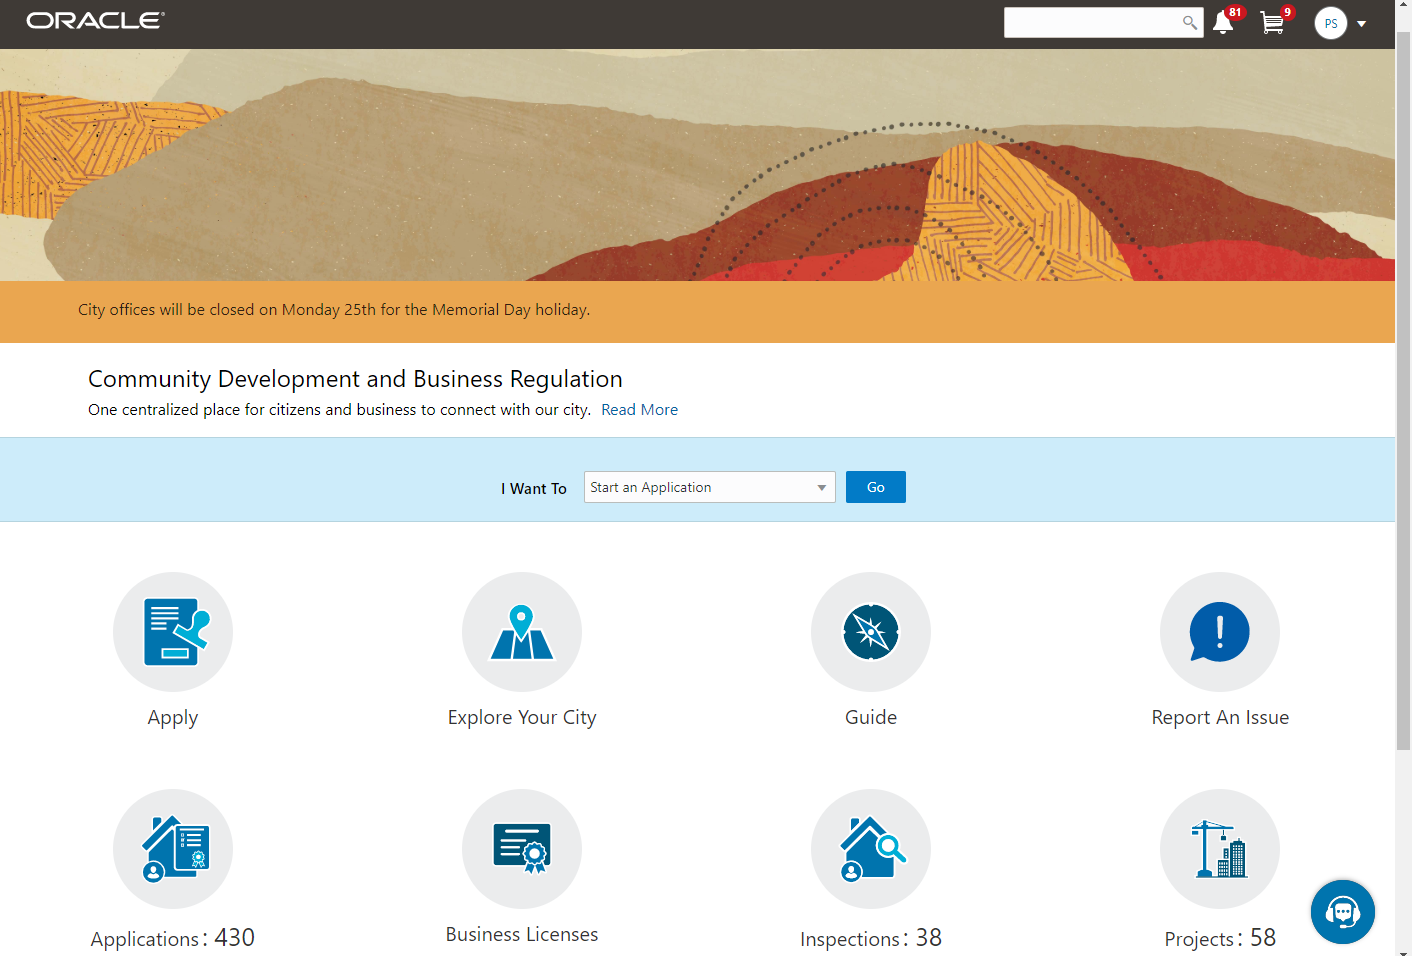
Setting Up the Landing Page for Registered Users
You set up the public landing page for registered users who have entered credentials into the service.
You can configure these elements on the Registered User Landing Page:
Banner image
Alerts banner
Banner summary
Quick actions (I Want To)
Tiles
This example illustrates the Registered User Landing page.
Setting Up the Banner Image
You use the Oracle Fusion Application Appearance page to upload and store the branding images that you will use for your Public Sector system. For information about setting up the banner image see Applying Branding Images.
Defining Alerts
You display alert messages on the Registered User Landing Page in an alerts banner.
For information about setting up alert messages, see Defining Alerts and Working with Ad Hoc Communications.
Setting Up the Banner Summary
You provide welcome information on the landing page for anonymous users and registered users in the banner summary element. You can also link to an external page from the banner summary.
For information about setting up welcome information, see Defining Summary Details.
Configuring the Quick Actions Section
The quick actions section includes I Want To actions in a drop-down list on both the Registered User Landing Page and Agency Springboard. Each link provides access to specific pages and functionality. You can show or hide the I Want To bar and include the link provided in the I Want To Content folder.
This example illustrates the quick actions section, including the I Want To label, drop-down list, and Go button.

To show the quick actions section:
Select .
On the Configure Menu Structure page, select the Products menu.
Click Open Menu.
Expand the Agency Springboard Data folder.
Select the I Want To menu link:
Menu Link
Description
I Want To
Show available actions for registered users in the I Want To actions bar.
A registered user can select from these actions: .
Start an Application
Estimate Fees
Go to Applications
View Recommendations
Schedule an Inspection
View Payment History
View Invoice History
The actions for agency staff and registered public users are determined by security setup.
Select the desired menu item and click the Edit button.
On the Link Details page, go to the Show On field and select an option:
All devices, Tablets and larger, or Smartphones only - Displays the quick actions section.
None - Hides the quick actions section.
Note: When you configure the quick actions section to appear on the Agency Springboard, the section also appears on the Registered User Landing Page.Click Close.
Managing Tiles on the Registered User Landing Page
You can show or make small modifications to tiles on the landing page for registered users, but you cannot delete delivered menu links. For more information about modifying tiles, see Configuring Menu Structure.
To manage tiles on the Registered User Landing Page:
Select .
On the Configure Menu Structure page, select the Products menu.
Click Open Menu.
Use the menu links for the tiles in the Anonymous Landing Page Data folder.
You can show or hide the delivered tiles:
Menu Link
Description
Apply
Provides a tile that links to the page where users can search for an application type and initiate an application.
Applications
Provides a tile for registered users to navigate to a list of their own applications. From here, users can access application details.
Inspections
Provides a tile for registered users to navigate to a list of their inspections. From here you can access inspection details and schedule inspections.
Guide
Provides a tile that links to a guided questionnaire used to find the type of application that the user needs for a particular project.
This tile links to a questionnaire set up with Oracle Intelligent Advisor.
Note: If your agency is not using Oracle Intelligent Advisor, you must hide this tile by selecting None in the Show On field for this menu link.Explore Your City
Provides a tile that links to a map where the guest user can search for and find property and application details.
On the Link Details page for a tile, you can change the tile image by selecting any delivered image from the Icon drop-down options.
Choosing a Guide Questionnaire
You enter an Oracle Intelligent Advisor definition for the Guide questionnaire on the Permit Options page.
Use the Permit Options page during agency setup to specify the Oracle Intelligent Advisor ID to use for the Guide questionnaire. This questionnaire helps public users determine which application type is appropriate for a project. A single questionnaire provides guidance for all types of applications types, including types of permit application and types of planning applications.
Public users do not need to register before using the questionnaire.
Predefined Oracle Intelligent Advisor rules are delivered as samples, but using Oracle Intelligent Advisor is optional. If you do not use Oracle Intelligent Advisor, do not include the Guide tile on your landing pages.
For instructions on associating an Oracle Intelligent Advisor ID with an agency, see Managing Oracle Intelligent Advisor Policies for your Agency.
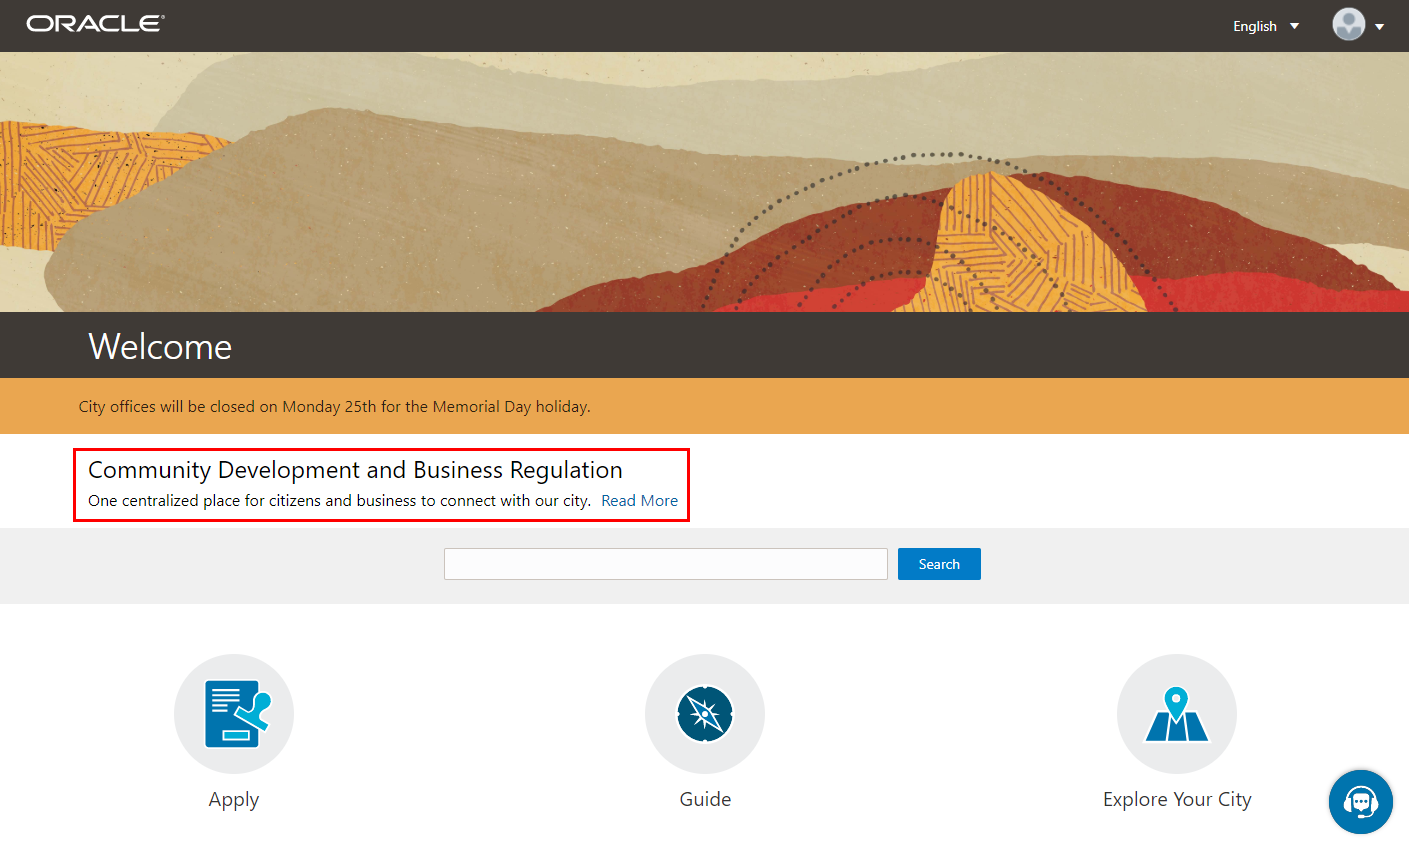
Defining Summary Details
You set up the banner summary section on the public landing pages for anonymous and registered users by defining a summary title and text. You can also link to an agency page outside of the Oracle Public Sector Compliance and Regulation Cloud.
The Banner Summary section includes a summary title and text as well as a Read More button that links to either a URL outside of the Oracle Public Sector Compliance and Regulation Cloud or a longer message that you define. You define the summary details for the Banner Summary section in the menu navigation configuration and on the Permit Options page.
This example illustrates the Banner Summary section on a public user landing page..
Setting Up Summary Details in the Menu Navigation Configuration
You set up summary details for the Anonymous User Landing Page and the Registered User Landing page in the menu navigation configuration. You must enable the Online Planning and Permits menu link for the Banner Summary section to appear on the landing pages.
Select .
On the Configure Menu Structure page, select the Products menu.
Click Open Menu.
Expand the Anonymous Landing Page Data folder.
Select the Online Planning and Permits menu link:
Menu Link
Description
Online Planning and Permits
Displays the summary title, summary text, and Read More button below the banner image. You can change the menu link label and description to display your choice of text.
Click the Edit button.
On the Link Details page, update these fields:
Page Element
Description
Show On
Select from these options:
None - Hides the page title section.
All devices, Tablets and larger, or Smartphones only - Shows the page title section.
Note: You must select an option to show on a device for the banner summary to appear, whether you define the summary details information here in the menu navigation configuration or in the agency setup.Label
Update the delivered title text.
Description
Update the delivered summary text, Streamline the application and review process for your project.
Click Close.
Setting Up Summary Details in the Permit Options Setup
You set up the summary title and text for the Anonymous User Landing Page and the Registered User Landing page on the Permit Options page during agency setup.
Select .
Search and select your agency row to open the Agency Information – Details page.
Click the Features tab.
You will see that your offering is enabled; click the Options link on the row to open the Permit Options page.
On the Permit Options page, enter values for the following fields in the Landing Page Message Definition section:
Page Elements
Usage
Message Title
Enter a short text version of the landing page message in a title format. If you leave this field blank, the value in the Label field on the Link Details page for the menu navigation link Online Planning and Permits is displayed.
Message Summary
Enter a longer version of the landing page message title in a sentence format. If you leave this field blank, the value in the Description field on the Link Details page for the menu navigation link Online Planning and Permits is displayed.
Button Content URL
Enter a content URL for the Read More button. Public users click this button to access the agency’s own additional information page, outside of the public sector system. If you leave this field blank, the Read More button opens a dialog box that displays the Landing Page Message.
Note: If you want to link to a page outside of the public sector system, you must enter a URL here.Landing Page Message
Enter information in rich text that appears in a dialog box when the user clicks the Read More button. If a URL to access the agency’s page is defined, you don’t need this message.
Click Save.
Defining Tiles
You define tiles by configuring a set of menu links that represent the tiles on landing pages and springboards.
The tiles and elements that you see on landing pages and springboards are treated as menu links that you configure during implementation. They give you access to specific pages and functionality within a product.
Your agency decides which tiles and elements to display on these home pages:
Anonymous User Landing Page
Registered User Landing Page
Agency Springboard
You can open delivered menus and make minor changes to menu items to meet your agency needs.
For more information about managing menu items, see Configuring Menu Structure.
Modifying Tiles
You can make minor changes to tiles on the Link Details page for the selected tile. You can hide or rename tiles, but not delete them.
Click the menu link in the selected folder.
Click the Edit button.
On the Link Details page, you can make these changes:
Page Element
Description
Label and Description
Enter text for the tile label and description.
Icon
Select an icon for the tile from the available options in the drop-down list.
Sequence
Change the sequence or order in which the tile appears.
Show On
Select a device type from these options:
All devices
Tablets and larger
Smart phones only
None
Show on Springboard
Turn on the switch to display the tile with a link to an associated page on the Agency Springboard, which is for agency staff only.
Note: The tile appears only on the Agency Springboard and not on any other landing pages when you select this option.Show in Page Finder
Turn on the switch to display the link in the Page Finder, which is a navigation feature accessed by agency staff by clicking the Page Finder button in the global header.
Click Save and Close.
Defining Alerts
You can enable alerts for the Agency Springboard and public landing pages using ad hoc alerts or using certain delivered communication events.
You have multiple options for setting up alerts that appear on the public user landing pages and the agency springboard:
Use the Communications Center to create an ad hoc alert.
This is the preferred method. For step-by-step instructions, see Working with Ad Hoc Communications
Use communication events, and create the alert using the delivered PSC_GENERIC_ALERT event.
This topic provides step-by-step instructions for setting up an alert this way.
Configuring the Agency Springboard and the Public User Landing Pages to Show Alerts
Select .
On the Configure Menu Structure page, select the Products menu.
Click Open Menu.
Expand the folder for the desired alert location:
Agency Springboard Data
Anonymous Landing Page Data
Registered Landing Page Data
Select the Alerts item in the folder.
On the Link Details page, change the Show On field to All devices.
Click Save and Close.
Adding Alerts Using Delivered Events
For general information about working with events, see Setting Up Communication Templates.
Select .
Locate the PSC_GENERIC_ALERT event row for general alerts and click the row to open the Communication Event Details page..
Click the Add button in the Communication Template section.
On the Communication Template Details page, select Alert in the Channel Type field. The page refreshes to show the fields required for defining an alert.
In the Template Attributes section, enter information for the required fields:
Page Element
Description
Code and Name
Enter a code and descriptive name for the alert.
Start Date Time and End Date Time
Enter when the alert is valid, including when to start and when to stop showing the alert.
Enabled
Turn on the switch to activate the alert.
In the Compose section, enter information in these fields:
Page Element
Description
To
Enter a value that identifies the target recipients:
Individual Registered Users
Enter comma-separated user IDs for the registered users, for example,
SYSTEM_ADMIN,BUSINESS_ANALYST.All Registered Users
Enter this attribute:
${User}. The Communication Alerts framework provides the alert information when the registered user logs in.All Anonymous Users
Enter this attribute:
${Anonymous}.A Combination of Users
Enter a string including comma-separated user IDs for the registered users,
${User}for all registered users, and${Anonymous}for all anonymous users.
Message Body
Compose the message for your alert here. For the Alert channel type, you can enter only plain, unformatted text.
Select and Insert
Insert variable attributes into your communications. You select the field and the attribute that you want to insert in that field, and click Insert to enter a variable for that attribute.
For example, if you select the To field and the Anonymous attribute, and click Insert, the
${Anonymous}variable is inserted into the To field of the communication template.Remarks
Enter any additional information about the communication. These remarks are not included in the generated communication.
Click Save to return to the Communication Event Details page.
On the Communication Event Details page, turn on the Enabled switch.
Click Save.
Modifying Alerts
Select .
Locate the row to be modified (either the PSC_GENERIC_ALERT row or the ADHOC-EVENT event row), and click the row to open the Communication Event Details page.
In the Communication Template section, click the row for the alert you want to modify.
On the Communication Template Details page, you can enable or disable the alert message, change the recipient of the alert in the To field, and update the message text in the message body.
Click Save.
On the Communication Event Details page, you can turn on or turn off the Enabled switch.
Click Save.