Adding Logic
This topic describes how to add business logic to intake forms using the Groovy programming language.
Groovy Overview
You can add business logic to your intake form using the Apache Groovy programming language.
Groovy is an:
Object oriented language that can be used for scripting or programming.
Extension of the Java programming language, using similar constructs and syntax.
For Java developers, Groovy can be compared to other programming languages, such as Python or Ruby, that don’t intend to replace Java, but act as a companion language, extending capabilities and providing additional flexibility.
When designing intake forms, you can add Groovy scripts to provide:
Validators
Triggers
Object functions
Global functions
The logic can be added at these levels:
Field: Field-level logic applies only to the currently selected field.
Object: Object-level logic can be used within a single intake form design.
Global: Global functions can be called from any intake form in your offering.
The types of scripts you can add depends on the level on which you are adding the logic (field or object).
|
Script Type |
Level |
|---|---|
|
Validator |
Field and Object |
|
Trigger |
Object |
|
Object Function |
Object |
|
Global Function |
Object |
Before adding Groovy to your intake forms, you will need to become familiar with the Groovy language and how it is intended to be used within Oracle Fusion applications.
For more information on Groovy usage within Oracle, refer to Oracle Applications Cloud: Groovy Scripting Reference.
For general information on the Groovy language, see Apache Groovy documentation.
Working with the Groovy Script Editor
To access the Groovy Script Editor:
Save the intake form you are creating.
The field(s) you reference in your logic at the field level or the object level must exist in the underlying database object, which occurs when you save the form after adding any new elements.
Note: For the user-defined fields you added manually to your intake forms, the Add Logic button doesn’t display in the Field Attributes panel until you have saved your intake form.Click the Add Logic button in the Field Attributes panel or in the intake form header.
When clicking Add Logic in the Field Attributes panel, your code operates at the field level.
When you click Add Logic in the intake form header, your code operates at the object level.
This example illustrates the separate field-level and object-level Add Logic buttons.

Use the Groovy Script Editor to add the logic, script name, error message, and additional options, depending on the type of script you are writing.
Only the page elements that apply to the type of script you are writing appear in the editor.
|
Page Element |
Script Type |
Description |
|---|---|---|
|
Work Area |
All |
In the work area, add your logic. The first line in the comments (/* <text> */) is automatically generated, and it provides you the field name and object name as they are referenced internally. For a field contained in a delivered field group, the field name will be similar to the field label, such as DemOverallHeight. In the case of a user-defined field, the field name will match the field label you have entered, with a "_c" as a suffix to indicate it is a custom field. For example, if you have a user-defined field named Rooms, the field name appearing in the script will be Rooms_c. The custom object name is the type code as defined on the Transaction Type page, and it is preceded by the offering code, such as LNP1 or PZ1 and a “_c” suffix. LNP1 is the prefix for permits and PZ1 is the prefix for planning and zoning applications. For example, if for a permit the Transaction Type Code is Fence, the custom object name in the script will be LNP1Fence_c. |
|
Minimap |
All |
In between the work area and the attributes panel, there is a narrow column serving as a minimap for your script. For longer scripts, you can use the minimap to help locate where you are within the lines. |
|
Script Name |
All |
By default, the script name follows this structure: field_script type or object_script type For example, the user-defined field Years Experience would have the following default validator script name: YearsExperience_c_validator. You can change the script name if needed. To add multiple scripts of the current type, select New from the drop-down list. |
|
Description |
All |
Add text to describe the purpose of the script. |
|
Type |
Triggers |
Used only for triggers. Defines when the trigger runs, such as during the Create event. See the "Add Triggers" section below for more information. |
|
Error Message |
Validators Triggers |
Provide the message
that the system displays the user to correct any issues. For example,
in the case of a validator script, the message appears if the data
entered for the field does not pass the validation logic.
|
|
Field ID Search |
Validators Triggers |
Use the Label field to search for the Field ID value, which reflects the name under which the field is stored in the database and how you’d refer to it in your script. |
|
Parameters |
Object Functions Global Functions |
Used only for object functions and global functions. Enables you to define the parameters the function will accept. |
|
Return Type |
Object Functions Global Functions |
Used only for object functions and global functions. Enables you to set the data type for the return value of the function. |
|
Error Message |
Validators Triggers |
Provide the message
that the system displays the user to correct any issues. For example,
in the case of a validator script, the message appears if the data
entered for the field does not pass the validation logic.
|
|
Save |
All |
Saves the current code. |
|
Remove |
All |
Removes the business logic from the associated field or object. This may be required in some cases prior to removing the field from the intake form. |
|
Close |
All |
Closes the editor without first saving any changes. |
Setting the Scope of a Groovy Script
The following table outlines the possible scope of a Groovy script.
|
Scope |
Description |
Where Set |
|---|---|---|
|
Field |
You can add Groovy logic to act on a single field. The code you add runs only against the selected field. You can add Groovy to fields in delivered predefined field groups or to user-defined fields you have added manually. |
Select the field to which you want to add validation logic, and click Add Logic in the Field Attributes panel for that field. |
|
Object |
If your script involves more than one field, you need to add that code at the object level. The object refers to the current intake form you are creating. For example, if you are creating a fence permit, the logic you add for the current object applies to fields in that fence permit definition. |
When in the designer with the intake form open, click the Add Logic button at the top of the form, next to the Preview button. |
|
Global |
You can create global functions that can be called by any field-level script or object-level script in your offering. |
When in the designer with a intake form open, click the Add Logic button in the header at the top of the form. You can access the Global Functions option only by opening the Groovy Script Editor at the object level. |
When you add logic at the object level, you can add these types of scripts:
Validators
Triggers
Object Functions
Global Functions
Working With the Transaction Type Data Structure
Accessing data stored within the transaction type business object requires and understanding of the underlying data structure. To understand the data structure, you need to become familiar with the JSON payload for a transaction intake form.
Use your REST client utility such as cURL or Postman to access the REST endpoint for an intake form. To find the name of the business object for your intake form, open the Details section in the Attributes panel for a field or grid and note the Business Object value.
You can use a “describe” request to view the data structure of the intake form, using a GET operation. For example:
https://servername.fa.us2.oraclecloud.com/fscmRestApi/resources/11.13.18.05/LNP1<transaction_type>_c/describeThis example illustrates the parent-child relationship of the data within a transaction type.
The describe results show you the metadata for the business object, such as the name, type, and so on, such as LnpRecordKey, integer, and so on.
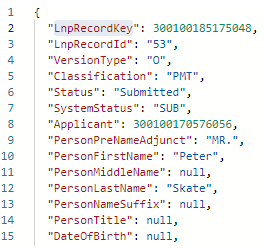
You can also submit a request to access data for a specific transaction by including the LnpRecordKey value to the request. For example:
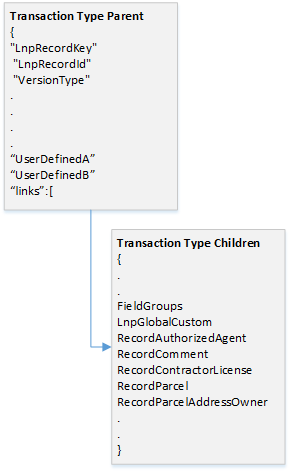
https://servername.fa.us2.oraclecloud.com/fscmRestApi/resources/11.13.18.05/LNP1<transaction_type>_c/<LnpRecordKey>This example illustrates transaction type JSON returned in a REST client.
The top portion of the JSON reflects the parent object, and the sections within the “links” block are the child objects. The parent object contains attributes from the transaction type, some general field groups, such as Application and Applicant, and any user-defined fields you have added.
The majority of the fields in the field groups reside in a single object, the FieldGroups object (FieldGroupsVO). Reusable fields reside in LnpGlobalCustom object (LnpGlobalCustomVO).
Knowing the object on
which you are writing your logic is essential for achieving the desired
scope of your results. When you write logic at your transaction type
level, as in Custom
Object LNP1FencePermit_c, that logic applies locally, only
for that transaction type. If you write logic at a child object level,
as in Custom Object
FieldGroupsVO, that logic is global and would apply to any
instance of that field group or field group field in any transaction
type where it appears.
When you open the Groovy Script Editor, comments at the top of the work area indicate where the logic you write will apply. For example:
/* Object Validator for
Custom Object LNP1FencePermit_c */
What element you have selected in the workspace and where you click the Add Logic button (in the header or in the Field Attributes panel) determines where your logic applies, either locally to the current transaction type only, or globally. The following table provides selected scenarios to illustrate how the comments at the top of the work area indicate the scope of the logic for that script.
|
Workspace Selection |
Comment |
Logic Scope |
|---|---|---|
|
|
The Logic applies to the Front Fence Height field in the selected field group. This field is stored in the child Field Groups view object, where all other fields appearing in field groups are stored. Logic written at this level for this field will apply globally to all instances where this field group is used. |
|
|
The Logic applies to the Field Groups view object, and logic applies globally to all instances where this field group is used. Because the logic is written at the object level it can apply to multiple fields in the Field Groups view object. Note: Most field groups are
considered child objects with the fields being stored in the Field
Groups view object. Applicant and Application are considered parent
objects, with their fields stored in the transaction type parent object.
|
|
|
The logic applies to the user-defined field Years Experience locally for that transaction type. Note: If the field is set
to be reusable, then the logic you add applies to all instances where
that field is used.
|
|
|
The logic applies locally to multiple fields to the current transaction type. |
|
|
The logic applies globally to that reusable in any intake form where it is used. |
Accessing Data within Child Objects
When you are writing logic on a field or object at the child level, such as FieldGroups, you can reference the fields that reside on that object directly. For example:
/* Object Validator for
Custom Object FieldGroupsVO */
FenHeightFront < FenHeightRearIf you are writing logic that is local to your transaction type intake form, and you want to access values in a child object, such as FieldGroups, for validations and comparisons, you can’t directly reference the field names in your logic. The FieldGroups view object is a collection, so you need to parse the child record using the hasNext() method. For example:
/* Object Validator for Custom Object LNP1InfoDevResFence01_c */

// Identify and assign the object.
def vo = FieldGroups

while (vo.hasNext()) {
  // Access the next row in the row iterator.
  def currow = vo.next()
	// Run validation.
  currow.FenHeightFront < currow.FenHeightRear
  }
This resolves to a row iterator where you can use built-in functions, such as next() and first(), to navigate through the child object.
If you are writing logic that is local to your transaction type intake form, and you want to access values in a child object, such as LnpGlobalCustom, for validations and comparisons, you need to write code similar to accessing FieldGroups, but because LnpGlobalCustom isn’t a collection, you don’t need to use the hasNext() iteration method. For example:
First, instantiate the child object:
def vo = LnpGlobalCustom
Then use dot notation to access the desired field:
vo.EstimatedCost_c > 100
Accessing Data Within Grids
When you add a grid to an intake form layout, a child object for each grid gets added to the intake form custom object. The following example illustrates a grid child object in the JSON for an intake form REST resource.
{
   "rel" : "child",
   "href" : "https://servername.fa.us2.oraclecloud.com/fscmRestApi/resources/11.13.18.05/
             LNP1BuildingPermit2022_c/{id}/child/BuildingPermit2022g1Collection_c",
    "name" : "BuildingPermit2022g1Collection_c",
     .....
 }
Use the Details section of the Grid Attributes and note the name of the grid. The name of the grid child object follows this syntax:
<transaction type ID>gNCollection_c
Where transaction type ID is the value entered as the type ID, such as Permit Type ID, on the Permit Type page. N reflects the sequential order of the grid within the form layout.
For example, if you've added two grids to a permit with a permit type ID of BuildingPermit2022, the two child objects for the grids are:
-
BuildingPermit2022g1Collection_c
-
BuildingPermit2022g2Collection_c
You access data within grids the same as you do other child objects, such as the field groups object. For example:
def vo = BuildingPermit2022g1Collection_c

while (vo.hasNext()) {
// Access the next row in the row iterator.
def currentRow = vo.next()
// Run validation.
return currentRow.TotalCost_c < 5000
}
return true
Where the BuildingPermit2022g1Collection_c identifier is the grid name.
TotalCost_c is the grid field identifier.
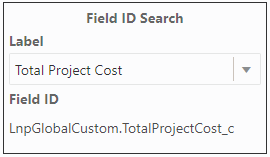
Using the Field ID Search
When you reference a field in your script, you use the internal field ID, not the label that you see on the form design. For fields stored in child objects, you also need to know the object name. The Field ID search feature enables you to find the internal field name and object name.
Use the Label drop-down list to select or search for the label of the field as it appears in the form design.
Initially, the drop-down list contains only a subset of the fields stored in the transaction type parent object. To search for additional fields, you need to enter partial search criteria to begin building a result list matching possible fields.
Select the desired field label from the result list.
Use the value displayed for the Field ID in your script.
Fields stored on the transaction intake form object do not list an object, while fields stored in the field groups or global custom object show the object and field in dot notation, as in ObjectName.FieldName.
The following examples illustrate that depending on where the field is stored, it may or may not include an object name.
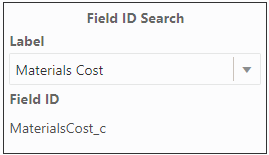
This example illustrates using field ID search on a user-defined field, showing just the field name.
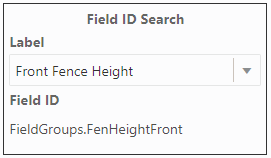
This example illustrates using field ID search on a field group field, showing the object and field.
This example illustrates using field ID search on a reusable field, showing the object and field.
Running Groovy Depending on Request Type
You can have your Groovy logic run depending on the current request type. The supported request types are:
-
Submit
-
Save
-
Import
You can use built-in Groovy functions to return the request type to evaluate and then selectively run your logic depending on the result. For example, in some situations you may want a validation to run only when an intake form is submitted, but not when it is saved or when legacy data is being imported into the system for that transaction type.
|
Request Type |
Function |
Description |
|---|---|---|
|
Submit |
|
Returns true if the request type indicates the intake form is being submitted. |
|
Save |
|
Returns true if the request type indicates the intake form is being saved. |
|
Import |
|
Returns true if the request type indicates legacy data is being imported into the transaction type associated with the intake form using the supported import utilities. |
These functions are supported for:
-
Validations
-
Triggers
-
Object functions
For example, to run a validation only when an intake form is submitted, you could use:
if(isSubmit())
    TotalCosts_c <= EstimatedCosts_c;
Or, to run the logic only if it's not a data import request, you could use:
if(!isImport())
    return true;
/* Continue with validation logic. */
Using Intake Form Built-In Functions
You can use these built-in functions to get information about the intake form and run specific logic based on the return.
|
Function |
Description |
|---|---|
|
|
Returns the layout version. |
|
|
Returns the transaction type, such as the permit type, planning and zoning type, and so on. |
|
|
Returns the underlying custom object name. |
Adding Validation Logic
A validator script provides data integrity for end user input. A validator script is a logical construct that returns either true or false.
The essential components of a validator script include:
Groovy logic
Error message
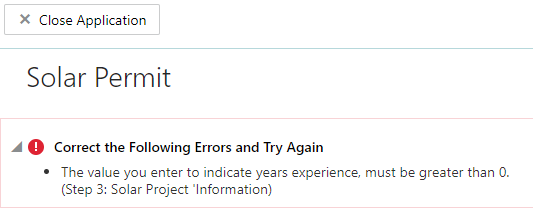
For example, assume you have a form with the field Years Experience to indicate the number of years experience of a solar panel installer. To meet permit criteria for your agency policy, you can validate that the applicant doesn’t enter zero by adding the following validation script to the field.
newValue > 0At runtime, if the field value entered does not meet your validation logic criteria during a save or submit request. The validator script returns either true or false. If the return is false, the system displays the error message so the user can resolve the issue.
This example illustrates the runtime message displayed by a Groovy validation script.
Validator scripts can be run at the field level and at the object level. Field-level validation is for single-field validation, and object-level validation involves validation of multiple fields. Use the object level when you reference multiple fields in the validation, and use the field name, not newValue. For example:
TotalCosts_c <= EstimatedCosts_c
Adding Triggers
Triggers enable you to invoke processing logic based on an event.
In addition to the common attributes, including Script Name, Description, and Error Message, you also set the Type. Setting the type is how you define the event on which the trigger is based.
|
Type |
Description |
|---|---|
|
On Initialize |
Runs only when the intake form is saved the first time. It does not run on subsequent saves or submits. Use to assign programmatic default values to one or more fields. |
|
On Invalidate |
This trigger type isn't currently used. Fires on a valid parent object when a child row is created, removed, or modified, or also when the first persistent field is changed in an unmodified row. |
|
On Remove |
This trigger type isn't currently used. Fires when an attempt is made to delete an object. Returning false stops the row from being deleted and displays the trigger error message. |
|
Before Insert |
Fires before a new object is inserted into the database. This event runs on the first submit for an intake form. |
|
Before Update |
Fires before an existing object is modified in the database. This event runs on each save or submit of the intake form. |
|
Before Delete |
This trigger type isn't currently used. Fires before an existing object is deleted from the database. |
Adding Functions
You can create functions at the object and the global level.
|
Level |
Description |
|---|---|
|
Object |
Object functions provide business logic to be used within the scope of the current business object, which is the current transaction type, such as an intake form for a permit. |
|
Global |
Global functions can be called from any intake form design within the offering. |
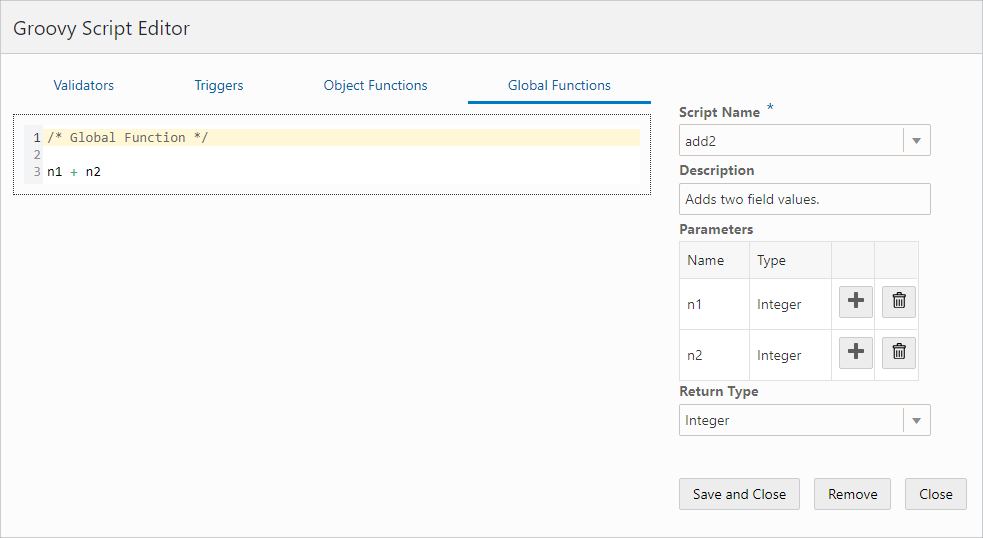
The interface for creating functions is the same for creating object or global functions, and it contains the same general options in the editor, such as Script Name, Description, and Error Message, plus the additional items listed below.
This example illustrates defining a function, parameters, and return type. Details are in the surrounding text.
|
Page Element |
Description |
|---|---|
|
Parameters |
Define the parameters received by the function when it is called. Add the name of the parameter and its data type. Refer to the following table for data type descriptions. Click Add to include multiple parameters in the grid. Click Delete to remove a row from the grid. |
|
Return Type |
Define the data type of the value returned by the function. Refer to the following table for data type descriptions. |
You can apply these data types.
|
Data Type |
Description |
|---|---|
|
Void |
Applies only to return values. Use in situations when the function does not provide a return value to the caller, such as when the functions performs a task, writes an output line, and so on. |
|
String |
A text value. |
|
Integer |
A whole number, either positive or negative. |
|
Boolean |
A logical true or false value. |
|
Long |
An integer value in the range of ±263-1. |
|
BigInteger |
An integer of arbitrary precision. |
|
Double |
A floating-point decimal value in the range of ±1.79769313486231570 x 10308 |
|
Big Decimal |
A decimal number of arbitrary precision. |
|
Date |
A date value with optional time component. |
|
List |
An ordered collection of objects. |
|
Map |
An unordered collection of name/value pairs. |
|
Object |
An entire business object, which in this case refers to an instance of an intake form. |
Once you create the function, you can call it from other scripts. For example:
/* Object Trigger for Custom Object LNP1SolarPermit_c */

/* Define variables and explicitly cast the type (Integer).*/

def n1 = (Integer) EquipmentCosts_c
def n2 = (Integer) LaborCosts_c

/* Call the global function add2 to add total costs, passing in the variables.*/

TotalCosts_c = adf.util.add2(n1, n2)
For a function defined
at the object level, you can call the function using just the function
name, such as add2.
For a function defined
at the global level, you need to add as a prefix adf.util. For
example, if the global function name is add2, you call the function
using adf.util.add2(param1, param2).
In this example, there
is global function named add2, which adds
two parameters passed in. On the Triggers page, the trigger script
is set to run on the Create event type, and the values for EquipmentCosts_c and LaborCosts_c are passed
to the function to calculate the value of the TotalCosts_c field.
def n1 = (Integer) EquipmentCosts_cIdentifying Where Groovy Is Located
When adding Groovy to your intake forms, the Intake Form Designer displays an icon to indicate which elements have Groovy business logic associated with them. The Groovy icon enables you to find your business logic quickly to assist development and troubleshooting efforts.
![]()
If you've added Groovy logic at the object level, the icon appears on the Add Logic button at the top of the form design.
![]()
If you've added Groovy logic at the field level, the icon appears next to the field where you've added Groovy logic.
Example: Basic Calculations
You can use functions to calculate, but you can also use basic expressions, such as A + B, A - B, and so on. For example:
TotalCost_c = EquipmentCosts_c
+ LaborCosts_c
Example: Accessing User Security Context
To access information regarding the current user, instantiate the getSecurityContext() object. In this example, the script checks if the user is assigned a particular role, and if not, displays the error message.
/*Get the security context.*/

def secCtx = adf.context.getSecurityContext()

/*Check if the user has the desired role.*/

if (secCtx.isUserInRole('PSC_ROLE_NAME')) {

/*If user has role, then check if field is not blank. If field is blank,
returns false, showing error message.*/

 return newValue != null
}

/*If the user doesn't have the role, returns true, bypassing the error message.*/

return true
Example: Using Regular Expressions
To validate the format of a phone number, such as 111–222–3333, you can use a regular expression. For example:
newValue ==~ /^(\d{3}\-\d{3}-\d{4})/
Example: Copying a Field Value to Another Field
To make a field reflect the value of another field (to copy it), you can use a trigger. For example, you may have a field named Estimated Project Cost that will be reflected in the Final Cost field once the permit has been processed. To do this:
Use the Triggers tab.
Enter this code:
FinalCost_c = EstimateProjectCost_cSelect Before Update from the Type drop-down list.
Example: Working with Dates
When working with dates, switches and so on, and you are checking for null values, it is recommended to use the following construct:
(!ExpirationDate_c)Instead of using something like:
(ExpirationDate_c == null || ExpirationDate_c == "")This can help to avoid script saving issues and unexpected validation results.
Example: Validation Return Value
When writing validation, your code must always return either a true or false when exiting. Failing to do so can cause validation to fail a validation by mistake. If an exit occurs, such as at the end of the code, without returning a true or false, the assumed return is false. To avoid this, consider the following approach.
if (TotalProjects_c < 10)
     return false;
else
     return true;
return true;
Example: Validation by Business License View Type
When defining validation logic for a specific from view, such as a business license amendment view, you must insure that it only runs within that view to prevent erroneous save or submit errors.
For example, some fields that have Groovy validation may only be visible in the amendment view of that form. However, validation logic runs regardless of the view. As such, saving or submitting while in another view type, such as origination, will cause erroneous error messages.
To prevent this, your logic should be written to detect the view by checking the version type (VersionType). The version type can be:
-
A: Amendment
-
O: Origination
-
R: Renewal
For example, the following validation logic runs only if the amendment view is active.
if (VersionType == "A"){
     if (BusinessLocations_c < 5)
          return false
     else
          return true
    }
    return true
Example: Accessing Field Values in a Grandchild Object
The following sample JSON illustrates two objects within the object hierarchy of a permit custom object.
"item" : {
            "links" : [ {
              "rel" : "child",
              "href" : "https://servername.fa.us2.oraclecloud.com/fscmRestApi/resources/11.13.18.05/LNP1PERMITNAME_c/{id}/child/RecordContractorLicense/{id}/child/RecordContractorLicFact",
              "name" : "RecordContractorLicFact",
              "kind" : "collection",
              "cardinality" : {
                "value" : "1 to *",
                "sourceAttributes" : "LnpLicenseKey, LnpRecordId, LnpRecordKey",
                "destinationAttributes" : "LnpLicenseKey, LnpRecordId, LnpRecordKey"
}|
Parent/Child Relationship |
Object |
|---|---|
|
Parent |
LNP1PERMITNAME_c |
|
Child |
RecordContractorLicense |
|
Grandchild |
RecordContractorLicFact |
The following example shows how you can use the hasNext () function to iterate through child and grandchild objects.
//Define child object.
def vo = RecordContractorLicense

while (vo.hasNext()) {
  //Access the next row in the row iterator.
  def currow = vo.next()
  //Define grandchild object.
  def factVO = currow.RecordContractorLicFact
  //Run validation on the record contractor license.
  while (factVO.hasNext()){
    def factRow = factVO.next()
    if (factRow.LicFactCode != "C46" && Jobvalue_c > 5000)
      return false
  }
}
return true
Example: Running Groovy Depending on Intake Form Layout Version
Unless specified, Groovy logic will apply to all intake form layout versions.
Use the getIntakeVersion() built-in
function to get the current intake form version, and run your business logic for specific
version. For example:
def version = getLayoutVersion()
if (version == "V2"){
     if (TotalCost_c < 5000)
          return false;
     else
          return true;
    }
    return true
For more information on intake form layout versioning, see Creating Intake Form Versions.
Example: Setting Default Values for Fields Hidden from the Public User
When a field has been set to be hidden from the public user and you need to set a default value, it is recommended to use Groovy to set the default value in addition to setting the Default Value field in the Attributes panel. Doing so covers the widest range of use cases.
When setting the default value with Groovy, use an object function to set the field values, and call the function from a trigger. For example, in the case of a switch named Environmental Inspection that you want turned on (enabled) by default, create an object function containing:
EnvironmentalInspect_c = 1Assume the object function is named setSwitchDefaultValues with Return Type set as Boolean. You don't need to define any parameters.
In the trigger, select the desired event type, such as On Initialize, On Insert, or On Update, and call your function like the following:
setSwitchDefaultValues()
- Aren't included in the application fee summary.
- Don't appear in a copied application until the new application has been saved.