Expenses Agent Enhancements for Receipt Capture and Matching
Employees can now view itemization details from corporate card data and accommodation receipts, receive a consolidated notification for corporate card expenses, assign spend authorization to expenses, and select any configured location format on the Expense Details page. These ongoing enhancements to the Expenses Agent drive productivity and strengthen compliance by empowering employees to complete expense reports quickly and accurately.
- Automatic Itemization: By default, accommodation expense emails now include a detailed breakdown of charges. In addition to this, if itemization is required, itemized lines are automatically created for the accommodation expense in the desktop application.
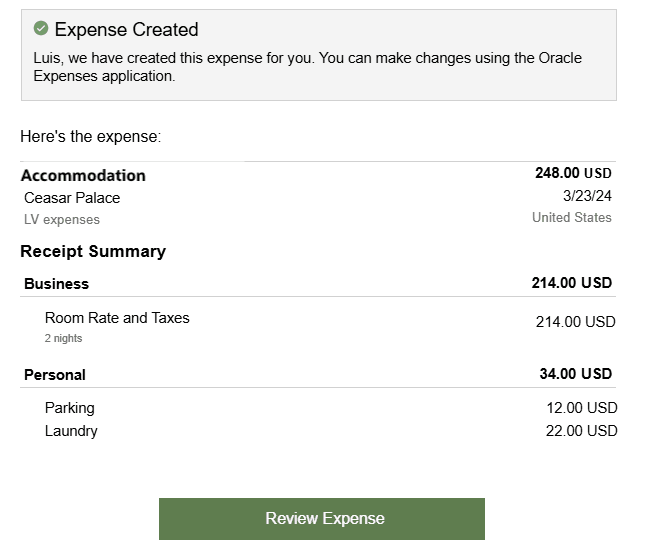
Receipt summary in email
Bulk corporate card notification: Expenses Agent now sends a consolidated email for corporate card transactions, organizing expenses into categories such as expenses needing receipts, expenses ready to submit, and expenses requiring additional information. This enables employees to quickly review outstanding actions and manage multiple expenses from a single notification.
Bulk notification
-
Spend Authorization: The Spend Authorization field allows employees to attach a preapproved spend authorization to an expense. To use this feature, Spend Authorizations must be enabled, and “Attach Authorizations” must be set up as Lines Only.
NOTE: Create spend authorizations in Standard Expenses.
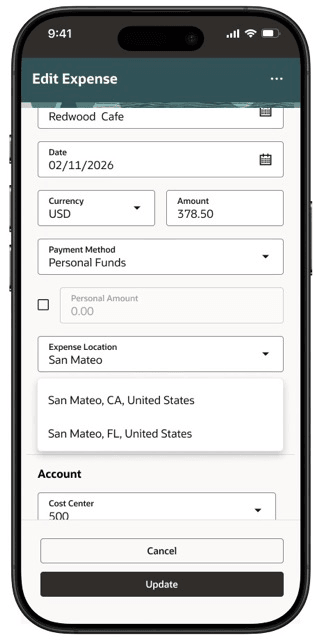
Associating a spend authorization to an expense
- Full Location: Provide country, state, and/or city, state, country on the Expense Details page, depending on configuration.
Selecting a location when the full location is configured.
Business benefits include:
- Automatic itemization provides a clear, line-by-line breakdown of expenses, reducing ambiguity and speeding approvals.
- Spend authorization ensures expenses are preapproved, helping to streamline compliance, control spending, and accelerate reimbursements.
- Location selection improves accuracy by capturing the right city/state/country for each expense, supporting correct policy application, reporting, and faster approvals.
Steps to enable and configure
- Automatic Itemization: To use Automatic Itemization for expenses, enable itemization for applicable expense types and configure supported card expense types.
1. Open the expense report template
-
Navigate to Setup and Maintenance.
-
Search for and select the Manage Expense Report Templates task.
-
Search for and select the appropriate expense report template (for example, Travel).
-
Edit the expense report template.
2. Configure child expense types that will be used during automatic itemization.
Examples include:
-
Room Charge
-
Room Service
Note: Set any child expense type as 'Itemization Only Type' if expenses are not charged directly to this child expense type.
3. Enable itemization behavior for expense types of Accommodation category that should support automatic itemization:
-
Edit the applicable parent expense type.
-
Navigate to the Itemization tab.
-
Set Itemization to Required.
-
Include the child expense types defined in Step 2 with the parent expense type
-
Save and Close.
4. Enable automatic itemization for card expense types:
Card Expense Type Mapping
-
In the Card Expense Type Mapping tab within the expense report template, for each supported card expense type:
- Enable Automatic Itemization.
- Select the appropriate Default Itemization Expense Type.
- Save the changes.
These are the card expense types used for automatic itemization:
-
Room
-
Room Service
-
Restaurant
-
Miscellaneous
-
Health
-
Internet
-
Laundry
-
Mini Bar
-
Movie
-
Parking
-
Bar
-
Telephone
-
Transportation
-
Conference Room
-
Banquet
-
Gift
-
Gambling
-
Liquor
-
Health and Beauty
-
Spend authorization: To view the Spend Authorization field in the application, administrators must enable the following.
-
In Manage Cash Advances and Authorization Policies, select the relevant business unit and set the Enable Authorizations field to Yes.
-
Next, set the Attach Authorizations field to Lines Only.
-
Configure the spend authorization Behavior as Optional or Required, based on your requirement.
-
-
Full location support: To view the full expense location in the application, administrators must enable the following.
-
In Manage Expenses System Options, select the relevant business unit.
-
Set Enable Expense Location Level to one of the following:
-
All Locations
-
Country
-
Country and State or Province
-
-
Tips and considerations
- When Expenses Agent is enabled for a business unit for the first time, the receipt forwarding email address is generated automatically, eliminating the need to run the Create Expenses from Email Receipts scheduled process. For more details, refer to Prerequisites for Email Receipt Processing in Configure Email Receipt Forwarding section of the Detailed Adoption Guide.
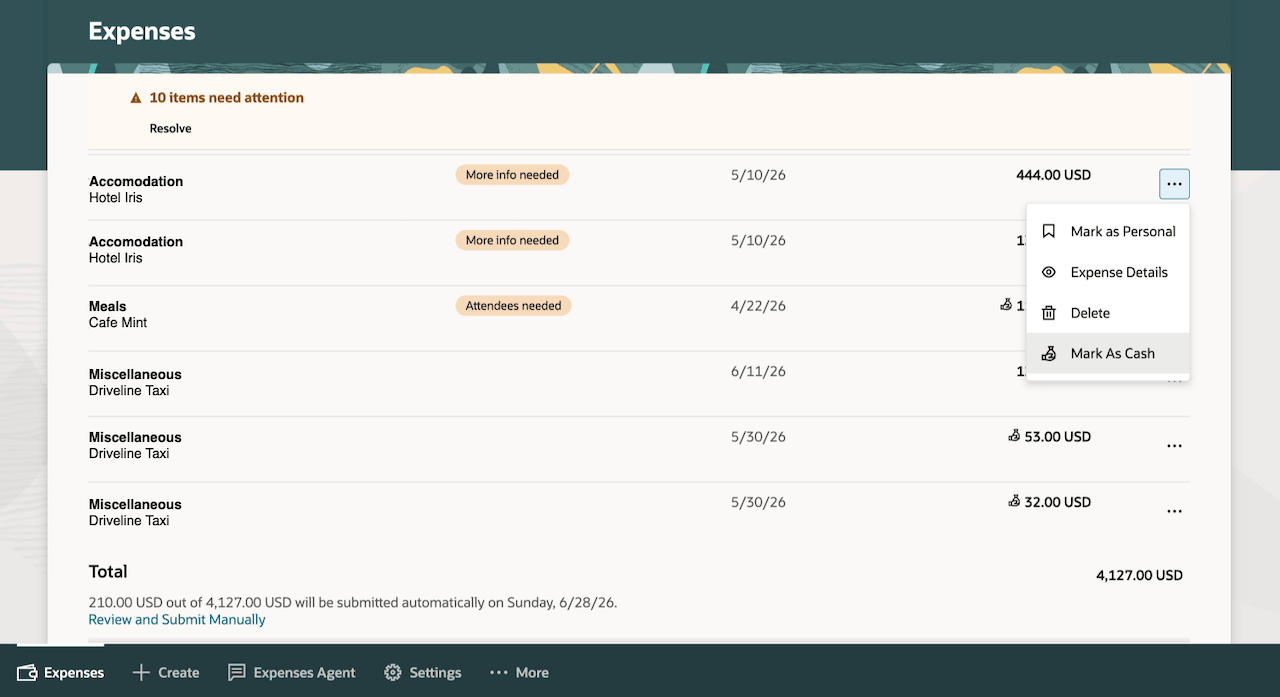
- For expenses created from emailed receipts that require the Classic desktop experience, the Mark as Cash swipe action is no longer available on mobile. This is to simplify the mobile experience and prioritize the most commonly used actions. Payment method changes from Corporate Card to Cash or Personal Funds must now be completed in the desktop interface as shown below.
Users can continue to update the payment method from Corporate Card to Cash or Personal Funds directly from the Expense Details page.
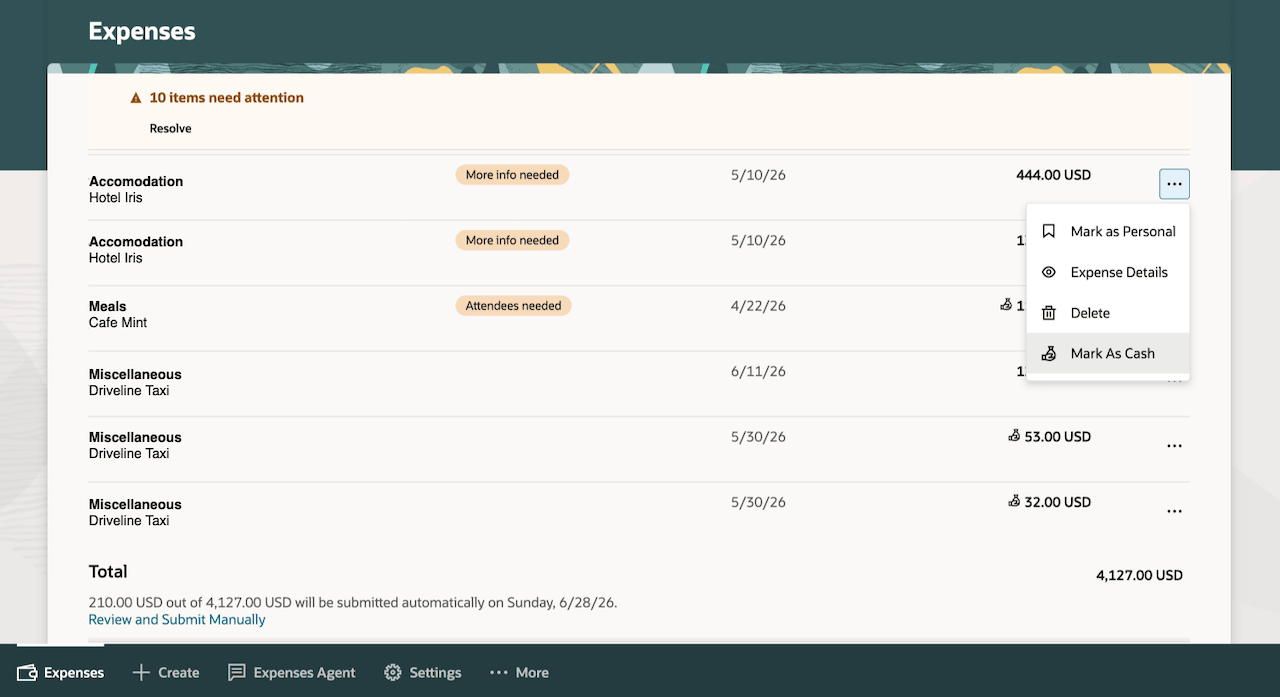
Mark as Cash
Key resources
- To use these capabilities, first enable Touchless Expenses as outlined in the Touchless Mobile Expenses (25D) feature.
- What's New in 26A
Access requirements
No new access requirements.