Redwood Experience for Convert Pending Workers
Enrich your user experience with the new Convert Pending Worker page developed using the Redwood tool set. The page is built from the ground up using Visual Builder Studio (VBS) to give you a unique experience of Oracle applications.
You can access this new flow from the Pending Workers Redwood page. On the Home page, go to the My Team tab, or the My Client Groups tab and click the Pending Workers quick action. On the page, from the list of pending workers, click the ellipsis icon on the entry that you want to perform the convert action. A menu is displayed with the list of actions you can perform. Select Convert to launch the Convert Pending Worker flow.

Convert option on the Pending Workers dashboard
The new flow is a guided process which divides the process into sequential steps making the whole experience seamless. You can also add guided journeys that provide guidance through the whole converting process and add each step as a task in the journey. Here’s an image with all the attributes you can add while converting a pending worker.
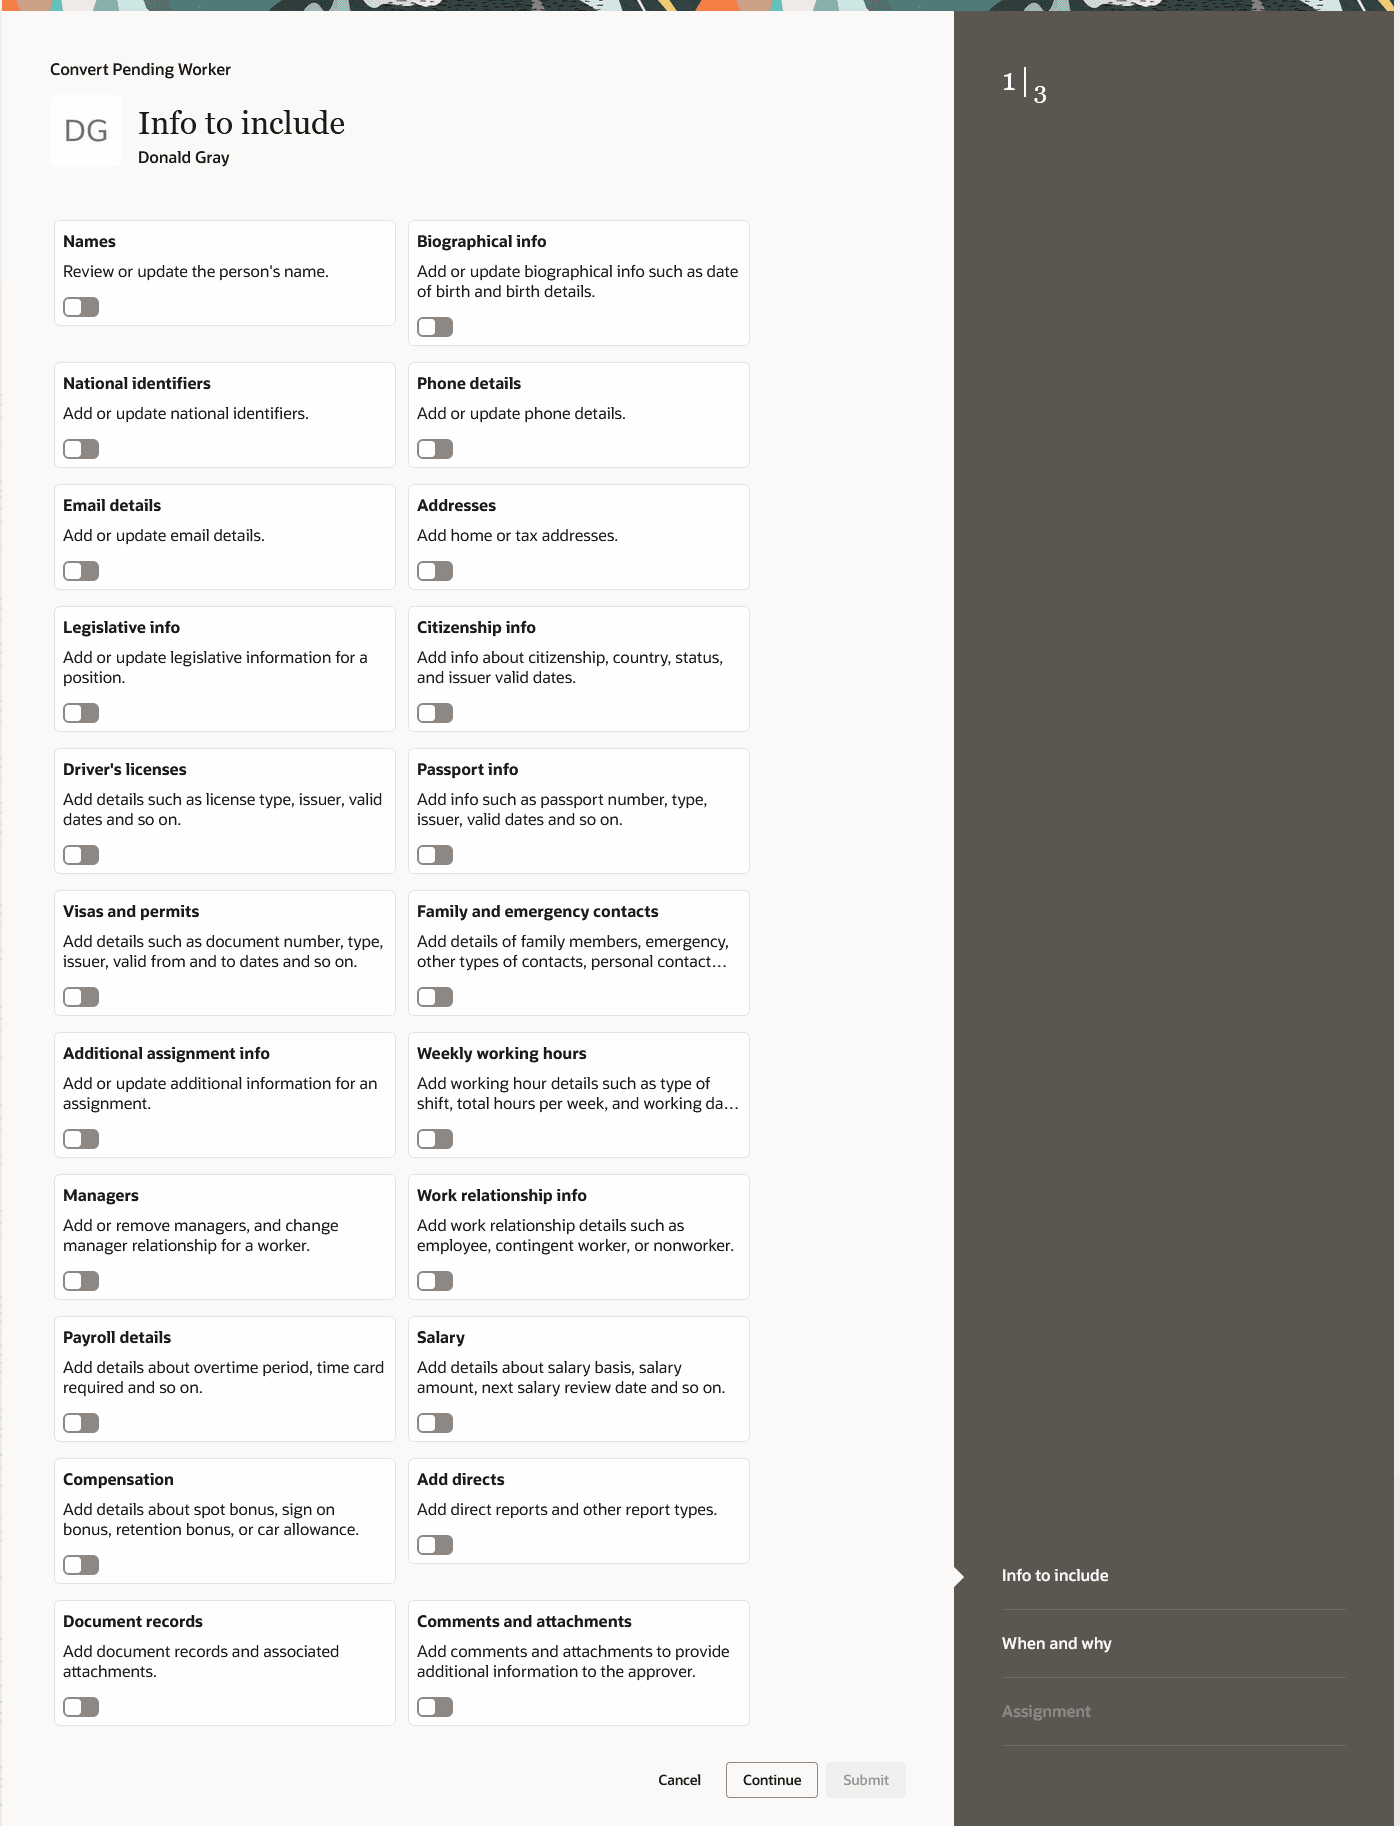
Info to include step in Convert Pending Worker
The new page lets you convert pending workers manually. The mandatory attributes are already available as steps in the flow. You can customize the flow and mark some attributes as required as per your business requirements.
In this new flow, while adding addresses, you can add more than one address for each type.
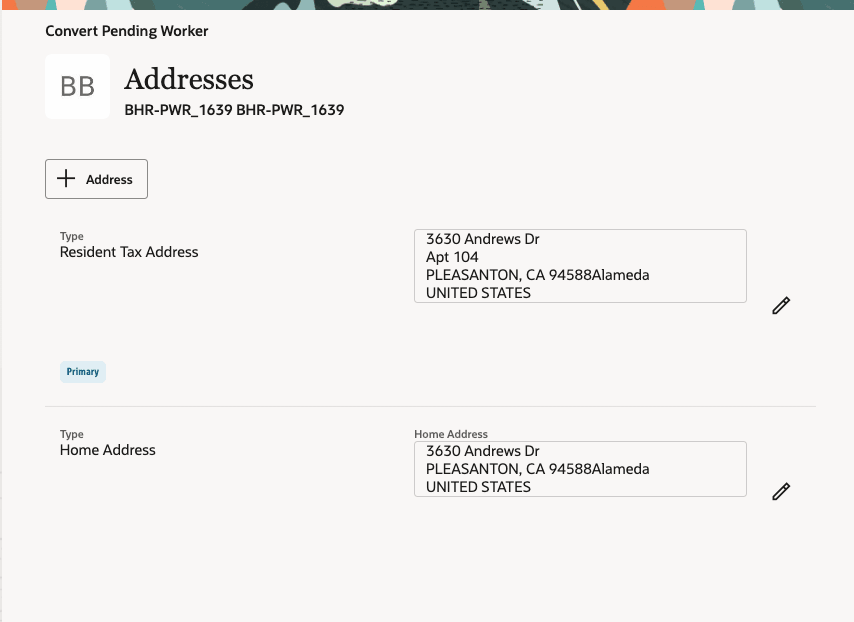
Address step to add more than address of each type
Similarly, you can add multiple family and emergency contacts in the Family and emergency contacts step.
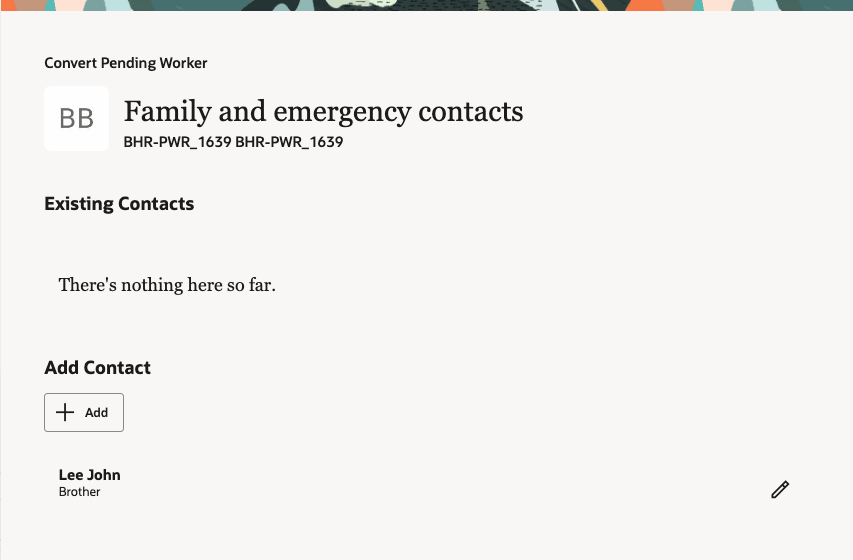
Family and emergency contacts step
The Personal Details section in responsive Convert Pending Worker pages is available as three separate steps in the Redwood flow. These are the Name, Biographical info and National identifiers sections.
Similarly, the Communication Details section in the responsive pages is available as three separate steps in this flow. These are the Phone details and Email details sections.
Depending on the position you select for the pending worker, you can define position override attributes in the Position Override step.
The new flow offers fewer clicks and better performance. You can take advantage of the cohesiveness of the application with the new flow.
Steps to Enable
You don't need to do anything to enable this feature.
Tips And Considerations
- To use the new Convert Pending Worker flow, you must first enable the Redwood Pending Workers page.
- A user can have access to all the three flows for pending workers, Add, Edit, and Convert Pending Worker flows. You can't provide access to only one or two pending worker flows.
- Guided journeys are available for the new Convert Pending Worker pages.
- You can personalize Redwood pages using Visual Builder Studio (VBS).
- If you've already personalized any of the existing ADF pages, you need to personalize them again in Redwood.
- After the Convert Pending Worker flow is submitted for approval and the approver doesn't have access to the flow, the approver can't edit any details, but they can approve the conversion.
- Note these when you configure flexfields in all the Convert Pending Worker pages:
- In the Assignment section, People Group and Default Expense Account fields, key flexfields (KFF) aren’t yet available.
- When you map position descriptive flexfields to assignment descriptive flexfields and assign mappings to legal employers, selecting a legal employer in the When and Why step doesn’t make the corresponding synchronized flexfields non-editable in the Assignment section.
- When you select a value from an LoV, the whole section refreshes but the selected values are retained.
- When you create a work relationship, the contracts section is set to optional unlike the existing ADF page.
- These features will be implemented in future releases for the Convert Pending Worker flow:
- Extra attributes in work structure LoV for Job, Location, Department, Grade, Legal Employer and Business Unit.
- Validating data based on effective date for all LoV.
- Adding specified grades by enforcing valid grades profile option.
- Derivation of grade step based on grade.
- Filtering grade ladder and step values.
- Adding direct reports. You need to use the Manage Directs page for now.
- Parameters for extensible flexfields (EFF).
- Unique key validation for multiple row extensible flexfields (EFF) in additional assignment info.
- Defaulting and validation using Autocomplete.
- Salary and individual compensation details of the pending worker will be converted to the employee or pending worker when the person using the Convert flow
- Has access to the salary and individual compensation info of the pending worker. For details, see the Access Requirements section.
- Visits the salary and additional compensation detail sections in the Convert flow.
- The Submit button will be enabled only when you navigate to all the mandatory sections in the process. However, no warning or error messages are displayed if you don't navigate to the mandatory sections.
- The option to save and save for later isn't available.
Key Resources
For more information, refer to these resources on the Oracle Help Center.
- What's a pending worker? and How You Convert Pending Workers in the Hire and Manage Workers chapter, Implementing Global Human Resources guide.
-
Redwood Experience for Pending Workers and Redwood Experience for New Person Pages readiness announcements.
Access Requirements
- Access to the new Convert Pending Worker flow is controlled using the same security privileges that control access to the responsive Convert Pending Worker pages. For information on existing security privileges, refer to the Security Reference for HCM guide on the Oracle Help Center.
- If you're using a custom role, you need these aggregate privileges added to your role to access the Payroll section LOVs:
- Use REST Service - Payroll List of Values (ORA_PAY_REST_SERVICE_ACCESS_PAYROLL_LOV)
- Use REST Service - Payroll Reference Data Lists of Values (ORA_PAY_REST_SERVICE_ACCESS_PAYROLL_REFERENCE_DATA_LOVS)
- Use REST Service - Payroll Legal Organization Lists of Values (ORA_PAY_REST_SERVICE_ACCESS_PAYROLL_LEGAL_ORGANIZATION_LOVS)
- Here are the access requirements you need for the Individual Compensation and Salary sections:
| Aggregate Privilege (Code) | Job or Abstract Role | Details |
|---|---|---|
| Manage Salaries
(ORA_CMP_MANAGE_SALARIES) |
|
|
|
Manage Individual Compensation (ORA_CMP_MANAGE_INDIVIDUAL_COMPENSATION) |
|
|