Redwood Experience for View Flows
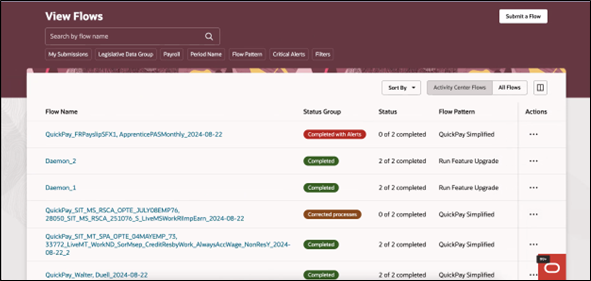
The View Flows page has been moved to the Redwood toolkit, giving the page the look of Redwood. With this new page you can now view high level information of submitted and scheduled flows.
Use the standalone View Flows task from Quick Actions or from My Client Group > Payroll to access this page.
You can also navigate to this page from the Payroll Activity Center. When you navigate from the Payroll Activity Center you view the flows in the context of a particular LDG, payroll, and payroll period.
When you use the Data Exchange work area from My Client Groups and navigate to View Flows, the page displays flows that aren’t payroll specific. It doesn’t display payroll-specific data, such as payroll, period name, or process date filters or columns.
Use the View Flows page to do the following:
-
View scheduled or submitted flows sorted by the date they were created. By default flows created in the last seven days are shown.
-
Search a flow by the name of the flow.
-
Use the Columns option to add to the page Submission Date, Submitted By, Scheduled Date, Process Date, Period Name, Records, or flow Type. These columns are hidden by default. \Use the Filters option to view flows as per your choice and for a wide range of filter choices such as Legislative Data Group, payroll, process date, flow pattern name, individual flow status, and so on.
-
This table explains the flow dates that the page displays when you chose to show flows by the different dates shown in this table.
-
Date
Description
Submission Date
Shows submission date for unscheduled flows and the creation date for scheduled flows.
Scheduled Date Shows the scheduled date for scheduled flows and no date for unscheduled flows.
- Use the Filters option to view flows as per your choice and for a wide range of filter choices such as Legislative Data Group, payroll, process date, flow pattern name, individual flow status, and so on.
-
Use the My Submissions filter to view flows submitted by the signed-in user.

-
Use the Sort By option to sort the flows displayed on the page by Process Date, Submission Date, or Flow Name in alphabetical order.
-
Use the Submit a Flow button to navigate to the Flow Submission page and submit a flow.
-
Click on a flow name to drill down to the Checklists page. Use the Checklists page to monitor issues with a flow such as processes in error, reconciliation issues, and to track status of individual tasks within the flow.
Flow Statuses
The View Flows page includes the Status Group column that displays a high-level status per flow. Each high-level status is a set of sub-statuses grouped together.
The Status column displays the status of the flow as given here.
-
For a task flow that has multiple tasks, this column shows the completion status of the tasks. It displays the number of tasks completed within the flow.
-
For a report or a single task flow, this column shows the actual sub-status of the flow.
Available Actions
The actions that you can take on a flow is dependent on the flow status and the flow ownership.
When there are no actions available for you to take, the Actions menu displays a message to indicate the reason. This is either because there are no available actions when the flow is in that status, or that you cannot take actions because you aren’t the owner of the flow.
Activity Center Flows and All Flows
Use the Activity Center Flows or All Flows options on the page to view flows as given here.
-
All Flows
The View Flows page displays all submitted and scheduled flows, with no filters applied, irrespective of the entered flow parameters.
However, if you select and apply a filter, for example, a specific payroll, the page displays flows that use the selected payroll as a flow parameter when the flow was submitted.
Subsequently, if you select the Activity Center Flows option, the View Flows page displays flows for one of the Payroll Activity Center processes and flows where the selected payroll was entered as a flow parameter.
-
Activity Center Flows
The View Flows page displays all flows that consume results of one of the Payroll Activity Center processes. No filters are applied on the flows.
In-App Navigation
Use these two navigations available at the bottom of the View Flows page to navigate between the Payroll Activity Center and View Flows page.
Take advantage of all the features that come with the new Redwood View Flows page for a more modern feel and experience.
Steps to Enable
The View Flows page is enabled by default and is controlled by the Redwood Payroll Activity Enabled profile option. It's set to Yes by default.
In case this page isn’t enabled, use these steps to enable it:
- Navigate to the Setup and Maintenance area and search for the Manage Administrator Profile Values task.
- On the Manage Administrator Profile Values page, search for and select the Redwood Payroll Activity Enabled profile option. The code for this profile option is ORA_PAY_PAYROLL_ACTIVITY_REDWOOD_ ENABLED.
- In the Profile Values section, click Add.
- Specify the level at which the profile value is to be set, select Site.
- Click Save and Close.
Similarly, enable the ORA_PAY_DE_ FLOWS_REDWOOD_ENABLED profile option to view flows from the Data Exchange work area.
NOTE: The ORA_HCM_VBCS_PWA_ENABLED central profile option must also be enabled.
Key Resources
For more information on enabling Redwood functionality, refer to this document on My Oracle Support document located on the All Fusion HCM Cloud Product Papers (Doc ID 1504483.1):
For more information on extending Redwood pages in HCM, refer to the Extending HCM Redwood Pages Using Visual Builder Studio (VBS) on the Oracle Help Center.