Endpoint Support in Output Interfaces
In 24A, we’ve introduced a more streamlined user experience for users. Moving out of the Output Interface Configuration Target screen, an Endpoints UI has been added; where users can configure and manage endpoint details.
Enhancing secure logins in WMS even further, we’ve also added OAuth2 support for the Endpoints screen.
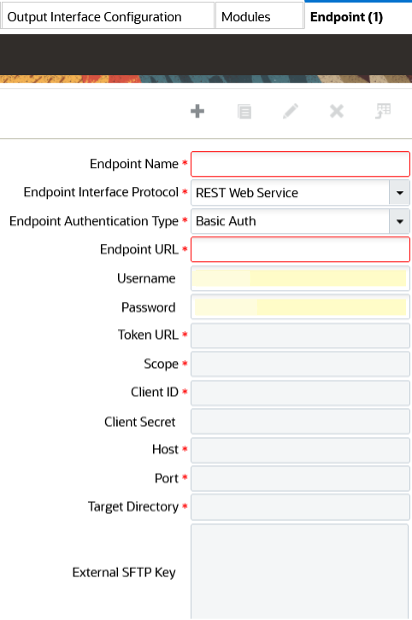
Endpoints UI
You can configure a new Endpoint from the drop-down in the Output Interface Configuration Target UI and the relevant fields will display in the Endpoint UI. For existing records on the Output Interface Configuration Target screen, you will still be able to edit all available fields. However, the Interface Protocol field will be greyed out in the Output Interface Configuration UI which restricts the creation of new interface protocols for existing records.
For Bill Of Lading, Commercial Invoice, Export Shipment Packing List and Shippers Export Declaration, Endpoint configuration is restricted. However, you can configure Endpoints for Web Reports as an Output Interface Type.
NOTE: The Endpoint screen supports only REST Web Services and External SFTP.
The following table represents the list of screens and fields that are introduced in this feature for the Endpoint Interface Protocol:
|
Interface Protocol |
Authentication Type |
Fields |
|---|---|---|
| REST Web Service |
Basic Auth |
Endpoint Name |
|
Endpoint URL |
||
|
Username |
||
|
Password |
||
|
OAuth2.0 Password |
Endpoint Name |
|
|
Endpoint URL |
||
|
Username |
||
|
Password |
||
|
Token URL |
||
|
Scope |
||
|
Client ID |
||
|
Client Secret |
||
|
OAuth2.0 Client Credentials |
Endpoint Name |
|
|
Endpoint URL |
||
|
Token URL |
||
|
Scope |
||
|
Client ID |
||
|
Client Secret |
||
|
External SFTP |
Basic Auth |
Endpoint Name |
|
Username |
||
|
Password |
||
|
Target Directory |
||
|
Host |
||
|
Port |
||
|
Private Key Auth |
Endpoint Name |
|
|
Target Directory |
||
|
External SFTP Key |
||
|
Host |
||
|
Port |
ADDED SUPPORT FOR INTERFACE PROTOCOLS IN OUTPUT INTERFACE CONFIGURATION
Now, interface protocols on the Output Interface target can be configured as "None", "Email" or "Printer".
Steps to Enable
You don't need to do anything to enable this feature.