 Reason Code Handling by Groups and Module Category
We’ve introduced a new feature that provides more granular control over Reason Codes used for stock adjustments. These enhancement enables you to restrict reason codes to specific user groups and/or transactional categories, ensuring that sensitive adjustments, such as those made by Finance teams, are accurately tracked, and audited.
ENHANCEMENT IN REDWOOD
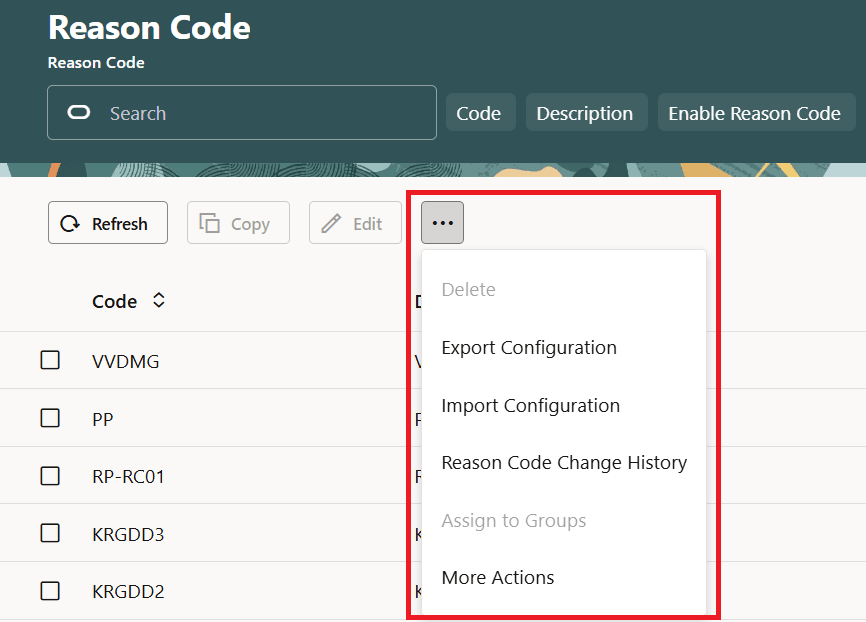
To support Reason Code Assignment to Groups, following news child screens are added to the Reason Code View UI on the REDWOOD. To access these screens, following new buttons with the same screen name are added to the More option:
- Assign To Groups: Allows assignment of user groups to each reason code.
- Assign to Categories: Allows assignment of categories to each reason code.
NOTE: By default, these buttons are disabled. You need to select one or more records to enable the button and access the screen. Also, these buttons are permission controlled and requires “Reason Code / Edit Reason Code" to be enabled for non-admin.
Reason Code
A new button, Reason Code Literals is also introduced to displays reason codes with supported translation. These UI screens have following fields:
| New UI Screens | New Fields in Each Screen |
|---|---|
| Assign to group |
|
| Assign to Categories |
|
| Reason Code Literals |
|
INTRODUCING REASON CODE CHANGE HISTORY UI
The Reason Code Change History UI is enhanced to displays more granular level of information by introducing following new fields to capture user activity performed on the Reason Code View and all child screens:
- Current Value: Displays the new value.
- Last Value: Displays the previous or old value.
- Entity: Displays the Entity (REASONCODE, REASONCODEGROUP, REASONCODECATEGORY, and REASONCODELITERALS) in which the value for the selected record is changed when performing CRUD operations.
NOTE: When you run any CRUD actions, the system will now capture multiple records per actions with last and current values populated. For example, when you perform CREATE operation, the system will write 1 record per field that is populated. Similarly, for Update and Delete operations, the system will write 1 record per field that is updated or deleted.
IMPROVEMENTS IN REASON CODE ASSIGNMENT
- Categorizing the UI Screens - We’ve enhanced our reason code authorization by defining the categorise for the UI modules.
- Categorizing the POST APIs - We've also categorized our POST APIs by introducing new table API_CATEGORIES that stores list of APIs and their respective categories. You can view all the APIs through newly introduced ApiCategoryView UI on Redwood (read-only).
GET API SUPPORT FOR REASON CODE
We also extend our GET API to support retrieving list of assigned groups to Reason code(s), categories assigned to Reason code(s), or query list of api_category or Reason Code Literals.
For more information, refer to WMS REST API Guide.
REASON CODE AUTHORIZATION LOGIC
If a reason code is assigned to a specific group and/or category, the system allows its use only for that group and/or for screens belonging to the specific category.
For example, let’s say you have the following reason code configuration:
NOTE: This logic is applicable for UI, Mobile, and API transactions where reason code is applicable.
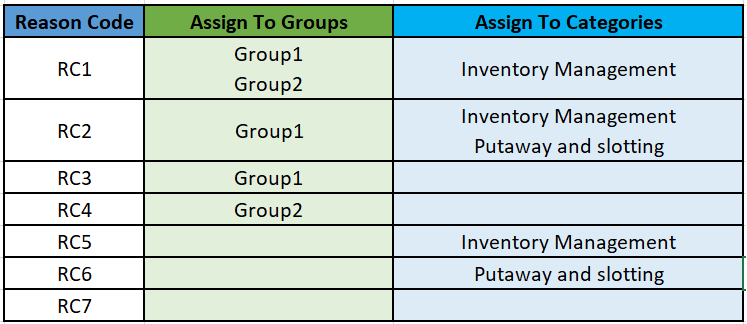
Reason Code Configuration Example
Example 1: If User1 of Group1 cancels an OB Order via OrderHdrView UI (Of 'Wave Management' category ), then, the Reason code drop-down displays only - RC2, RC3, RC6, & RC7.
Example 2: If User2 of Group2 cancels an OB Order via OrderHdrView UI (Of 'Wave Management' category), then, the Reason code drop-down displays only - RC4, RC6, & RC7.
Example 3: If User1 of Group1 modifies the LPN Quantity via IbContainerView UI (Of 'Inventory Management' category), then, the Reason code drop-down displays only - RC1, RC2, RC3, RC5, & RC7.
NOTE: If a user is assigned to multiple groups, the Reason Code Authorization Logic is validated against the logged-in view/group in the Web UI. For Mobile and API transactions, the system will fall back to the default user group.
Steps to enable and configure
- Launch Redwood Mobile Reason Code UI Transaction
- Select the one or multiple record.
- Click More Action (…) button. The Assign to Group, Assign to Category, and Reason Code Literals buttons are enabled.
- Click your desired button and the child screen opens.
- Perform CRUD operations.