Redwood: Correct Receipts Using a Redwood Page
No matter how hard you try to prevent mistakes, they're going to happen from time to time. Whether someone keys in the wrong quantity when entering the receipt or miscounts the quantity received, situations arise that require you to correct a receipt quantity. Now you have the ability to correct your receipts using a Redwood page.
On the Received Lines tab, you can view receiving transactions for purchase orders, transfer orders, in-transit shipments, and return material authorizations (RMAs). The Received Lines tab lets you view receiving transactions by receipt number, purchase order, transfer order, advanced shipping notice (ASN), shipment, RMA, and item. The Received Lines tab also lets you view the ordered quantity, received quantity, accepted quantity, rejected quantity, delivered quantity, and returned quantity. The receipt number link corresponding to each receipt transaction navigates you to the receipt summary which provides the receipt header and line details. You can view the transaction date corresponding to receive, inspect, deliver, return to receiving, return to supplier, return to customer, and return to organization transactions for a receipt line.
The Corrections tab lets you search for lines to correct by receipt number, purchase order, transfer order, shipment, RMA and item. You can perform corrections to receive, deliver, inspect, return to receiving, and return to supplier for inventory destination purchase orders. For expense destination purchase orders, you can correct the receive and return to supplier transactions. For transfer orders, in-transit shipments, and RMAs, you can correct the receive transactions. For expense destination transfer orders, you can correct the receive transactions. The correction is allowed only when the transaction date for the correction transaction is after the parent transaction date.
You can search for received lines on the Received Lines tab by entering the receipt number in the search bar. You can also use the filters for Purchase Order, Transfer Order, ASN, Shipment, RMA, and Item to search for received lines.
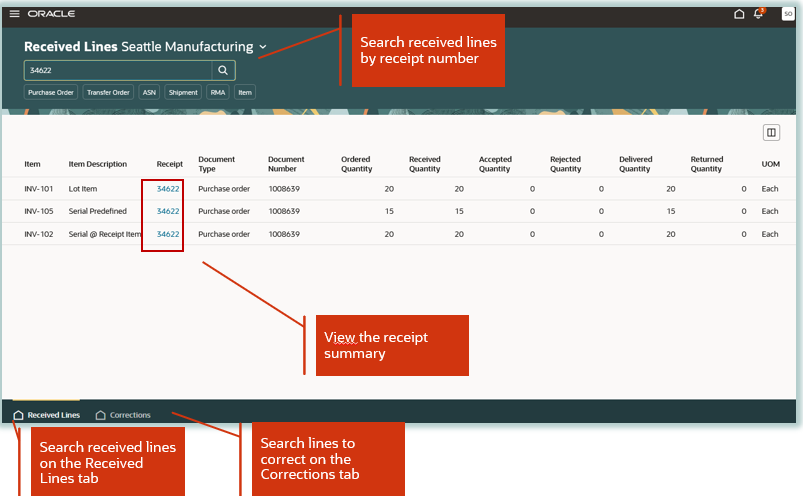
Searched Received Lines
Click the receipt number link on the Received Lines page to open the receipt details. Use the Transaction History button in the Lines section to view the transaction details corresponding to a receipt line.
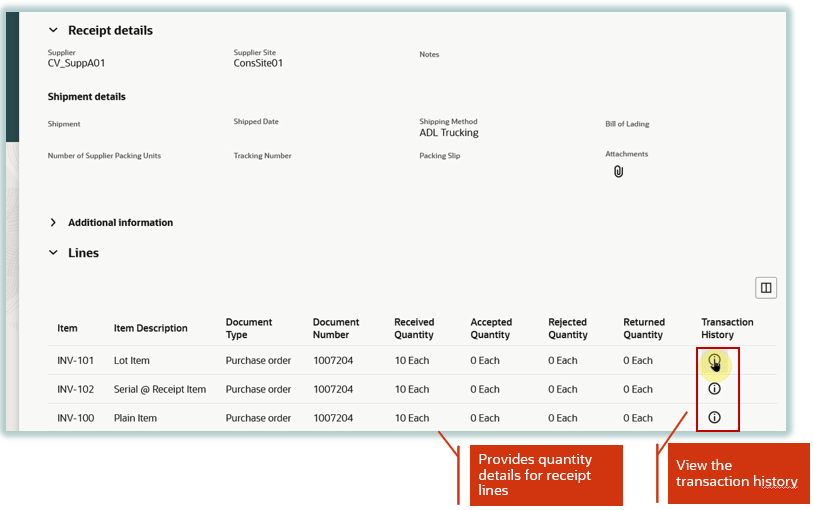
View Transaction History in Receipt Lines
The transaction history provides the transaction dates corresponding to a transaction. Click the Lot Details or Serial Details button to view the lot or serial numbers associated to the transaction.
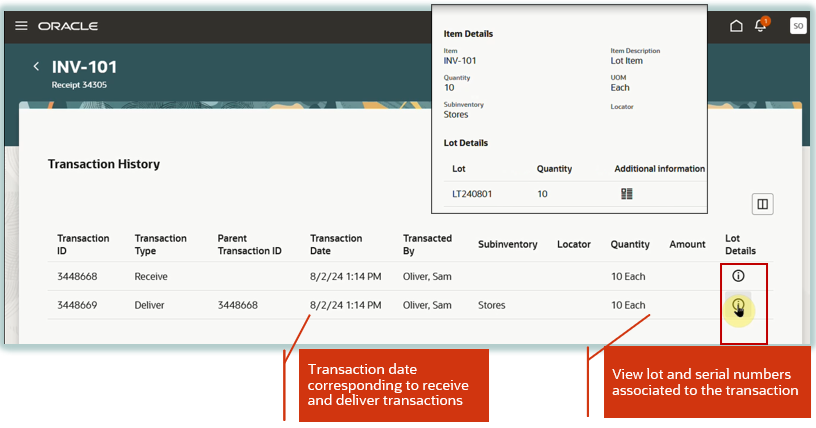
View Transaction Dates and Lot or Serial Numbers Corresponding to a Transaction
You can search for lines to correct on the Corrections tab by entering the receipt number in the search bar. You can also use the filters for Purchase Order, Transfer Order, Transaction Type, Shipment, RMA, and Item to search for lines to correct.
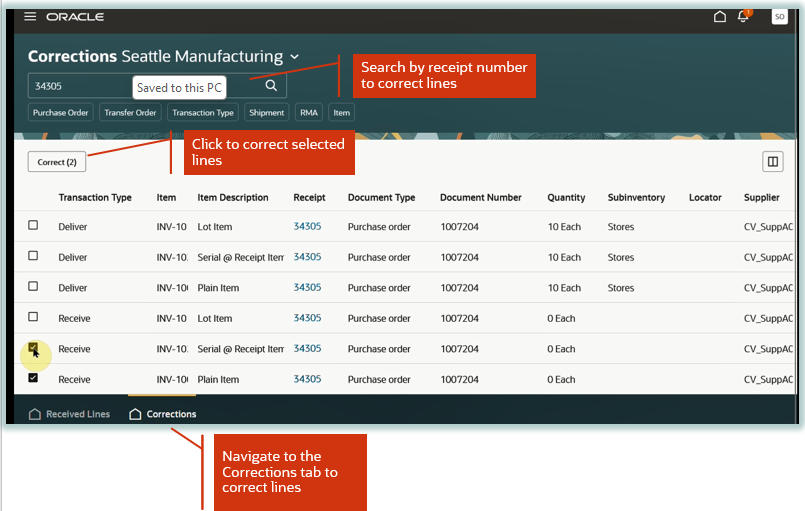
Corrections Tab - Search Lines to Correct
Click the Correct button on the Corrections page to update your selected lines. This takes you to the Correct Lines page where you can submit corrections for multiple lines. To update one line indivually, select the Edit action on the Correct Lines page to make a correction to an individual line.
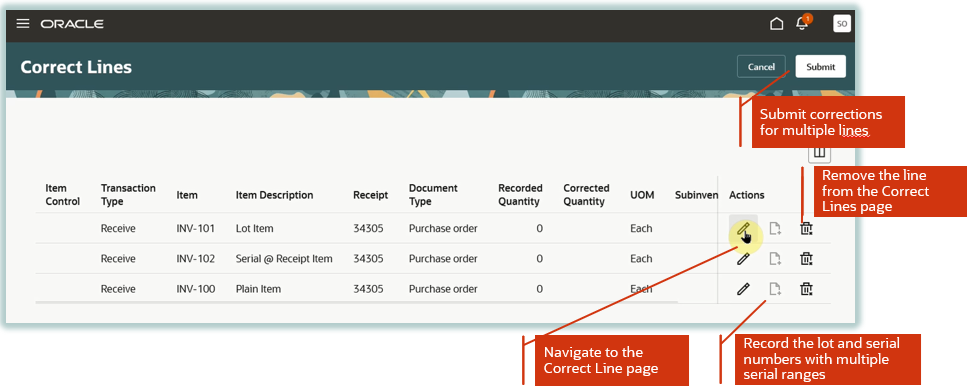
Correct Lines
In the Correct Line drawer, you can update the corrected quantity corresponding to an individual line. The transaction date defaults to the current date. If you need to perform a correction for a single lot or single serial number range, you can enter the lot or serial numbers in the Correct Line panel drawer itself.
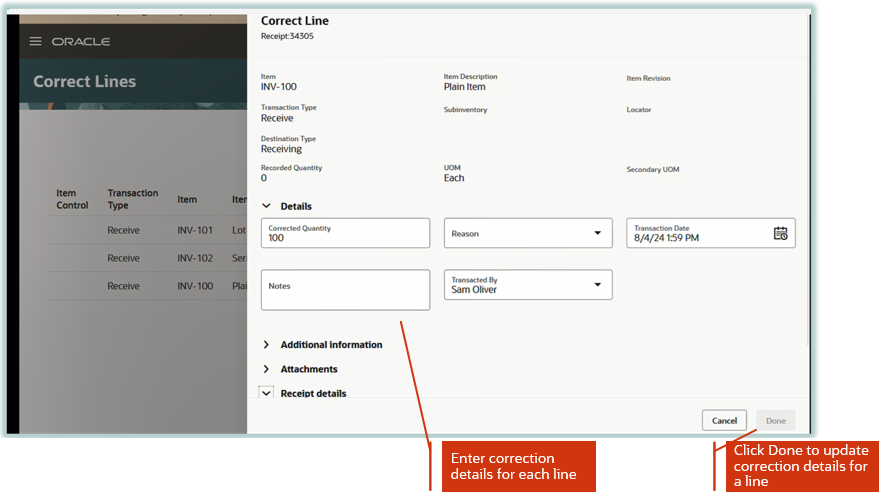
Enter Correction Details for a Line
If you need to perform a correction for multiple serial numbers or a range of serial numbers with different serial number ranges, you can enter the corrected quantity on the Correct Line page and click Done to return to the Correct Lines page. Back on the Correct Lines page, click the Lot and Serial icon corresponding to the correction line. This navigates you to the Record Serial Numbers page where you can click the Select Serial Numbers button to begin selecting the serial numbers that you want to correct. This opens a panel drawer where you can enter or scan individual serial numbers or multiple serial number ranges. The numbers entered and numbers remaining keep updating as you scan serial numbers. Click the Add Serial Number button to add the serial numbers to the list. You can view the entered serial numbers at the bottom of the panel drawer.
In the case of a positive correction, you can also enter the serial descriptive flexfields (DFFs) corresponding to a serial number or serial number range.
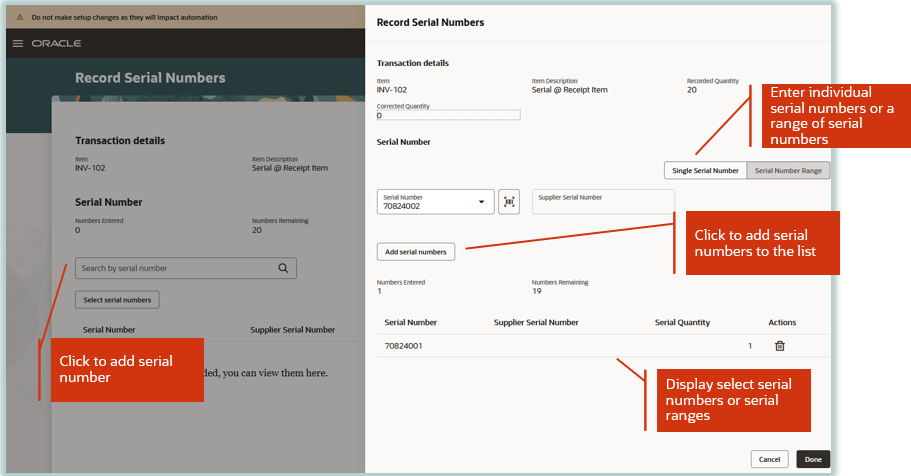
Record Serial Numbers Using the Lot and Serial Icon
If you need to perform a correction for multiple lots, you can enter the corrected quantity on the Correct Line page and click Done to return to the Correct Lines page. Back on the Correct Lines page, click the Lot and Serial icon corresponding to the correction line. This navigates you to the Record Lots page where you can click the Select Lots button to begin selecting the lots that you want to correct. This opens a panel drawer where you can enter or scan lots and enter the quantity corresponding to the lot. Click the Add button to add the lot to the list. You can view the list of entered lots at the bottom of the panel drawer.
In the case of a positive correction, you can also enter the lot attributes and the lot DFFs corresponding to a lot.
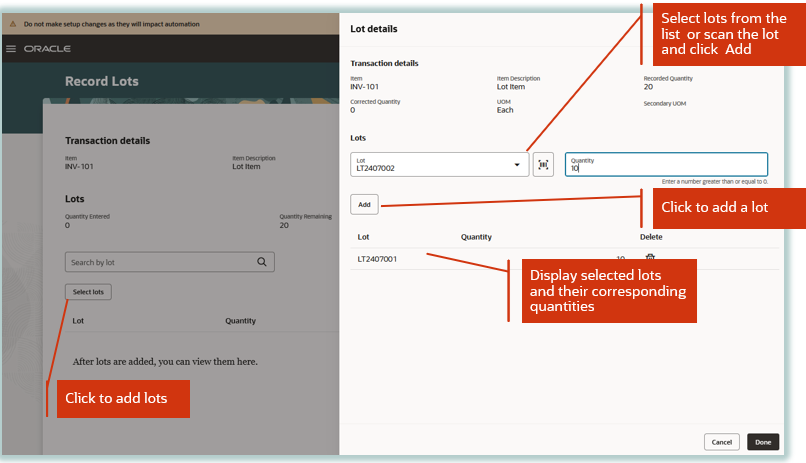
Record Lots Using the Lot and Serial icon
This feature provides you the ability to correct errors that may have occurred during receipt creation using an improved user experience.
Here's the demo of these capabilities:
Steps to Enable
Follow these steps to enable or disable this feature:
- In the Setup and Maintenance work area, search for and select the Manage Administrator Profile Values task.
- On the Manage Administrator Profile Values page, search for and select the ORA_RCV_CORRECT_RECEIPTS_REDWOOD_ENABLED profile option code.
- In the Profile Values section, set the Site level to Yes or No. The default value is No.
- Yes = enables the feature
- No = disables the feature
- Click Save and Close. Changes in the profile value will affect users the next time they sign in.
Tips And Considerations
- You can enter a single serial number or a single continuous serial number range in the panel drawer of the Correct Line page.
- You can enter multiple serial number ranges after entering the corrected quantity for a transaction line using the lot and serial number component corresponding to a correct line.
Key Resources
- Oracle Fusion Cloud SCM: Using Inventory Management guide, available on the Oracle Help Center.
Access Requirements
Users who are assigned a configured job role that contains this privilege can access this feature:
- Correct Receipts using Responsive Receiving (RCV_CORRECT_RECEIPTS_USING_RESPONSIVE_RECEIVING_PWA_PRIV)
This privilege is new in this update.