Redwood: Manage Inbound Shipments and Create ASN or ASBN Using a Redwood Page
In many industries, your suppliers inform you that your goods have shipped by providing an advanced shipment notice (ASN) or advanced shipment billing notification (ASBN). However, in some situations, your supplier just sends you the shipment details and you create the ASN for more optimal tracking of the goods' status. Now, you have the ability to create an ASN or ASBN and view these inbound shipments using a Redwood page. The new Redwood Inbound Shipments and Purchase Orders to Ship pages can be accessed from the Receipts tasks in the Inventory Management work area. Additionally, suppliers can access these pages through the Supplier Portal. In application navigation is provided allowing you to easily navigate between the Inbound Shipments and Purchase Orders to Ship pages. These two new Redwood pages replace the existing Manage Inbound Shipments, Create ASN, and Create ASBN pages.
As part of this new Redwood user experience, a number of enhancements have been introduced to improve the usability of the inbound shipments and ASN flows.
- Ability to navigate to the inbound shipments and ASN pages from a single menu entry
- Support for header-level descriptive flexfields and attachments when creating an ASN
- Ability to view billing details on the Inbound Shipments page
- Support for entry of container number for inbound shipments and ASNs
- Support for entry of supplier shipment number for inbound shipments and ASNs
- Enhanced existing REST API to support cancellation of ASN lines
- Ability to close partially received ASN lines
- Expanded shipping method to include carrier, mode of transport, and service level
- Ability to add new header-level attachments and remove existing attachments on an ASN
- Updated existing header-level descriptive flexfields on an ASN
- Additional attributes can be updated on an existing ASN
- Ability to default Order Quantity as Shipped Quantity when creating an ASN
- Enhanced the user interface to easily view lot and serial number-controlled items
On the Inbound Shipments page, you can search for your inbound shipments by shipment, supplier, purchase order, and transfer order. You can view inbound shipment details by clicking the shipment number link or clicking the Edit icon. You can click the Additional Information icon to access header-level descriptive flexfield details.
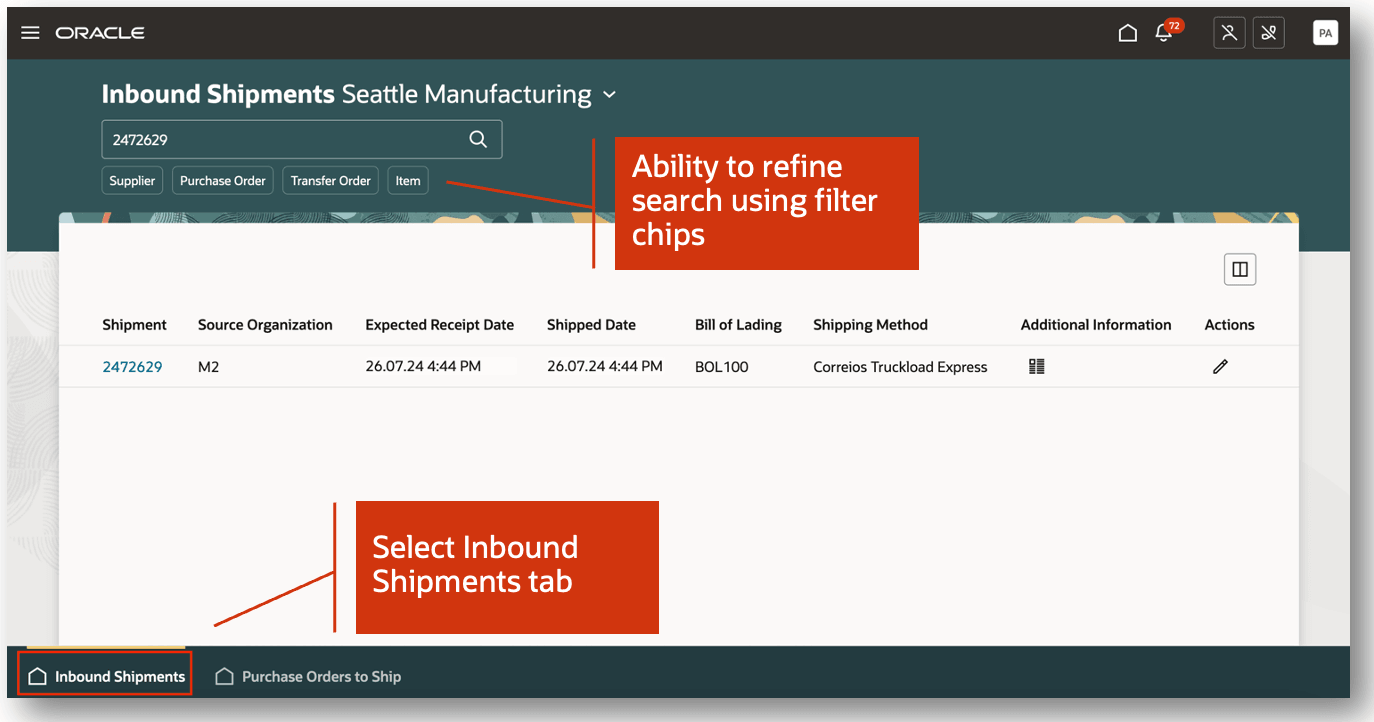
Inbound Shipments
You can edit shipment details such as the Supplier Shipment Number, Shipped Date, and Expected Receipt Date. The edit shipment page is segmented into four regions including Shipment Details, Billing Information, Additional Information, and Lines. In the Shipment Details region, you can update attributes such as Supplier Shipment Number, Freight Terms, and Bill of Lading. In the Billing Information region, you can view billing details such as Invoice Number, Invoiced Date, and Invoiced Amount. In the Additional Information region, you can enter descriptive flexfield details. Lastly, in the Lines region, you can review the lines associated with the inbound shipment.
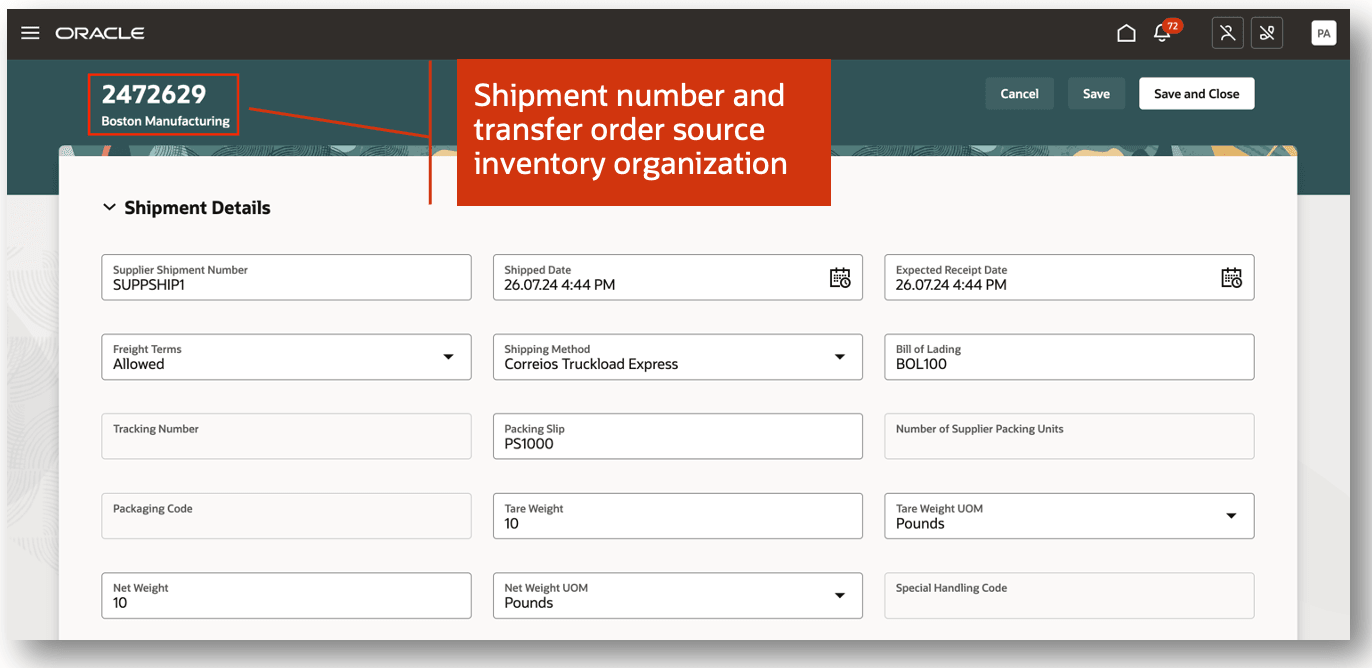
Inbound Shipment Details
In the Lines section, you can review details such as the Item, Received Quantity, and Shipped Quantity. The Status and Item Control columns display visual indicators allowing you to easily see the line status and type of item associated with the line. You have the option to select one or more shipment lines and click the Update Lines button. This lets you select one or more lines to update common attributes.
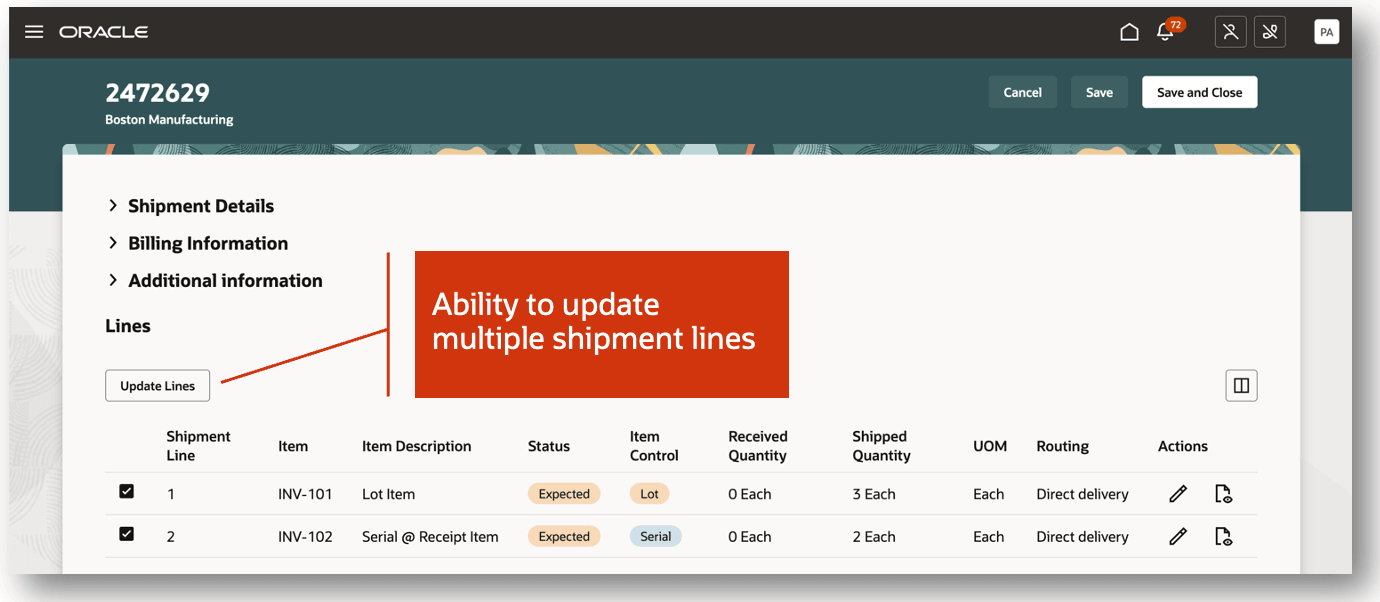
Inbound Shipment Line Details
The Update Lines drawer enables you to update specific attributes for the selected inbound shipment lines. For example, you can select multiple lines and update attributes such as the Packing Slip, Reason, and Routing. This allows you to save time by updating multiple lines at once.
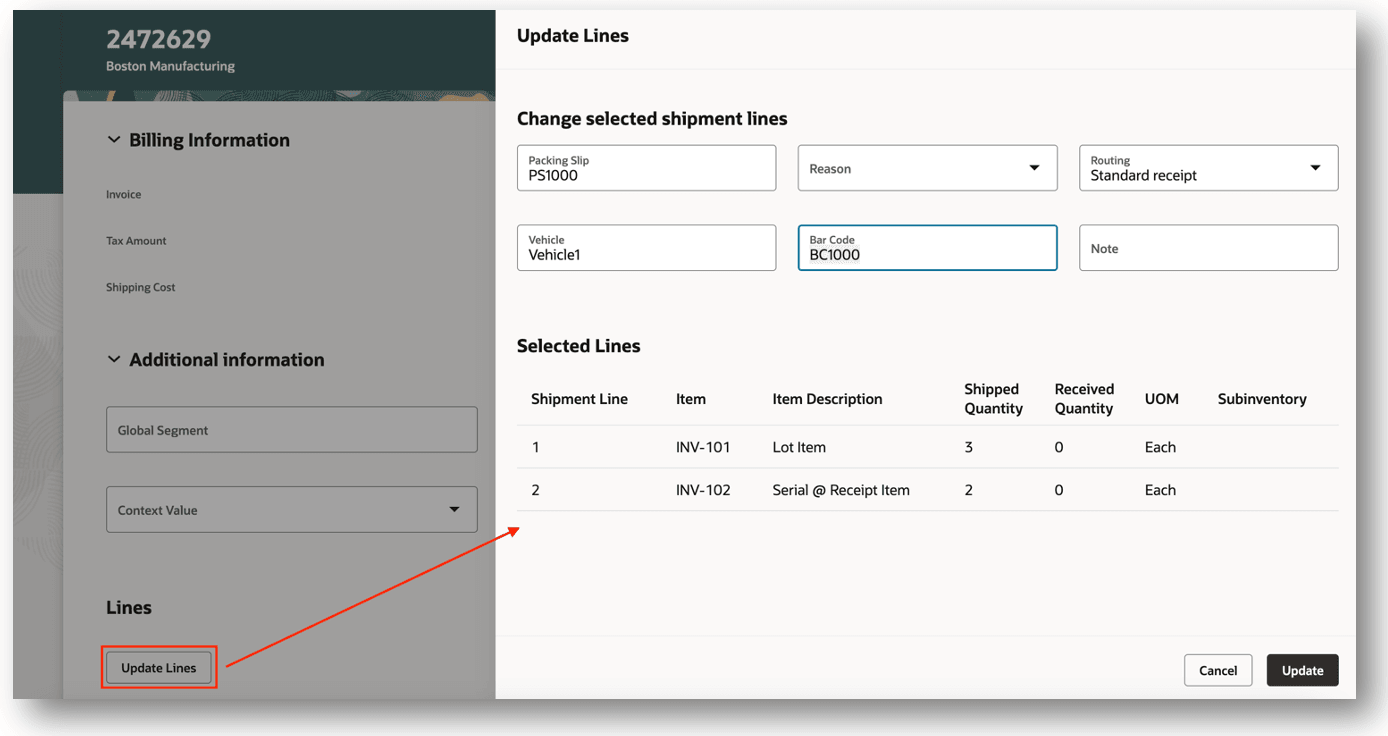
Update Inbound Shipment Lines
Once you've completed editing the inbound shipment, you can click Save or Save and Close to update the shipment. A confirmation toast message displays indicating that the shipment has been successfully updated.
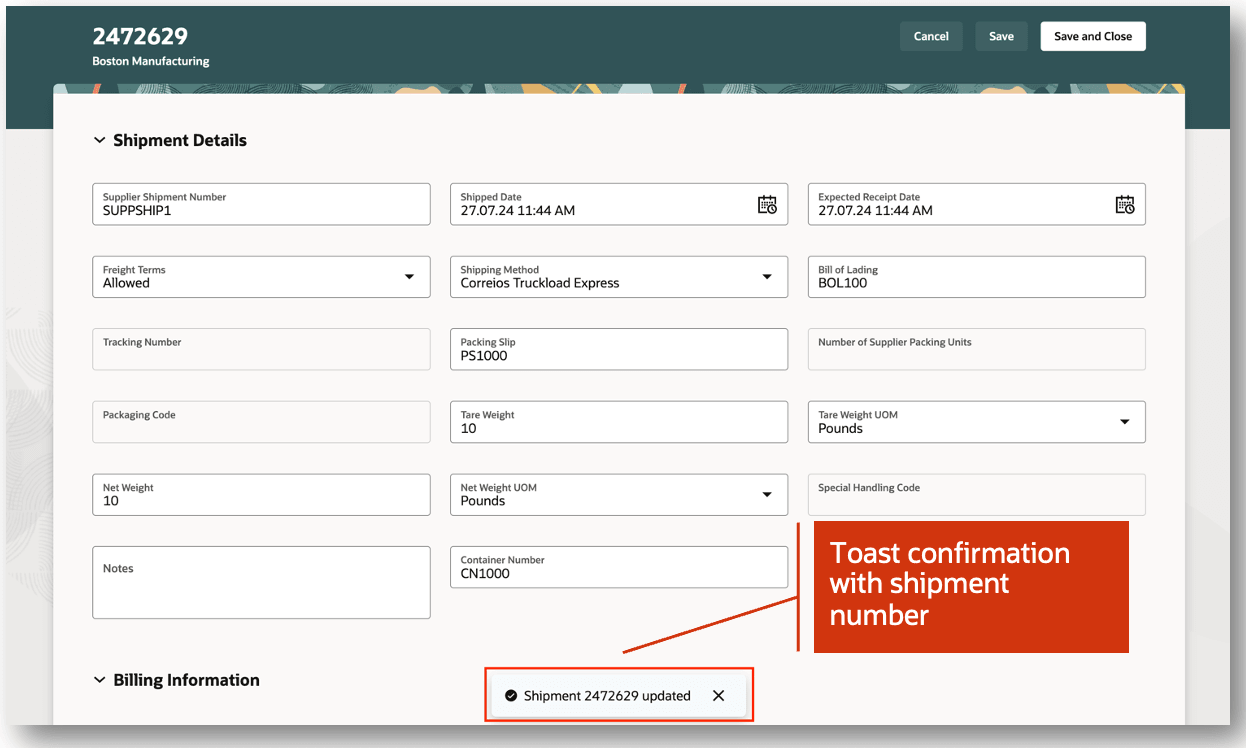
Confirmation Toast Message
The Purchase Orders to Ship Redwood page replaces the existing Create ASN and Create ASBN pages. You can navigate to the Purchase Orders to Ship page by clicking the corresponding tab. You can easily navigate between the Inbound Shipments and Purchase Orders to Ship pages. On the Purchase Orders to Ship page, you can search for your purchase orders to ship by supplier, item, supplier item, and due date. For example, you can search for purchase orders by a specific supplier that are due within a certain date range.
Once you have completed your search, you can select one or more lines and click the Create ASN button.

Purchase Orders to Ship
The New ASN page is segmented into several regions including ASN details, Additional details, Additional information, and Attachments. In the ASN details region, you can enter details such as Shipment, Supplier Shipment Number, and Shipping Method. In the Additional details region, you can enter the Container Number, Number of Supplier Packing Units, and Packaging Code. Descriptive flexfields and attachments can also be entered for the ASN.

Create New ASN
You can edit ASN line details such as the Shipped Quantity, UOM, Country of Origin, and Packing Slip. Additionally, you can add nested packing units, descriptive flexfields, and attachments at the ASN line level. You also have option to select multiple ASN lines and update attributes such as the Packing Slip, Supplier Packing Unit, and Country of Origin. In the event an item is lot controlled, serial controlled, or lot and serial controlled, you can enter the associated lot and serial number details.

ASN Line Details
When the Pay on Receipt option isn't enabled for the supplier site, the Enter billing details checkbox displays on the New ASN page. Select the Enter billing details checkbox to display the Billing details region which allows you to enter details such as the Invoice, Tax Amount, and Payment Terms.

ASN Billing Details
Once you've completed entry of the ASN details, click the Submit button to create the ASN. A confirmation message displays indicating that the ASN has been successfully created.
You can navigate back to the Inbound Shipments page to view the inbound ASN shipment that was created.
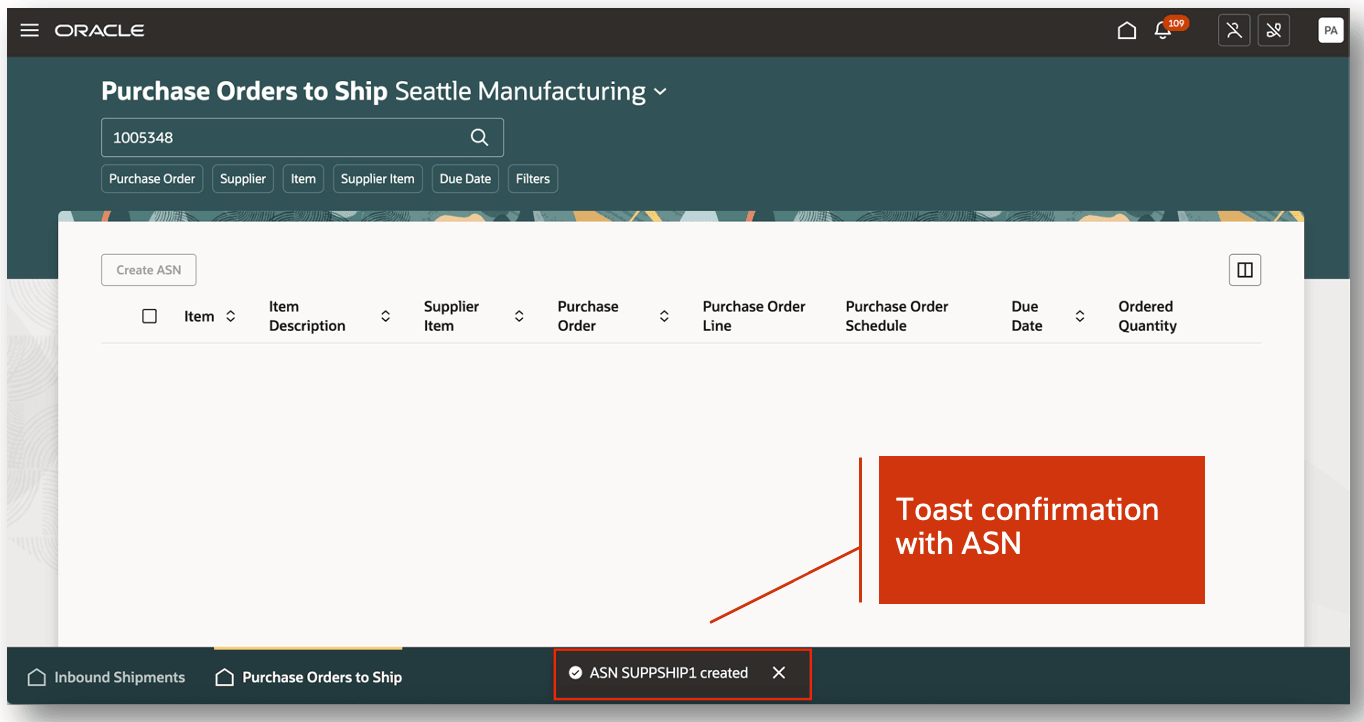
Confirmation Toast Message
This feature provides you the ability to create and manage your inbound shipments in a modern user experience and provides you with additional capabilities when creating an ASN or ASBN.
Here's the demo of these capabilities:
Steps to Enable
Follow these steps to enable or disable the Inbound Shipments page:
- In the Setup and Maintenance work area, search for and select the Manage Receiving Profile Options task.
- On the Manage Receiving Profile Options page, search for and select the ORA_RCV_INBOUND_SHIPMENTS_REDWOOD_ENABLED profile option code.
- In the Profile Values section, set the Site level to Yes or No. The default value is No.
- Yes = enables the feature
- No = disables the feature
- Click Save and Close. Changes in the profile value will affect users the next time they sign in.
Follow these steps to enable or disable the Purchase Orders to Ship page:
- In the Setup and Maintenance work area, search for and select the Manage Receiving Profile Options task.
- On the Manage Receiving Profile Options page, search for and select the ORA_RCV_ADVANCE_SHIPMENT_NOTICE_REDWOOD_ENABLED profile option code.
- In the Profile Values section, set the Site level to Yes or No. The default value is No.
- Yes = enables the feature
- No = disables the feature
- Click Save and Close. Changes in the profile value will affect users the next time they sign in.
Follow these steps to enable or disable the Inbound Shipments page in the Supplier Portal.
- In the Setup and Maintenance work area, search for and select the Manage Receiving Profile Options task.
- On the Manage Receiving Profile Options page, search for and select the ORA_RCV_INBOUND_SHIPMENTS_SUPPLIER_PORTAL_REDWOOD_ENABLED profile option code.
- In the Profile Values section, set the Site level to Yes or No. The default value is No.
- Yes = enables the feature
- No = disables the feature
- Click Save and Close. Changes in the profile value will affect users the next time they sign in.
Follow these steps to enable or disable the Purchase Orders to Ship page in the Supplier Portal.
- In the Setup and Maintenance work area, search for and select the Manage Receiving Profile Options task.
- On the Manage Receiving Profile Options page, search for and select the ORA_RCV_ADVANCE_SHIPMENT_NOTICE_SUPPLIER_PORTAL_REDWOOD_ENABLED profile option code.
- In the Profile Values section, set the Site level to Yes or No. The default value is No.
- Yes = enables the feature
- No = disables the feature
- Click Save and Close. Changes in the profile value will affect users the next time they sign in.
This feature requires that you submit the Ingest Receiving Search Indexes scheduled process. You can review the 24B feature Receive Goods Using a Mobile Device to learn more about this scheduled process.
Tips And Considerations
- Inbound Shipments is the new Redwood page for the Manage Inbound Shipments page.
- Purchase Orders to Ship is the new Redwood page for the Create ASN and Create ASBN pages.
- Inbound Shipments and Purchase Orders to Ship are navigable from a single menu entry.
Key Resources
- Oracle Fusion Cloud SCM: Using Receiving guide, available on the Oracle Help Center.
- Oracle Fusion Cloud SCM: Implementing Manufacturing and Supply Chain Materials Management guide, available on the Oracle Help Center.
Access Requirements
Users who are assigned a configured job role that contains these privileges can access this feature:
- Manage Inbound Shipment Using Responsive Receiving (RCV_MANAGE_INBOUND_SHIPMENT_PWA)
- Manage Inbound Shipment as Supplier Using Responsive Receiving (RCV_MANAGE_INBOUND_SHIPMENT_AS_SUPPLIER_PWA)
- Create Advance Shipment Notice Using Responsive Receiving (RCV_CREATE_ADVANCE_SHIPMENT_NOTICE_PWA)
- Create Advance Shipment Notice as Supplier Using Responsive Receiving (RCV_CREATE_ADVANCE_SHIPMENT_NOTICE_AS_SUPPLIER_PWA)
These privileges are new in this update.