Redwood: Manage Supplies and Demands in Replenishment Planning Using a New User Experience
You can now use the Redwood user experience to view all supplies and demands at the order level in the context of a specific plan or view collected data in the Plan Inputs work area. You can also identify the source of any mismatches between demand and supply and seek ways to adjust the orders to meet plan objectives. The key features of the Supplies and Demands page include the ability to:
- Search by items and organizations.
- Filter the rows by items, locations, order types, and other attributes that meet the business conditions that you specify.
- Sort the rows by items, locations, segments, and other attributes.
- Drill to other pages, and drill to the Supplies and Demands page from other pages.
- Mark for release, release, or edit planned recommendations.
- Edit the firm status, firm date, firm quantity, source organization, supplier, supplier site, and shipping method for an item-location combination.
- Create manual demands, planned recommendations, or on-hand quantities.
- Copy any edited rows or firm orders to a simulation set.
- Export data to a Microsoft Excel workbook file (.xls).
- Configure the layout of the page to display only the attributes required.
Supplies and Demands Overview
You can view supplies and demands for a specific replenishment plan or the collected data in the Plan Inputs work area.
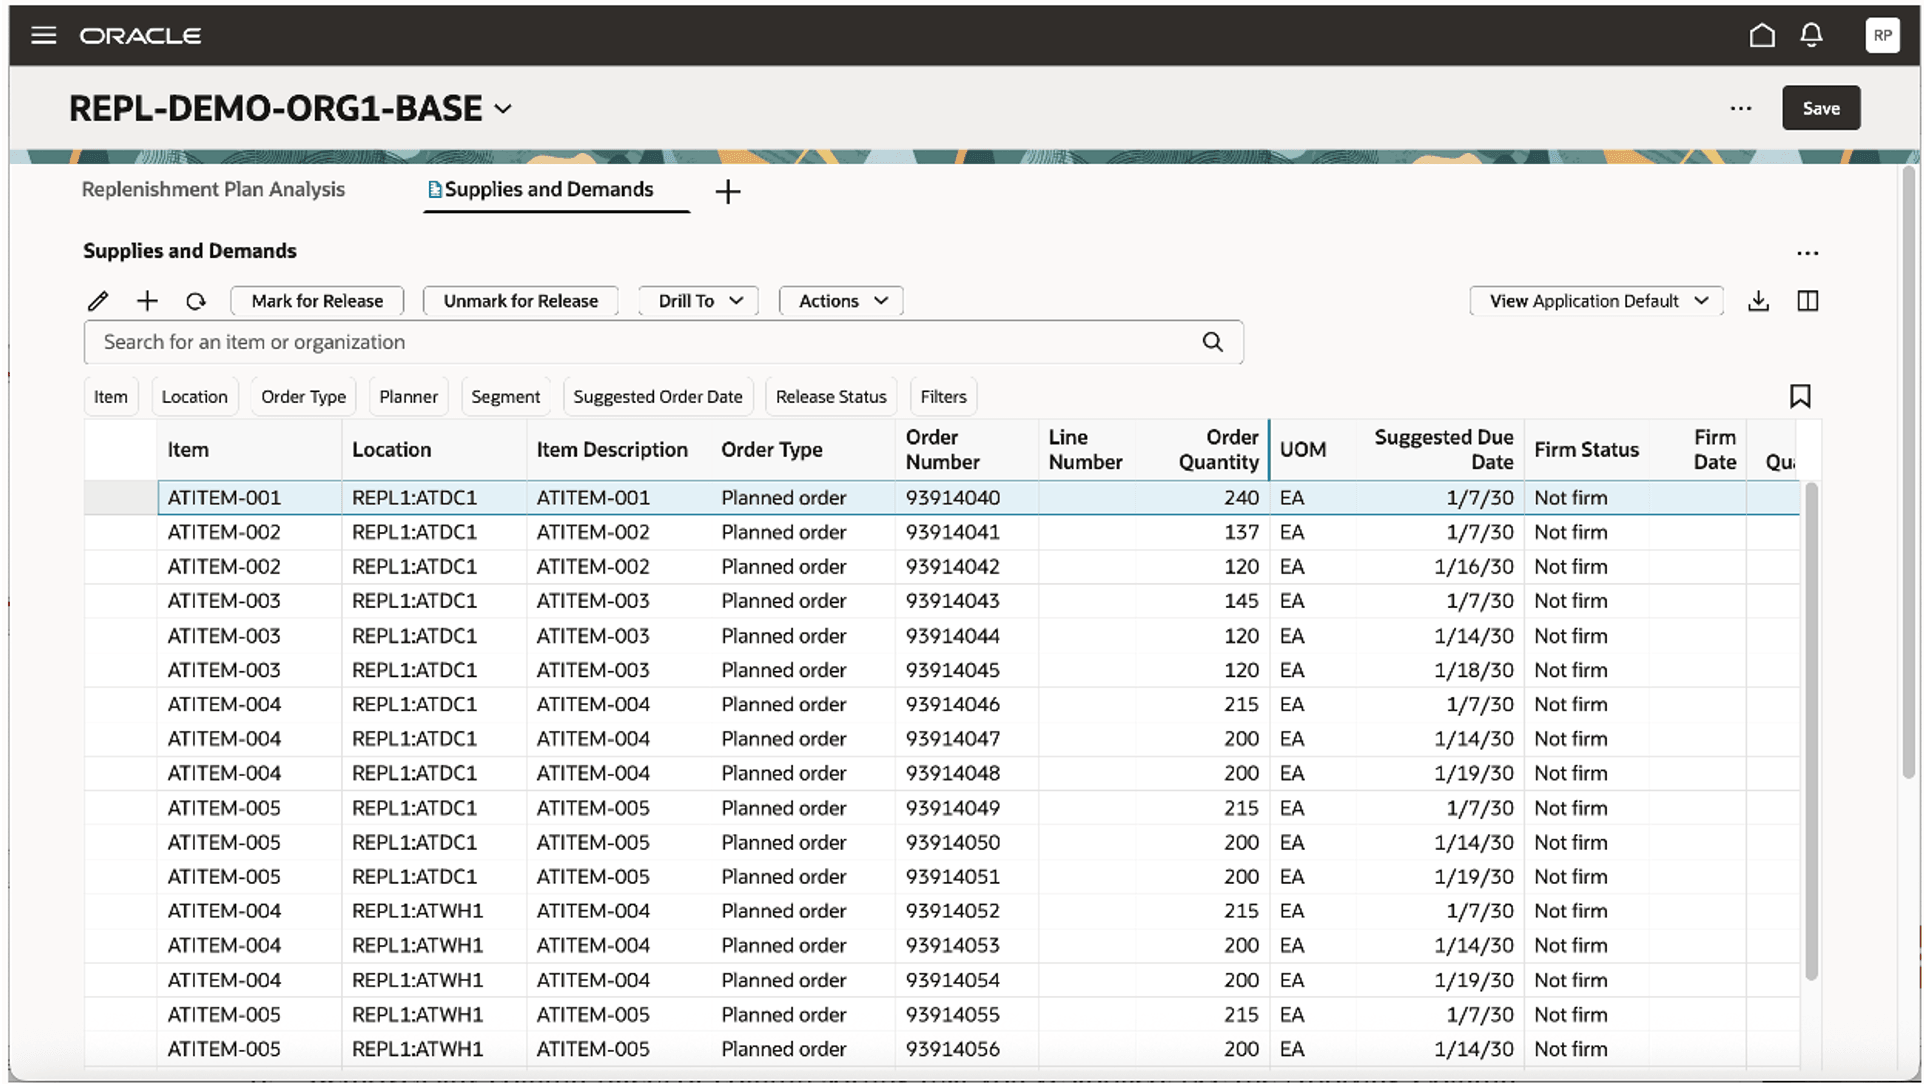
Supplies and Demands Page
Let’s look more closely at the Supplies and Demands page.
Toolbar
If you’re familiar with the classic version of the Supplies and Demands page, many of the actions on the toolbar will be familiar to you.

Toolbar on Supplies and Demands Page
The actions on the toolbar are as follows:
- Edit: You can edit the firm status, firm date, firm quantity, source organization, supplier, supplier site, and shipping method.
- Add: You can open a drawer from which you can create a manual demand, on-hand supply, or a planned order. See the section titled “Creating Orders” for more information.
- Refresh: When you refresh the page, the following happen:
- You’re notified if there are unsaved changes. If you proceed with the refresh, any unsaved changes are discarded.
- Any filtering or sorting of columns is removed.
- The data is queried again according to the applied filters.
- Mark for Release: This button works like the Actions menu option in the classic version of the page. You first select one or more orders that are eligible for release and then click Mark for Release.
- Unmark for Release: This button also works like the Actions menu option in the classic version of the page. You first select one or more orders that were previously marked for release and then click Unmark for Release to set the orders back to their original release status.
- Drill To: You can pass the selected context to a table or graph by selecting one or more supplies or demands and then selecting a table or graph from the Drill To list. The selected table or graph will be opened on a temporary page. To add more choices to the Drill To list, you can select Manage Links from the Actions menu for the Supplies and Demands page.
- Actions: You can use this list to save, restore, or delete views. Views are the counterpart to layouts in the classic version of the Supplies and Demands page. You can also use this list to copy the selected rows to a simulation set.
- View: You can use this list to control which columns are visible on the page as well as the order in which they appear. You can quickly switch between views to display the columns appropriate to the task you want to perform. For example, when marking orders for release, you may want to see a different set of columns than what you would want to see when analyzing supplies and demands. See the section titled “Views” for more information.
- Export: You can export the rows that meet the current filter criteria to a Microsoft Excel XML workbook file (.xlsx). The exported file contains only the columns in the current view and in the order in which they appear on the page.
- Columns: You can select the columns you want to be visible on the Supplies and Demands page. You can reorder the columns in one of two ways:
- In the Columns drawer, you can drag and drop the columns.
- On the Supplies and Demands page, you can drag and drop columns.
Searching and Filtering
Oracle Fusion Cloud Supply Chain Planning uses a common Redwood component to ensure consistent search behavior across all modules.

Common Redwood Component for Searching and Filtering
- Keyword Search: You can use this field to search across the Item and Location columns with your entered text. The keyword search uses the Contains operator. For example, if you enter “mon” in the field and press the Enter key, you will see rows for items that contain “mon” in their names, as in MK-ENG-Monitor. The search isn’t case-sensitive, making it easy for you to find rows for items or locations you’re interested in.
- Suggested Filters: You can use suggested filters to add column-specific filter criteria. For example, you can filter supplies and demands by selecting items and locations. When you click outside the list for the suggested filter, the page is updated to show only the rows that meet the current criteria.
- Filters: You can use the Filters button to open the Filters drawer, from which you can add columns as applied filters.
- Saved Searches: You can preserve the current keyword search and applied filters as a saved search. Thus, you can reuse a set of search criteria.
Filters Drawer
By clicking the Filters button, you can open the Filters drawer, in which you can select the columns of the Supplies and Demands page for use as applied filters.
The type of filter criteria you can specify is based on the column data type.
- Numeric columns: When filtering on a column that’s numeric, you can specify both the operator and value. When using the Between operator, you can specify both a from and a to value.
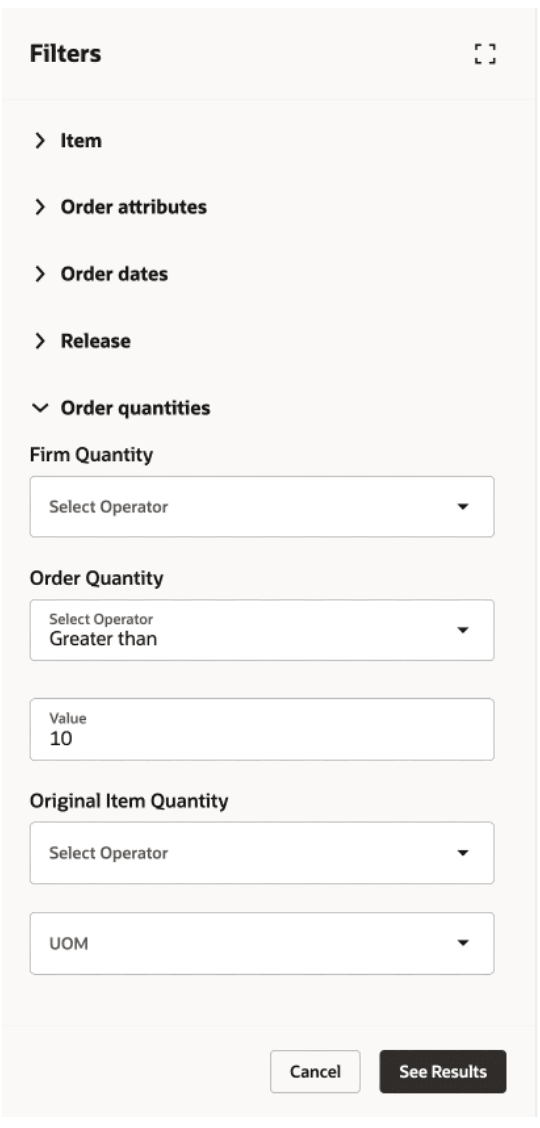
Filters Drawer Showing Numeric Column (Order Quantity)
- Date columns: When applying filter criteria to a date column, you can specify the from date, to date, or both.
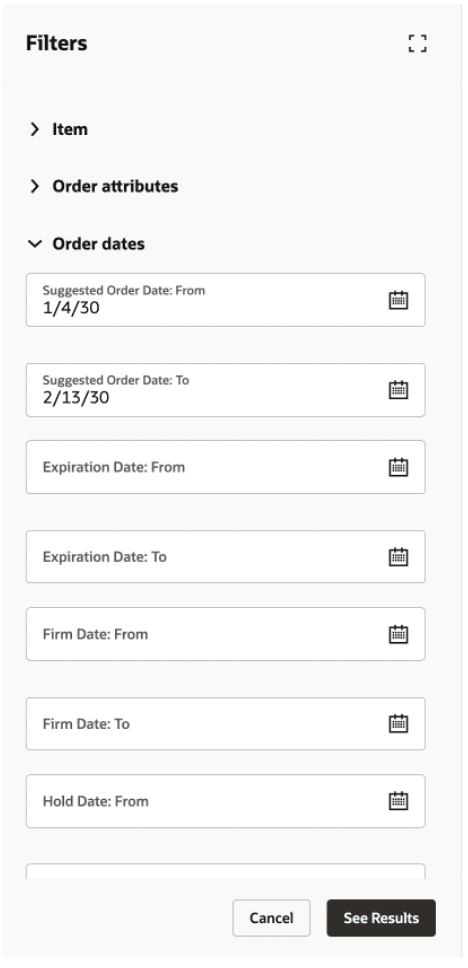
Filters Drawer Showing Date Columns
- LOV columns: When filtering on a column that’s associated with a list of values (LOV), you can usually select multiple values. There are use cases where selecting multiple values doesn’t make sense, such as columns that have only Yes and No values. In such cases, you’re restricted to a single selection.
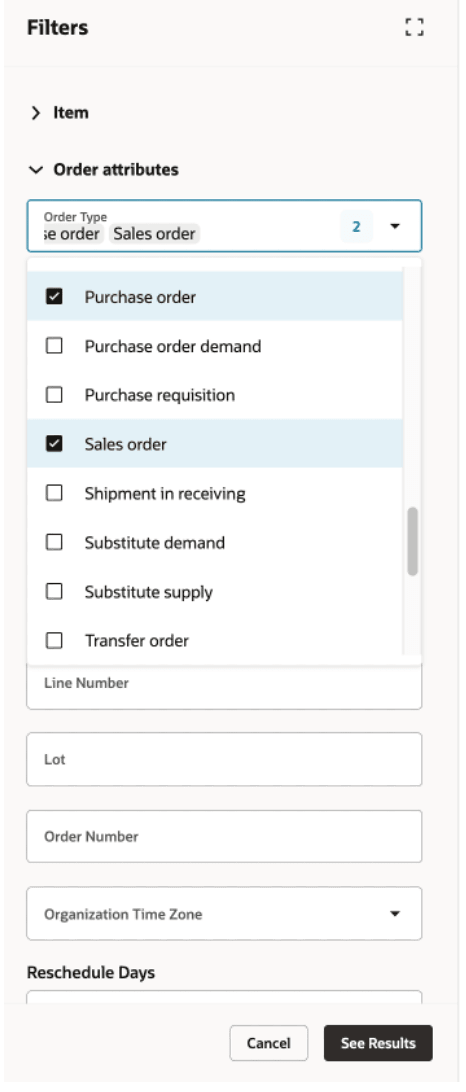
Filters Drawer Showing LOV Column (Order Type)
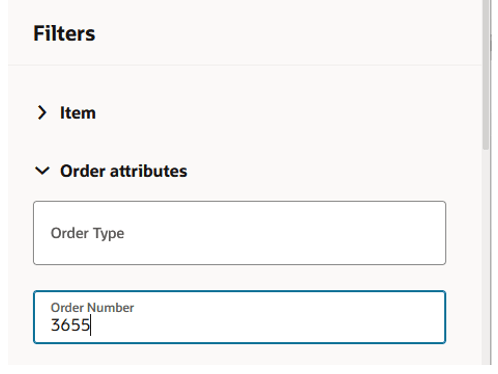
- Free-text columns. In cases where the column’s data type is alphanumeric, and there’s no associated LOV, you can enter free-form text. In the following example, the Supplies and Demands page will be filtered to display only those rows with order numbers that contain 3655.
Filters Drawer Showing Free-Text Column (Order Number)
When you click the See Results button, the applied filters are added to the Supplies and Demands page, and the data is queried again. Here’s an example of filtering supplies and demands by the on-hand order type.
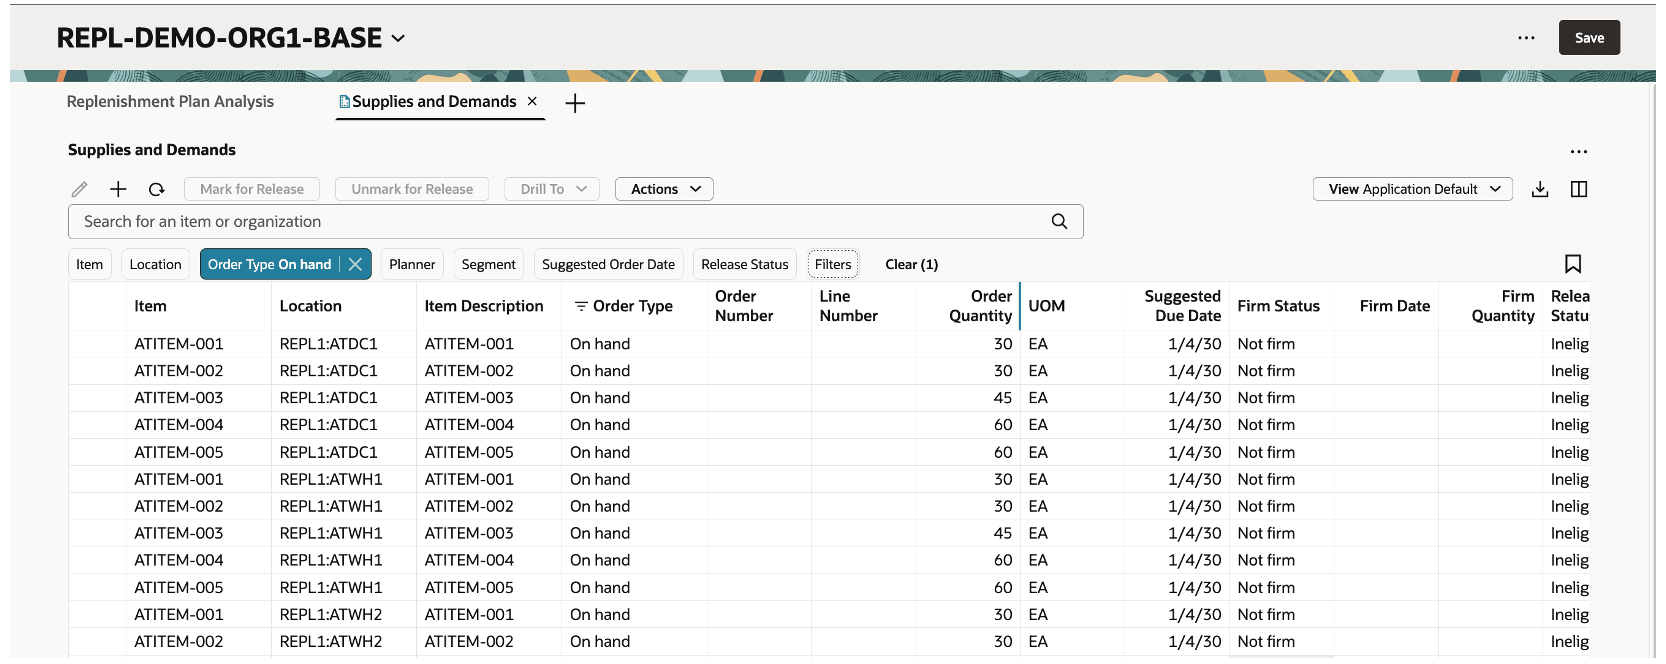
Supplies and Demands Page with Applied Filter for On-Hand Order Type
Column Filters and Sorting
You can append column filters to the keyword search and applied filters to further refine your results. To see column filters, hover over the column header, and click the Filter icon as shown in the following image.
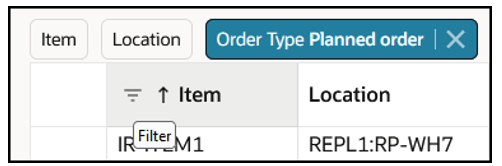
Column Filter
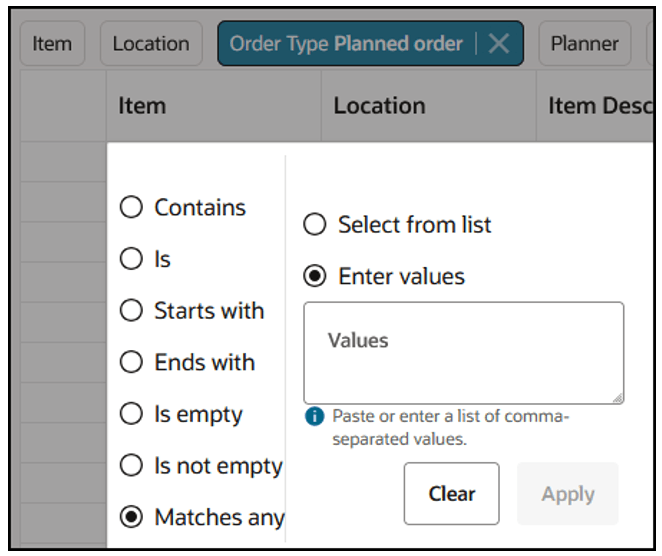
When you click Filter, you can pick an operator and enter criteria.
In some columns, such as Item and Location, you can paste values from an external source, such as an email or a spreadsheet, into the column filter. This quick method eliminates having to individually select the items or organizations of interest.
The following image shows the Item column filter prior to pasting values.
Column Filter Before Pasting Values
And, here’s the Item column filter after the values are pasted.
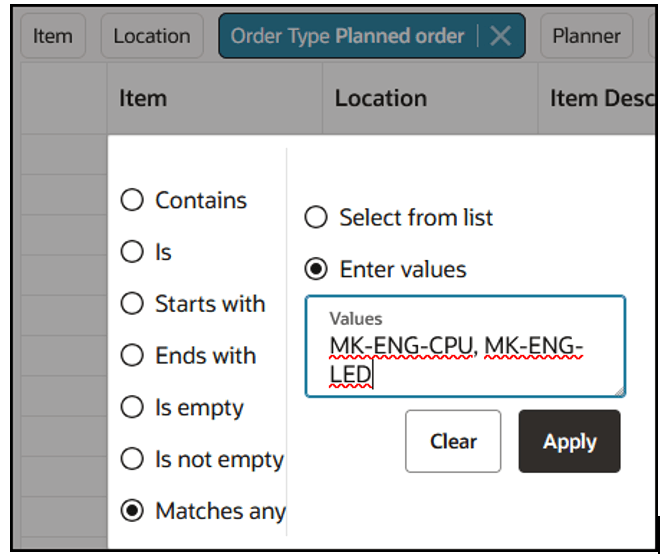
Column Filter After Pasting Values
After you click the Apply button, the Supplies and Demands page in this example shows the planned orders (the applied filter) for only the items specified in the Item column filter.
Here’s some additional information about column filters:
- The operators available vary by data type. Date fields and numeric fields have different operators than alphanumeric fields.
- You can remove a column filter by clicking the Clear button.
- Column filters are retained when the keyword search or applied filters are changed.
- Column filters can be used in combination with drill-to links from the Supplies and Demands page.
- All column filters are cleared when the Refresh icon is clicked.
- Column filters aren’t included in saved searches.
You can also change how supplies and demands are sorted. Hovering over a column heading gives you access to the icons for sorting the rows by the column values in the ascending or descending order.
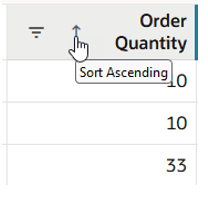
Icon for Column Sorting
Here’s some additional information about column sorting:
- Sorting is applied only to one column. If you select a different column to sort by, you’ll lose the sorting by the previous column.
- Sorting is removed when the Refresh icon is clicked.
Views
Views help you to control which columns are visible, the order in which they appear, and their width. Views are equivalent to layouts in the classic version of the Supplies and Demands page.
Views don’t contain any filtering or sorting information. For example, if you’ve applied a column filter, and you save the view, the column filter isn’t included in the view.
To create views, first arrange the page as you want it to appear, specifying which columns are visible and the order in which the columns appear. Once you’re happy with the appearance of the page, you can then save the view. After the view is saved, you can easily switch between views to see a different set of columns based on the task you want to perform.
To manage columns, click the Columns icon, which appears on the far right of the Supplies and Demands toolbar, to open the Columns drawer.
For example, in the following image, the Make or Buy column is currently hidden. To make the column visible, first select the checkbox in front of the column name, and then click Show. To rearrange the order of the columns, drag and drop them.
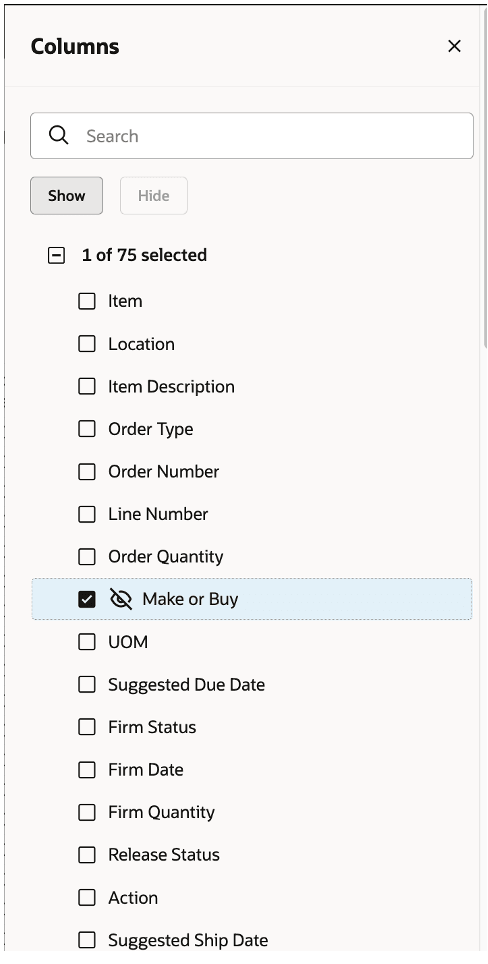
Columns Drawer
Another way to rearrange columns is to drag and drop columns on the Supplies and Demands page. First, click the column heading to select the column. The column will be highlighted in blue, as shown in the following image. While keeping the column heading selected, drag and drop the column to the required location.
Selecting Columns for Drag and Drop
To save the changes you’ve made, select Save View from the Actions list.
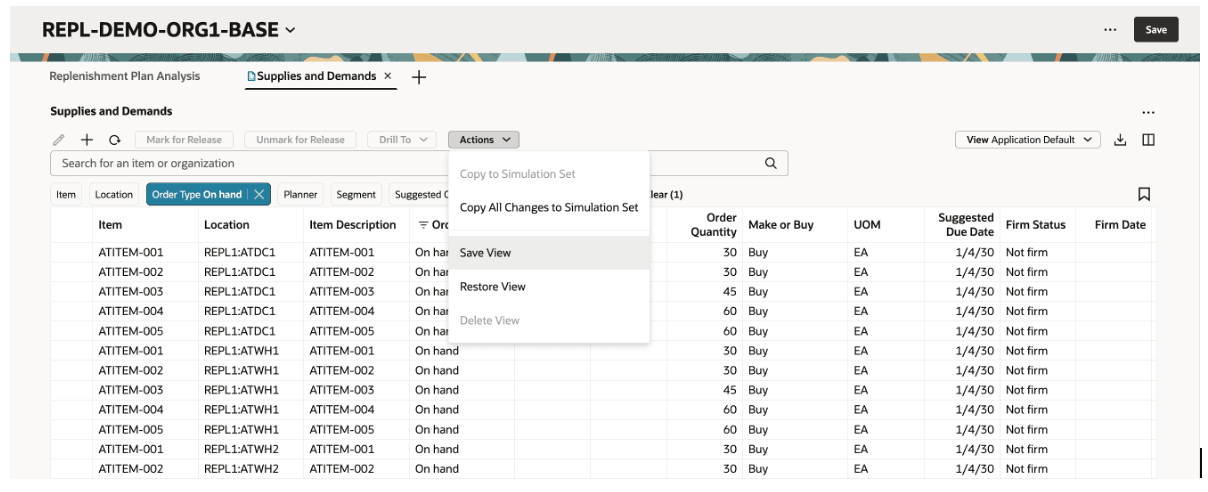
Actions List
The Save view drawer opens. From here, you can either update the current view by selecting the Save as existing option, or you can create a view by selecting the Save as new option.
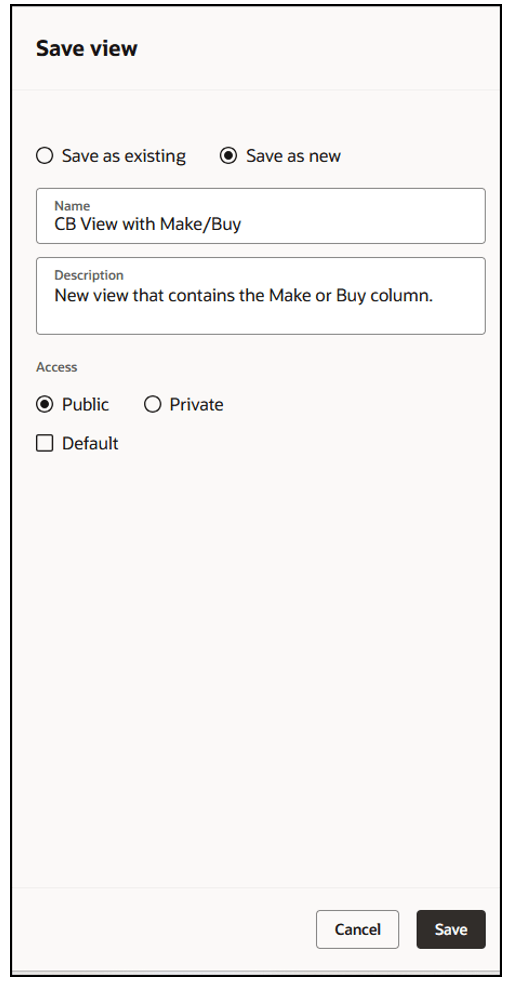
Save View Drawer
If you aren’t the owner of the current view, the Save as new option is automatically selected for you. You aren’t allowed to make changes to a view that was created by another user.
The Actions list contains two other, view-related actions:
- Restore View. If you make changes to the column order and appearance and decide that you want to discard those changes, you can select Restore View. The page is refreshed based on the view as it was last saved. Any unsaved view changes are discarded.
- Delete View. This selection deletes the current view. You’ll be asked to confirm your action. You can delete a view only if you own it.
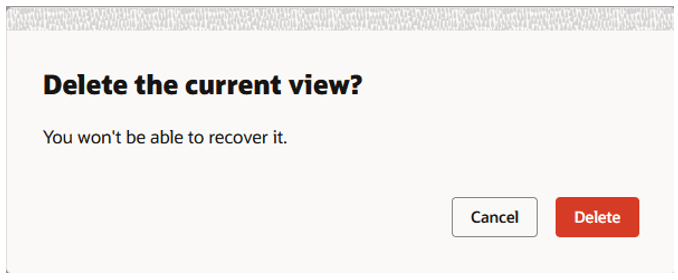
Warning Message for Deleting View
Editing Supplies and Demands
You can edit the same columns in the Redwood version of the Supplies and Demands page as you could in the classic version of the page.
To perform an inline edit for a field, double-click it to enter the edit mode. In the following images, a planned order is being firmed.

Planned Order Before Inline Edit

Planned Order After Inline Edit
Another way to edit supplies and demands is to use the Edit icon. You can either select one row or multiple rows as shown in the following image. A drawer with the editable order attributes opens.
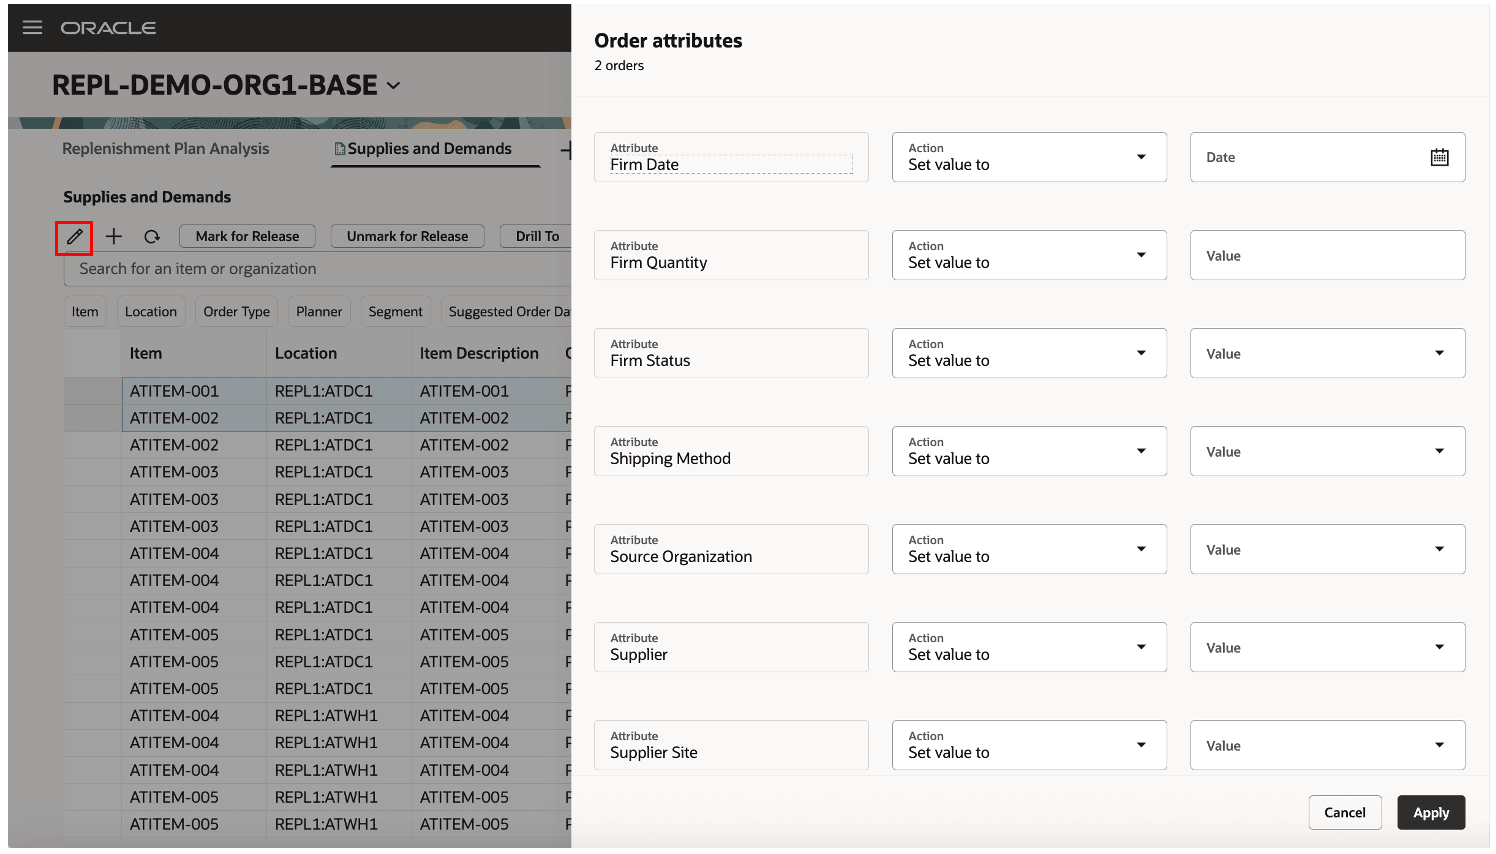
Mass Edit of Order Attributes
You must save changes to the Supplies and Demands page using the plan-level Save button. If you close the page or click Refresh, you’ll be asked whether you want to save your changes.
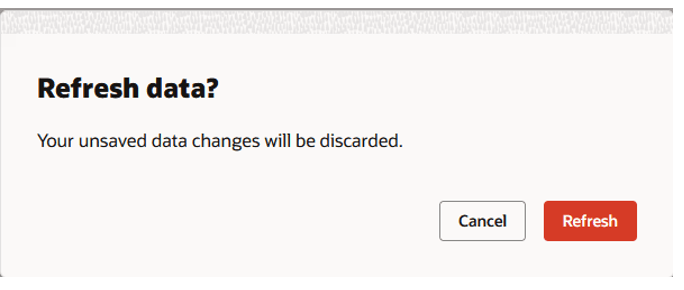
Warning Message for Refreshing Page
Creating Orders
Clicking the Add icon on the toolbar opens the New order drawer. You can create a manual demand, on-hand supply, or a planned order. Depending on the order type you select, the drawer displays the applicable fields. The drawer provides equivalent functionality to the classic Create Order dialog box. The following image shows an example of the New order drawer when the manual demand order type is selected.
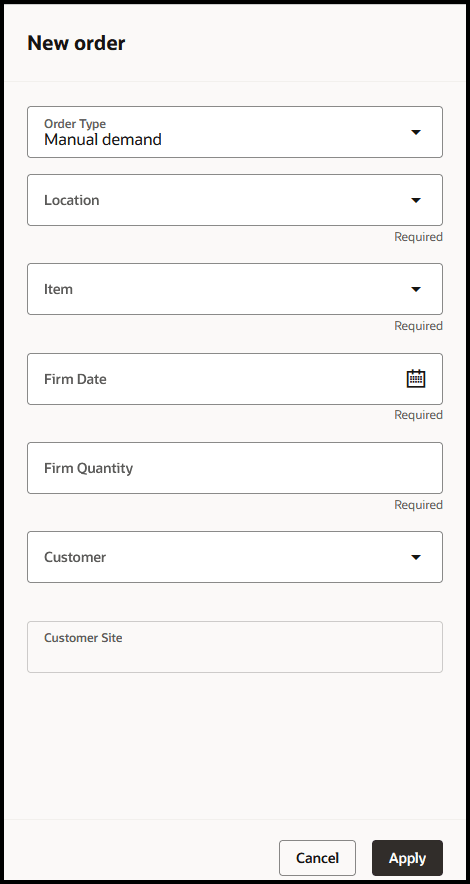
New Order Drawer
When you click Apply, the order is displayed on the Supplies and Demands page. However, the new order is a pending change until you click the plan-level Save button.
Releasing Recommendations
You can release orders that have been marked for release by selecting Release in the More Actions menu for the plan. This action submits the Release Plan scheduled process. If the Released only by user checkbox is selected on the General tab in the Supply: Advanced Options dialog box that you open from the General subtab on the Supply tab on the Plan Options page (classic), then only the recommendations that you’ve marked for release within the plan are released. If the checkbox isn’t selected, then all recommendations that have been marked for release within the plan are released.

Plan-Level Release Action
You can also access the Released only by user checkbox in the Advanced supply options step in the Redwood guided process for creating or editing your replenishment plan.
Steps to Enable
Use the Opt In UI to enable this feature. For instructions, refer to the Optional Uptake of New Features section of this document.
Offering: Supply Chain Planning
Tips And Considerations
If you want to use the Redwood: Manage Supplies and Demands in Replenishment Planning Using a New User Experience feature, then you must opt in to its parent feature: Replenishment Planning. If you’ve already opted in to this parent feature, then you don’t have to opt in again.
Follow these steps to enable or disable this feature:
- In the Setup and Maintenance work area, search for and select the Manage Administrator Profile Values task.
- On the Manage Administrator Profile Values page, search for and select the ORA_MSC_REPLENISHMENT_PLANNING_REDWOOD_ENABLED profile option code.
- In the Profile Values section, set the Site level to Yes or No. The default value is Yes.
- Yes = enables the feature
- No = disables the feature
- Click Save and Close.
Changes in the profile value will affect users the next time they sign in.
These are some tips you can use while searching and filtering:
- Entered values in the search field or applied filters on the Supplies and Demands page will override the context of any drill-to link to the page from a table or graph.
- Don’t specify a saved search as your default view if you plan to drill to the Supplies and Demands page from a table.
The saved search that’s specified as your default view will override the context of the drill-to link from the table. For example, if you select an item and location in the Replenishment Workbench and drill to the Supplies and Demands page, then any saved search that’s specified as your default view for the page will override the drill-to context.
These are some tips that you can use while working with views:
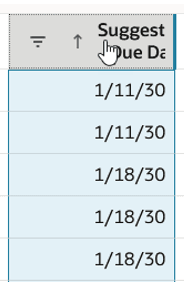
- The vertical blue bars between column headings indicate hidden columns. You can reduce the number of blue bars by positioning the hidden columns together. The following images show the before and after effects of moving columns. By moving the UOM and Suggested Due Date columns immediately after the Order Quantity column but before the hidden columns, you can place the hidden columns together between the Suggested Due Date and Firm Status columns.
![]()
Hidden Columns Before They’re Repositioned
![]()
Hidden Columns After They’re Repositioned
These are some points to remember when you move to the Redwood version of the page:
- Saved searches created in the classic Supplies and Demands page don’t show up on the Redwood version. You’ll need to recreate the searches for the Redwood page.
- Layouts created in the classic version of the Supplies and Demands page don’t show up on the Redwood version. You’ll need to recreate the layouts for the Redwood page.
Key Resources
- Visit https://redwood.oracle.com/ for more information about the Redwood experience.
Access Requirements
Users who are assigned a configured job role that contains these privileges can access this feature:
- Manage Segments (MSC_MANAGE_SEGMENTS_PRIV)
- Monitor Replenishment Planning Work Area (MSC_MONITOR_REPLENISHMENT_PLANNING_WORK_AREA_PRIV)
These privileges were available prior to this update.