Receive Recall Alerts From Oracle Content Curation Service in your Google Email Account
You can now register your Google email account to receive email communication about recalls issued by the U.S. Food and Drug Administration from the Oracle Content Curation Service. These recall notices are automatically ingested into your recall management application. Prior to this release, you were only able to register your Microsoft email account to receive these recall alerts.
When a recall notification is sent to the designated recall email address, it is automatically received and processed by the recall management application. The application scans incoming emails, parses their contents, and imports them as recall notices within the recall management application. This automated process runs on a scheduled job, ensuring that recall notices are consistently updated and accurately captured in your application.
The recalls captured from U.S. Food and Drug Administration and curated by the Oracle Content Curation Service team with the highest standard of data accuracy and reliability are communicated efficiently to your registered email address, irrespective of whether you are using Microsoft Outlook client or Google client.
Steps to enable and configure
To enable this feature, do the following:
- Identify or create a Google client email address to receive the recall notices from the Oracle Content Curation Service. If it’s necessary to create the client email, you must work with your IT team to configure this email account . Based on the FDA recall data research, the email client is estimated to receive around 8 emails a day.
- For the ESS job to ingest the recall email from the curation service, you must ensure that the Google client is set up, so that the email is accessible. Your IT team (Google Email Client Administration) will have to perform the following setups to get the Client ID, Client Secret, and Refresh token that are required to be configured during email registration.
- Create Authorization Credentials
- Navigate to the Google Cloud Console to create authorization credentials.
- Create a new Google Cloud project
- For more information about setting up a Google Cloud Project, see Google Sign-In for Websites.
- Configure the OAuth Consent page:
- Once the project is created, navigate to APIs & Services > OAuth Consent page
- Set up the consent page
- Provide App Information
- Enter the App Name and User Support Email Address in the OAuth Consent page
- Click "Next"
- Select the audience as "External" and click "Next"
- Provide Contact Information & Agree to Terms
- Provide the required contact information
- Click Next
- Agree to the Terms and Conditions
- Click Create
- Add Authorized Domains
- Navigate to the Branding section
- Add necessary authorized domains (e.g., google.com, gmail.com)
- Click Save
- Add Test Users
- Navigate to the Audience section
- Add Test Users
- Enable Gmail API
- Navigate to APIs & Services > "Enabled APIs & services"
- Click + ENABLE APIS AND SERVICES
- Search for Gmail API and enable it
- Add Gmail API Scopes
- Return to APIs & Services > "OAuth Consent Screen" -> "Data Access
- Click ADD OR REMOVE SCOPES
- Search for Gmail APISelect the required scopes (for example, Read Emails) or select all
- Click Update to add the scopes to the project
- Click Save
- Create OAuth Client ID
- Navigate to APIs & Services > Credentials
- Click + CREATE CREDENTIALS
- Select OAuth Client ID
- Choose Web application as the Application Type
- Provide a name for the Web Client
- Enter https://developers.google.com/oauthplayground as the Authorized Redirect URL
- Click Create
- A popup will display the Client ID and Client Secret. Note down these details.
- Navigate to OAuth Playground:
- Navigate to Google OAuth 2.0 Playground
- Authorize Gmail API in Playground. Under Select & authorize APIs, enter https://mail.google.com
- Configure OAuth Playground with Your Credentials:
- Click the gear icon in the top right corner
- Check the box Use your own OAuth credentials
- Enter the "OAuth Client ID" and "OAuth Client Secret" obtained in Step 10
- Click Authorize APIs
- Give your consent using your Google Account
- Exchange Authorization Code for Tokens
- The playground will generate an Authorization Code
- Click Exchange authorization code for tokens to generate a Refresh Token and Access Token
- Use the Client ID, Client Secret, Refresh Token, and User Email address to set up the registration for Recall Alerts in Fusion applications
- Create Authorization Credentials
- Complete the registration to receive email communication about recalls from the Oracle Content Curation Service and to get these recall notices automatically ingested into your recall management application.
- In the Setup and Maintenance work area, go to the following:
- Offering: Manufacturing and Supply Chain Materials Management
- Functional Area: Product Recall Management
- Task: Manage Registration to Receive Recall Alerts
- Accept the third-party service terms of use
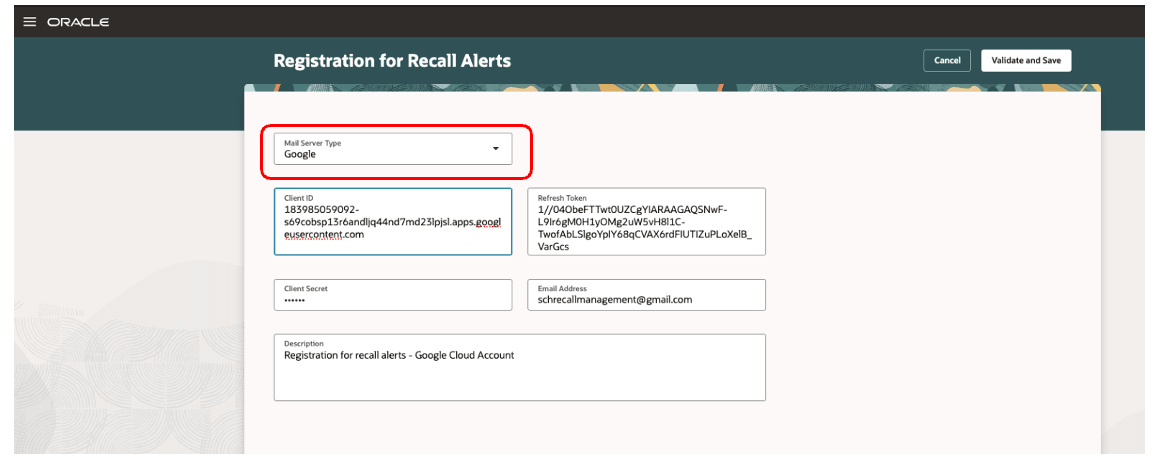
- Select the mail server type as Google
- Enter the Client ID, Refresh Token, Client Secret that you receive from your Google Administrator. The Google client details are used to retrieve the emails, parse the content and import the recall notices into the Oracle Cloud application
- Enter the Google email address to which the recall alerts will be sent
- Click Validate and Save
- In the Setup and Maintenance work area, go to the following:
Google Email Registration
Key resources
- Oracle Supply Chain Management guide, Implementing Product Recall Management guide, available on the Oracle Help Center.
Access requirements
Users who are assigned with configured job role that contains the following privileges can access this feature:
- Manage Product Recall Parameters (ENQ_MANAGE_PRODUCT_RECALL_PARAMETERS)
This privilege was available prior to this update.