Redwood: Use Order Management's Redesigned Landing Page
Use the redesigned Order Management landing page as the starting point to manage your sales orders. Get a summary of the orders that you recently created, submitted, or need your attention. Modify the page to meet your needs. This redesigned page is similar to the classic Overview page.
Realize these benefits:
- Use a personalized, efficient, intuitive experience to track and monitor sales orders.
- Monitor and manage sales orders across business units that you recently worked on.
- Configure the page to add performance measures that are relevant for your business.
- Navigate quickly to important tasks, such as to create or search for a sales order, or to monitor exceptions.
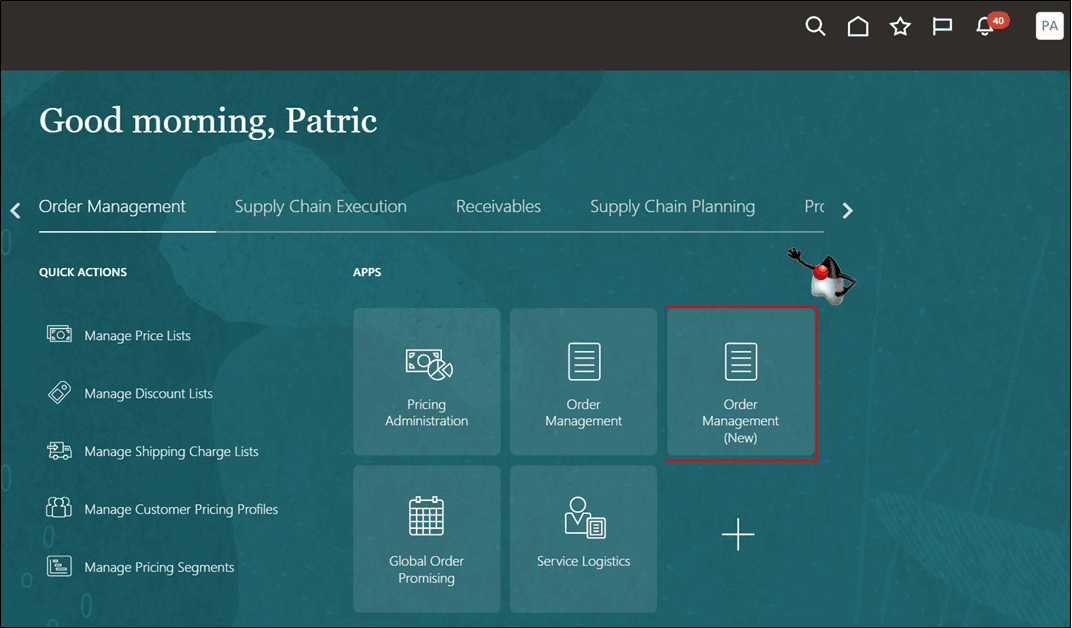
To get started, go to your home page, then click Order Management > Order Management (New):
The landing page comes with two predefined performance measures that you might find useful. Let's start with My Orders:
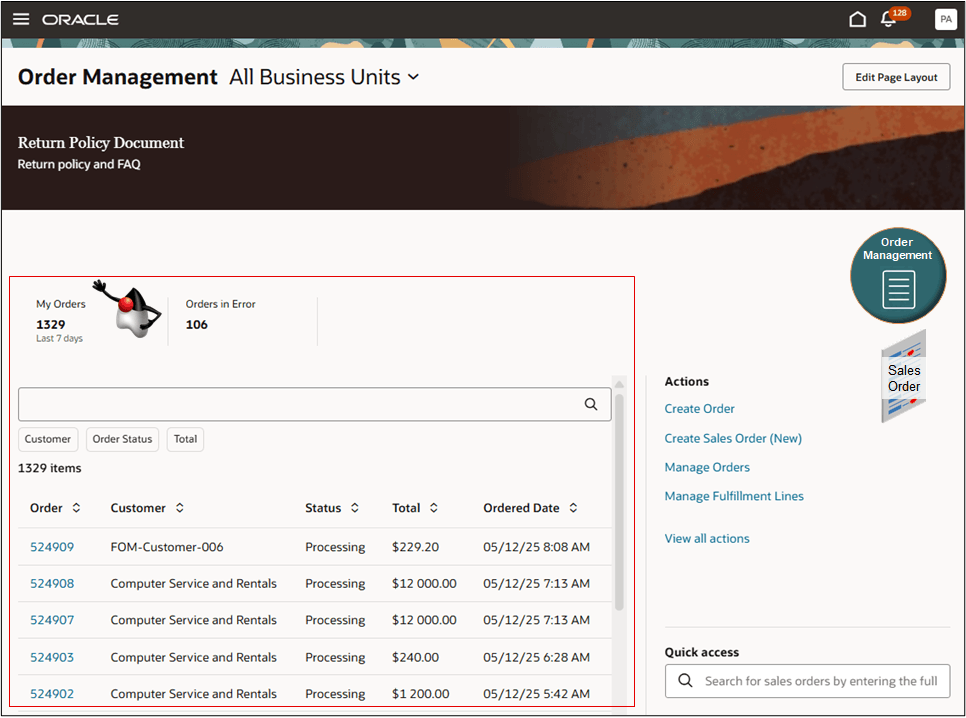
NOTE:
- View sales orders that are open and that you created, submitted, are the primary salesperson, or the order representative.
- Quickly view orders that you created in the last 7 days and that aren't closed or cancelled without having to search for them.
- View details, such as the order number, customer, status, total, and ordered date.
- Click an order number to go to the sales order.
Click Orders in Error, then examine the details:
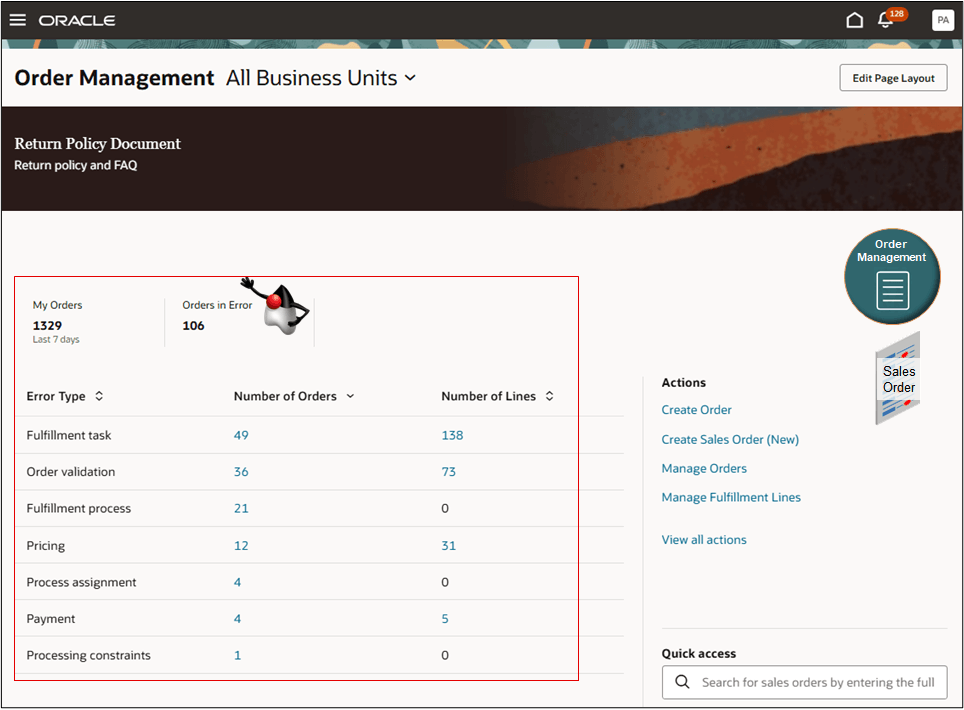
NOTE:
- View sales orders that are in error, open, and that you created, submitted, are the primary salesperson, or the order representative.
- Quickly identify orders that need your immediate attention.
- Click a link in the Number of Orders column, then view them on the Sales Order page.
- Click a link in the Number of Lines column, then view them on the Sales Order Lines page.
Click an action in the Actions section to go to a task:
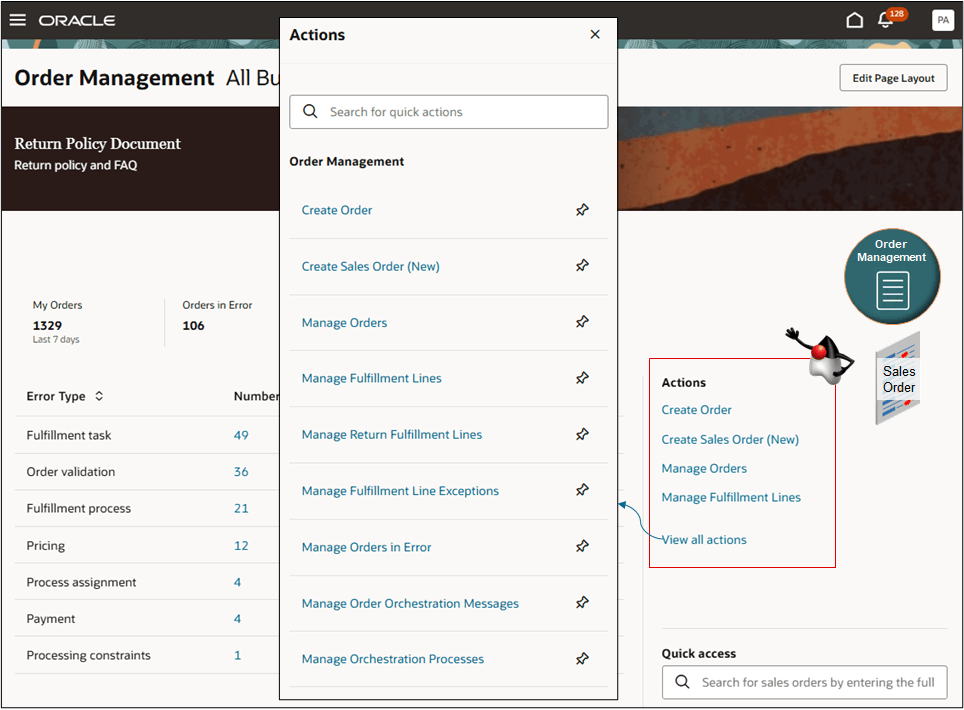
NOTE:
- You can do a variety of tasks, such as create a new sales order.
- View up to 4 tasks directly on the page.
- If you have access to more than 4 tasks, then click View All Actions.
- Use the pin to pin a link directly on the page.
- The actions that you can see depend on your privileges.
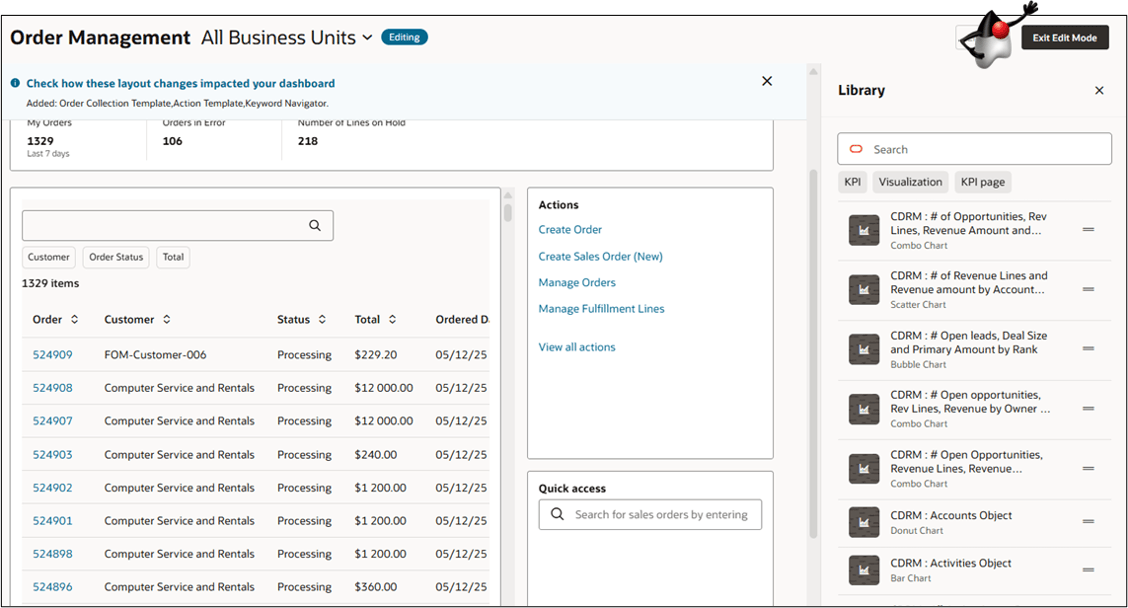
Edit the Landing Page
Click Edit Page Layout. You can add performance measures and visualizations that reflect your business needs and help you monitor metrics:
You can add your own performance measures and visualizations to meet your specific requirements. Assume you need to track the number of order lines that are on hold. You will create this analysis:
Try it:
- Go to the Reports and Analytics work area, then click Browse Catalog.
- On the Catalog page, click Create > Analysis.
- In the Select Subject Area dialog, click Order Management - Order Holds Real Time.
- On the Untitled page, click Save As, then give your report a name, such as Count of Active Holds.
- Expand the Hold Name folder, then notice that there's a Hold Name column inside the Hold Name folder. Drag the Hold Name column to the Selected Columns section.
- Expand the Holds Details folder, then drag the Doo Fulfill Line Id column to the Selected Columns section.
- Click the gear icon on the Doo Fulfill Line Id column in the Selected Columns section, then click Edit Formula.
- In the Edit Formula dialog, set these values:
Attribute Value Custom Headings Enabled Column Heading Count of order lines Column Formula COUNT("Holds Details"."Doo Fulfill Line Id") - Click OK > Save Analysis.
- In the Filters section, click the funnel icon, then click More Columns.
- In the Select Column dialog, expand Holds Details, then click Active Flag > OK.
- In the New Filter dialog, create this filter, then click OK:
Active Flag is equal to / is in Yes - Click Save Analysis, click Results, then verify that the results display order lines that are on hold according to hold type.
For background, see Use Reports and Analytics with Order Management.
Set up your visualization:
- Go to the Visualization Configurations page, then click Add. Use this address to get there:
https://server_address/fscmUI/redwood/cx-analytics/application/container/dvconfig - On the Create Configuration page, set this attribute:
Attribute
Value
Source Type
OTBI Analysis
- In the field next to the folder icon, enter Count of Active Holds.
- Modify the visualization to meet your requirements. For example, select a visualization type, and display or hide columns.
- If all looks good, set the status to Active, then click Create.
- As an option, create another visualization, but set the Visualization Type to Metric Card. You can use it on the landing page.
Add your visualization to the landing page:
- Go to your home page, then click Order Management > Order Management (New).
- Click Edit Page.
- In the Library section, search for the:
- Performance measure, then drag and drop it onto the landing page.
- Visualization that you created, then drag and drop it onto the landing page.
- Click Exit Edit Mode.
You typically add a performance measure near the top of the layout and its visualization below the measure. For example, create a metric card visualization that represents the Lines on Hold measure, then add a pie chart below the measure to illustrate the lines according to hold type.
Business Unit
Use the business unit's drop down to filter sales orders according to business unit. If you have access to more than one business unit, then the page displays sales order for all business units and you can access all of your sales orders.
Quick Access
Use the Quick Access section to go directly to a sales order. Use it when you need to go to an order that doesn't display in the My Orders section. For example, My Orders only displays orders that you created in the last 7 days. Use Quick Access to search for a sales order regardless of when you created it.
Guided Journey
Use a guided journey to display useful details, such as policy documents and FAQs that can help you manage your supply chain operations. See Create Guided Journeys for FAQs in Order Management.
Here's the demo of these capabilities:
Steps to enable and configure
Set up Order Management’s Landing Page
You must opt into the Redwood: Search and Apply Actions on Multiple Sales Orders feature. If you already opted, you don't need to opt in again.
Set Up the Index
- Start at your home page, then click Order Management > Show More > Index Management for Sales Orders.
- Click Sales Order.
- On the Sales Order - Configure Index page, sort the Attribute column in ascending order, then verify that the index has these attributes:
Alerts
Business Unit Name
Canceled
Created By
Creation Date
Message Request Area
Message Type
Open
Order Representative
Primary Salesperson
Submitted By
Submitted On
- If any attributes are missing, then add them and click Save > Rebuild. Notice the message, such as Process submitted Job: 237741. If necessary, you can go to the Scheduled Processes work area and monitor the progress.
- Click Cancel, then click Sales Order Line.
- Use the Sales Order Line page and verify that the index has these attributes:
Alerts
Business Unit
Canceled
Created By
Message Request Area
Message Type
Open
Order Representative
Primary Salesperson
Submitted By
If attributes are missing and you don't add them, then you might encounter an error on the landing page that's similar to:
We can't load data on this page yet. This page uses indexes that are missing some or all required attributes. To complete the setup for the sales order or order line index, follow the steps outlined in Set Up Order Management's Landing Page on Oracle Help Center.
If you have the privileges that you need to add attributes to the index, then the message will include a link that you can click to go to the Index Management page and rebuild the index.
Set Up Your Search Views
- Start at your home page, then click Order Management > Show More > Search Views for Sales Orders.
- On the Search Views page, click the Application filter, click Order Management, then notice that two search views come predefined as enabled and as the default.
- Click Sales Orders Search View.
- On the Sales Orders Search View page, click Filters, then make sure the Enabled attribute and the Show attribute each contain a check mark for these attributes:
Attribute Name Hierarchy Filter type Business Unit Header.BusinessUnit.BusinessUnitId Dynamic facet Message Type Messages.MessageType Dynamic facet Message Request Area Messages.RequestFunction.RequestFunction Dynamic facet Alerts Messages.ActiveMessages Switch My Orders Header.CreatedBy Switch Click Save and Close.
- On the Search Views page, click Sales Order Lines Search View, then repeat these steps to add the attributes to the order line.
If you don't add the attributes, then you might encounter a warning on the landing page that's similar to:
We found an incomplete setup that's needed for the Orders in Error KPI. The results for the Orders in Error KPI may include errors that aren't in the category you selected because some or all required attributes are missing from the sales order or sales order line search views. To set up the search views, follow the steps outlined in the Set Up Order Management's Landing Page topic on Oracle Help Center.
If you have the privileges that you need to set up search, then the message will include a link that you can click to go to the Search Views page and set up the search.
Tips and considerations
- Your data security rules determine what you can see on the landing page. Assume you create a sales order on July 1. On July 5 you create a new data security rule that limits access to that order. On July 10 you can't view the order any more.
- You can’t use Edit Page Layout to remove a predefined performance measure.
- You must enter the entire order number when you search through quick access. You can't do a keyword search in quick access.
- Visualizations aren’t interactive on the landing page. You can view the data in various formats, but you can’t drill down into a visualization.
- If you add your own performance measure and visualization, then the landing page will display that measure, by default.
Key resources
- For details about how to add your own key performance indicators (KPIs) and visualizations to your page, see: Flexible Reporting in Redwood Dashboards.
- Additional resources:
Access requirements
Users who are assigned a configured job role that contains this existing privilege can access the landing page:
- View Orders (FOM_VIEW_ORDERS_PRIV)
Users who are assigned a configured job role that contains this new privilege can add performance measures and visualizations:
- Edit Order Management Landing Page Layout (FOM_EDIT_ORDER_MANAGEMENT_LANDING_PAGE_LAYOUT)
Users who are assigned a configured job role that contains these existing privileges can add performance measures through Reports and Analytics and can add visualizations to the Visualization Configurations page:
- View Data Visualization Configuration (ZCA_VIEW_DATA_VISUALIZATION_CONFIGURATION_PRIV)
- Manage Data Visualization Configuration (ZCA_MANAGE_DATA_VISUALIZATION_CONFIGURATION_PRIV)
- SVC_VIEW_SERVICE_MANAGER_DASHBOARD_PRIV
- SVC_VIEW_SERVICE_REPRESENTATIVE_DASHBOARD_PRIV
- SVC_VIEW_HR_SERVICE_REPRESENTATIVE_DASHBOARD_PRIV
- SVC_VIEW_HR_SERVICE_MANAGER_DASHBOARD_PRIV
- SVC_VIEW_ISR_SERVICE_REPRESENTATIVE_DASHBOARD_PRIV
- SVC_VIEW_ISR_SERVICE_MANAGER_DASHBOARD_PRIV