Redwood: Get Advance Payments for Sales Orders
Receive part of or the entire payment from each of your customers when they place a sales order instead of waiting until after fulfillment. Get paid before you ship and fulfill the item. Send an invoice after you finish fulfillment, and it will include the advance payment and any remaining balance.
Get and save the amount that your customer pays when you create a sales order in the Order Management work area. Order Management will create an advance, process it, then create a receipt for that payment. As an option, you can wait to receive the receipt's clearance before you fulfill the item. Order Management will then automatically process the lines, fulfill the item, send billing details to Oracle Receivables, and Receivables will apply the receipt to the invoice. If there's any remaining balance, Receivables will bill it to your customer.
Use this feature to help avoid the manual work that happens when your user in Order Management must communicate with a user in Receivables to manage the payment as its own receipt in Receivables, and when the user in Receivables must manually apply the receipt to the invoice.
Try It
Create a sales order, then add an order line:
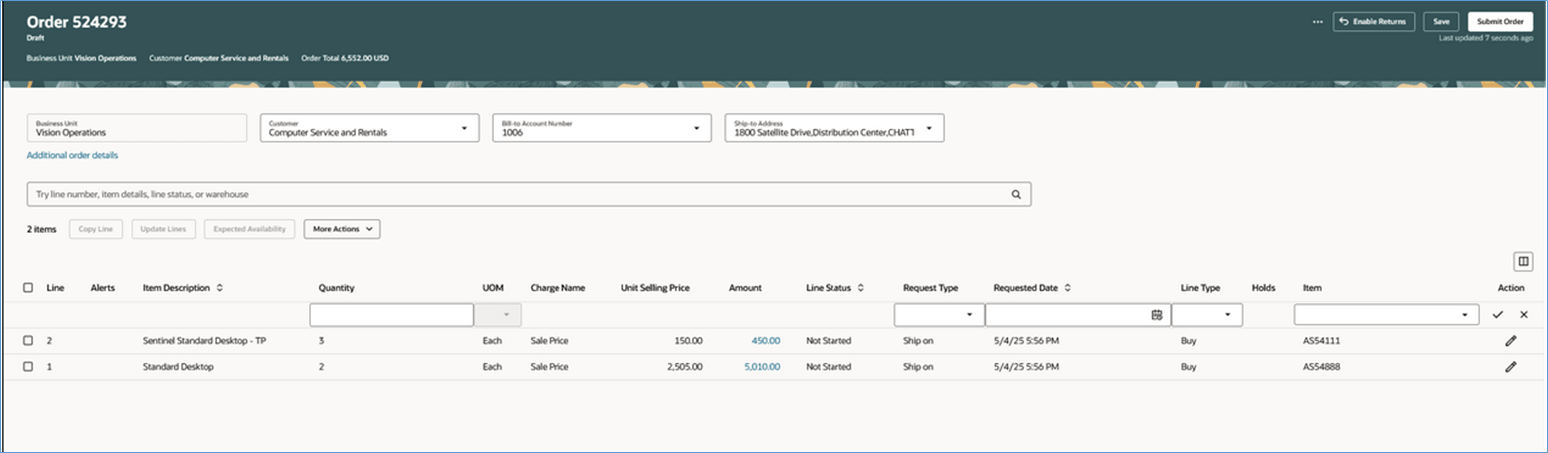
Save the sales order, then click Payments:
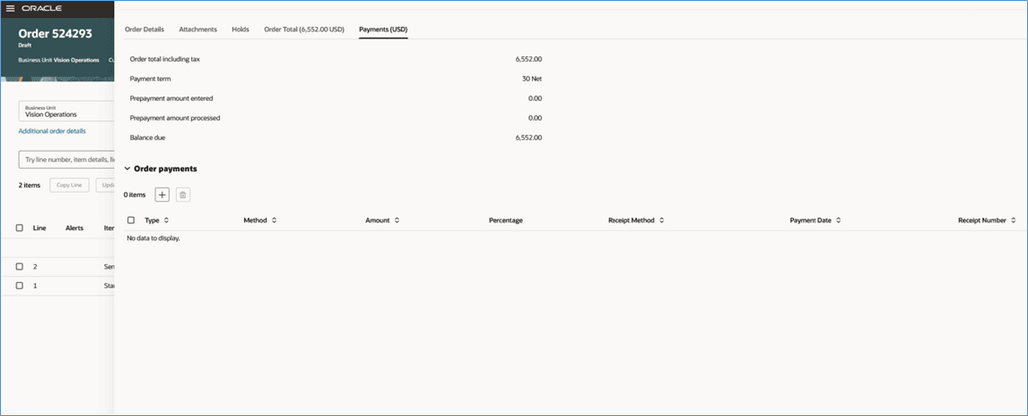
Here are the details:
|
Attribute |
Value |
|
Order Total Including Tax |
6552.00 |
|
Payment Term |
30 Net This value comes from the order header. |
|
Prepayment Amount Entered |
0 Starts as 0, and then displays the running total of payments that you enter in the Order Payments section. This attribute displays the value before Receivables creates the receipt for the payment. The value in Prepayment Amount Entered can't exceed the value in Order Total Including Tax. |
|
Prepayment Amount Processed |
0 Same as Prepayment Amount Entered, except this attribute displays the value after Receivables creates the receipt for the payment. |
|
Balance Due |
6552 It's the Order Total Including Tax which is 6552, minus Prepayment Amount Processed of 0. |
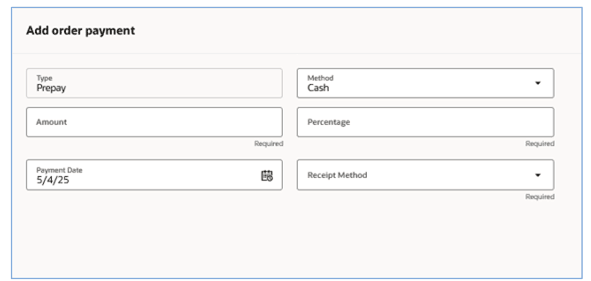
Click the plus (+) under Order Payments to add your payment. Assume you add a 10% payment:
Notice:
|
Attribute |
Value |
|
Type |
Prepay This is the default value. You can't modify it. |
|
Method |
Cash You can also use Check for the method. |
|
Amount |
655.20 If you set this attribute, then Order Management calculates Percentage as Amount divided by Order Total Including Tax. Percentage is up to 2 decimals, and can't be greater than 100. |
|
Percentage |
10% If you set this attribute, then Order Management calculates Amount as Amount Percentage multiplied by Order Total Including Tax divided by 100. Rounds to precision according to the header's currency. Amount can't be greater than Order Total Including Tax. |
|
Receipt Method |
CASH You must set a value. |
|
Payment Date |
5/4/25 Defaults to system date. You can modify it. Order Management sends this date to Receivables, and Receivables uses it when it creates the receipt for this payment. Payment Date can be in the past or future, but it can't be earlier than the header's date. |
Click Add then examine the values:
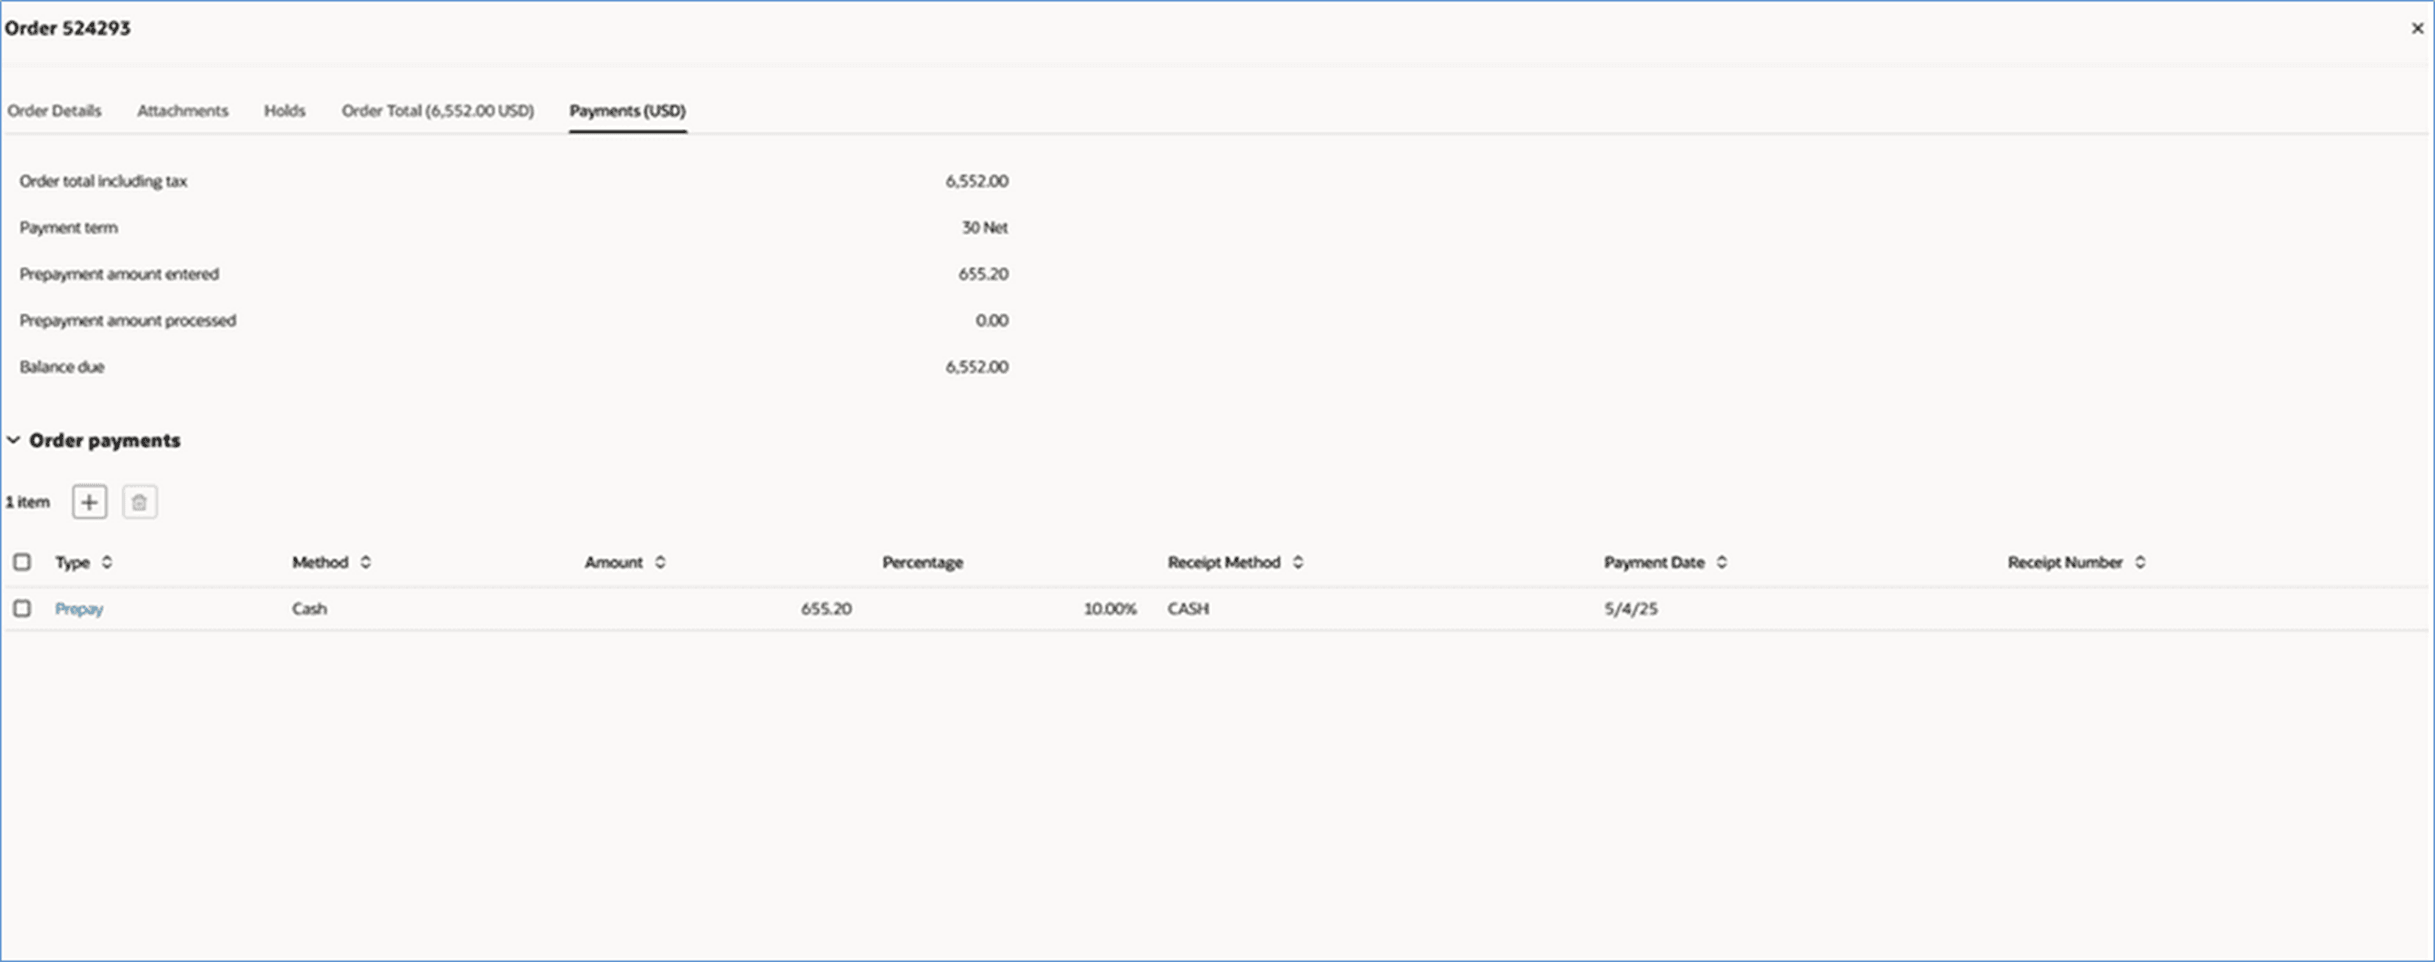
Notice:
|
Attribute |
Value |
|
Prepayment Amount Entered |
655.20 Contains the payment that you entered. |
|
Balance Due |
6552 It's the 6552 in Order Total Including Tax minus the 0 in Prepayment Amount Processed. |
|
Type |
Prepay Click this link to edit the values that you already entered. |
|
Method |
Cash |
|
Amount |
655.20. |
|
Percentage |
10% |
|
Receipt Method |
CASH |
|
Payment Date |
5/4/25 |
|
Receipt Number |
Empty because Receivables hasn't processed the payment. |
Add another early payment but this time set the Method attribute to Check:
|
Attribute |
Value |
|
Type |
Prepay |
|
Method |
Check |
|
Amount |
982.80 |
|
Percentage |
15% |
|
Receipt Method |
Check You must set a value for this attribute. |
|
Check Number |
12345 If you use the check method, then you must enter a check number. Receivables uses this number for its receipt number. |
| Payment Date | 5/4/25 |
You have entered both early payments and saved them on the sales order, but Order Management won't process them until you submit the order. Submit the order, then notice the revised attribute values:
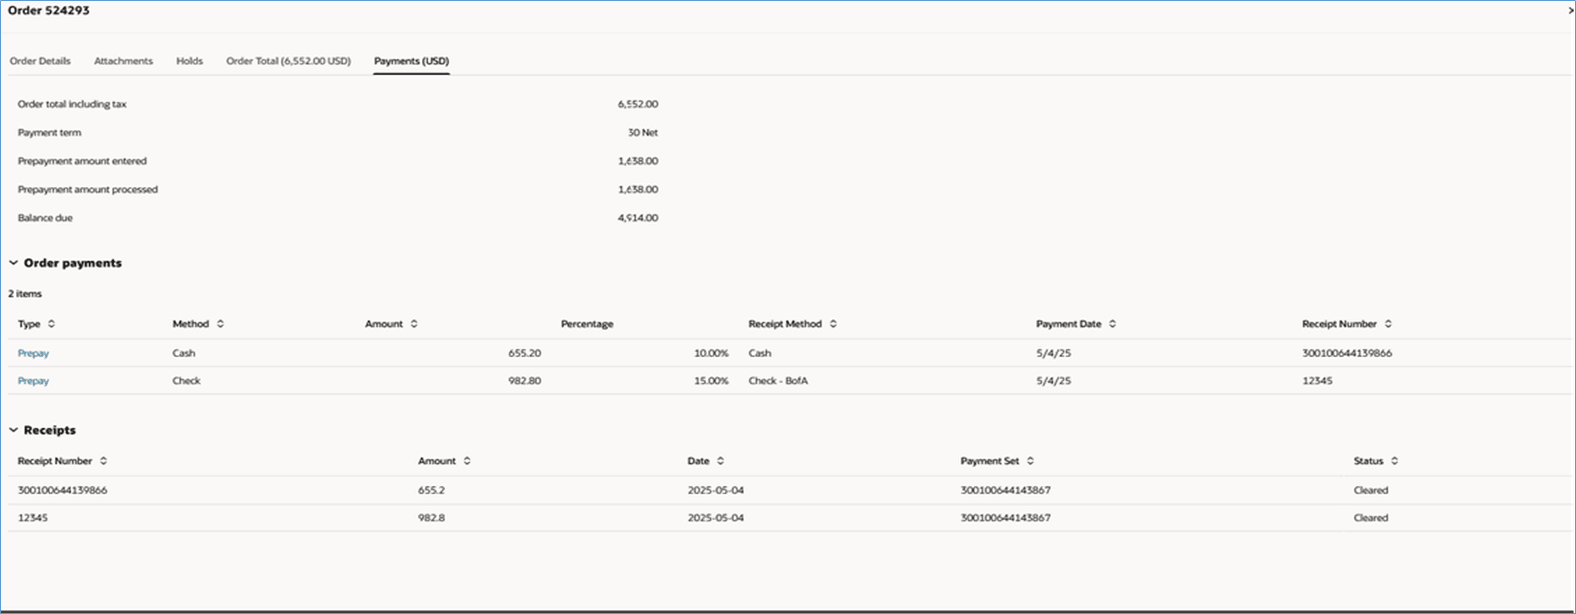
Notice:
- The value in the Receipt Number attribute in the Order Payments section are the receipts that Receivables created for the early payment that pays for the sales order.
- The Receipts section displays the same values as the the Order Payments section unless Receivables changed something, such as reducing the amount after processing an early payment. This section also displays the amount, date, payment set, and receipt status.
- If your sales order has more than one early payment, then it will have different receipt numbers but the payment set will have the same value for all of the order's receipts.
- Order Management sends the Payment Set to Receivables for billing after it fulfills all of the order lines.
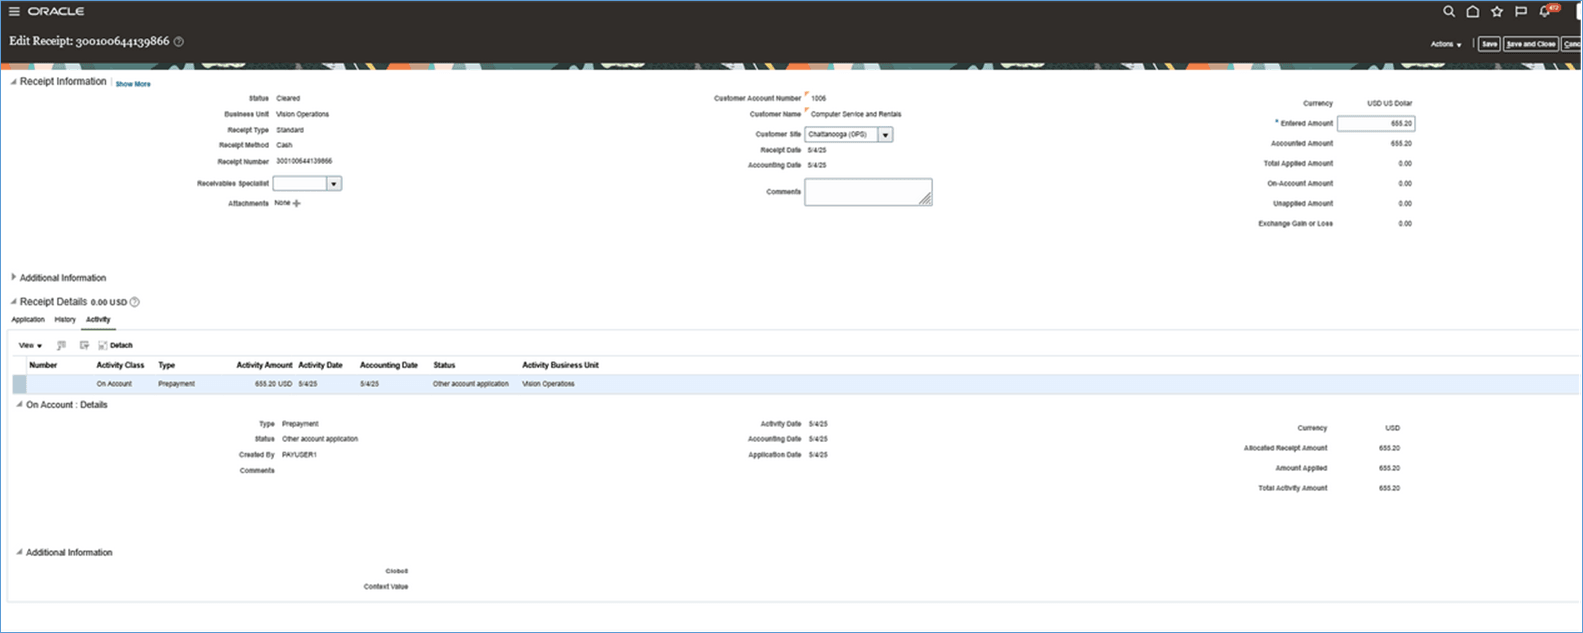
Go to Oracle Receivables and examine the payment's receipt that uses the cash method:
Now examine the main receipt for the payment that uses the check method:

View the Receipt's Status
Run the Import AutoInvoice scheduled process, then view the invoice:
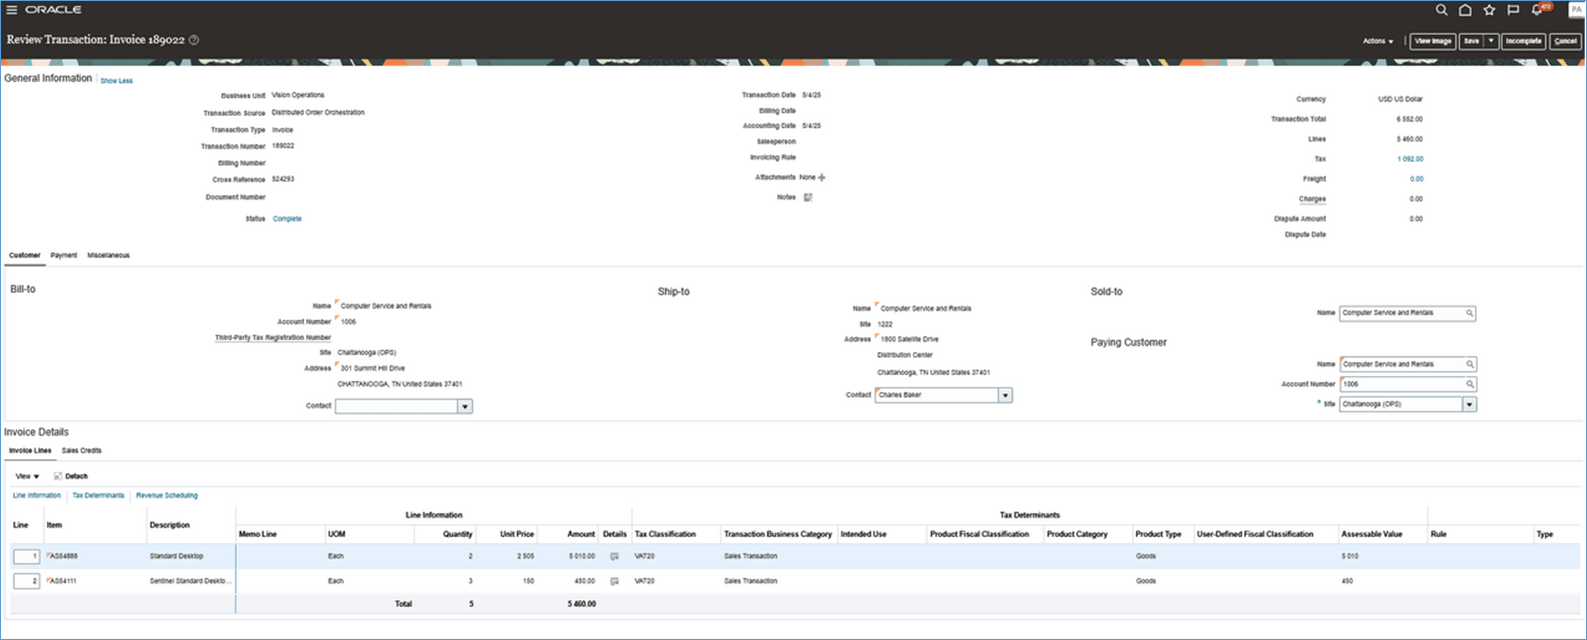
Notice that the invoice doesn't have the payment's receipt. The Receipts row contains 0:
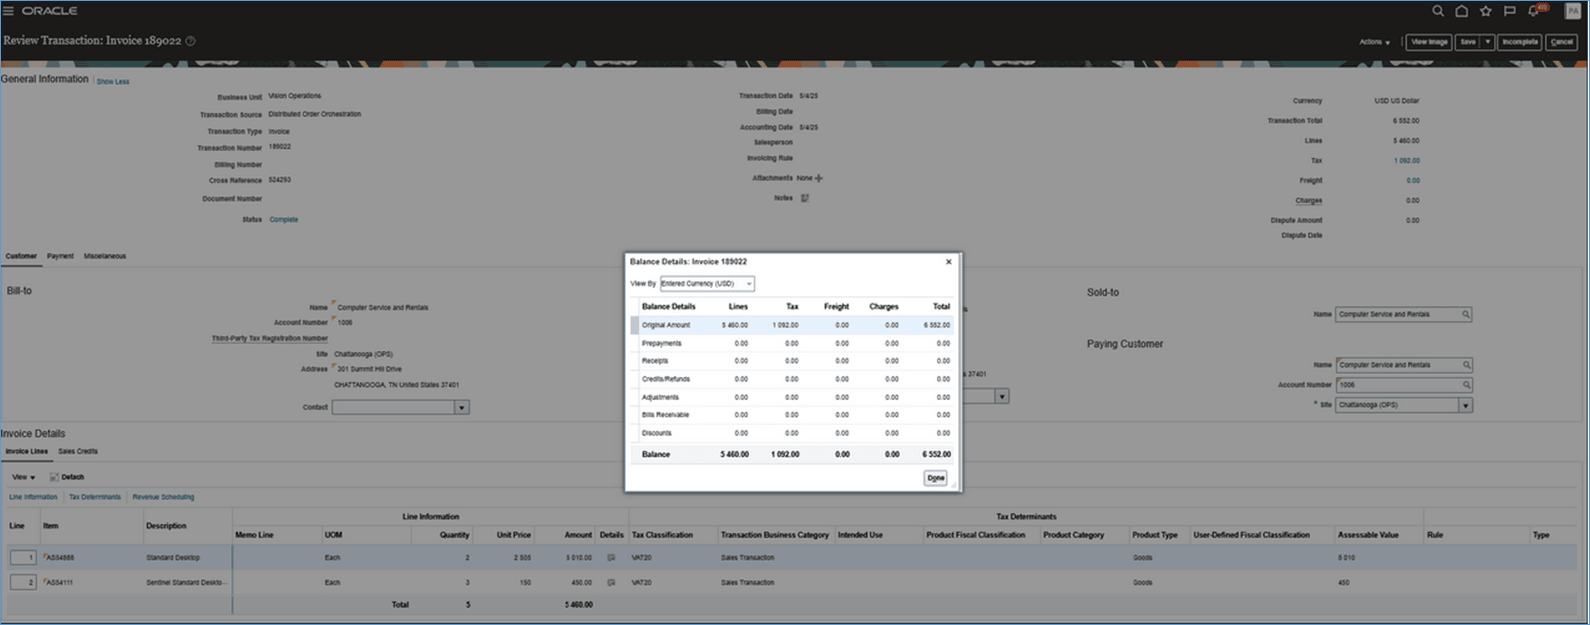
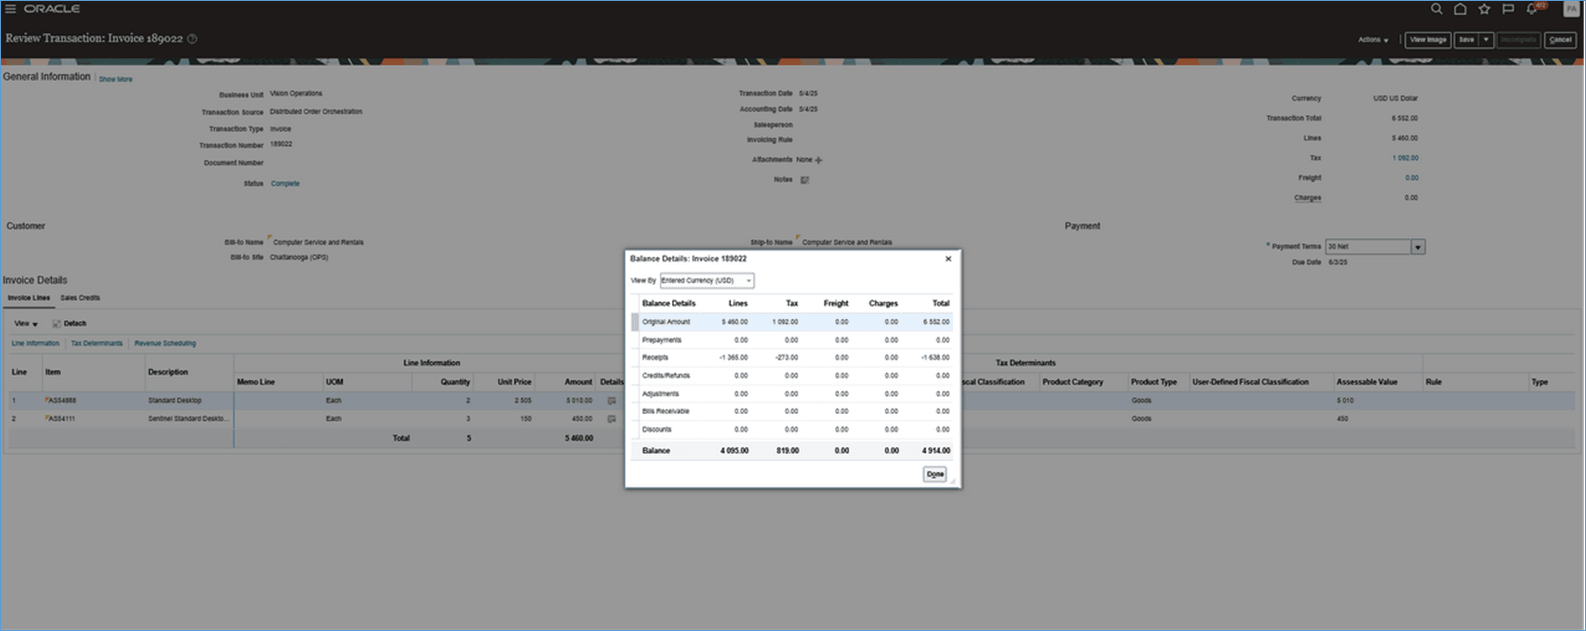
Run the Match Prepayments scheduled process, then notice that the invoice now has the payment. The Balance Details dialog displays a $6552 amount, the total receipt's amount is $1638 for the 2 receipts, and the invoice balance that's due from your customer is $4914:
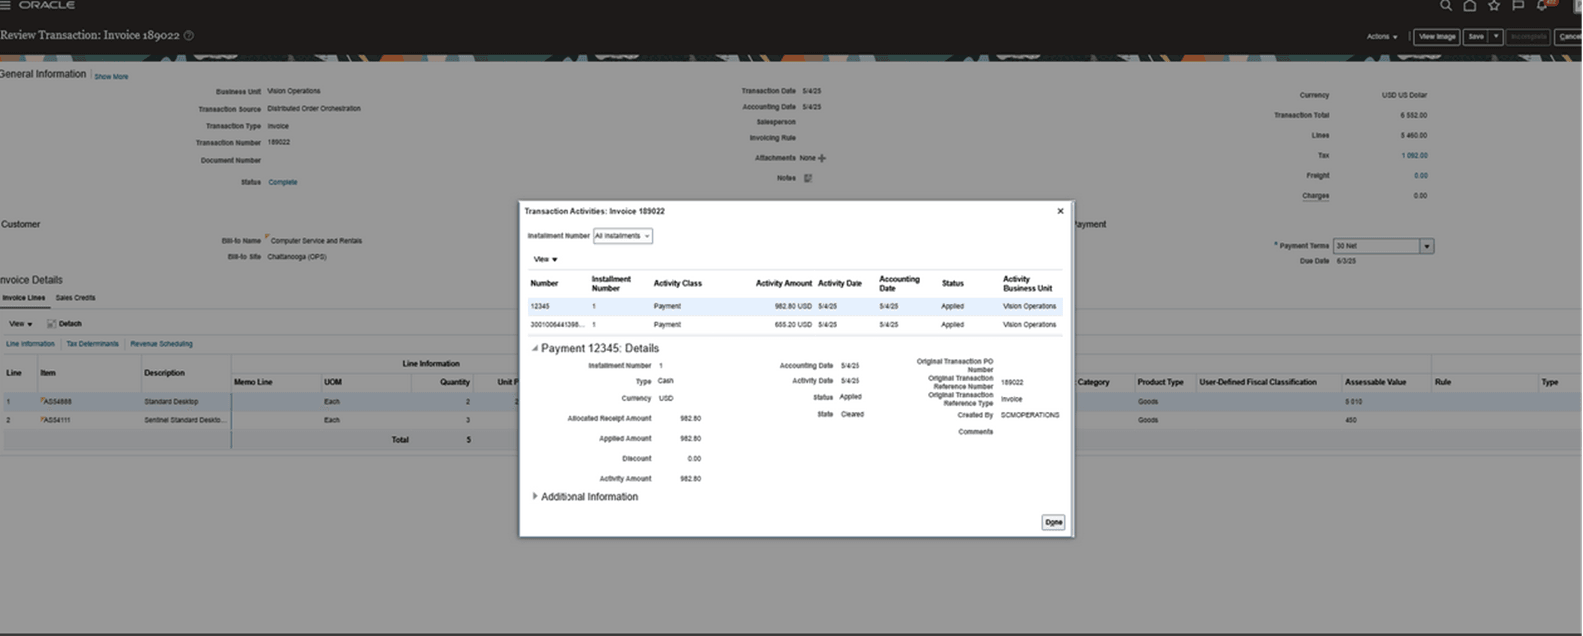
The Transaction Activities dialog indicates that receipt 12345 for the payment has an amount of $982.80 that Receivables applied to the invoice, and the receipt's status is Cleared:
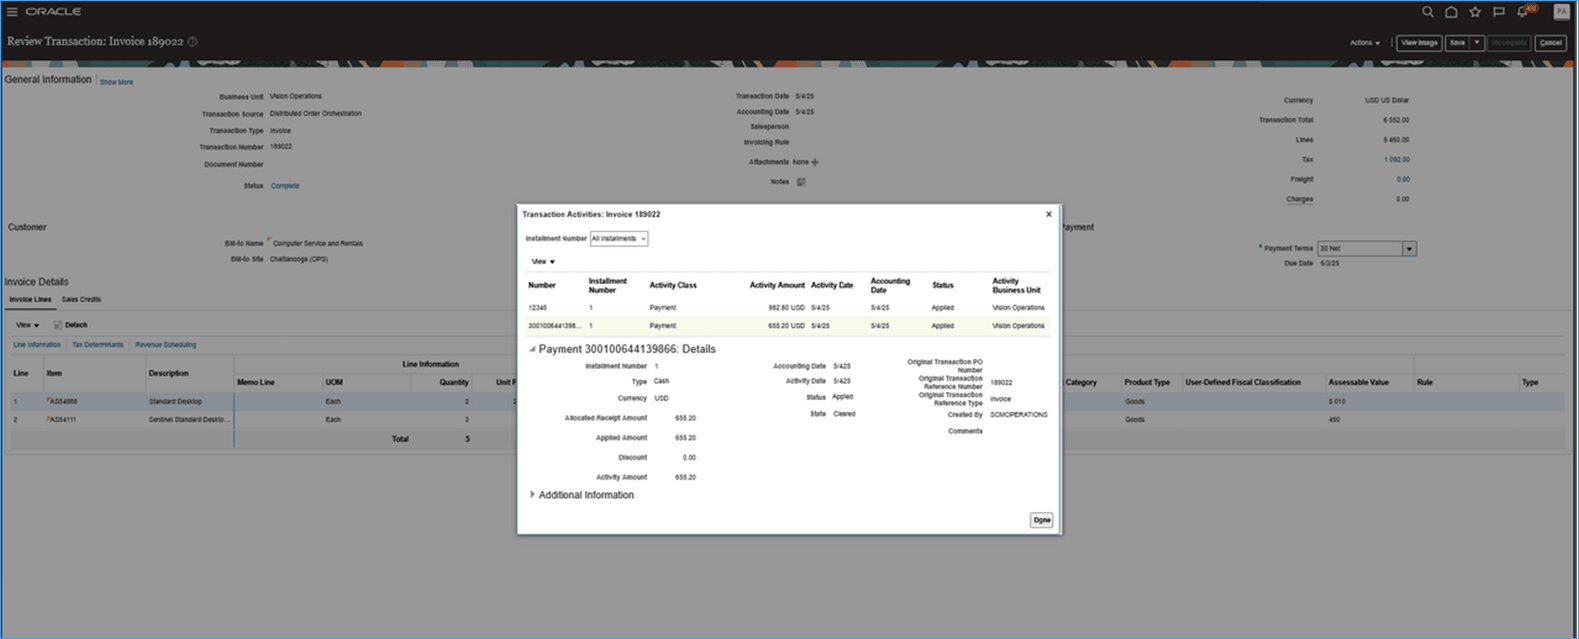
Receipt 300100644139866 for the cash payment has a $655.20 amount, is in Cleared status, and billing applied that amount to the invoice:
Revise Your Payment
You have different options when you revise your payment.
|
Action You Attempt to Take |
Original Payment's Receipt Status |
What Billing Does |
|
Increase the payment's amount. |
Can be any status |
Rejects the change. You can't increase the amount. Instead, you can add a new payment. |
|
Reduce the payment's amount. |
Confirmed |
Reverses the original receipt, then creates a new receipt that has the same receipt number for the revised amount in the Confirmed status. |
|
Cancel the order. |
Confirmed |
Reverses the original receipt. |
|
Reduce the payment's amount. |
Cleared |
Creates a refund request that has the original amount minus the reduced amount. It doesn't modify the amount or status on the original receipt. |
|
Cancel the order. |
Cleared |
Creates a refund request for the amount on the original receipt. It doesn't modify the amount or status on the original receipt. |
|
Delete the payment. |
Can be any status |
Rejects the change. You can't delete it. Instead, you can reduce the payment's amount to 0. |
Steps to enable and configure
You don't need to do anything in Oracle Order Management to enable this feature. However, you do need to do some setup for Oracle Receivables:
- Make sure you have set up Receivables so it can create and process standard receipts.
- Go Home > Setup and Maintenance > Search > Manage Receivables Activities.
- Click Create, then set the values:
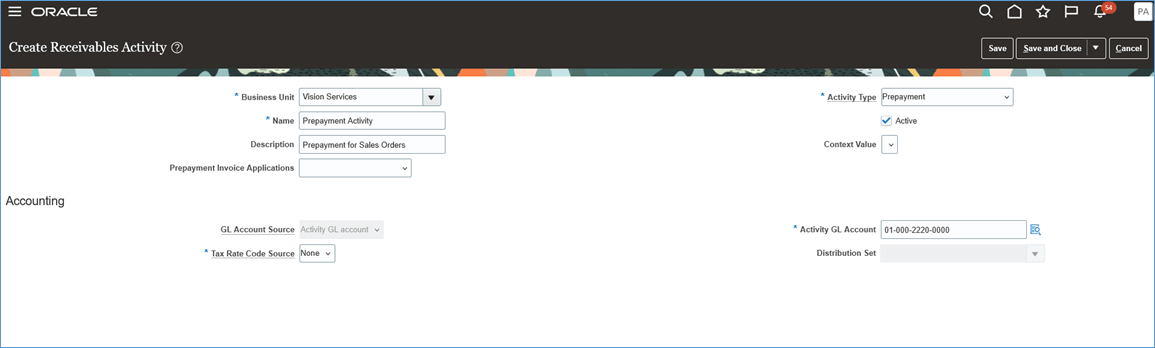
- You must set the Activity Type attribute to Prepayment. Set the other attributes to meet your needs.
- Each business unit can have only one receivables activity with its Activity Type attribute set to Prepayment and the Active option enabled.
- Click Save and Close.
You can process a refund request on a prepayment receipt that's already cleared. For example, you cancel a sales order but you already collected the prepayment. Click Create again:
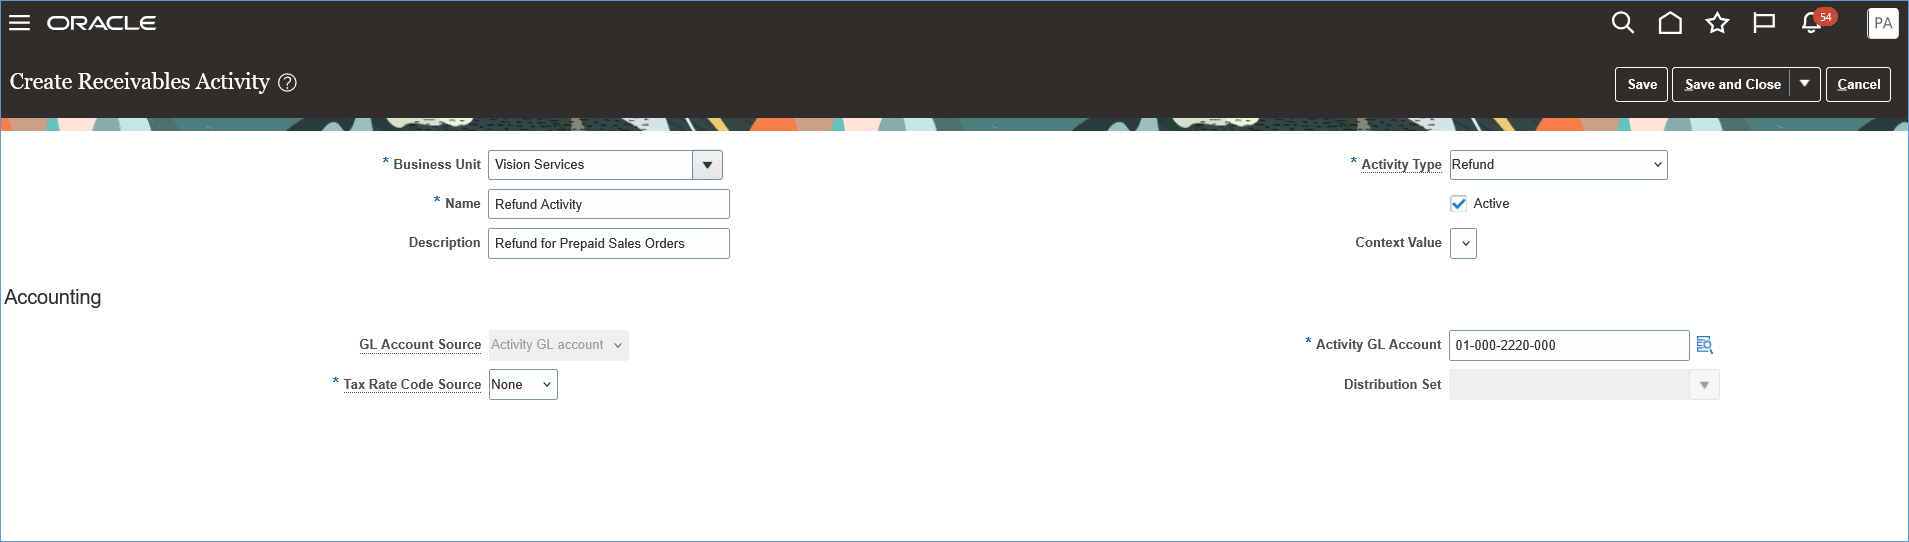
- You must set the Activity Type attribute to Refund. Set the other attributes to meet your needs.
- Each business unit can have only one receivables activity with its Activity Type attribute set to Refund and the Active option enabled.
Get a Refund
If you need to cancel the sales order or lower the payment amount when it's already in Cleared status, then you must use the Manage Approval Limits task in the Setup and Maintenance work area to create a refund request for that payment. Set these attributes when you use the task:
|
Attribute |
Value |
|
Document Type |
Credit Memo Refund |
|
Currency |
Minimum and Maximum Amounts |
Optional Setup
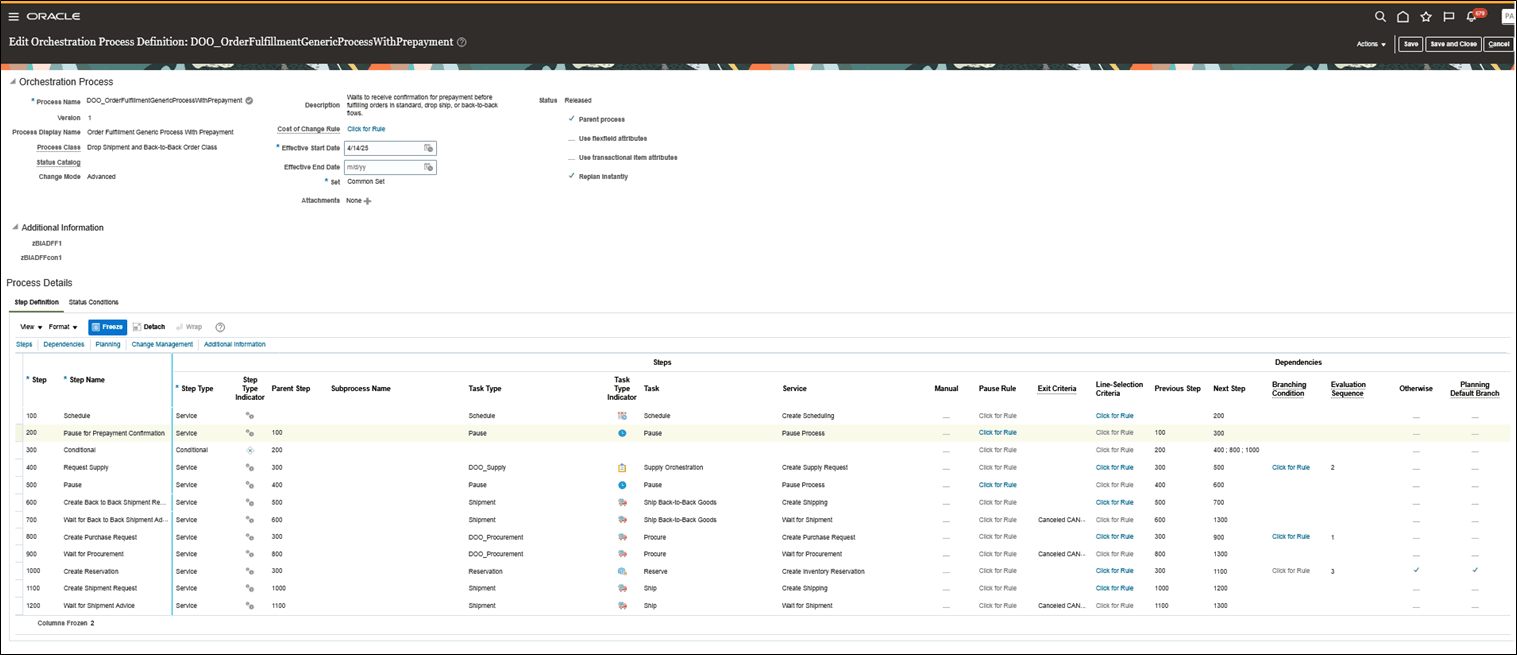
If you need to clear your payment before you reserve or interface the order line to shipping, then you must add the Pause for Prepayment Confirmation pause step to your orchestration process. The predefined DOO_OrderFulfillmentGenericProcessWithPrepayment process has this step:
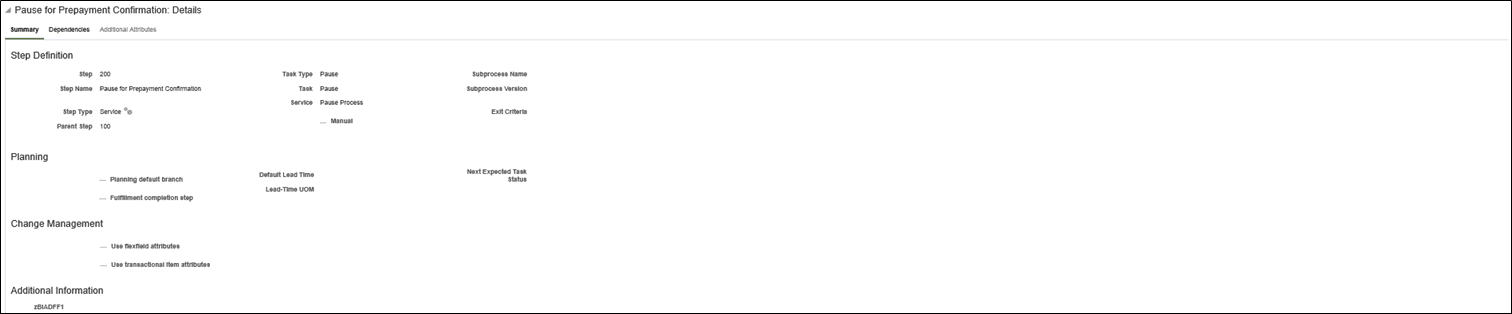
Here are the details:
The step's rule:
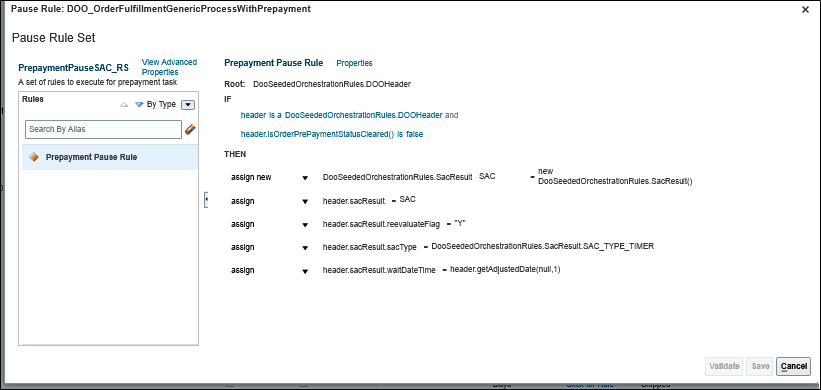
The retry interval in the rule comes predefined to retry one time each day. You can modify it to meet your needs. As an option, you can also set the Number of Times to Retry Pause order management parameter.
Tips and considerations
- You can use this feature only on Order Management's redesigned pages. You can't use it on the classic pages.
- If you revise a sales order, then Order Management doesn't modify the order total. If the total increases, then you can add a new payment. If it decreases, you can lower the existing amount.
- The receipt's currency must match the sales order's currency.
- Order Management doesn't send the exchange rate, exchange type, or exchange date to Receivables when it creates the receipt.
- If you want to skip credit check for a prepaid order, then you must use an order management extension to implement this logic.
- If you use the check method, then Order Management sets the receipt number to the check number. The check number can be alphanumeric.
Early Payments
- You can create an early payment, lower the payment's amount after you already processed it, or refund the payment when you cancel the sales order.
- You can use your payment only on the sales order. You can't use one on the order line.
- You can use a payment only with cash or check. You can't use it with a credit card, electronic funds transfer, or direct debit.
- The payment's amount can't exceed the sum of the order total plus tax.
- You can't delete or increase the payment after Order Management processes it.
- The payment date is the receipt date and it can be a date in the past, the current date, or a future date.
- The payment date can't happen before the order date.
- Order Management doesn't send the Payment Set ID to Receivables for a return line.
- The Copy Order action doesn't copy the payment from the original order to the new order.
FBDI and REST API
You can include a payment in your FBDI or REST API payload. For example:
"PaymentTypeCode": "ORA_CASH"
"PaymentMethodCode": 1002 (This is the Receipt Method Id)
"PaymentModeCode": "ORA_PREPAY"
"PrepaidAmount": 2000
"PaymentDate": "2025-06-30"
"CheckNumber": 12345 (This is required for CHECK only)
Troubleshoot
|
Trouble |
Shoot |
|
I enter the payment details on the sales order and submit it, but get an error message: Sales order couldn't be submitted. Prepayment processing for the order didn't complete. Here's why: You must enter a valid receipt method ID. Ensure the prepayment data is valid and try again. |
Make sure your set up on the Manage Receivables Activities task for the Prepayment activity type correctly supports the sales order's business unit. |
|
I submit the sales order and Oracle Receivables creates the payment receipt, but I don't see any data under Receipt on the sales order's Payments tab. |
Create and assign the data security policies for the sales order's business unit. See the Access Requirements section, below. |
Key resources
- Overview of Integrating Order Management with Oracle Receivables
- Implementing Receivables Credit to Cash
- Implementing Payables Invoice to Pay
Access requirements
- The person who uses the Order Management work area must have the predefined Order Entry Specialist role or your own custom order entry role.
- Use the Manage Data Access for Users task to make sure the Order Entry Specialist role or your custom role has the business unit that you use.
- Assign the Manage Receivables Receipt privilege to the Order Entry Specialist role or your custom role.
To create and assign the data security policies according to the business unit, go to the Security Console, query for the predefined role or your custom role, then set these values:
|
Data Resource |
Privilege |
Condition |
|
Business Unit |
Manage Receivables Receipts; View Receivables Activities; Manage Receivables Activity Data; Manage Receivables Activities; Manage Payables Invoice |
Access the business units for which the user is explicitly authorized |