Redwood: Create and Edit Workflows
With the new Redwood: Create and Edit Workflow feature, you can access workflow objects, including change orders, change requests, problem reports, and corrective and preventive actions on Redwood pages. The new pages are more efficient, allowing you to review information more quickly. For example:
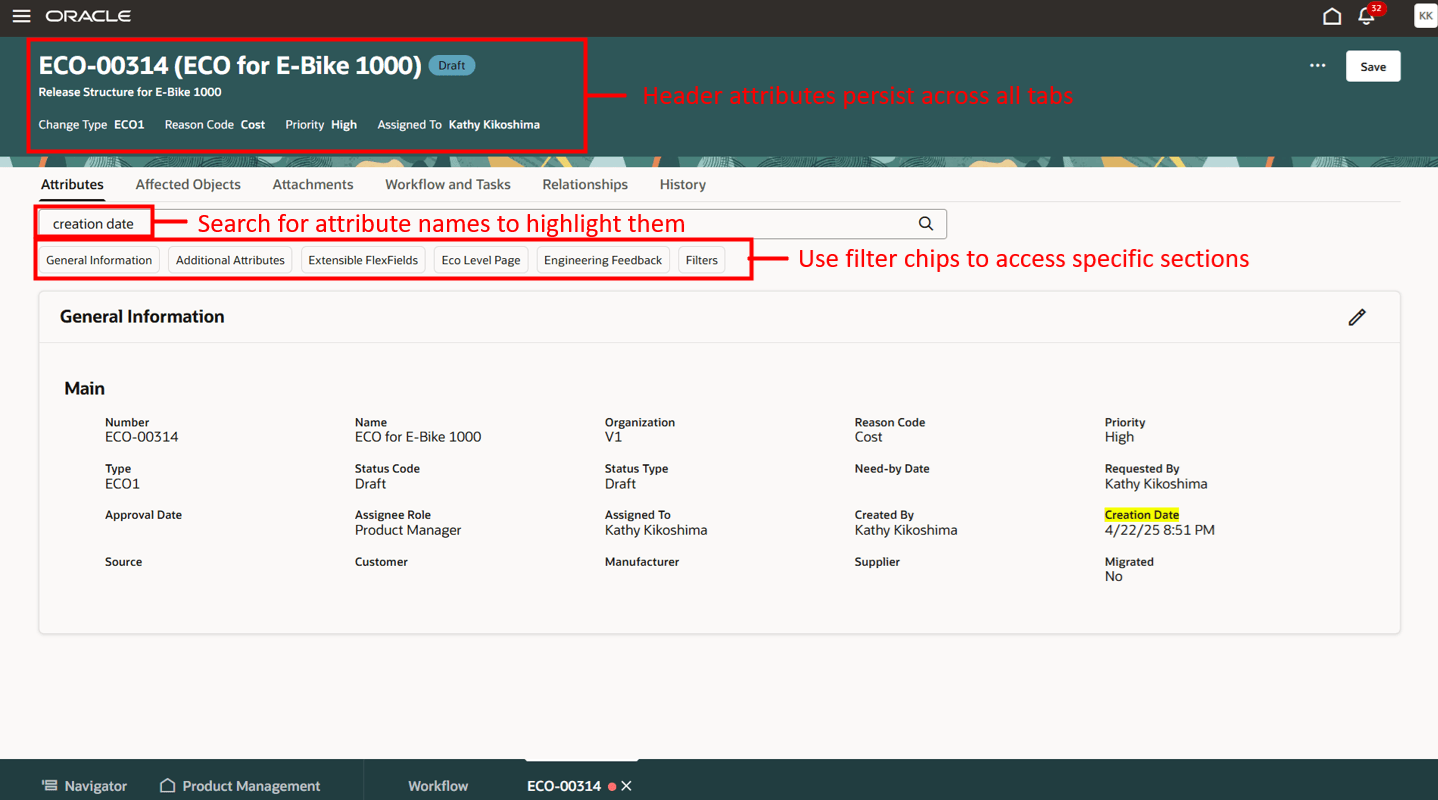
- Workflow header attributes on the page header persist across all the tabs, providing context for the workflow object.
- Search across workflow attributes.
- Use filter chips for header attributes, additional attributes and extensible flexfields.
- Use the spotlight to quickly navigate through the affected objects.
- Redline the item directly in the change order context.
- Drag and drop items from the Clipboard or Spotlight to the affected objects tab.
- Preview attachments.
- View the workflow statuses and approvals in one table.
- Manage participants for multiple statuses in the same page.
- Use filter chips on tasks and relationships.
- There is an indicator when the workflow has unsaved changes.
- Click on workflow links in OTBI reports to open the workflow in Redwood.
You can access data in the following tabs on a workflow:
- Attributes
- Affected Objects
- Attachments
- Workflow and Tasks with sub-tabs
- Activities
- Tasks
- Relationships
- History
You can also perform additional actions using the More Actions (three dots) button.
Create Workflow
You can create workflows using the New workflow object drawer that slides in from the right. You can create workflows in multiple ways:
- You can click on the Add (+) icon from the Product Management Search pages for Workflow, Workflow Approvals, and Workflow History.
- You can use the links available in Actions on the Product Management home Page.
- If you are editing an item that has a needs approval rule, you can either create a new change order or add the item to an existing change order.
- If you are editing an item, you can also use the Assign to action to assign the item to a new or existing change order, change request, problem report or corrective action.
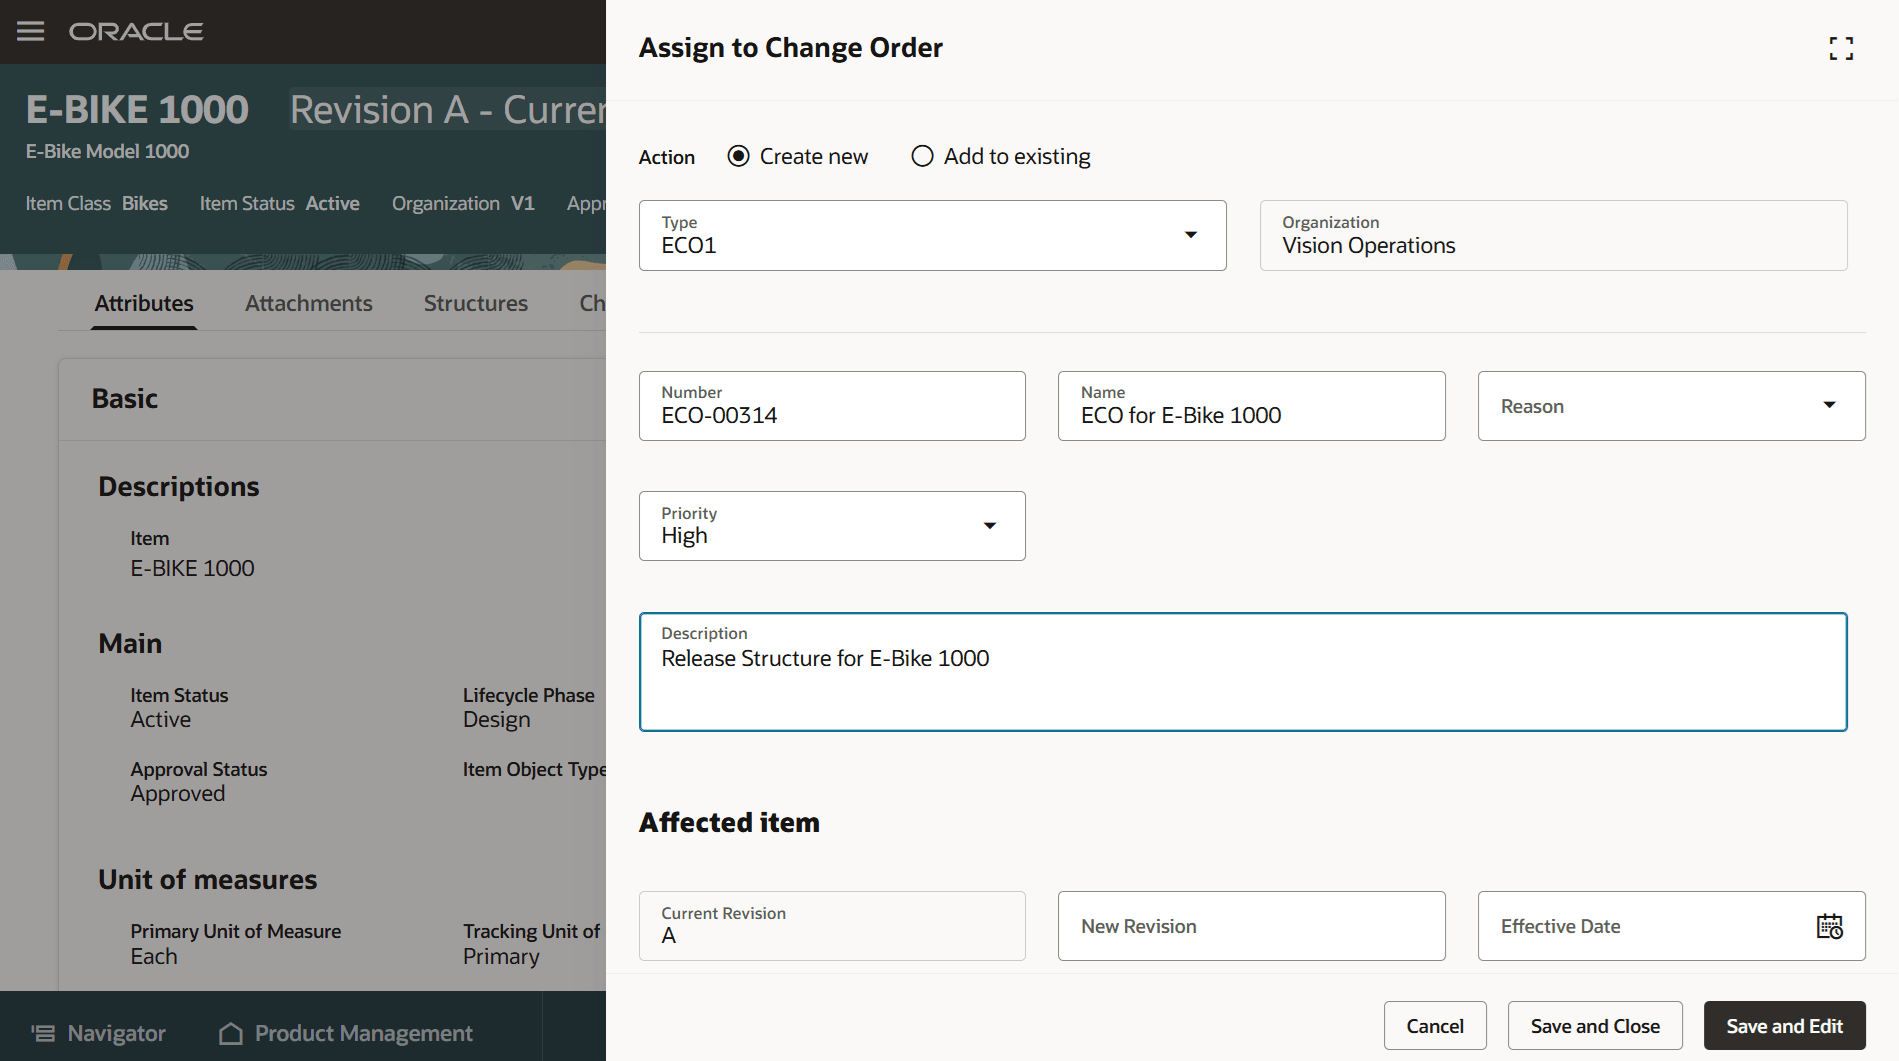
Enter Details when Assigning an Item to a New Change Order
Attributes Tab
Supports searching for attributes across sections, which can be accessed directly by selecting a filter chip. There are filter chips for General Information, Additional Attributes and Extensible Flexfield pages:
- General Information
- Descriptions
- Includes the new Formatted Description.
- Main
- Has a five-column layout that provides a more compacted view.
- Descriptions
- Additional Attributes
- Has a five-column layout that provides a more compacted view.
- Includes global descriptive flexfields followed by context sensitive descriptive flexfields.
- Includes a new migrated attribute (Y/N) that indicates if a workflow was migrated using import.
- Extensible Flexfields
- Includes extensible flexfields for the workflow type.
Workflow Attributes Tab
Affected Objects Tab
- Allows you to do the following:
- Select affected objects using the Select and Add Items icon (the item picker).
- Drag and drop items from the Clipboard or Spotlight to the affected objects tab.
- Search affected objects table to filter rows.
- Edit the new revision, new lifecycle phase, and effective date directly inline.
- You can also use copy and paste to edit these attributes.
- Edit descriptive flexfields in a drawer (side panel).
- Export all the affected object lines or just the selected ones.
- Cancel lines.
- Move lines.
- Copy selected affected objects to the clipboard.
- When you click an affected object number hyperlink on a change order, it appears in the change order context, allowing you to make redlines on the item and save your changes to the change order.
- When you click an affected object number hyperlink on a change request, problem report, or corrective action, it appears in the workflow context, allowing you to view the affected object and easily return to the change request, problem report, or corrective action.
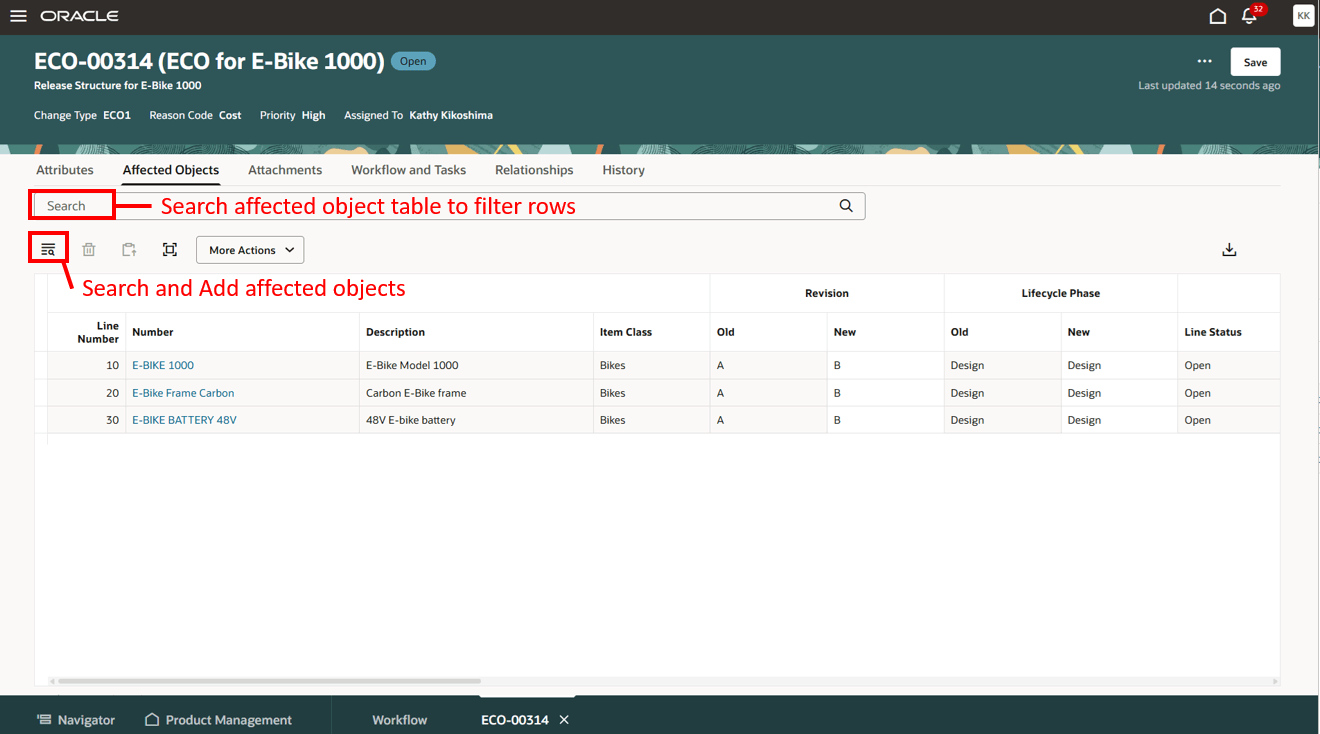
Affected Objects Tab on a Change Order
Attachments Tab
Supports the following:
- Adding attachments.
- Previewing attachments in a drawer (side panel).
- Use the arrows to scroll through multiple attachments.
- Searching and filtering of attachments.
- Downloading attachments.
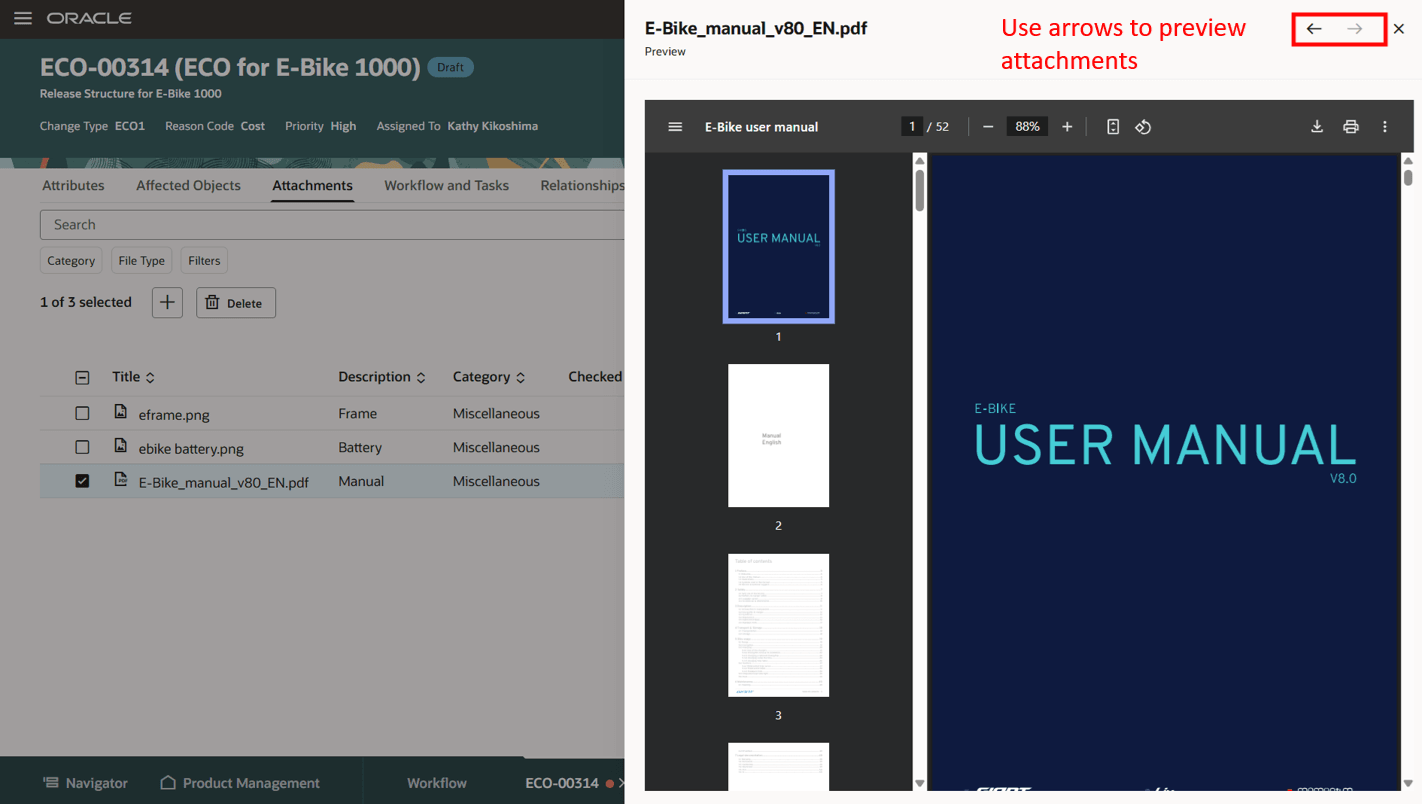
Preview Attachments in a Drawer
Workflow and Tasks Tab
- Workflow status diagram
- Appears in the top portion of the page.
- Displays the workflow statuses with the following color coding:
- Green - Completed statuses
- Blue - Current status
- Gray - Future statuses
- The current status is selected by default, or you can click on a status to see the corresponding activity for that status in the lower section of the page.
- Activity Subtab
- By default, displays the activity for the current status. You can remove the status filter chip to see all statuses for the workflow in the activity table.
- Use filter chips to refine the results.
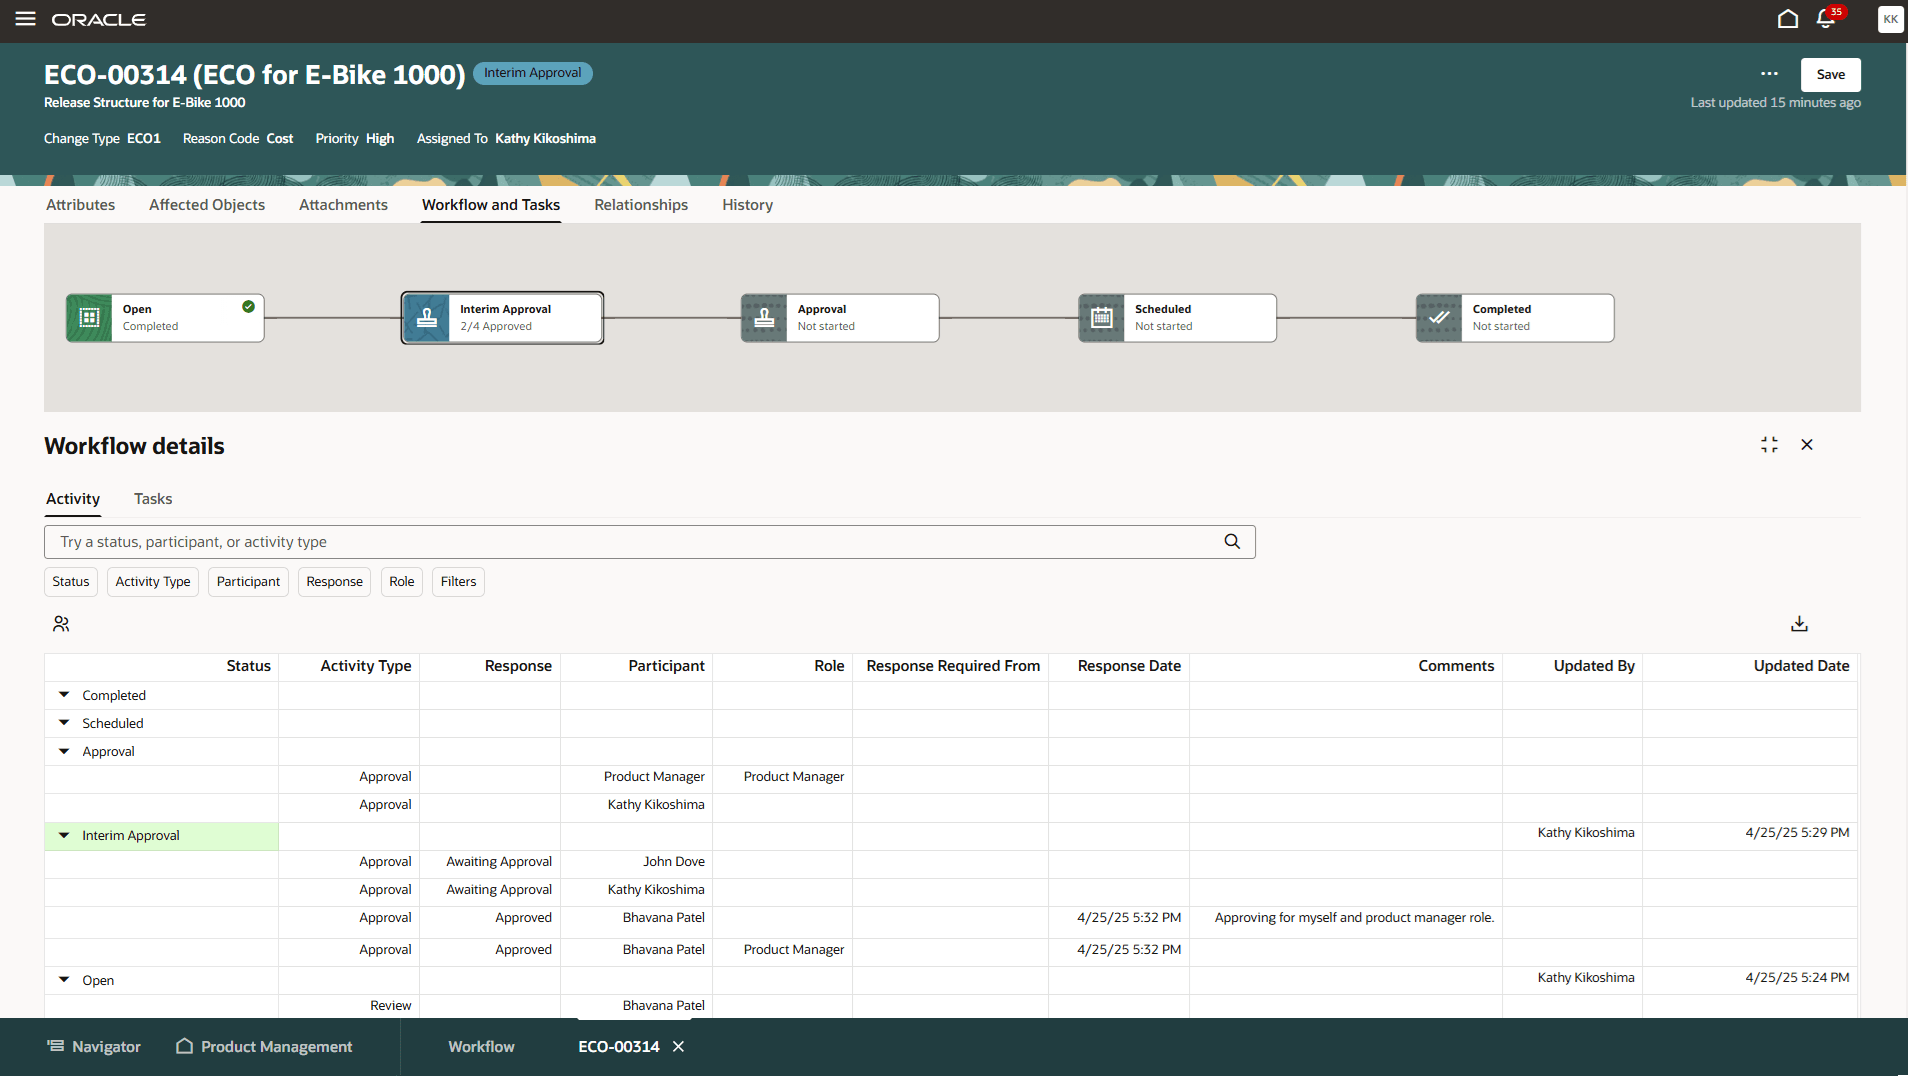
Workflow Diagram with Activity Subtab
- Use the Manage Participants button to open a drawer where you can add participants for current or future statuses.
- Select current or future status.
- Enter participant names to get a list of users or roles with matching names and use checkboxes to select users.
- Use the checkbox or highlight a name to delete it.

Manage Participants for the Current Status
- Tasks Subtab
- Tasks are now included on the Workflow and Tasks tab, as they can be linked to a specific workflow status.
- You can add and edit tasks using a drawer.
- By default, displays all open tasks.
- Supports filtering.
- Includes Completed Date.

Workflow Diagram with Tasks Subtab
Relationships Tab
You can create relationships using a drawer. You can also view and edit relationships.
- Supports filters on
- Relationship Type
- Object Type
- Status
- Revision (Item relationships only)
- Supports rules between workflow objects.
- You can add rules in the drawer using the + icon.
- You can view rules in the drawer using the eye icon.
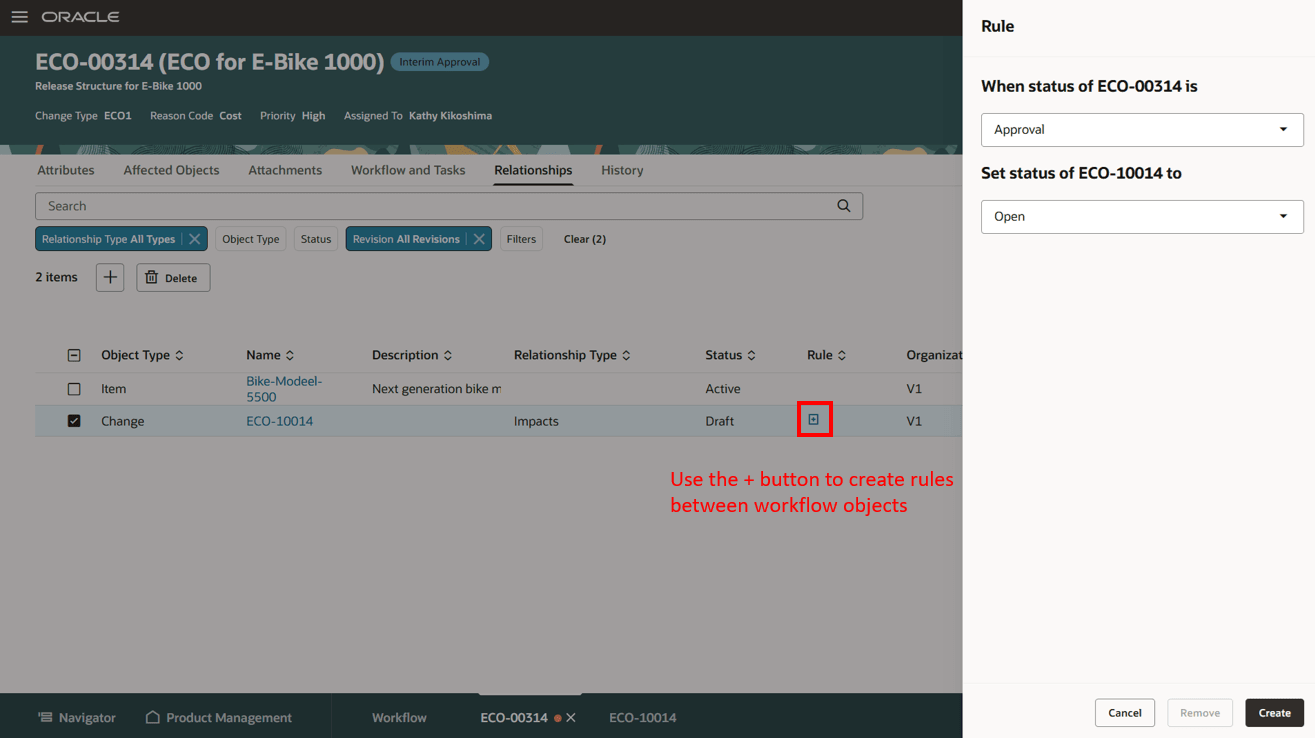
Add Relationships Rules Between Workflow Objects
History Tab
Displays all history columns by default.
- Supports personalized views.
- Supports filters on:
- Audit Type
- Action Type
- Status
- Author
- Date (using Date Range)
- Action
- Supports exporting all or selected history rows.
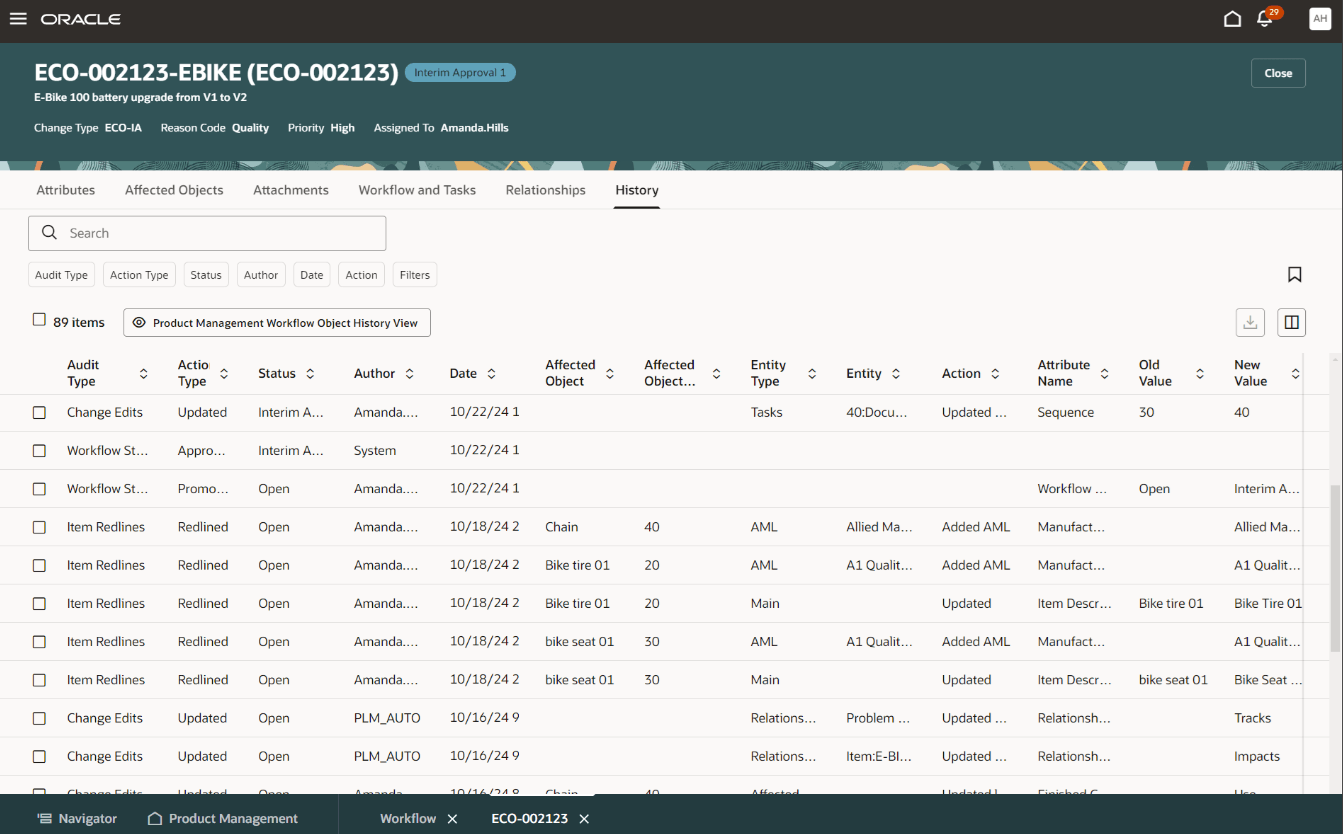
History Tab on a Change Order
Workflow Actions
- Spotlight
- Click More Actions (...) and select the Spotlight action to copy all affected objects to the spotlight tab of the Navigator.
- Click the item number hyperlink in the Spotlight tab to see the item and its redlines in the change context.
- For change requests, problem reports and corrective actions, the affected items are in read-only mode, as you can't perform redlines.
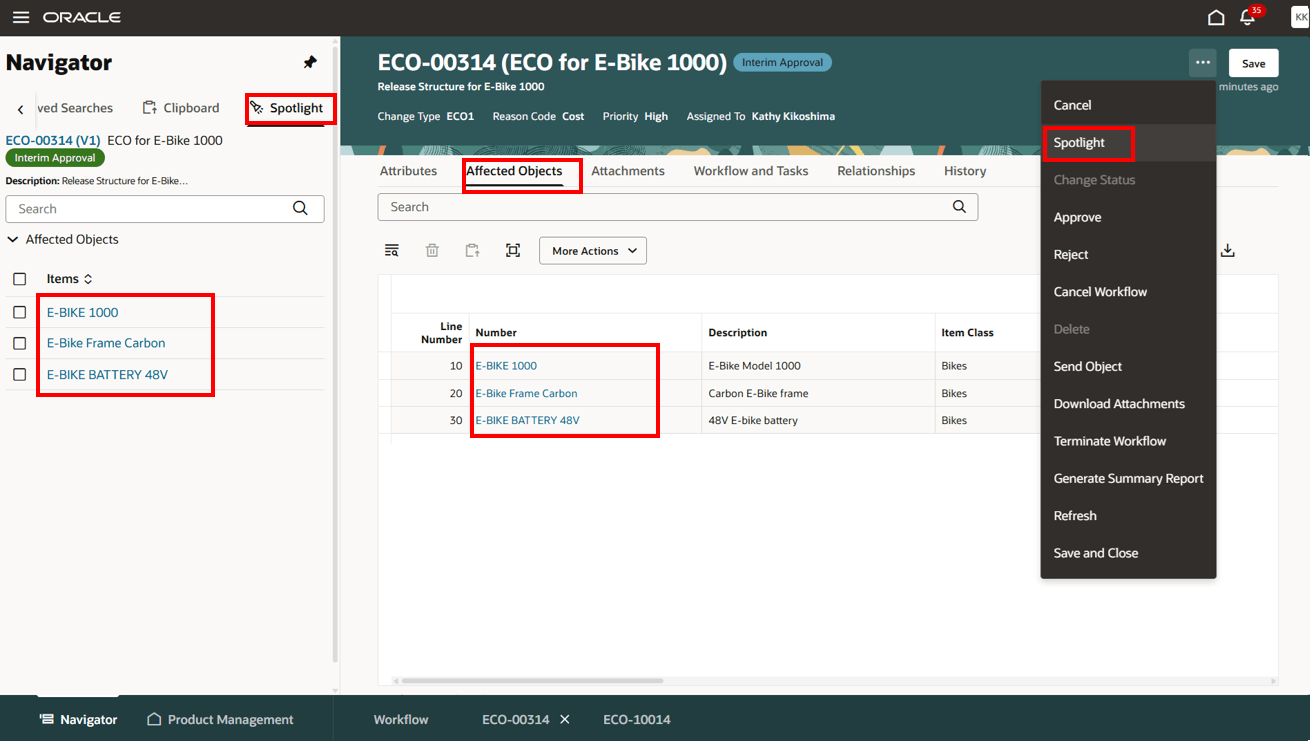
Copy Affected Objects to the Spotlight Tab
- Change Status
- Use the More Actions (three dots) button to change the status of the workflow. You can also add participants while changing the status.
- Comment character count is visible as you type your comment.
- Use the More Actions (three dots) button to change the status of the workflow. You can also add participants while changing the status.
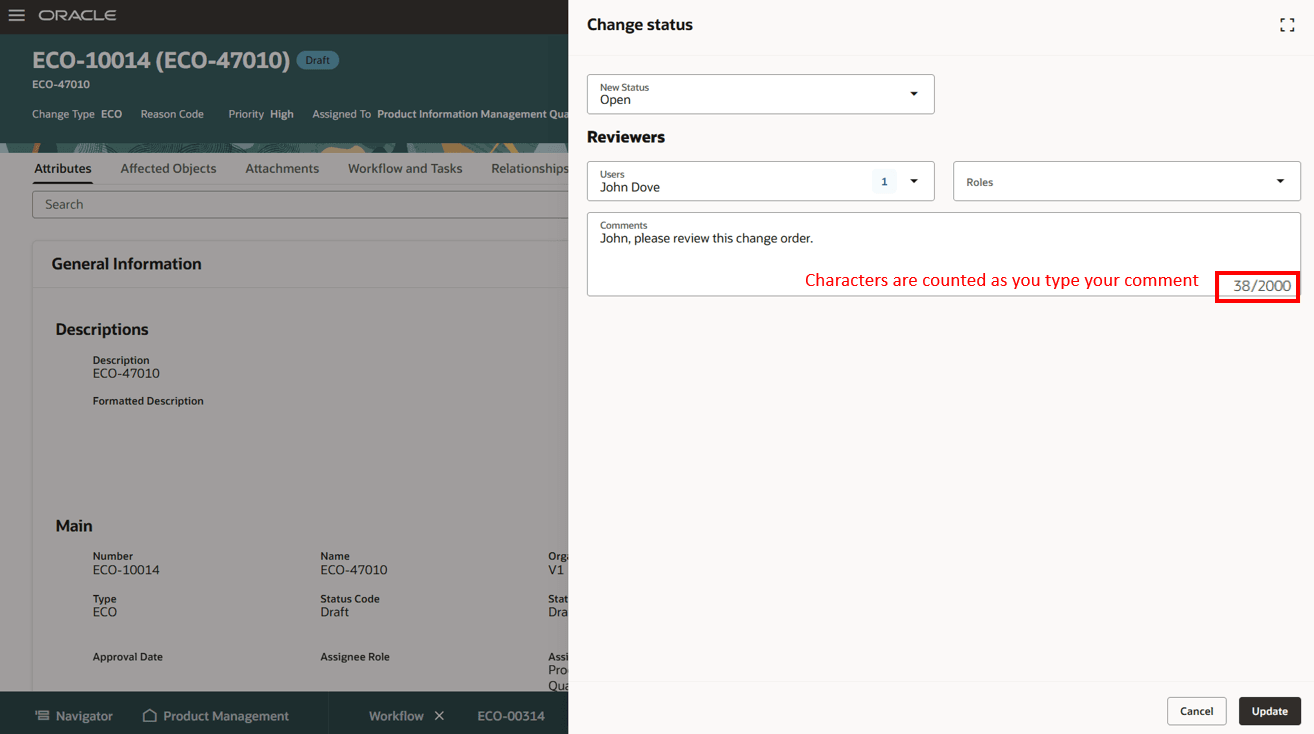
Change Status to Open
- Approve
- Reject
- Supports rejection reasons
- Cancel workflow
- Delete
- Send object
- Download attachments
- Terminate workflow
- Restart workflow
- Change order details report
- Refresh
- Save and Close
This feature benefits your business by leveraging the Next Gen Redwood workflow management. Here are the benefits:
-
Improve the visibility of your workflows and manage critical supply chain attributes within them.
-
Promote productivity with the ease and quickness of the new add or edit workflow attachments feature.
-
Enhance user experience with the new Redwood create and edit workflow relationships feature.
-
Improve productivity with the new Redwood affected item redlining feature and enhanced participant management feature for multiple statuses.
Here's the demo of these capabilities:
Steps to enable and configure
You must enable the Workflow Affected Item Picker attribute set and rebuild the index, enable the profile option ACA_WORKFLOW_REDWOOD_ENABLED, and create a data security policy.
-
Enable the attribute set and rebuild the index:
-
On the Tasks panel tab, click Configure Index.
-
On the Index Management page, click Item.
-
On the Item page, click Enable attribute sets.
-
In the Enable attribute sets drawer, enable Workflow Affected Item Picker and click Apply.
-
Once completed, rebuild the index.
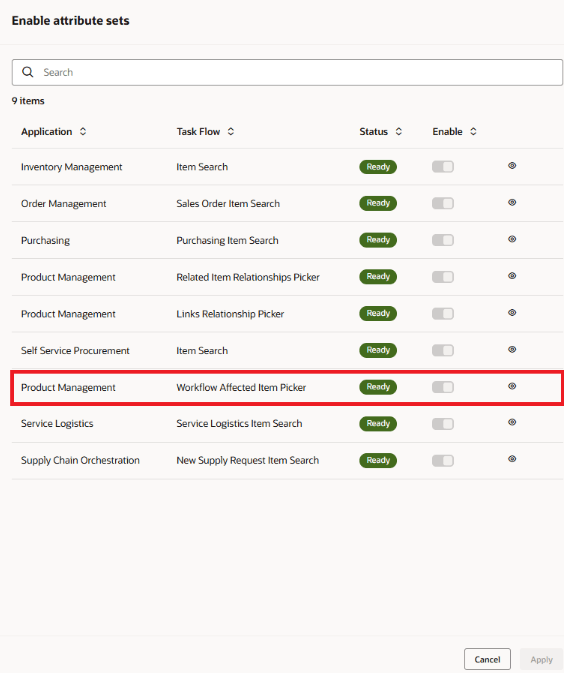
Enable Affected Item Picker Attribute Set
-
Set the administrator profile value for ORA_ACA_WORKFLOW_REDWOOD_ENABLED to Y.
-
Create a Data Security Policy
-
Sign in to Security Console.
-
Search for the configured role on which you want to configure the data security policy. Click Actions > Edit Role.
-
On the Edit Role page, click Data Security Policies.
-
Click Create Data Security Policy (plus icon). On the Create Data Security Policy dialog box, enter the following:
-
Policy Name: <unique name>
-
Data Resource: Search for and add the resource named EGO_ENGINEERING_CHANGES_B.
-
Data Set: Select Select by Instance Set.
-
Condition Name: Access the item changes for table EGO_ENGINEERING_CHANGES_B for the item changes they have access to.
-
Actions: Select all the actions.
-
Click OK and click Next.
-
-
Save your changes.
Tips and considerations
-
You must rebuild your workflow history index to view data in the History tab, since new predefined columns have been added to the workflow history index.
-
In the Main section of the Attributes tab, the visibility of the Source, Customer, Supplier and Manufacturer attributes depends on the workflow type.
-
Additional workflow controls for the change type are honored on Redwood pages.
-
You must edit the affected object lifecycle phase and effective date separately.
-
Attachment preview supports common file types, including images, PDFs, and Microsoft Office files like Word, Excel, and PowerPoint.
-
Guided journeys are supported on workflow objects.
-
The workflow deep links in the OTBI reports open the workflow in Redwood when profile option (ORA_ACA_WORKFLOW_REDWOOD_ENABLED) is set to Yes.
-
To create workflows with required descriptive flexfields (DFFs), you must provide default values for the required DFFs.
-
Business rules are supported on workflow objects.
The following three new workflow header attributes are hidden by default for change orders and change requests, but you can display them using business rules:
-
Supplier Site
-
Reported By
-
Reported Date
-
You can create extensible flexfield attribute groups as pages if you want the filter chips to appear on the Workflow Attributes tab. Here's how
-
Access the Manage Extensible Flexfields task in the Setup and Maintenance work area.
-
Search for the flexfield code EGO_CHANGE_EFF and edit the Change Extended Attributes.
-
In Change Type Details, select the Add (+) button to create a new page for the selected change type. You can edit the Display Name as you would like it to appear in the filter chip.
-
In the lower table, use the Add (+) button to add your extensible flexfields to the newly created page.
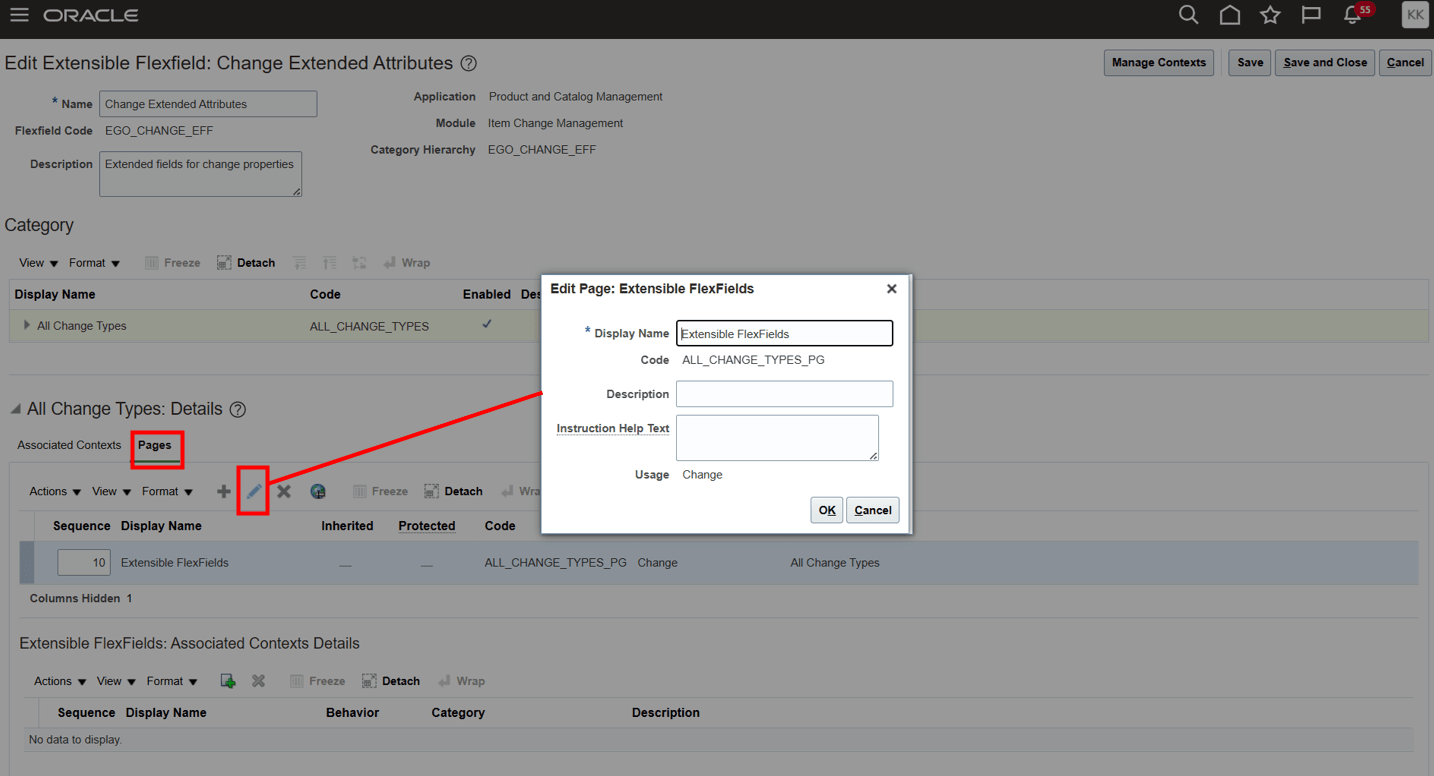
Edit the Display Name for an Extensible Flexfield Page
Key resources
-
Oracle Fusion Cloud SCM Using Product Development Guide, available on the Oracle Help Center.
-
Oracle Fusion Cloud SCM Using Product Master Data Management Guide, available on the Oracle Help Center.
Access requirements
Users who are assigned a configured job role that contains these privileges can access this feature:
To view or edit workflows on the new workflow pages, or to access notifications, you should have one of the following privileges:
For change orders:
-
View Change Order (ACA_VIEW_CHANGE_ORDERS_PRIV) or
-
Manage Change Orders (ACA_MANAGE_CHANGE_ORDERS_PRIV)
For change requests:
-
View Change Request (ACA_VIEW_CHANGE_REQUESTS_PRIV) or
-
Manage Change Requests (ACA_MANAGE_CHANGE_REQUESTS_PRIV)
For problem reports:
-
View Problem Report (ACA_VIEW_PROBLEM_REPORTS_PRIV) or
-
Manage Problem Report (ACA_MANAGE_PROBLEM_REPORT_PRIV)
For corrective and preventive actions:
-
View Corrective Action (ACA_VIEW_CORRECTIVE_ACTIONS_PRIV) or
-
Manage Corrective Action (ACA_MANAGE_CORRECTIVE_ACTION_PRIV)
To create workflows from the search pages or when using links in Actions in the Product Management home page:
-
Create Change Order (EGO_CREATE_CHANGE_ORDER_PRIV)
-
Access Change Types Using a REST Service (EGO_GET_CHANGE_TYPES_REST_PRIV)
To create a change order from the item, either through a Needs Approval rule or by using the Assign to action:
-
Create Change Order (EGO_CREATE_CHANGE_ORDER_PRIV)
-
Manage Change Orders (ACA_MANAGE_CHANGE_ORDERS_PRIV)
-
Access Change Types Using a REST Service (EGO_GET_CHANGE_TYPES_REST_PRIV)
To approve or reject workflows:
-
Approve Item Change Order (EGO_APPROVE_ITEM_CHANGE_ORDER_PRIV)
To move change order lines to a new change order:
-
Create Change Order (EGO_CREATE_CHANGE_ORDER_PRIV)
-
Manage Change Orders (ACA_MANAGE_CHANGE_ORDERS_PRIV)
To move change order lines to an existing change order:
-
Manage Change Orders (ACA_MANAGE_CHANGE_ORDERS_PRIV)
To change status, delete, terminate, restart or cancel a workflow:
-
Manage Change Orders (ACA_MANAGE_CHANGE_ORDERS_PRIV)
-
Manage Change Requests (ACA_MANAGE_CHANGE_REQUESTS_PRIV)
-
Manage Problem Report (ACA_MANAGE_PROBLEM_REPORT_PRIV)
-
Manage Corrective Action (ACA_MANAGE_CORRECTIVE_ACTION_PRIV)
To select or be selected as an Assigned To user or Assignee Role on a workflow:
-
Manage Assignee (EGO_MANAGE_ASSIGNED_TO_PRIV)
To view the history tab on the workflow:
-
View Change History (EGO_VIEW_CHANGE_HISTORY_PRIV)
To run the change order details report:
-
Generate Item Change Order Report (EGO_GENERATE_ITEM_CHANGE_ORDER_REPORT_PRIV)
-
Get BIP Report Definitions (EGI_GET_BIP_REPORT_DEFINITIONS_REST)
To send a workflow object:
-
Use REST Service - Users and Roles Lists of Values (PER_REST_SERVICE_ACCESS_USERS_AND_ROLES_LOVS_PRIV)
-
Manage HR Name Format (PER_MANAGE_HR_NAME_FORMAT_PRIV) (optional)
To select users managing participants or changing workflow status:
-
Use REST Service - Users and Roles Lists of Values (PER_REST_SERVICE_ACCESS_USERS_AND_ROLES_LOVS_PRIV)
-
Manage HR Name Format (PER_MANAGE_HR_NAME_FORMAT_PRIV) (optional)
To search for items on Redwood pages:
-
Product Search (ORA_EGI_PRODUCT_SEARCH_DUTY)
To search for workflow objects in Redwood pages:
-
Get Search View REST (EGP_GET_SEARCH_VIEW_REST_PRIV)
-
GET Product Management Index REST (EGP_GET_PM_INDEX_REST_PRIV)
-
Access Product Management Change Search (EGO_VIEW_PRODUCT_MANAGEMENT_CHANGE_SEARCH_PRIV)
These privileges were available prior to this update.
Additionally, you will require the new privilege Access Users (EGP_ACCESS_USERS_PRIV), to select users in:
-
Requested By or Assigned To attributes in the Attributes tab.
-
Task Owner in Workflow and Tasks > Create or Edit Task drawers.
-
Manage Participants or Change Status drawer.
-
Send Object drawer.
Additionally, to run workflow OTBI reports, you need the following:
-
Product Catalog Transaction Analysis Duty (FBI_PRODUCT_CATALOG_TRANSACTION_ANALYSIS_DUTY)
-
Product Transaction Analysis Duty (FBI_PRODUCT_TRANSACTION_ANALYSIS_DUTY)
-
BI Consumer Role (BIConsumer)