Redwood: Record a Serial Number Range Using a Mobile Device
Scanning individual serial number barcodes for serialized items during a mobile transaction can be a tedious process, especially when dealing with a large quantity of consecutive serial numbers. In such cases, having the ability to input the starting and ending serial numbers of the range and complete the transaction swiftly is essential.
You can now record a range of serial numbers when performing transactions using a mobile device for direct receipts, interorganization transfers, miscellaneous transactions, subinventory transfers, and putting away and shipping goods.
The Serial Number Range tab on the specified mobile pages is hidden by default. To display this tab, enable the Opt-In feature Redwood: Record a Serial Number Range Using a Mobile Device.
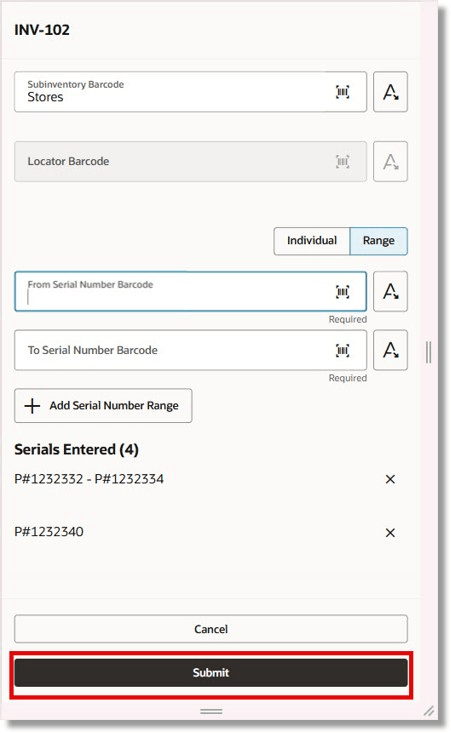
- Miscellaneous Receipt:
- On the Miscellaneous Transactions page, select the organization name and click Continue. Choose the transaction type Miscellaneous Receipt.
- On the Miscellaneous Receipt page, select Receive By Item or Subinventory. Choose the account from the drop-down list.
- If receiving by subinventory, select the subinventory name from the drop-down list. Click Continue to proceed.
- On the Miscellaneous Receipt page, scan the item bar code and proceed to the next page.
- Enter the required details such as the subinventory to receive into, item revision, and lot details (if applicable). Enter a single serial number and/or a serial number range by scanning the serial numbers. Optionally, you can add additional serial number information.
- Add the serial numbers to the receipt transaction and submit the transaction.
Miscellaneous Receipt - Enter Serial Number Range
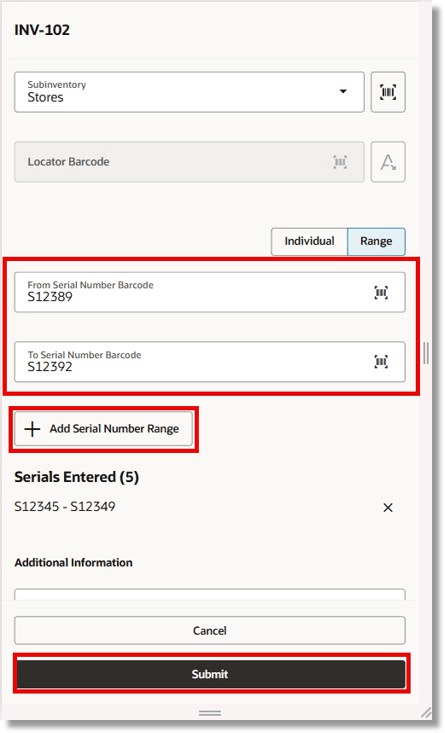
- Miscellaneous Issue:
- On the Miscellaneous Transactions page, select the organization name and click Continue. Choose the transaction type Miscellaneous Issue.
- On the Miscellaneous Issue page, select Issue By Item or Subinventory. Choose the account from the drop-down list.
- If issuing by subinventory, select the subinventory name from the drop-down list. Click Continue to proceed.
- On the Miscellaneous Issue page, scan the item bar code and proceed to the next page.
- Enter the required details such as the subinventory to issue from, item revision, and lot details (if applicable). Enter a single serial number and/or a serial number range by scanning the serial numbers.
- Add the serial numbers to the issue transaction and submit the transaction.
Miscellaneous Issue Page
- Interorganization Transfer:
- From the Inventory Execution tile under the Supply Chain Execution functional area, navigate to the Interorganization Transfer page.
- Select the organization name and click Continue.
- After entering the required details for a Direct Organization Transfer or Intransit Shipment, you can now enter the serial number range by scanning the first and last serial numbers for the item you want to transfer between organizations.
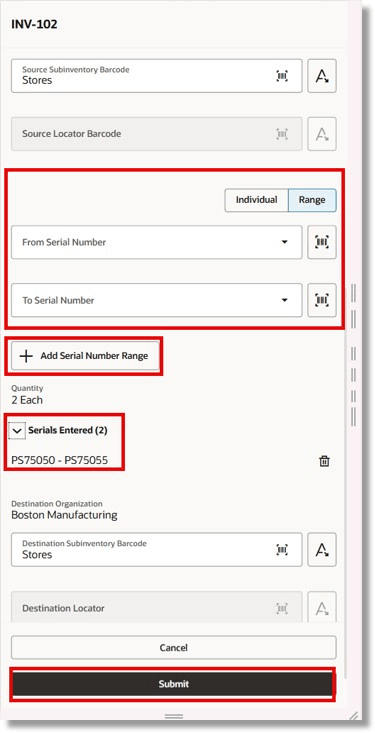
Interorganization Transfer Page
- Subinventory Transfer:
After entering the required details on the Subinventory Transfer page, you can now enter the serial number range for the item you want to transfer between two subinventories by scanning the first and last serial numbers.
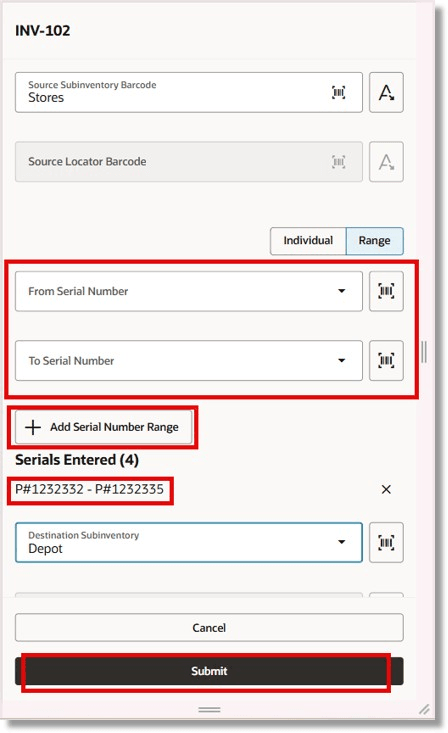
Subinventory Transfer Page
- Receive Goods:
After entering the required details on the Receive Goods page, you can now enter the serial number range for the lot and serial-controlled or serial-controlled item you want to receive by scanning the first and last serial numbers.
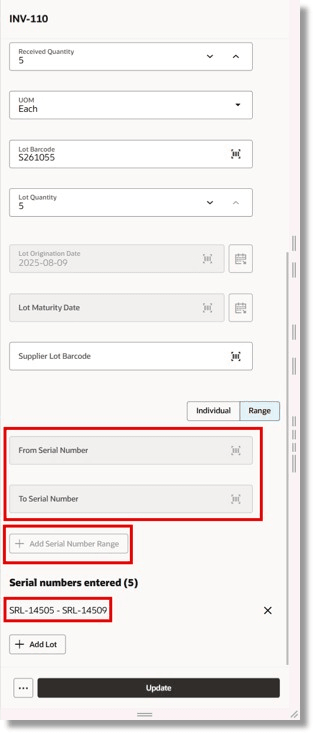
Receive Goods Page
- Put Away Goods:
You can now enter the serial number range for the received item you want to put away by scanning the first and last serial numbers.
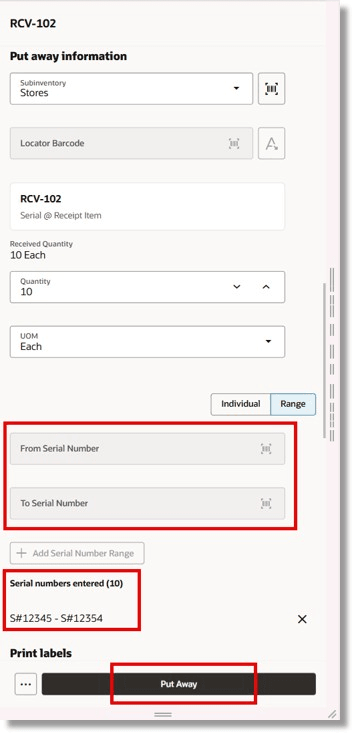
Put Away Goods Page
- Confirm Picks:
When confirming picks for serial-controlled items, you can now specify the serial number range by scanning the first and last serial numbers.
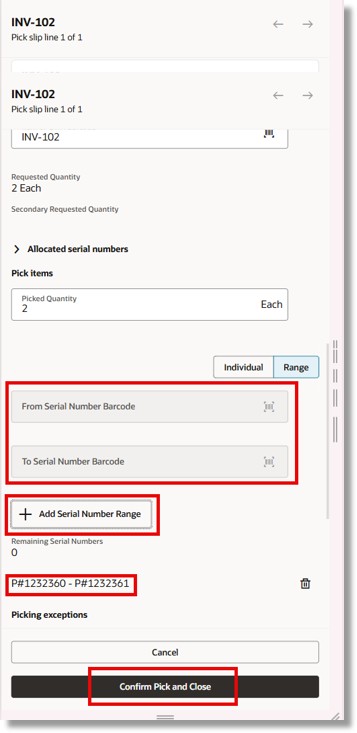
Confirm Picks Page
- Ship Confirm:
When confirming a shipment, you can now enter the serial number range by scanning the first and last serial numbers.
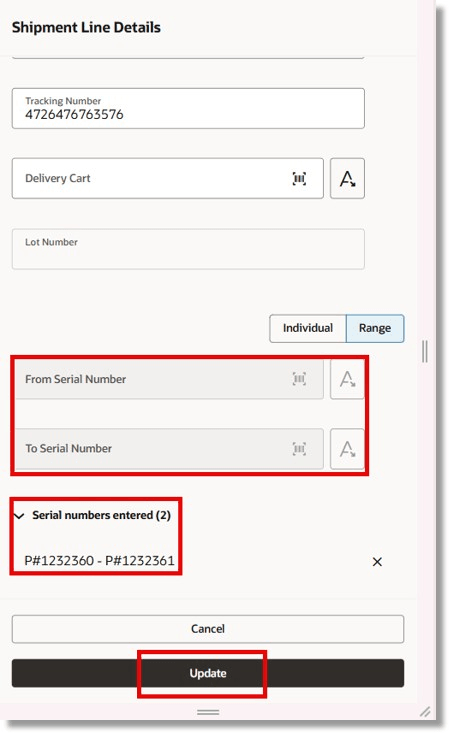
Ship Goods Page
This feature significantly streamlines mobile device transactions, saving time and effort for users.
Steps to enable and configure
Use the Opt In UI to enable this feature. For instructions, refer to the Optional Uptake of New Features section of this document.
Offering: Manufacturing and Supply Chain Materials Management
Tips and considerations
- Serial Control at Receipt or Pick
Serial numbers are captured during pick confirmation. As a result, the Edit Shipment Line page displays the list of serial numbers that were picked. The Barcode field becomes disabled once the number of entered serials matches the ship quantity. However, you can still delete and reenter a serial number if needed.
- Serial Control at Issue
Serial numbers are captured at the time of shipping. By default, the Ship Quantity field is populated with the picked quantity, and you must enter serial numbers that match the ship quantity.
Key resources
- Oracle Fusion Cloud SCM: Using Inventory Management guide, available on the Oracle Help Center.
Access requirements
Users who are assigned a configured job role that contains these duty roles can access this feature:
- Create Miscellaneous Transaction Using Responsive Inventory Duty (ORA_INV_CREATE_MISCELLANEOUS_ISSUE_PWA_DUTY).
- Create Interorganization Transfer Using Responsive Inventory Duty (ORA_INV_CREATE_INTERORG_TRANSFER_PWA_DUTY).
- Create Subinventory Transfer Using Responsive Inventory (INV_CREATE_SUBINVENTORY_TRANSFER_PWA_PRIV)
- Receive Goods Using Responsive Receiving (ORA_RCV_RECEIVE_GOODS_PWA_DUTY)
- Put Away Goods Using Responsive Receiving (ORA_RCV_PUT_AWAY_GOODS_PWA_DUTY)
- Confirm Pick Using Responsive Inventory (ORA_INV_CONFIRM_PICK_PWA_DUTY)
- Ship Goods Using Responsive Shipping (ORA_WSH_SHIP_GOODS_PWA_DUTY)
These duty roles were available prior to this update.