Redwood: Compare and Approve Policy Values Using a New User Experience
You can use the Redwood user experience to streamline the review, edit, and approval of inventory policy values. This update helps you to efficiently compare current and suggested policy values when you have millions of item-location combinations. You can edit adjusted policy values using the Compare Policies table and accept suggested policy values for selected item-location combinations, mark suggested policy values as reviewed for selected item-location combinations, or accept suggested policy values for all displayed item-location combinations. Additionally, you can also submit the scheduled processes named Update Policy Measures and Publish PAR Policies.
You can view the Compare Policies table in the context of a specific replenishment plan that’s enabled for policy comparison.
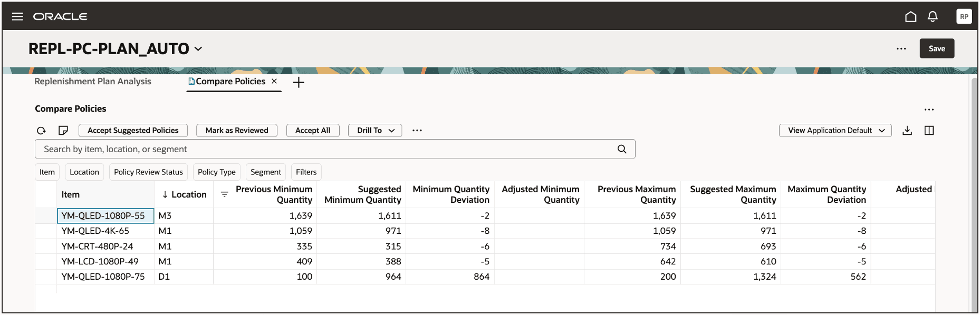
Compare Policies Table
In the replenishment plan, you can search for and select the Compare Policies table on the Visualizations tab in the Pages drawer.
Let’s look more closely at the table.
Toolbar
If you’re familiar with the classic version of the Compare Policies table, many of the actions on the toolbar will be familiar to you.

Toolbar
The actions on the toolbar are as follows:
- Refresh: When you refresh the table, the following happen:
- You’re notified if there are unsaved changes. If you proceed with the refresh, unsaved changes are discarded.
- Any filtering or sorting of columns is removed.
- Notes: You can add notes to your items.
- Accept Suggested Policies: This functionality works as in the classic version of the table. You first select one or more rows and then click Accept Suggested Policies. You can use this button to accept the policy values that are outside the threshold value. You must use the page-level Save button to save the changes. The policy values, such as the minimum quantity and maximum quantity, will be updated with the suggested policy values.
- Mark as Reviewed: This functionality works as in the classic version of the table. After reviewing the policy values, if you don’t want to take any action for the selected rows, you can click this button. The policy review status changes from To be reviewed to Reviewed. You must use the page-level Save button to save the changes.
- Accept All: This functionality is similar to that for the Accept Suggested Policies button. The difference is that when you click Accept All, the suggested policy values are accepted for all the rows displayed after your search.
- Drill To: You can select one or more rows and then select a table or graph from the Drill To list. The selected table or graph will be opened on a temporary page with the context of the selected rows. To add more choices to the Drill To list, you can select Manage Links from the Actions menu.
By default, you can drill to the Items, Replenishment Policy Parameters, and Suggested Replenishment Policy Parameters tables.
- Actions: You can use this menu to save, restore, or delete views. Views are the equivalent to layouts in the classic UI. You can also use this list to submit scheduled processes.
- When you select Update Policy Measures, the scheduled process named Update Policy Measures will be submitted. You will then be ready to use the new policy values in the replenishment plan.
- When you select Publish PAR Policies, the scheduled process named Publish PAR Policies will be submitted to publish periodic automatic replenishment (PAR) policies to Oracle Fusion Cloud Inventory Management.
- View: You can use this list to control which columns are visible in the table as well as the order in which they appear. You can quickly switch between views to display the columns appropriate to your task. For example, when working with min-max policy items or segments, you may want to see columns related to only min-max policies. The default view has all the columns configured for min-max planning. You can create your own views. See the section titled “Views” for more information.
- Export: You can export the rows that meet the current filter criteria to a Microsoft Excel XML workbook file (.xlsx). The exported file contains only the columns in the current view and in the order in which they appear in the table.
- Columns: You can select the columns you want to be visible in the Compare Policies table. You can reorder the columns in one of two ways:
- In the Columns drawer, you can drag and drop columns.
- In the Compare Policies table, you can drag and drop columns.
Searching and Filtering
You can use these search components:

Search Components
- Search Bar: Enter text to search across the Item, Location, and Segment columns using the Contains operator. For example, enter
Mon, and press Enter, or click the search icon in the search bar to display rows for items, locations, or segments that contain “Mon” in their names, as in MK-ENG-Monitor. The search is case-sensitive. - Suggested Filters: Make multiple selections in the suggested filters, and click outside them to filter the rows by your selections.
- Filters: Click the Filters button to open the Filters drawer, from which you can add columns as applied filters.
Filters Drawer
By clicking the Filters button, you can open the Filters drawer in which you can select filters.
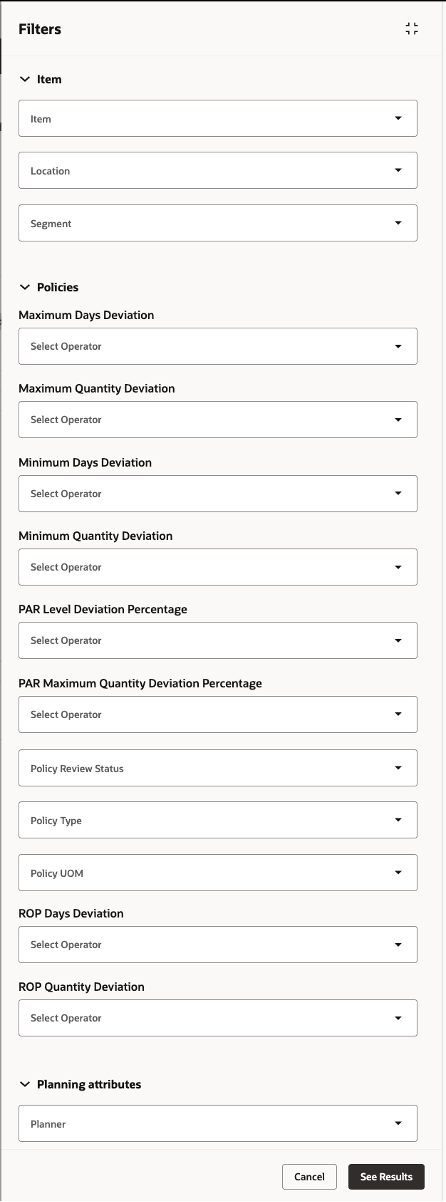
Filter Drawer
Views
Views help you to control which columns are visible and the order in which they appear. Views are equivalent to layouts in the classic UI.
Views don’t contain any filtering or sorting information. For example, if you’ve applied a column filter, and you save the view, the column filter isn’t included in the view.
To create views, first arrange the table as you want it to appear, specifying which columns are visible and the order in which they appear. Once you’re happy with the appearance of the table, you can then save the view. After the view is saved, you can easily switch between views to see a different set of columns based on the task you want to perform.
Columns
Click the Columns icon to open the Columns drawer that displays all the available columns. Select the columns that you want to be displayed. Reorder the columns by dragging and dropping them.
For example, in the following screenshot, the Planner column is currently hidden. To make the column visible, select it, and then click Show.
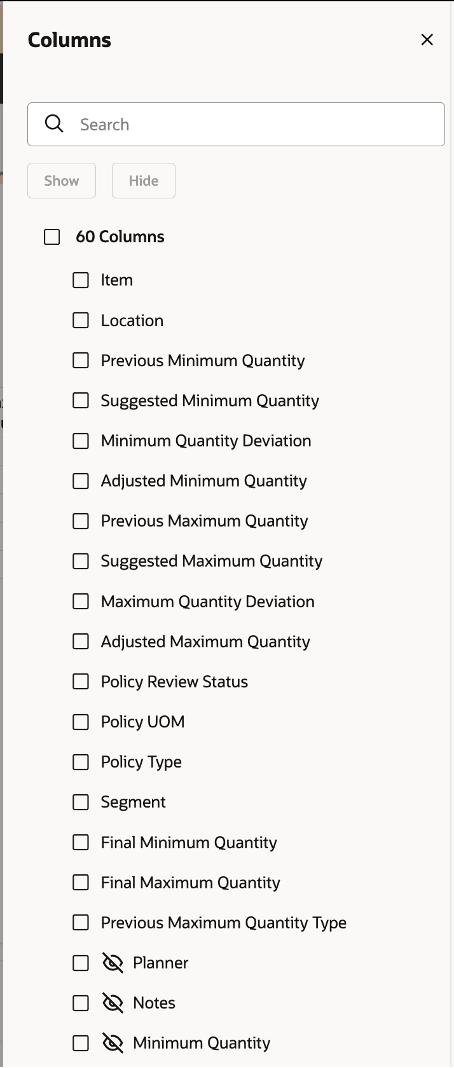
Columns Drawer
Editing Policy Values
You can edit the same columns in the Redwood version of the Compare Policies table as you could in the classic version of the table.
To perform an inline edit in an editable column, double-click it to enter the edit mode. In the following screenshot, the Adjusted Minimum Quantity column is being edited.
You must save changes using the page-level Save button.
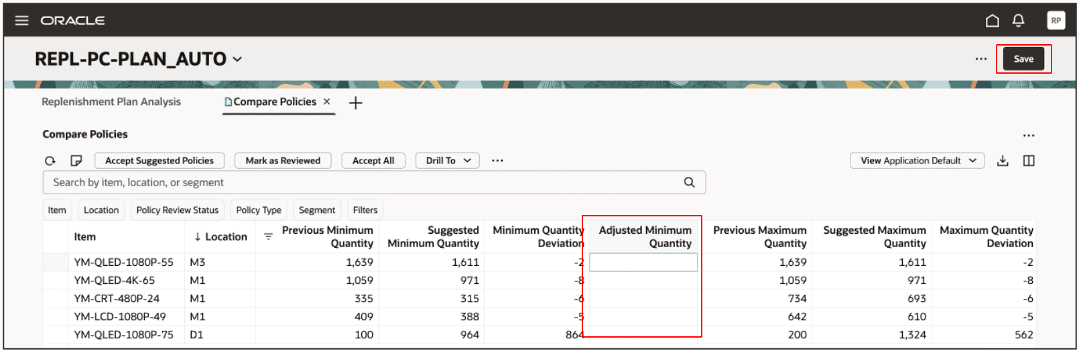
Inline Edit
Steps to Enable and Configure
Use the Opt In UI to enable this feature. For instructions, refer to the Optional Uptake of New Features section of this document.
Offering: Supply Chain Planning
Tips And Considerations
If you want to use the Redwood: Compare and Approve Policy Values Using a New User Experience feature, then you must opt in to its parent feature: Replenishment Planning. If you’ve already opted in to this parent feature, then you don’t have to opt in again.
Follow these steps to enable or disable this feature:
- In the Setup and Maintenance work area, search for and select the Manage Administrator Profile Values task.
- On the Manage Administrator Profile Values page, search for and select the ORA_MSC_REPLENISHMENT_PLANNING_REDWOOD_ENABLED profile option code.
- In the Profile Values section, set the Site level to Yes or No. The default value is Yes.
- Yes = enables the feature
- No = disables the feature
- Click Save and Close.
Changes in the profile value will affect users the next time they sign in.
Key Resources
- For information on comparing policy values, refer to the topic titled Overview of the Policy Comparison Feature in the Using Replenishment Planning guide.
- Visit https://redwood.oracle.com/ for more information about the Redwood experience.
Access Requirements
Users who are assigned a configured job role that contains these privileges can access this feature:
- Monitor Replenishment Planning Work Area (MSC_MONITOR_REPLENISHMENT_PLANNING_WORK_AREA_PRIV)
- Manage Segments (MSC_MANAGE_SEGMENTS_PRIV)
These privileges were available prior to this update.