Redwood: Manage Supply Network Model Using a New User Experience
You can use the Redwood user experience to manage the supply network model that defines the structure and relationships of the entities in an enterprise’s supply chain. The structure includes five dedicated tabs, Organizations, Customers, Suppliers, Carriers, and Interlocation shipping networks. You can review and maintain the full network on a single, consistent page.
You can use the Redwood Supply Network Model page to view your collected data that includes details of organizations, customers, suppliers, carriers, and interlocation shipping networks.
To open the Redwood Supply Network Model page, navigate to Supply Chain Planning and click More Actions icon in the upper right-hand side of the page and click View More. You can open the Supply Network Model page from Plan Inputs or from different plan types, such as Demand plans, Supply plans, Sales & Operations plans, Replenishment plans, Demand and Supply plans, and Backlog Management.
Quick Actions
Quick actions for the Redwood Supply Network Model page can be accessed based on the profile option Redwood Page for Supply Network Model value at the site level. If the profile option value is Yes, then quick actions show Supply Network Model and opens the Redwood Supply Network Model page. If the value is No, then quick actions show Manage Supply Network Model and navigates to ADF Manage Supply Network Model page.
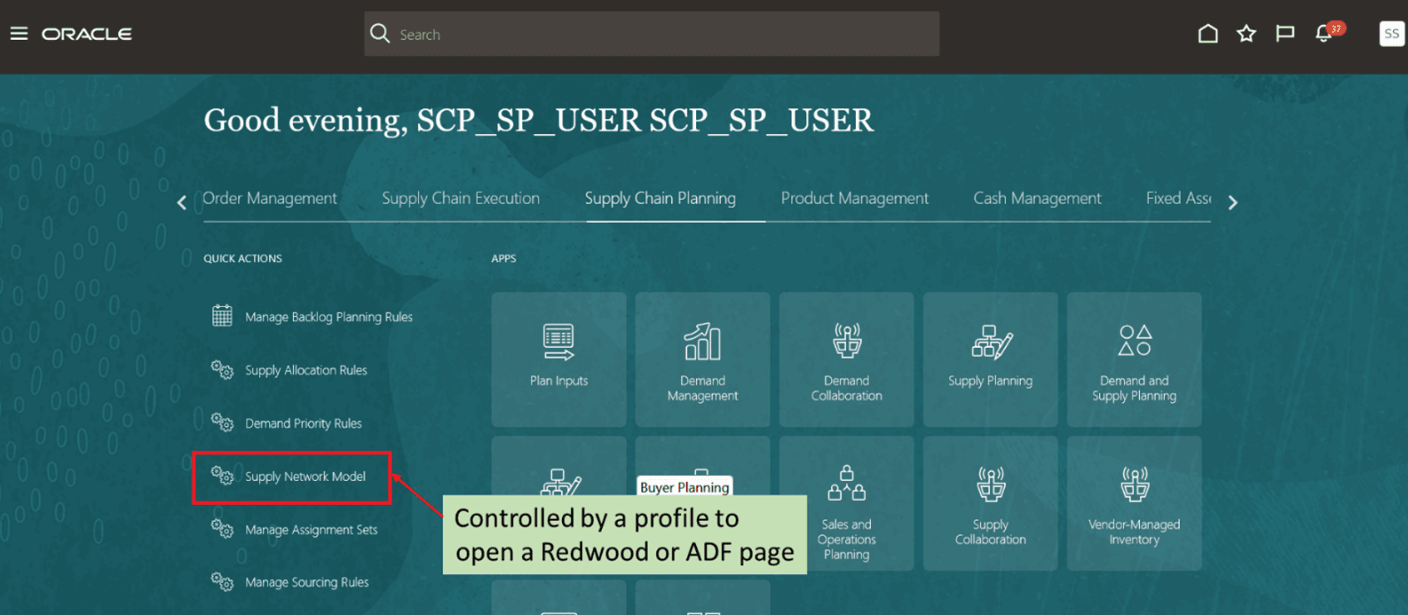
Access Supply Network Model page through Quick Actions
Supply Network Model
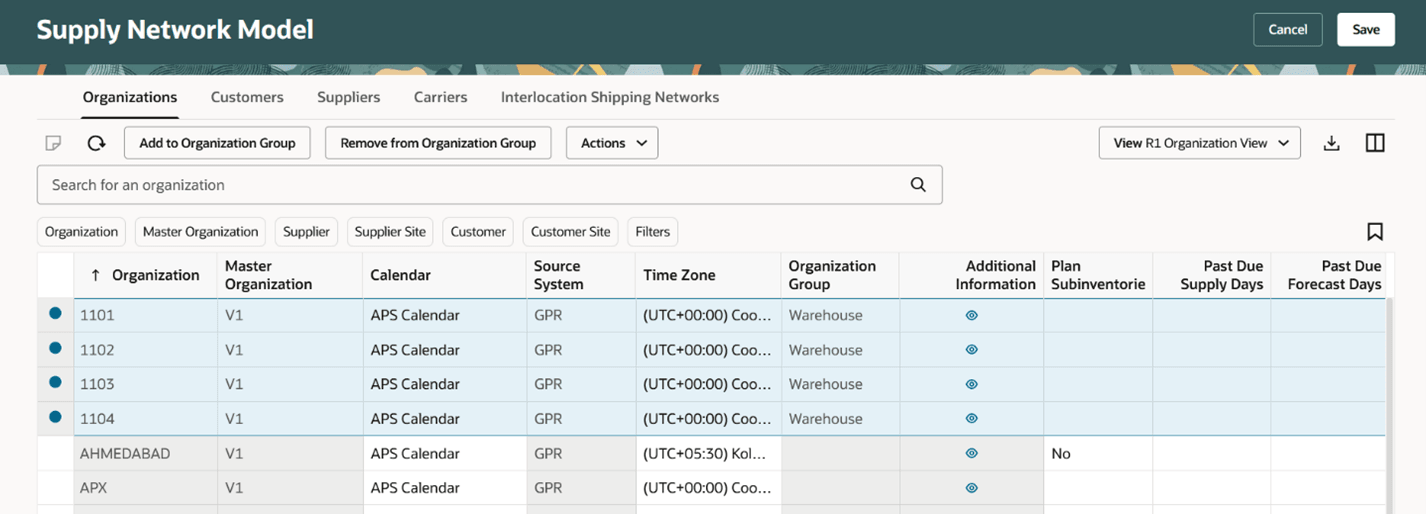
The following image displays the Redwood Supply Network Model page. Five dedicated tabs, Organizations, Customers, Suppliers, Carriers, and Interlocation Shipping Networks are given. This will help you review and maintain the full network on a single page.
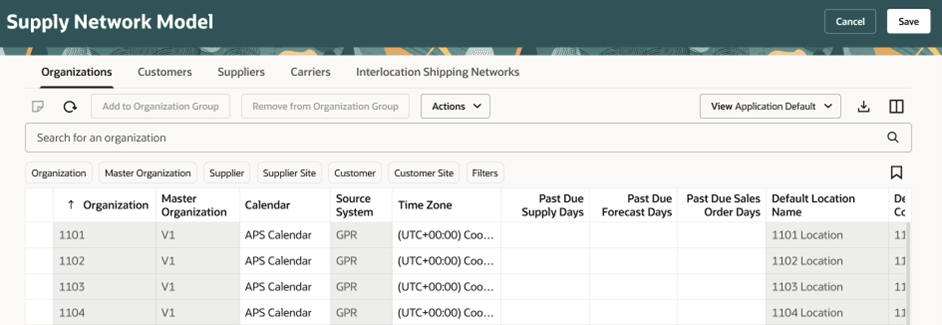
Supply Network Model
Let’s look into the details of each tab.
Organizations
You can use the Organizations tab for the following key purposes:
- Review organizations, including the time zones associated with the organizations, for all source systems.
- Create customer and supplier associations to organizations.
You can't have a unique supplier-supplier site or customer-customer site combination for more than one organization. - Select the drop ship validation organization.
For each source system, you can select only one organization as the drop ship validation organization. You can also assign a calendar to a drop ship validation organization. - Select the global forecast validation organization.
For each source system, you can select only one organization as the global forecast validation organization. - Set past due parameters for each organization, which include:
- Past due forecast days
- Past due sales order days
- Past due supply days
- Set up organizations for subinventory-level replenishment planning by selecting Yes under Plan Subinventories.
- Plan an external manufacturer in a supply plan by modeling it as an organization. Select the Plan External Manufacturer Supplies option. This option can be selected when supplier and supplier site are associated with the organization.
- Add notes for an organization.
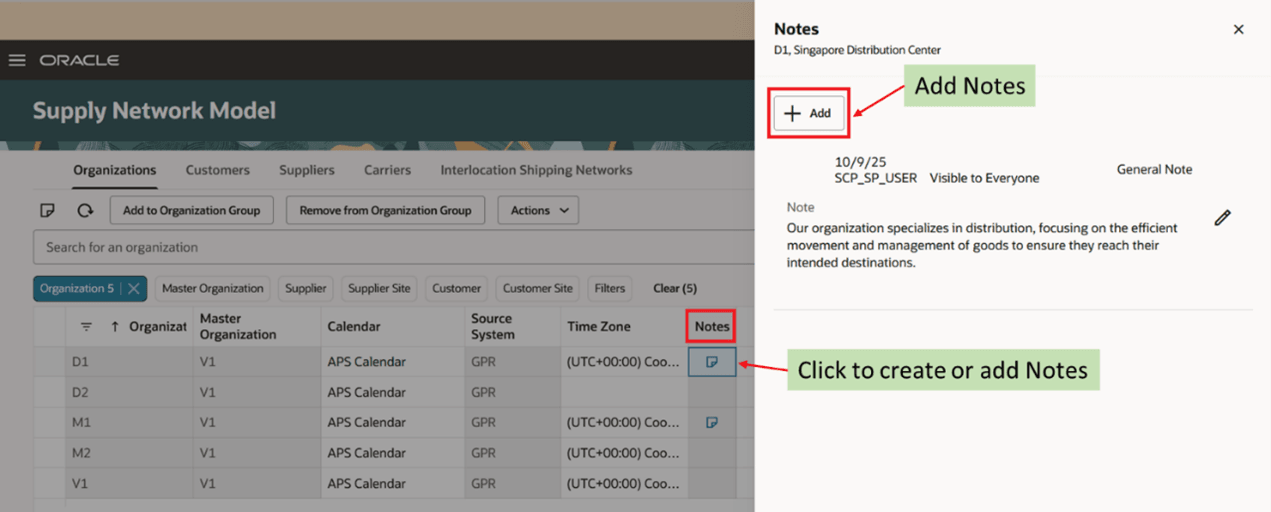
Notes for an Organization
You can search for an organization by using the default search criteria. You can also use primary filters as well as additional filters to further filter the records.
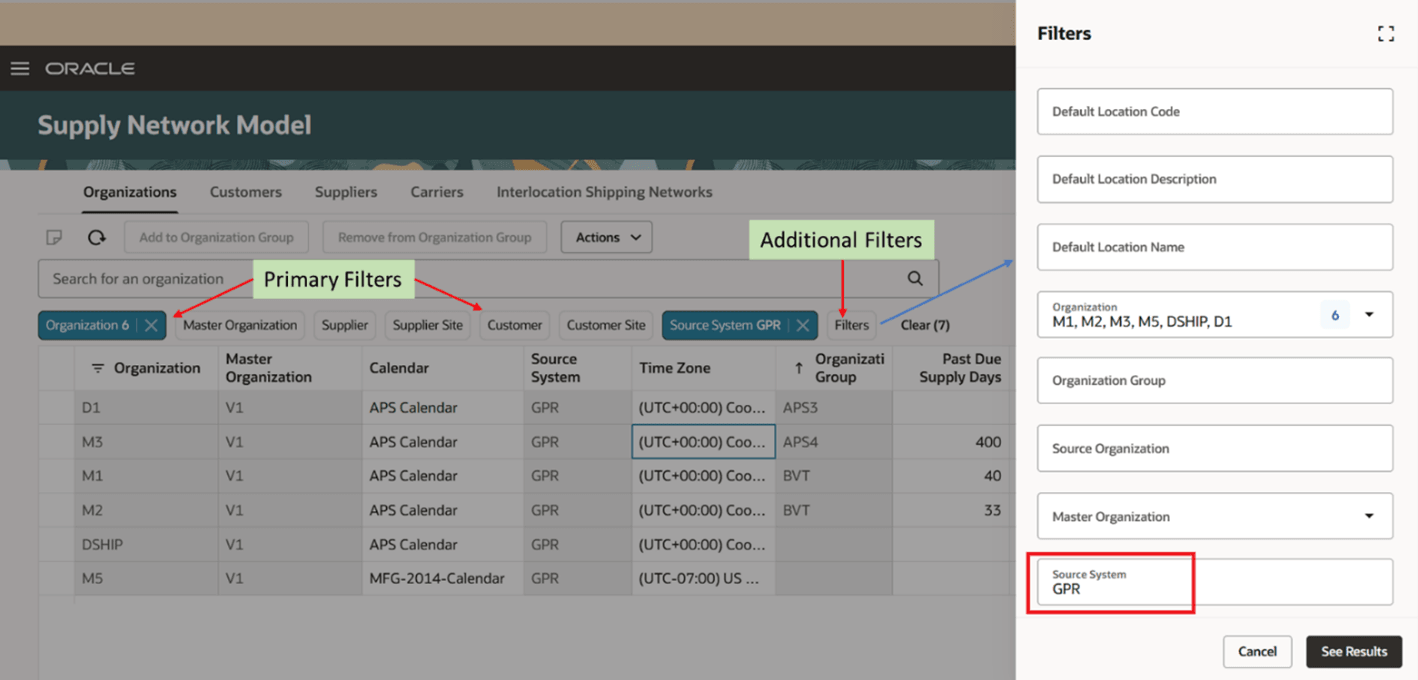
Filters in Organizations Tab
You can also sort and apply filters on individual columns. When you hover over a column, the sort and filter icon appear. You can sort a column either ascending or descending order. You can provide separate filter criteria for different columns and the resultant would apply all the filters together.
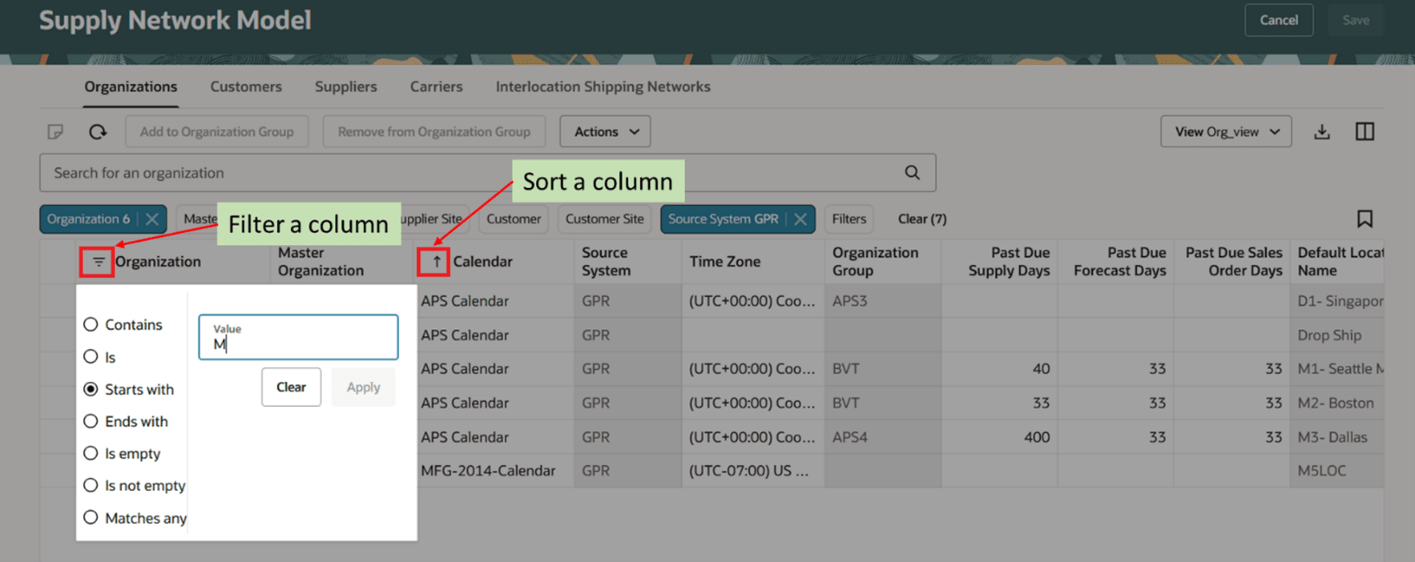
Sort and Filter a Column
Add additional attributes for an organization by using descriptive flexfields. These additional attributes appear under the column Additional Information.
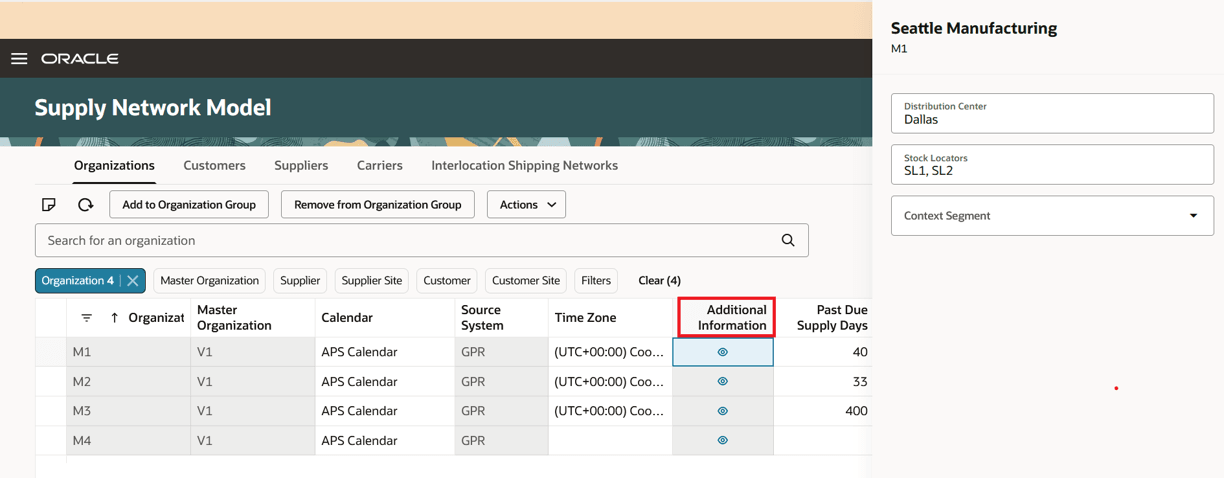
Additional Information
Customize the view of your Supply Network Model table by rearranging the order or toggling the visibility using the Columns option.
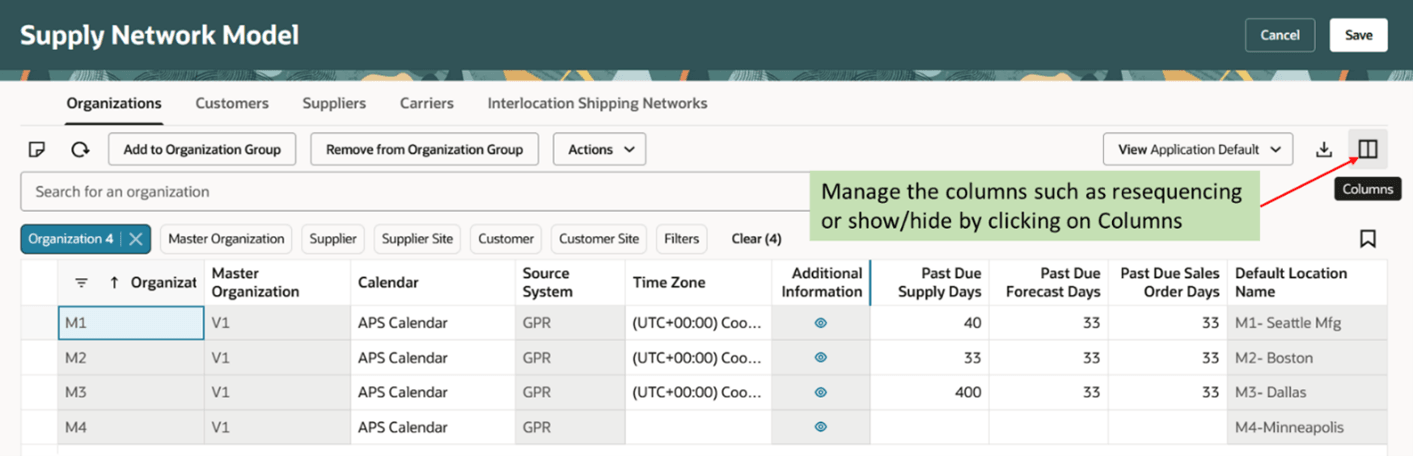
Rearrange Columns
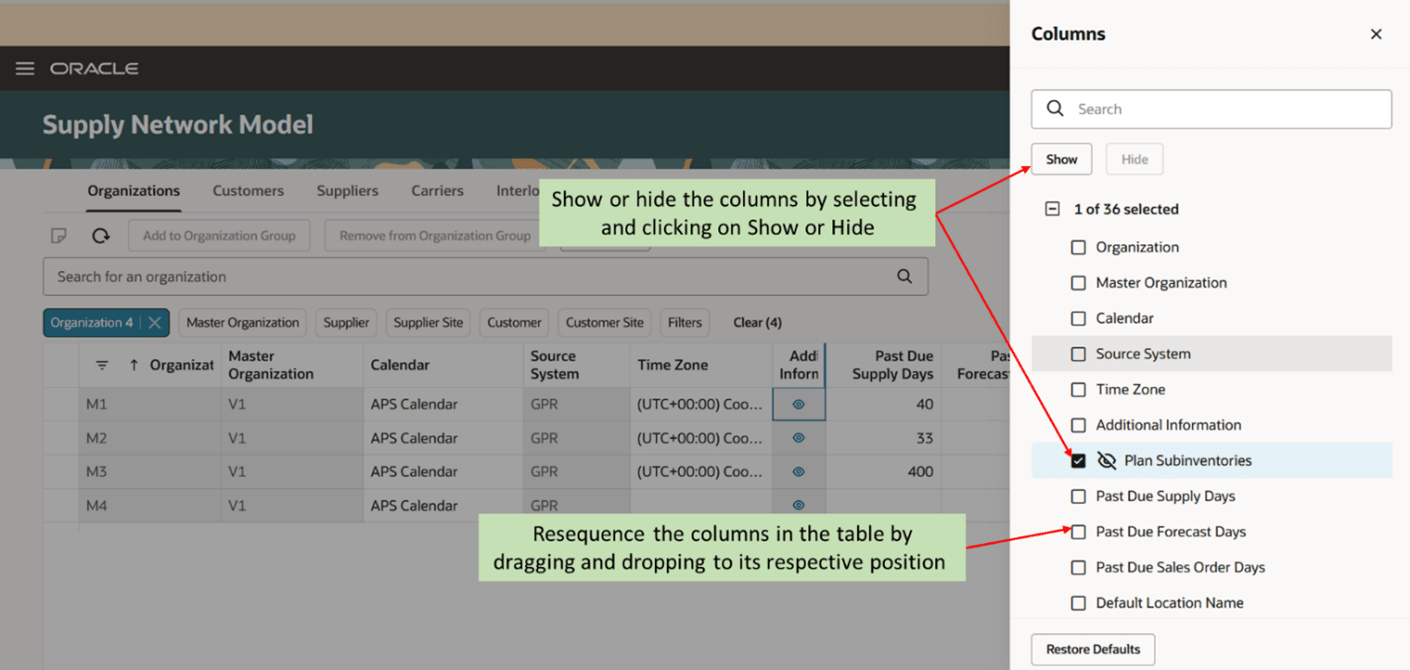
Show or Hide the Columns
After you've rearranged the columns, save the updated table view.
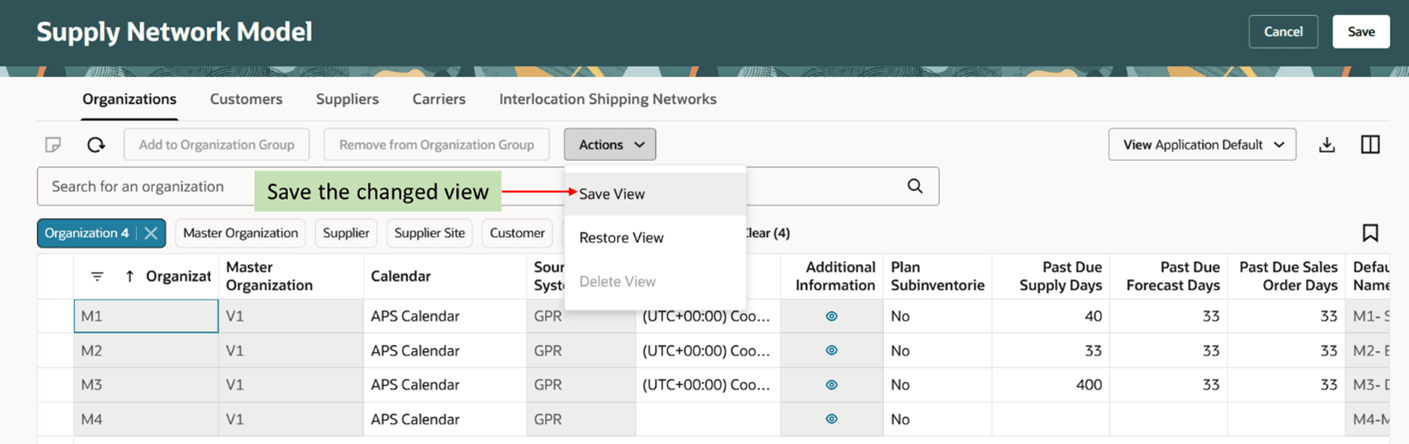
Save Supply Network Model View
Open an existing table view in the View menu.
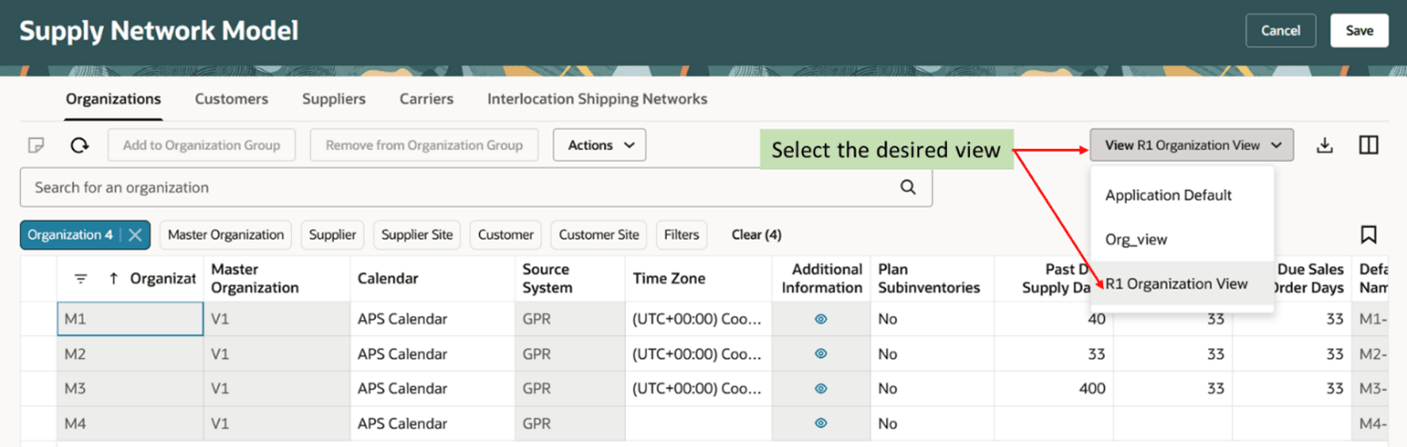
Select an Existing View
Organization Groups
Organization groups are managed within the source systems and are used to:
- Limit the net change data collection from a source system to specific organizations.
- Load planning data from files for a specific organization group when collection type is Targeted.
Click the Add to Organization Group button to add one or more organizations to an existing organization group or to a new organization group.
Select the organizations that belong to the same source system and click Add to Organization Group to add the organizations to an organization group. If you select organizations across different source systems, an error is displayed.
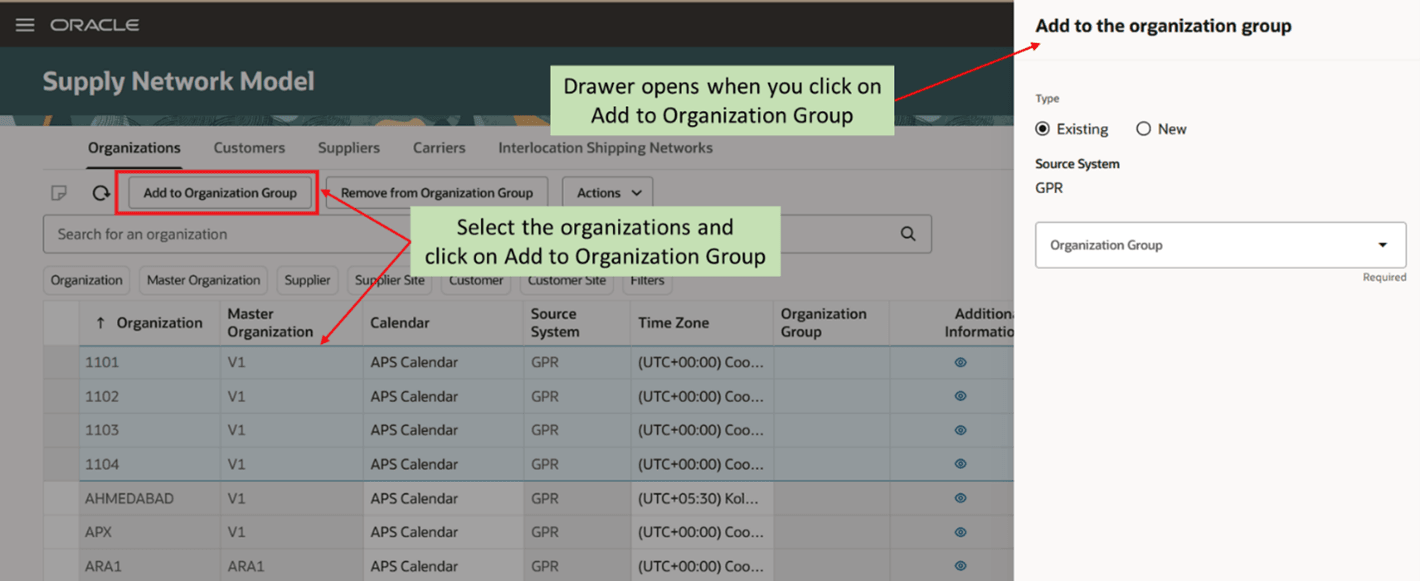
Add to Organization Group
You can add the organizations to an existing organization group or create a new organization group. Select the existing organization group from the Organization Group. To create a new organization group, select New and specify the new organization group name. Click Update to save the association.
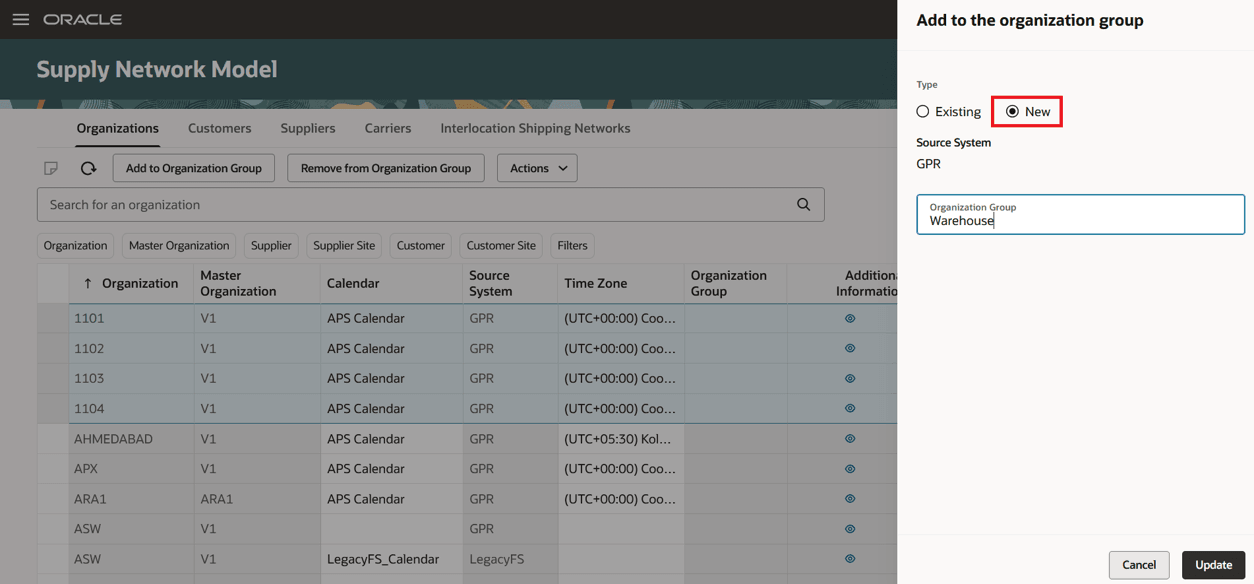
Create New Organization Group
Save the association of organizations to an organization group.
Save Organization Assignments to an Organization Group
To remove an organization from the organization group, select one or more organizations that you want to remove from the group. Click Remove from Organization Group and save the changes.
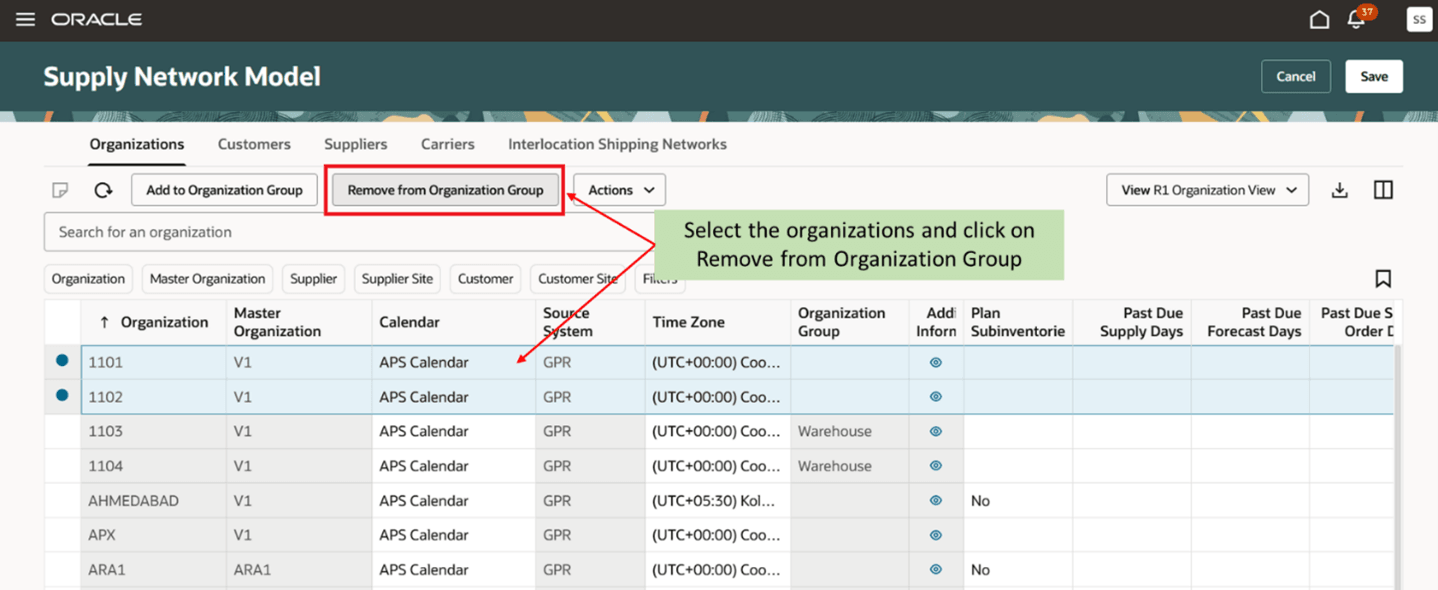
Remove from Organization Group
Customers
Use the Customers tab to review the collected data with customer details and assign time zones to customer sites. If the customer site doesn't have an associated time zone, then the customer site is assumed to be in the same time zone as the organization that's associated with the demand.
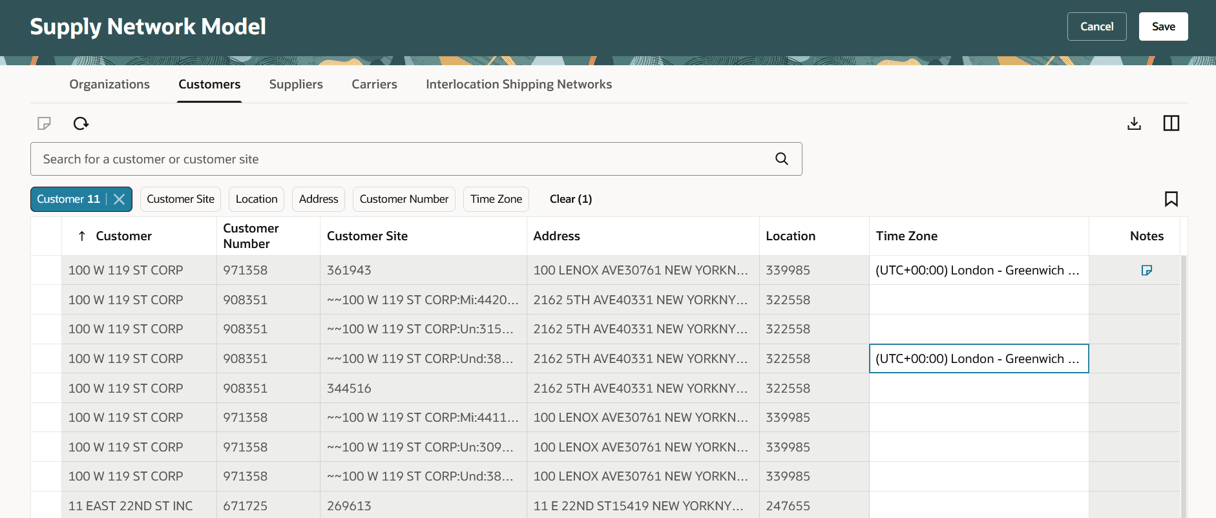
Customers Tab
You can:
- search for a customer or customer site using the default search criteria or use primary filters to further filter the records
- sort and apply filters on individual columns
- add notes for a customer
- rearrange the order or show or hide the visibility using the Columns option
- export the customer’s records to a spreadsheet.
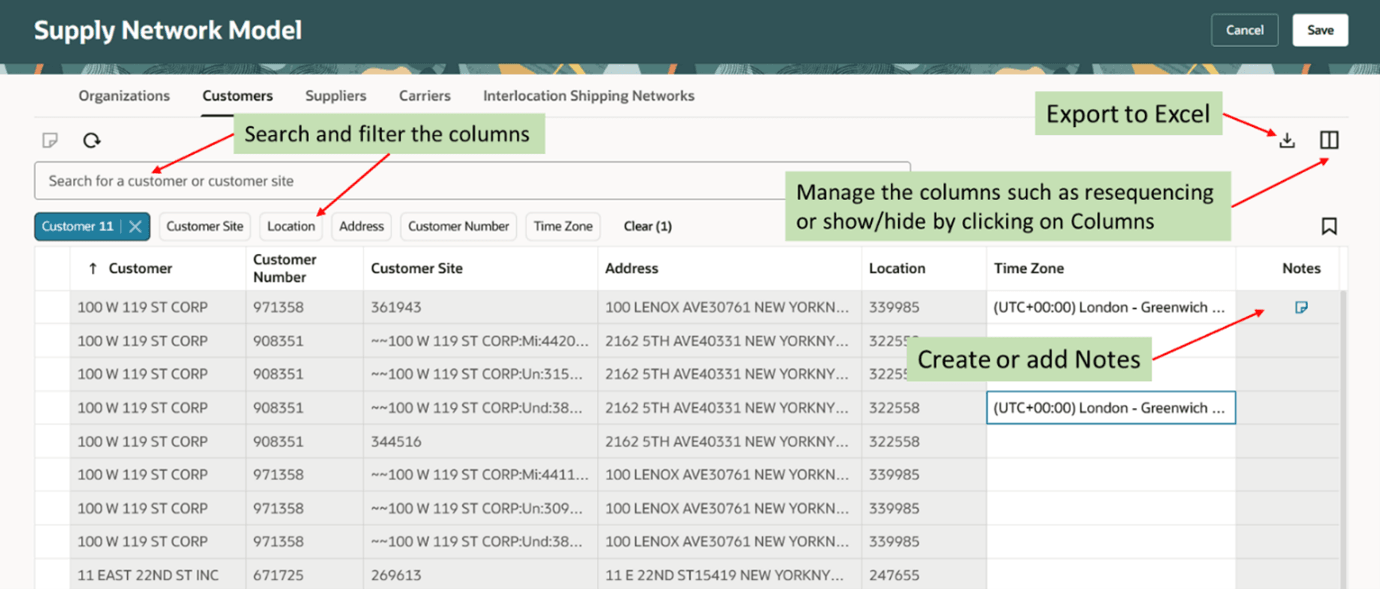
Actions Available in Customers Tab
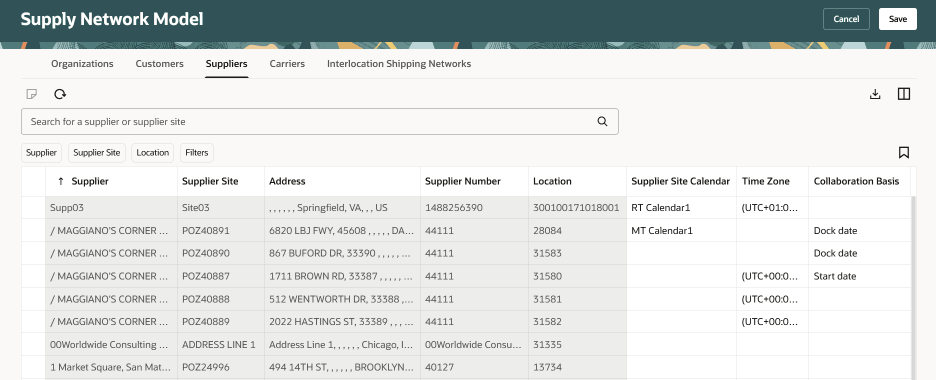
Suppliers
Use the Suppliers tab to review the collected data with supplier and supplier site details and assign time zones to supplier sites. If the supplier site doesn't have an associated time zone, then the supplier site is assumed to be in the same time zone as the organization that's associated with the supply.
You can associate a Supply Chain Planning calendar with a supplier site to use for all items sourced from that supplier site. The calendar is in the collected planning data. Associate a calendar with supplier sites to use if there isn’t any calendar defined through the Approved Supplier List upload for a supplier site-item combination. When you run the plan, the planning process uses the selected calendar on the Supply Network Mode page if the approved supplier list calendar for the supplier site-item is blank. If the approved supplier list calendar for the supplier site-item is blank, and you do not associate a calendar with a supplier site on the Supply Network Model page, then the planning process uses the 24/7 calendar.
Use the Collaboration Basis column to indicate the basis on which you want to publish the order forecast to your suppliers. You can choose to publish the order forecast at the supplier and supplier site levels based on one of the following dates:
- Start date: Suppliers use the start date to know when they need to start manufacturing an order to fulfill the order on time.
- Dock date: Suppliers use the dock date to know the date by which they need to fulfill the order.
Suppliers
You can:
- search for a supplier or supplier site using the default search criteria or use primary filters to further filter the records
- sort and apply filters at individual columns
- add notes for a supplier and supplier site
- rearrange the order or toggle the visibility using the Columns option
- export the supplier’s records to a spreadsheet.
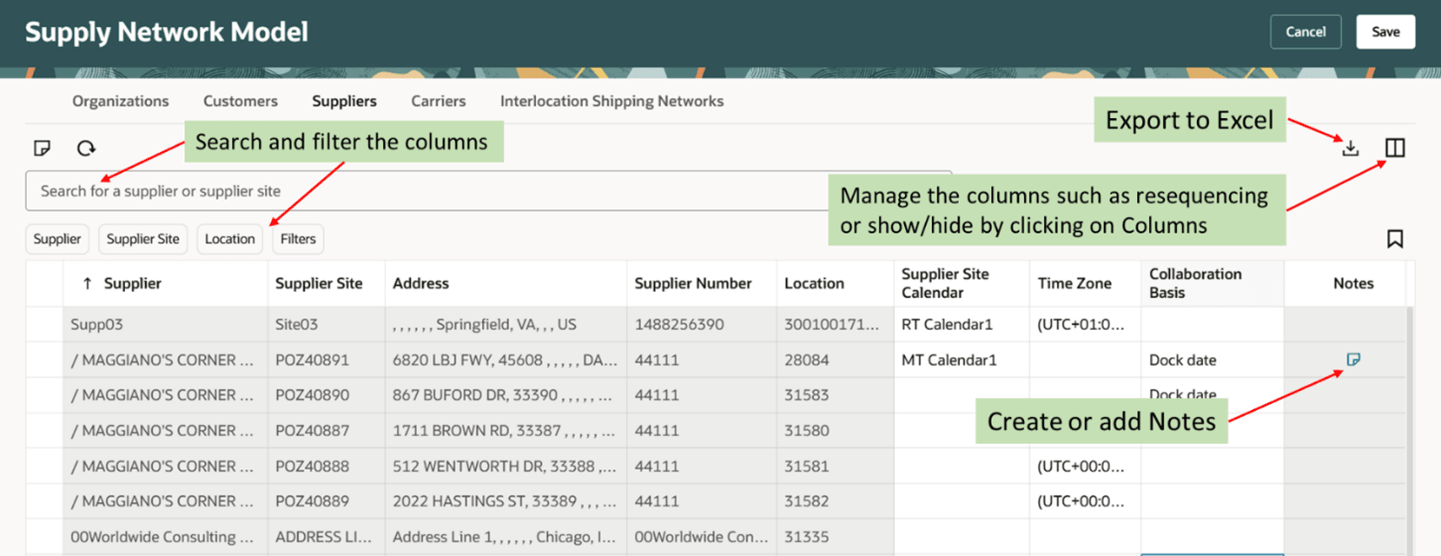
Actions available in Suppliers Tab
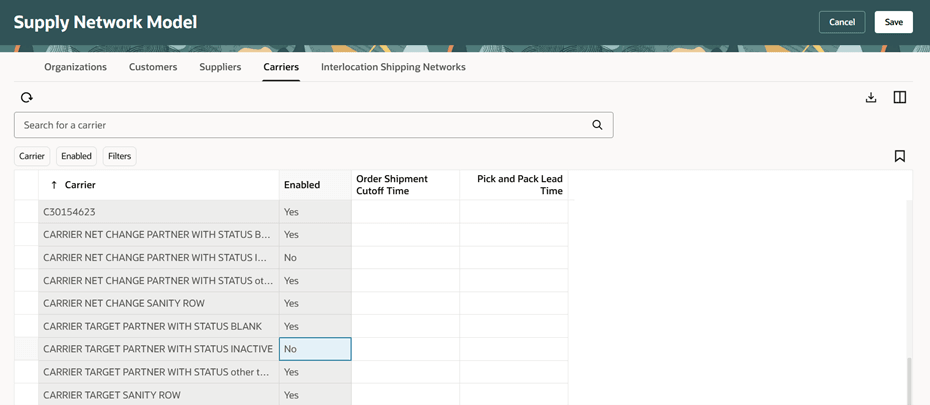
Carriers
Use the Carriers tab to review collected data on carriers.
You can use the Order Shipment Cutoff Time to change the scheduled ship date for sales orders that Order Promising has already scheduled but that you can't ship today for some reason. For example, you submit a sales order at 6 p.m. on Monday, but your carrier's last pick up for the day happens at 5 p.m. You can use the cutoff to tell Order Promising to move the shipment date to Tuesday. For more details, refer to Oracle Fusion Order Promising user guide.
Use the Pick and Pack Lead Time attribute to add flexibility between the date when supply becomes available at your fulfillment organization and the time when you ship it. You can add lead time to your scheduled shipment date and scheduled delivery date. You can use the lead time to package and label the item, arrange for transportation, or do quality checks before you ship. You can add extra pick and pack lead time for these activities, and you can adjust that time according to the fulfillment organization, carrier, and destination. The lead time that you specify will offset the promised shipment and delivery date for each order line. For more details, refer to Oracle Fusion Order Promising user guide.
Carriers
You can:
- search for a carrier using the default search criteria or use filters to further filter the records.
- sort and apply filters at individual columns
- rearrange the order or toggle the visibility using the Columns option
- export the carrier records to a spreadsheet.
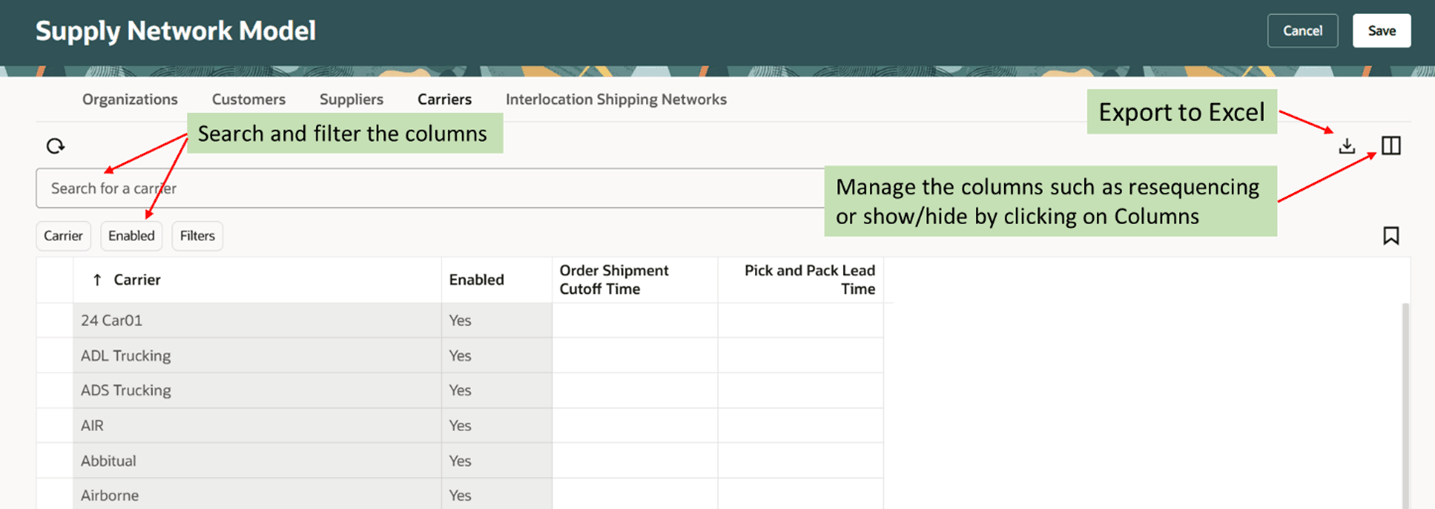
Actions available in Carriers Tab
Interlocation Shipping Networks
You can use the Interlocation Shipping Networks tab to review the collected data on shipping networks, shipping methods, and transit times. You can also specify Order Shipment Cutoff Time and Pick and Pack Lead time.
If you specify more than one order shipment cutoff time, then Order Promising uses a hierarchy to prioritize which one to use, where 1 is the highest and 3 is the lowest:
- Use the cutoff time that you specify for the source, destination, and carrier.
- Use the cutoff time that you specify for the carrier.
- Use the cutoff time that you specify for the organization.
You can set a value in the Pick and Pack Lead Time attribute on the Interlocation Shipping Networks tab, the Carriers tab, and the Organization tab. If you set it on more than one of these tabs, then Order Promising uses this priority to determine which value to apply:
- Ship-from organization, plus the shipping method (carrier plus the service level plus the transportation mode), plus the destination.
- The carrier.
- The organization.
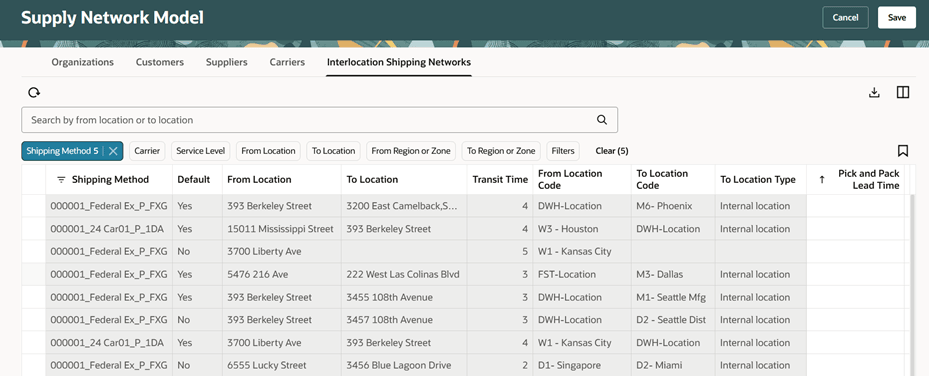
Interlocation Shipping Networks
You can search for from location or to location by using the default search criteria. You can also use primary filters as well as additional filters to further filter the records.
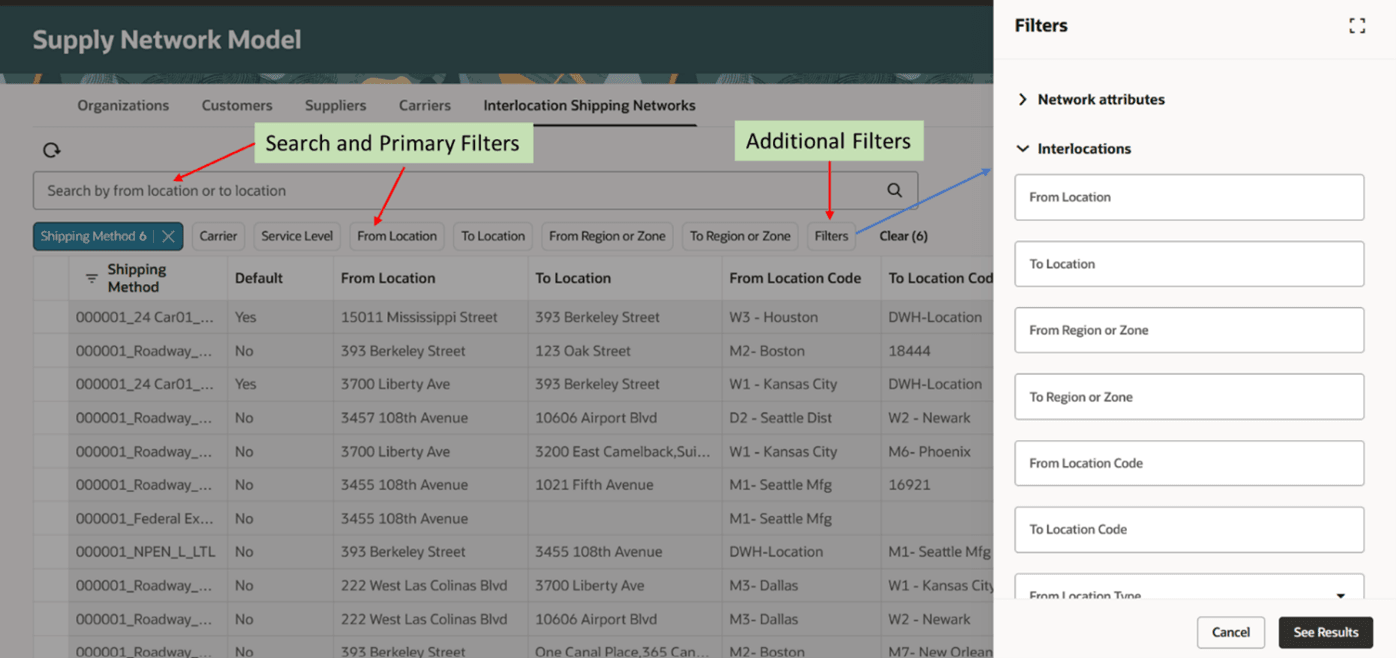
Filter columns in Interlocation Shipping Networks
You can sort and apply filters on individual columns. Also rearrange the order or toggle the visibility using the Columns option. You can export the records into a spreadsheet.
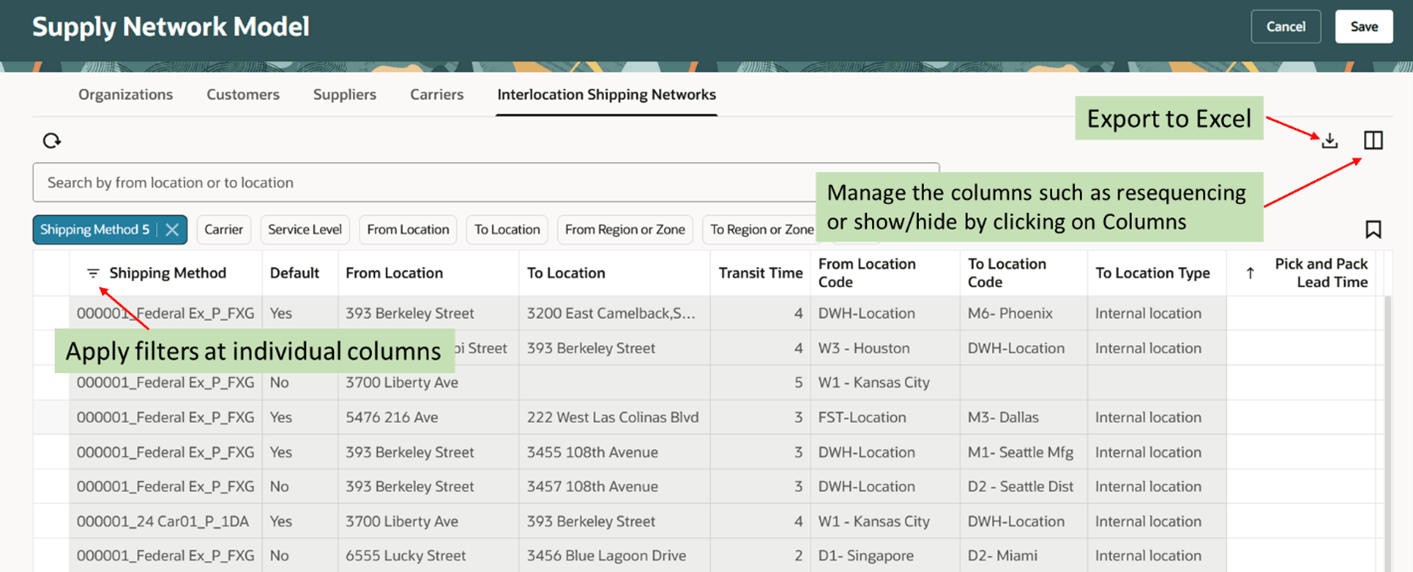
Actions available in Interlocation Shipping Networks
Steps to Enable and Configure
Use the Opt In UI to enable this feature. For instructions, refer to the Optional Uptake of New Features section of this document.
Offering: Supply Chain Planning
Tips And Considerations
If you want to use the Redwood: Manage Supply Network Model Using a New User Experience feature, then you must opt in to its parent feature: Replenishment Planning. If you’ve already opted in to this parent feature, then you don’t have to opt in again.
Access Requirements
Users who are assigned a configured job role that contains these privileges can access this feature:
- View Supply Network Model (MSC_VIEW_SUPPLY_NETWORK_MODEL_PRIV)
- Edit Supply Network Model (MSC_EDIT_SUPPLY_NETWORK_MODEL_PRIV)
These privileges were available prior to this update.