Redwood: Review Min-Max Quantities and PAR Levels Before Updating Current Values
Both Min-Max Planning and Periodic Automatic Replenishment (PAR) are fundamental replenishment techniques that help your organization maintain optimal stock levels while balancing service levels and carrying costs. Both techniques help ensure that you have enough stock on hand to meet demand without overstocking and to automate replenishment decisions. Thus it's imperative that your min-max and PAR levels are accurate and periodically reviewed to ensure that the established values are effective in keeping optimal stocking levels.
Oracle Fusion Cloud Inventory Management provides you with the ability to automatically calculate your optimal min-max levels using historical demand. Prior to this update, any time you calculated these values they dynamically updated the existing values without any review to ensure that things like the current storage capacity weren't exceeded. Now you have the ability to run the automatic min-max level calculation process and publish the values for review before updating the current values. If during your review, you determine that the calculated values need adjustment, you can manually override a calculated value and use that manually input value to update the existing value. Similarly, you can upload your PAR levels that were calculated outside of Oracle Inventory Management to review and manually update if required, before updating the existing values.
You can access the Min-Max Values page by selecting the Inventory Replenishment Values action from the Redwood Inventory Management landing page. Tabs are available at the bottom of the Min-Max Values page to navigate to additional pages including PAR Levels and Action Status. On the Min-Max Values page, you can search by min-max levels including item and subinventory. Additionally, you can search by the run date and by a specific item or subinventory.
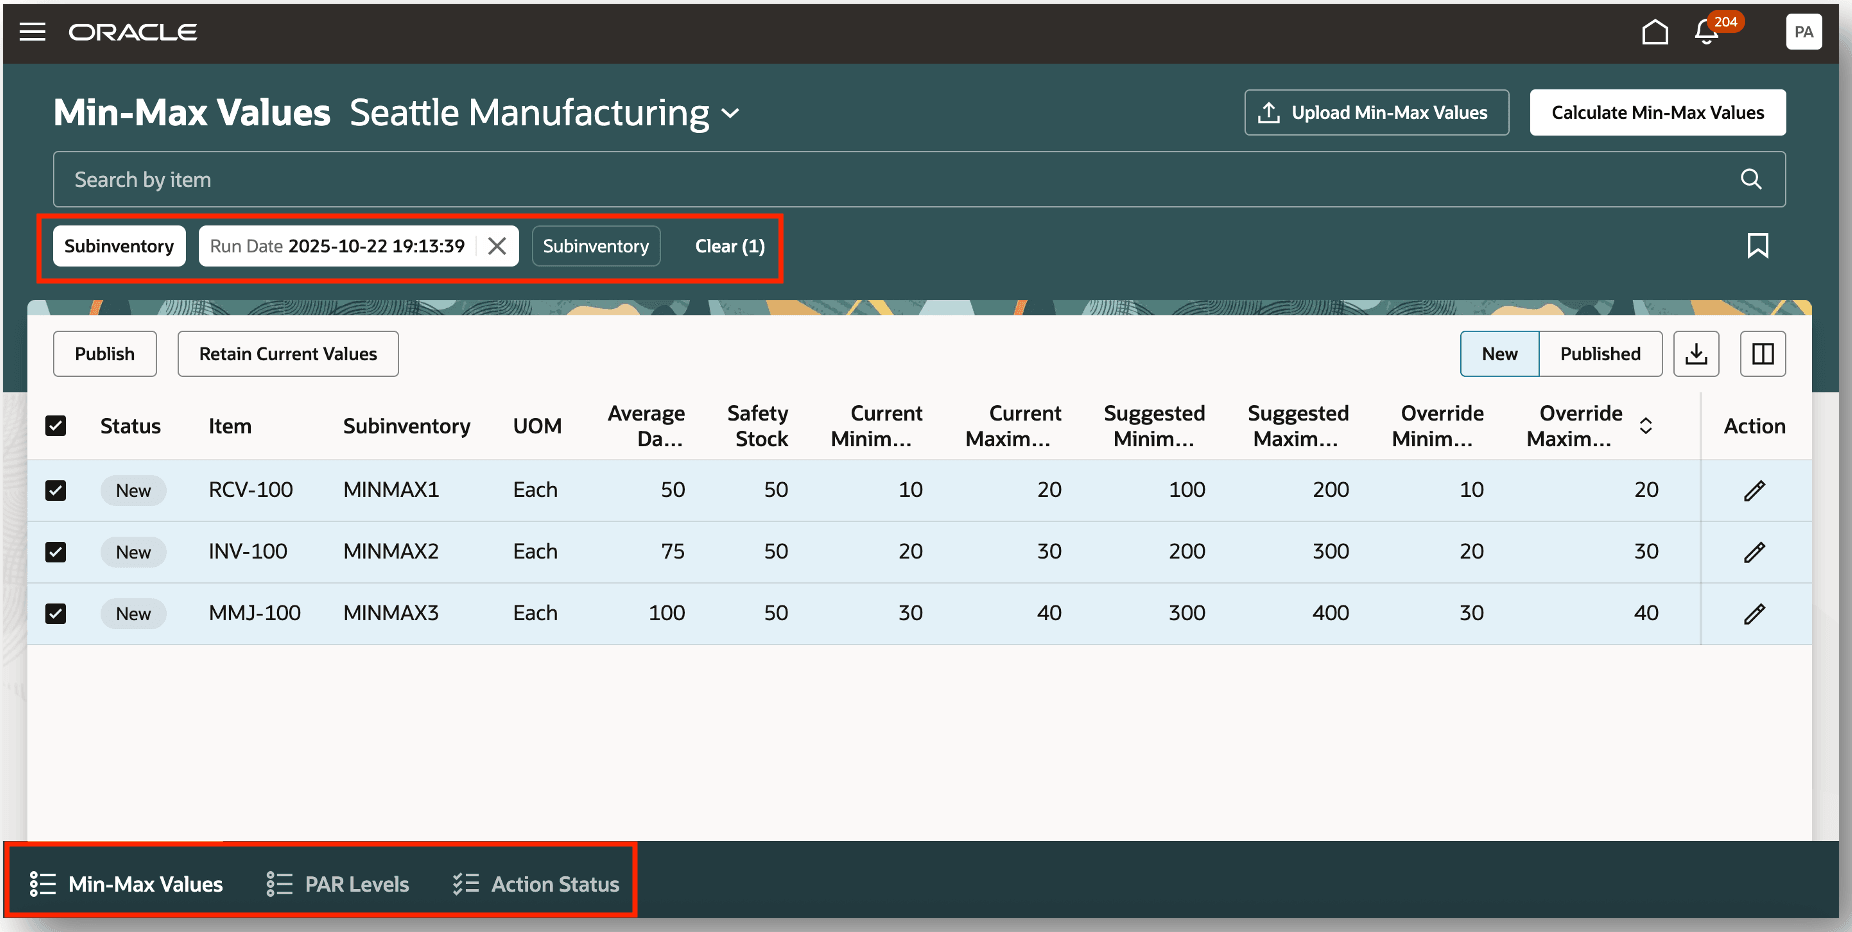
Inventory Replenishment Values
On the Min-Max Values page, you have the ability to override both the minimum quantity and maximum quantity. By selecting a row, you can edit the Override Minimum Quantity and Override Maximum Quantity fields. Once you've entered the override minimum quantity and override maximum quantity, you can publish the values. You can select one or more rows and publish the updated min-max quantities.
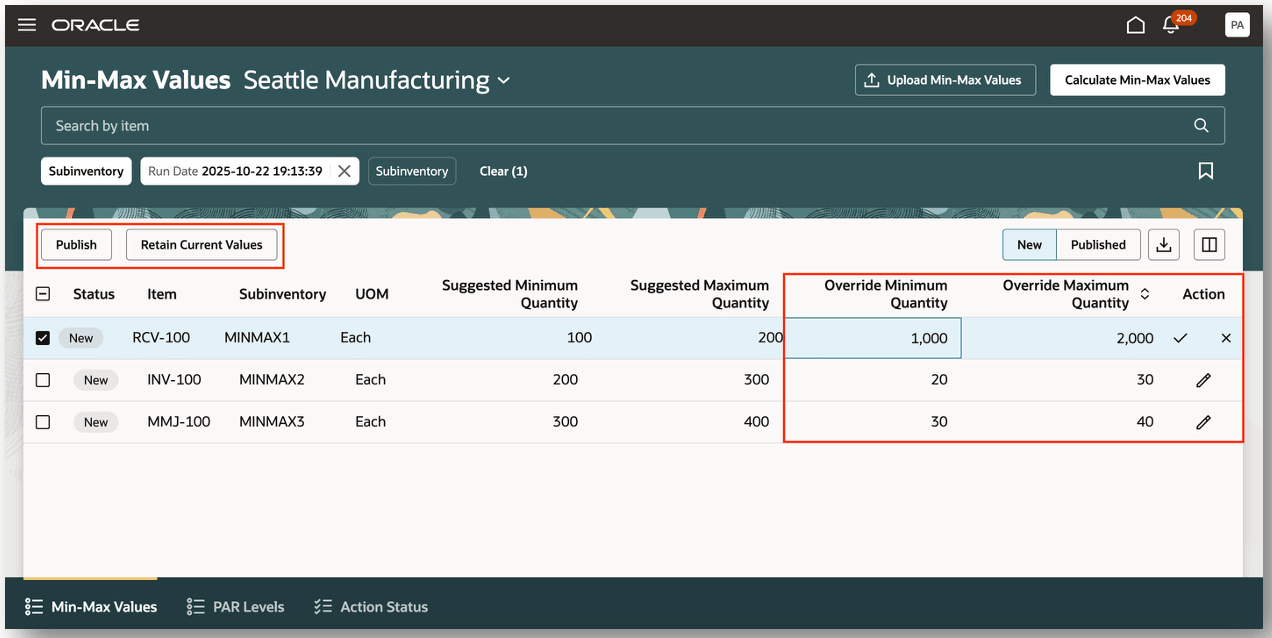
Override Min-Max Quantities
You can view the published min-max quantities by selecting the Published view. Once published, the status is updated from New to Published.
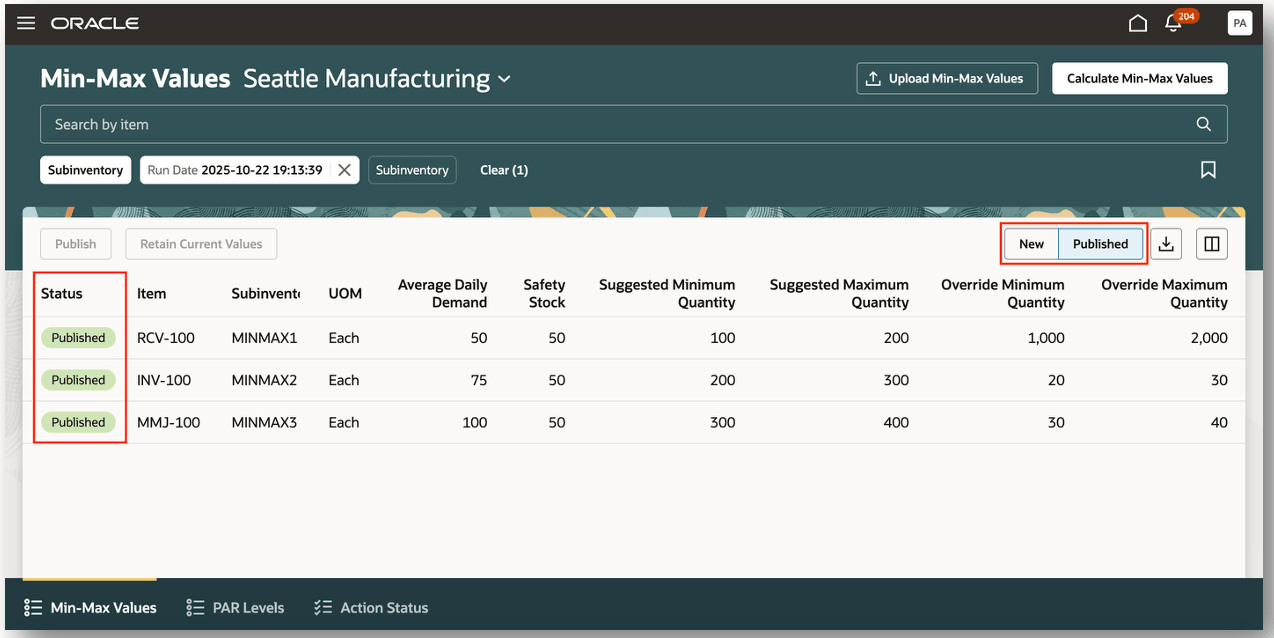
Publish Min-Max Quantities
When you publish the minimum and maximum quantities, you can confirm the published quantities by navigating to the item or subinventory pages. When the suggested quantities or override quantities are published, these quantities update the originally entered minimum and maximum quantities. For example, the original Minimum Quantity was 100 and the original Maximum Quantity was 200 and the you've overridden the respective quantities with 1000 and 2000. Once the new quantities are published, the original values will be updated accordingly.
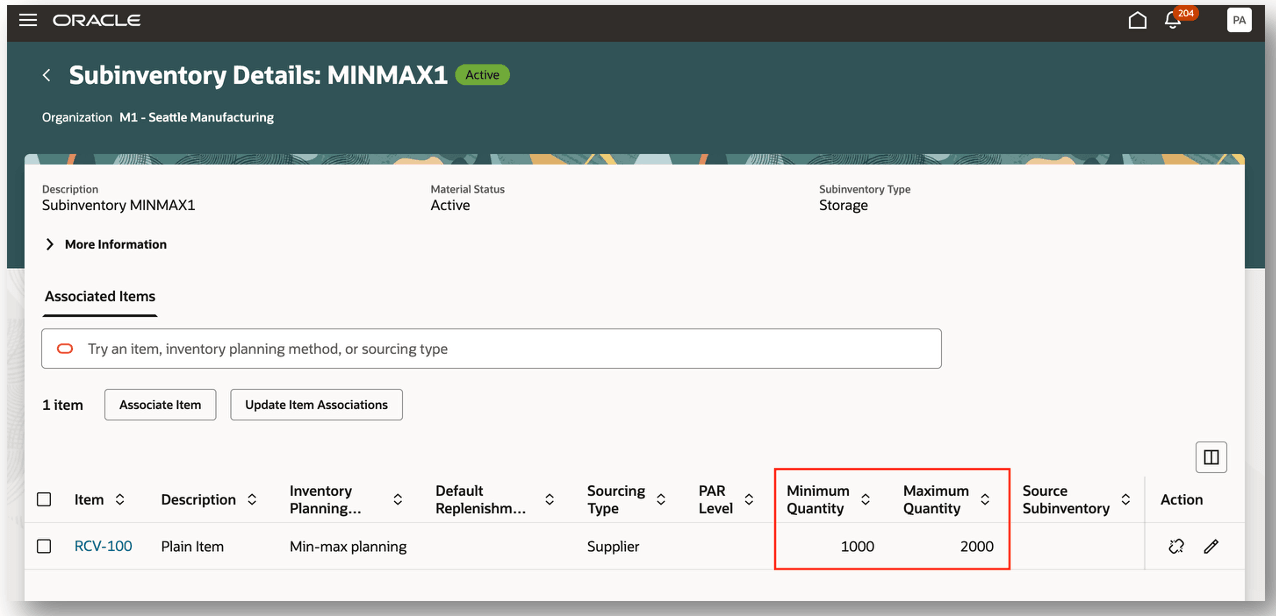
Configure Subinventories
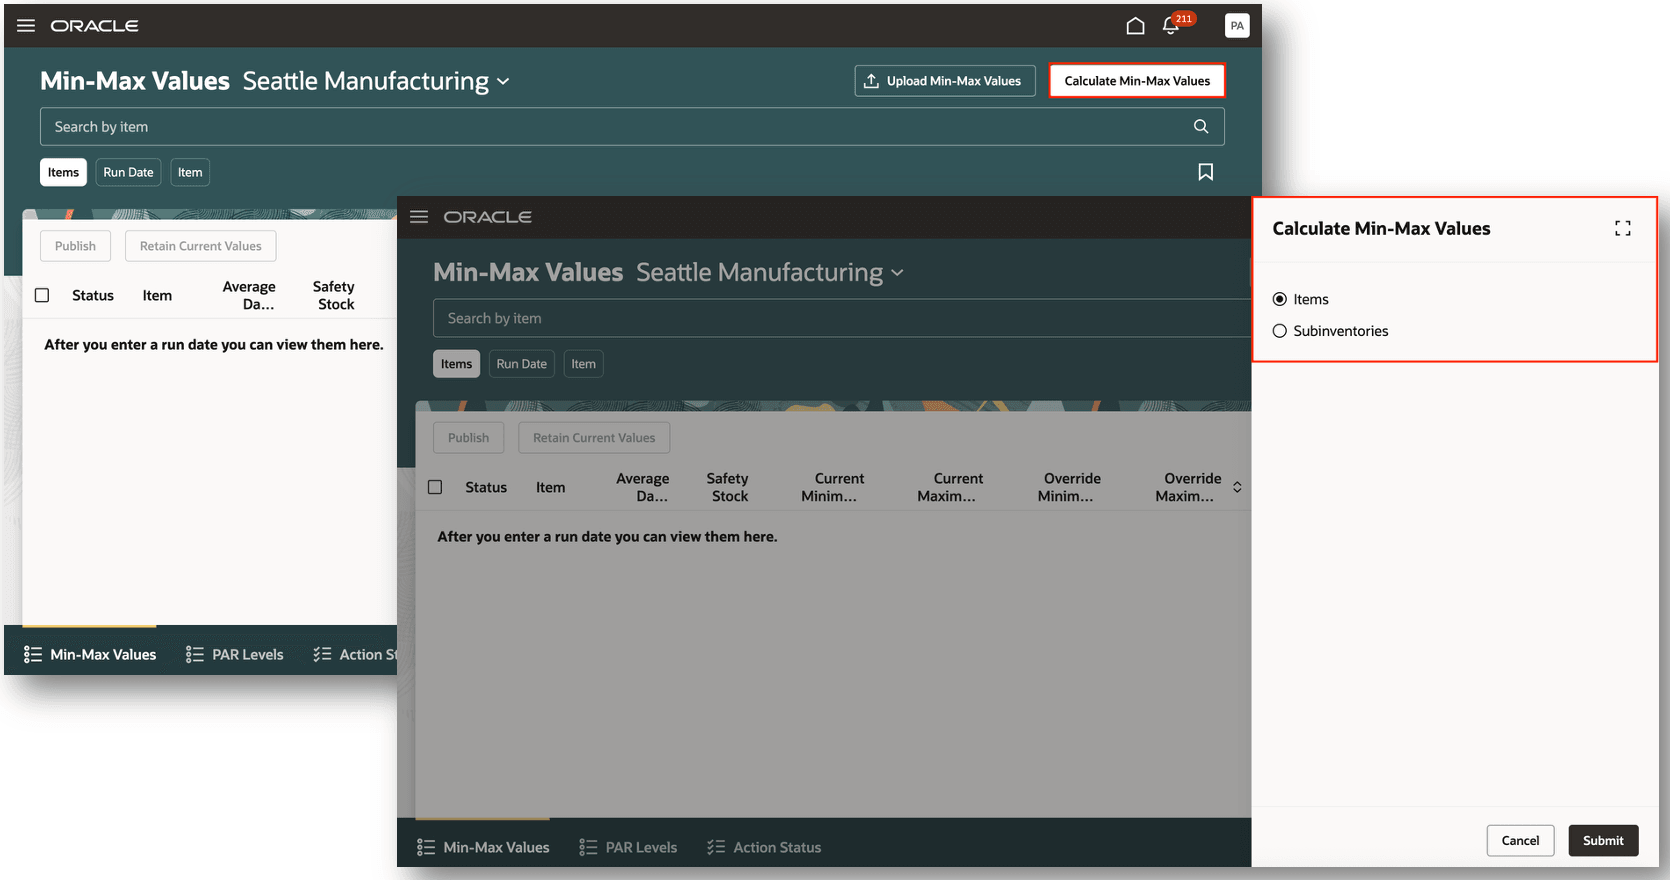
You can submit the Calculate Min-Max Values process directly from the Min-Max Values page. You can access the process by clicking the Calculate Min-Max Values action. You have the option to run the process for either items or subinventories.
The Calculate Min-Max Values process is based on the configuration performed on these pages:
- Manage Min-Max Planning Classification Groups
- Manage Min-Max Planning Policy Profiles
- Manage Min-Max Planning Policy Profile Assignments
Review the Min-Max Planning section in the Implementing Manufacturing and Supply Chain Materials Management guide. Specifically, review these topics: Classifications in Min-Max Planning, Policy Profiles in Min-Max Planning, and Policy Profile Assignments in Min-Max Planning. Additionally, you can review the Steps to Enable section for details on how to configure min-max planning classification groups, policy profiles, and policy profile assignments.
Calculate Min-Max Values
You can also submit the Calculate Min-Max Parameters scheduled process from the Scheduled Processes work area. You have the option to schedule this process to run on a regular cadence. Once the process is submitted, and the Enable Review Process for Min-Max Planning parameter is set to Yes, the calculated minimum and maximum quantities will be available for review on the Min-Max Values page.
These parameters are supported for the Calculate Min-Max Parameters scheduled process:
- Organization
- Select Min-Max Planning Level
- Organization: Min-max parameters are calculated at the inventory organization level
- Subinventory: Min-max parameters are calculated at the subinventory level
- Enable Review Process for Min-Max Planning
- Yes: Calculated min-max parameters are enabled for review on the Min-Max Values page
- No: Calculated min-max parameters aren't enabled for review on the Min-Max Values page
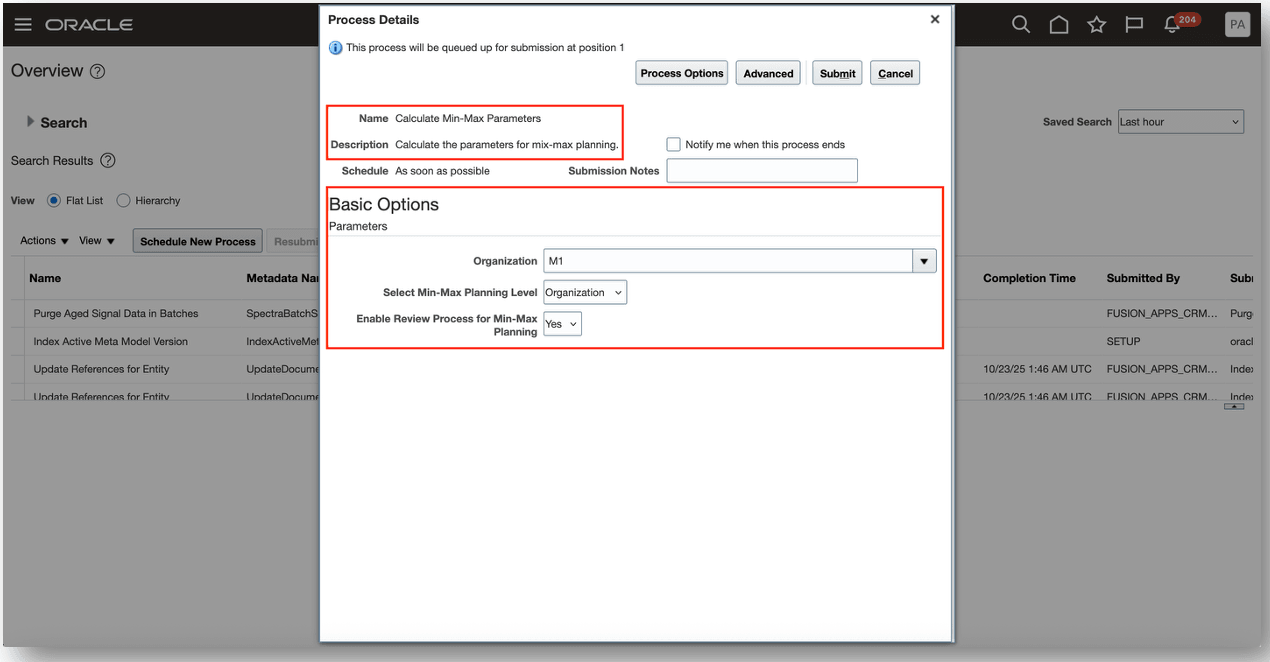
Calculate Min-Max Parameters
You have the option to upload min-max values using a spreadsheet template. You initiate the process by downloading the Min-Max Values Template.csv file. You can save the template locally and enter the values. Once the spreadsheet template has been completed, you can upload the completed spreadsheet. You can either drag and drop the file or browse and select the file for upload. Once you've uploaded the file, you can review the processing status by navigating to the Action Status tab.
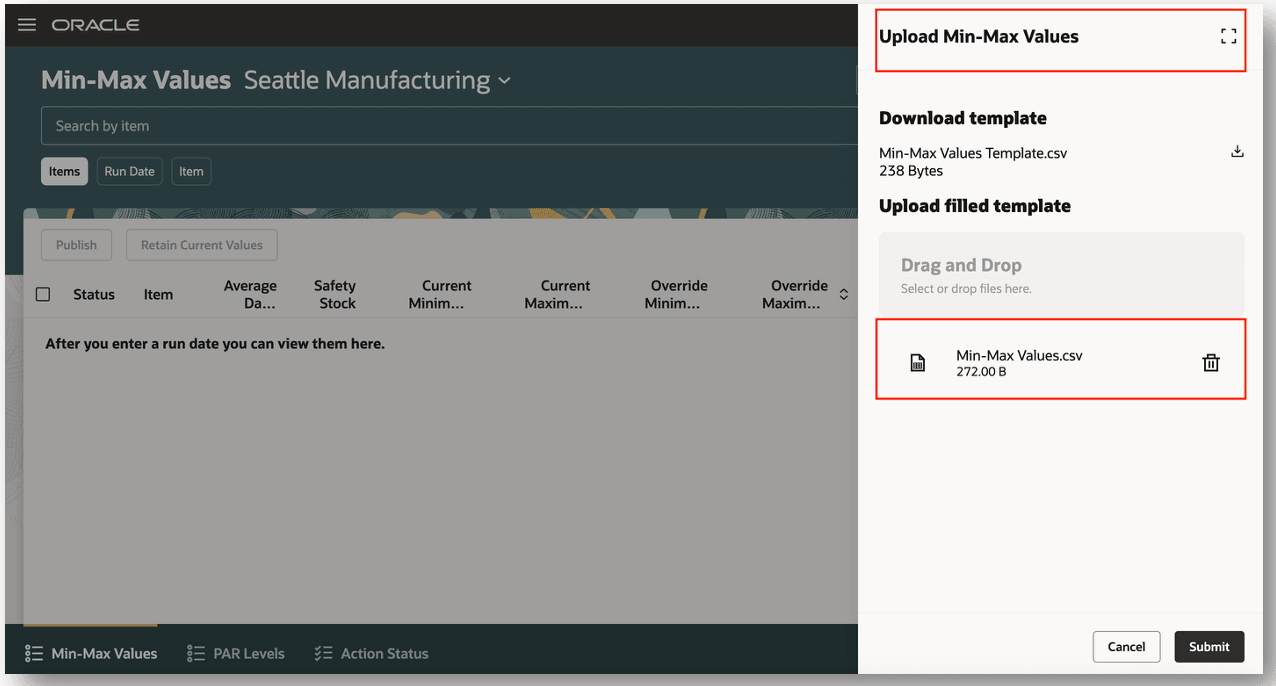
Upload Min-Max Values
Here's a sample completed spreadsheet template for min-max values. You can enter min-max values at either the item or subinventory levels within the same spreadsheet. When entering min-max values at the item level, the Subinventory Code and Subinventory Name columns can remain blank.
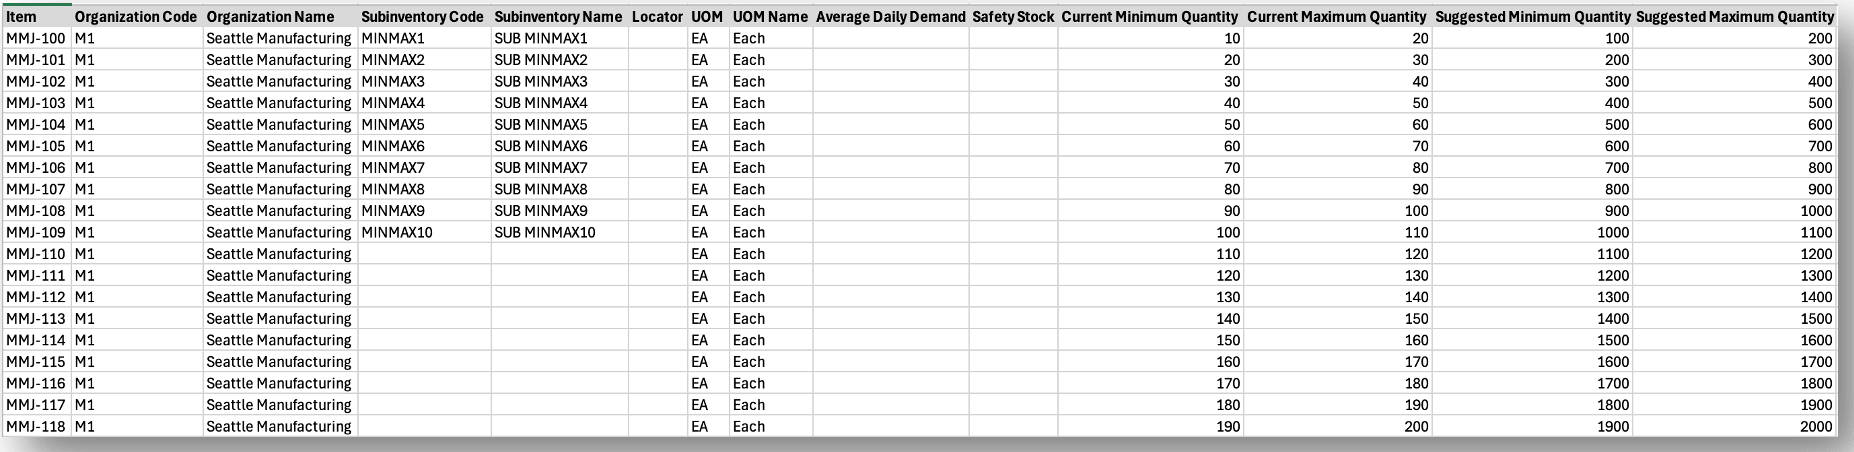
Min-Max Values Template
You can access the PAR Levels page by selecting the Inventory Replenishment Values action from the Redwood Inventory Management landing page. You can search for PAR levels by filtering by Item, Calculated Date, and Subinventory. You can review attributes including Current PAR Level, Current PAR Maximum Quantity, Suggested PAR Level, and Suggested PAR Maximum Quantity.
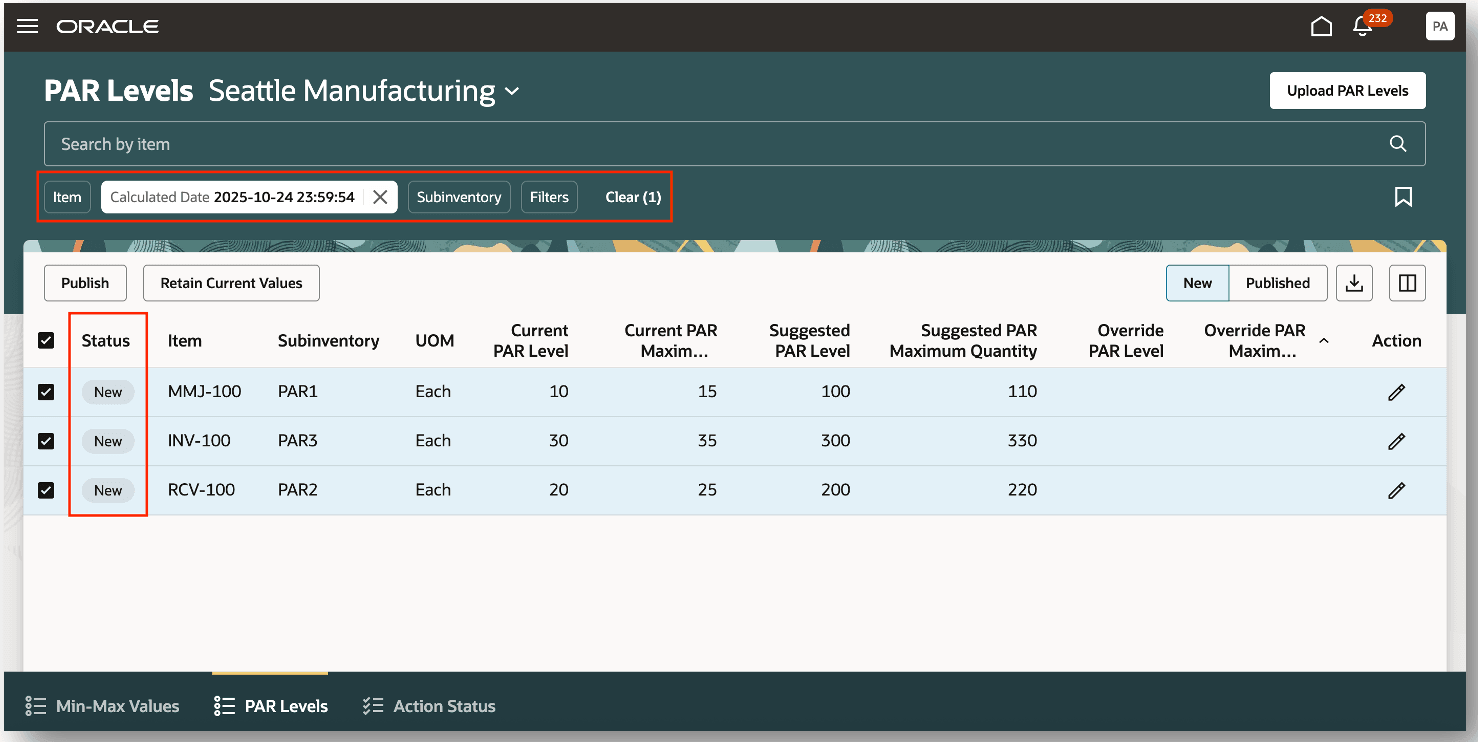
PAR Levels
On the PAR Levels page, you have the ability to override both the PAR level and PAR maximum quantity. By selecting a row, you can edit the Override PAR Level and Override PAR Maximum Quantity fields. Once you've entered the override minimum quantity and override maximum quantity, you can publish the values. You can select one or more rows and publish the updated PAR levels.
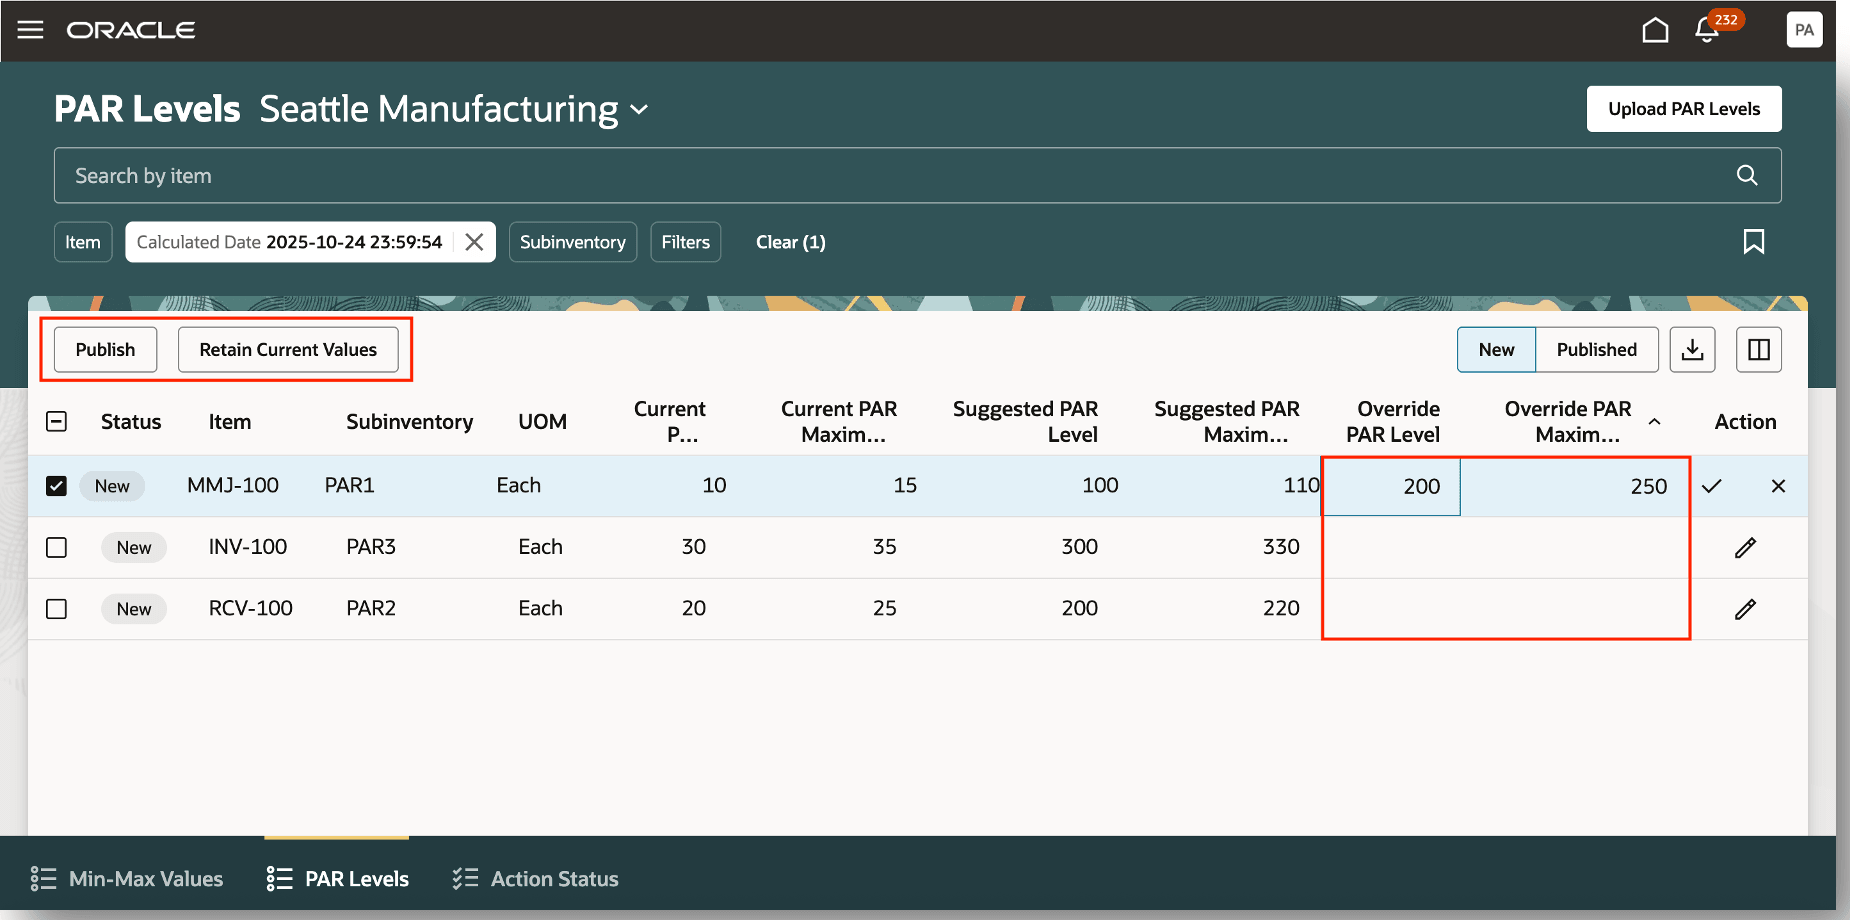
Override PAR Levels
You can view the published PAR levels by selecting the Published view. Once published, the status will be updated from New to Published.
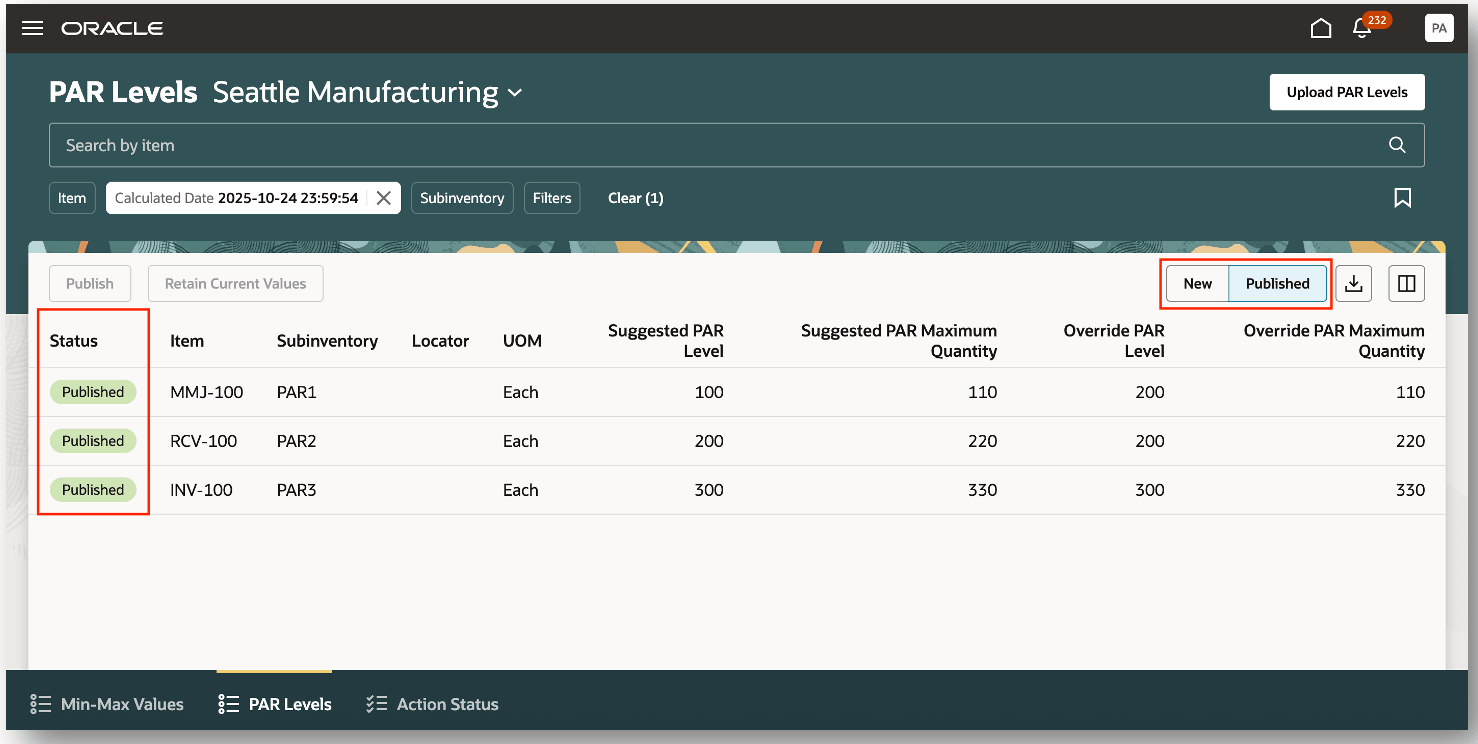
Publish PAR Levels
Once the PAR levels have been published, you can navigate to the Configure Subinventories page to review and confirm the updated PAR levels. PAR levels are supported at both the item subinventory and item locator levels.
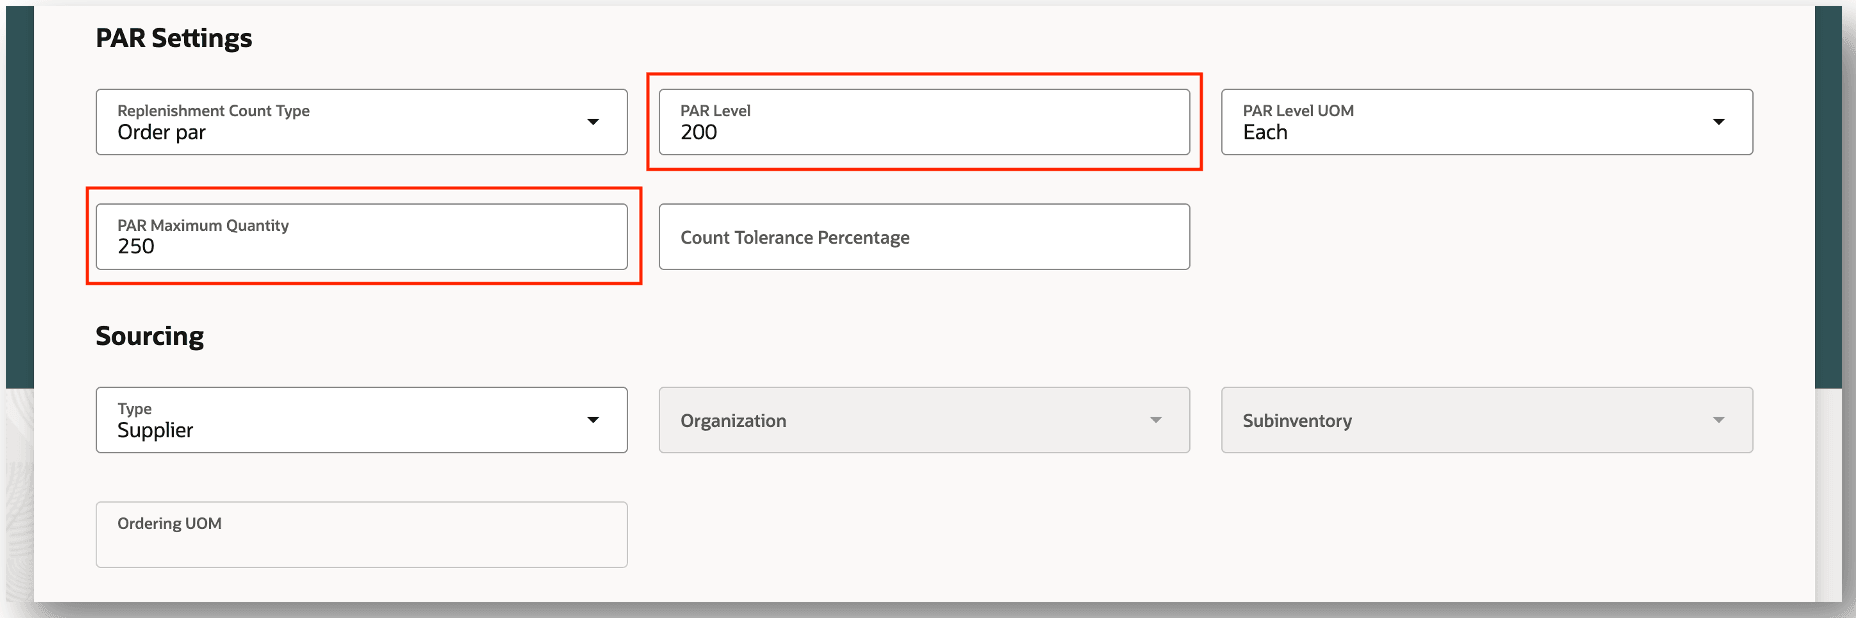
PAR Settings
You have the option to upload PAR levels using a spreadsheet template. You initiate the process by downloading the PAR Levels Template.csv file. You can save the template locally and enter the PAR levels. Once the spreadsheet template has been completed, you can upload the completed spreadsheet. You can either drag and drop the file or browse and select the file for upload. Once you've uploaded the file, you can review the processing status by navigating to the Action Status tab.
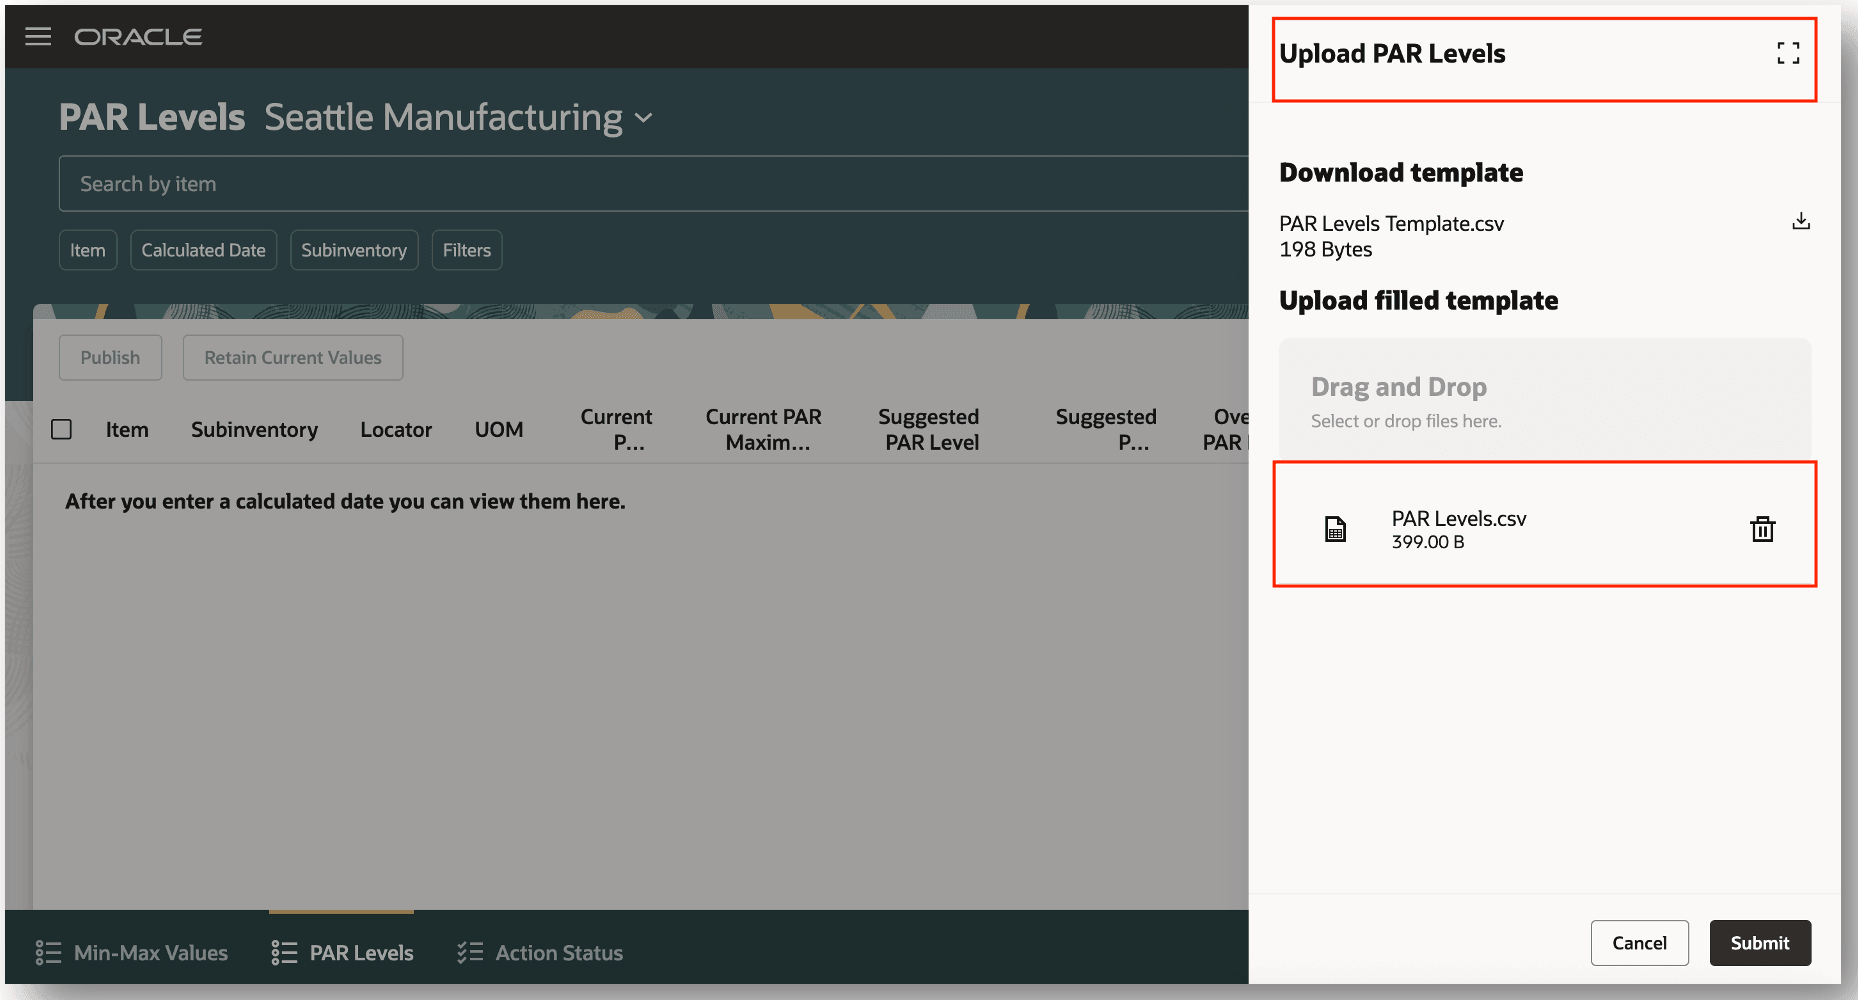
Upload PAR Levels
Here's a sample completed spreadsheet template for PAR levels. You can upload PAR levels at either the subinventory or locator level. When PAR levels are configured at the inventory locator level, the Locator column must be populated.
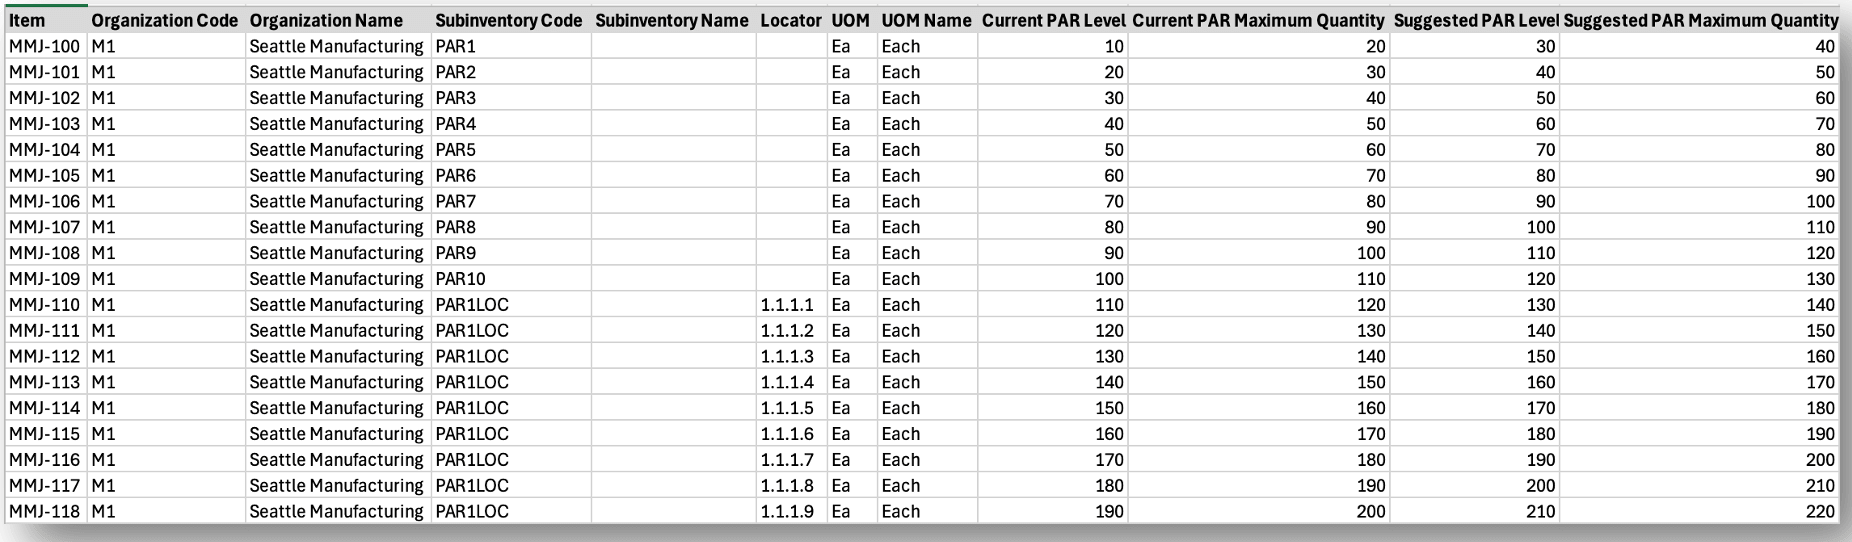
PAR Levels Template
Once you submit the Calculate Min-Max Values, Upload Min-Max Values, or Upload PAR Levels task, you can review the process submission status on the Action Status page. In the event that one or more records fail, you can review the errors and correct accordingly.
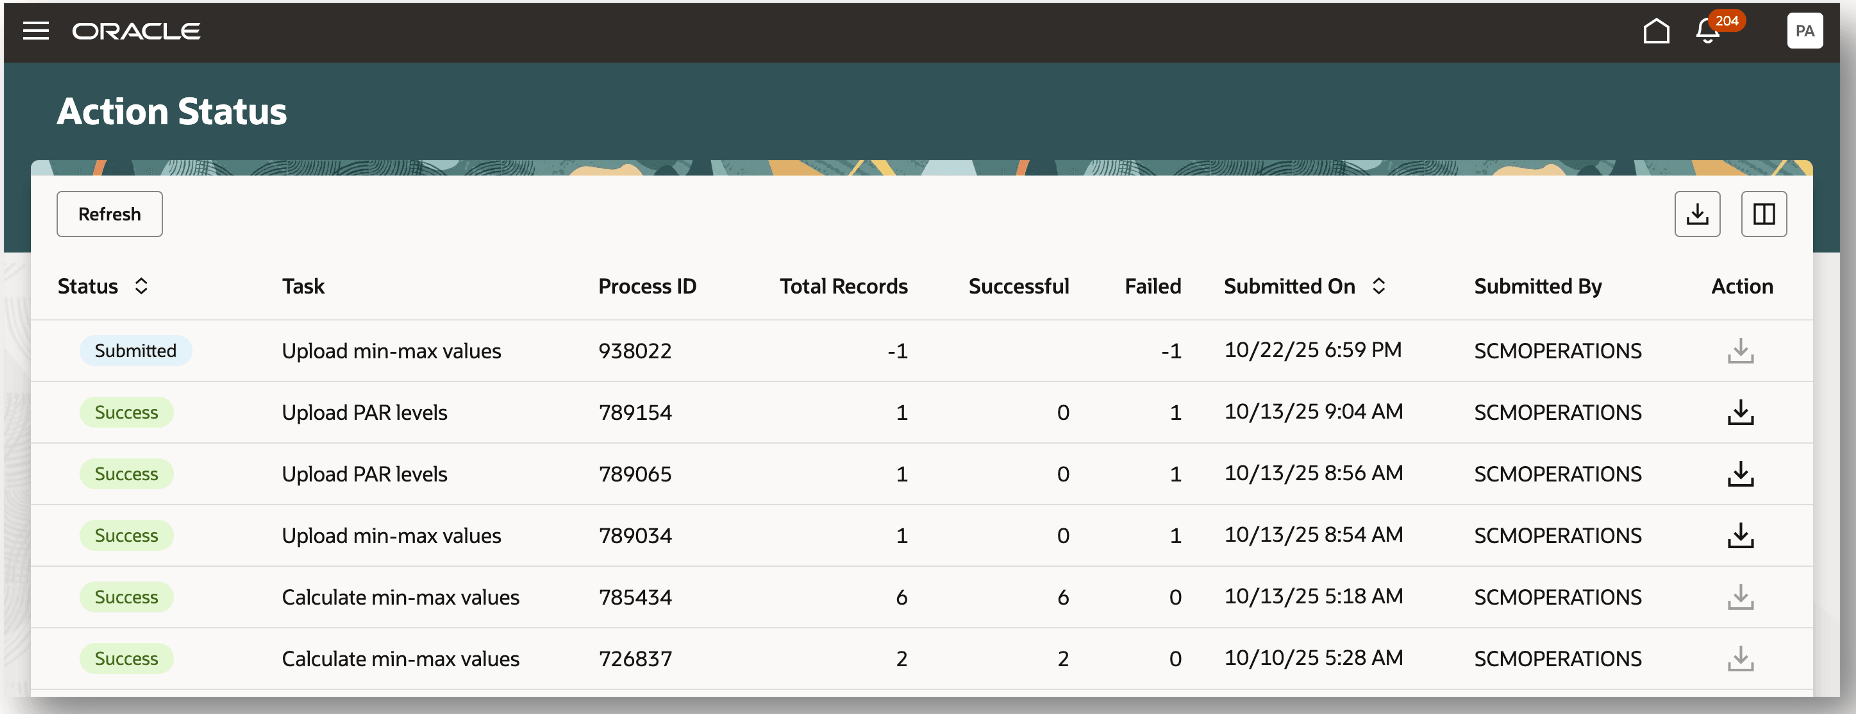
Action Status
A nudge acts as a reminder to take a specific action on a certain event. You can configure nudges to be received when min-max values have been computed. The email notification indicates the date and time when the min-max values were computed. Additionally, you can click the Review Inventory Replenishment Values link to review the details associated with the calculated values.
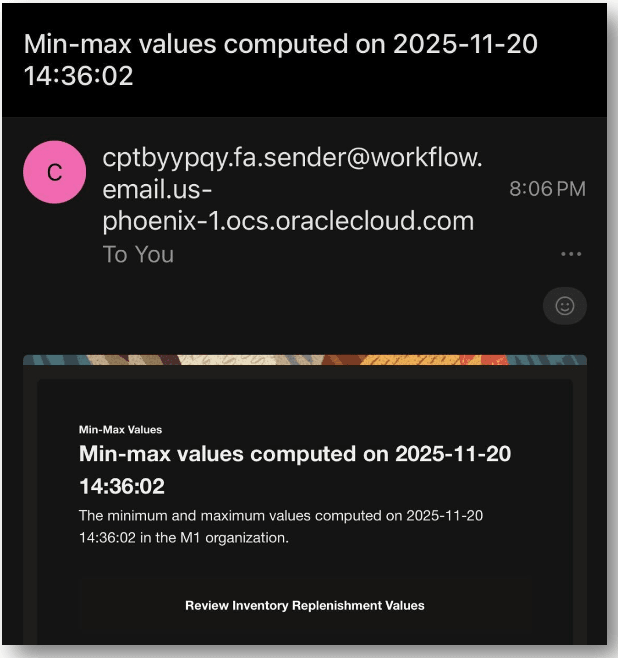
Nudge Email Notification
This feature provides more control and increased efficiency by allowing you the opportunity to review your min-max and PAR level values before mass updating the existing levels with the newly calculated values.
Here's the demo of these capabilities:
Steps to enable and configure
When setting up min-max planning for Oracle Inventory Management, you can create classifications to categorize your items. You associate categories with similar item attributes with a classification. Categorizing items with similar attributes enables you to specify the policies for computing the min-max quantities efficiently.
Create Min-Max Planning Classification Groups
- In the Setup and Maintenance work area, go to the Manage Min-Max Planning Classification Groups task:
- Offering: Manufacturing and Supply Chain Materials Management
- Functional Area: Inventory Management
- Task: Manage Min-Max Planning Classification Groups
- On the Manage Min-Max Planning Classifications Groups page, in the Specify Classification section, click the Add (+) button to add a new row and specify a classification name and description.
- In the Specify Classification Criteria section, click the Add (+) button, and do the following:
- In the Condition column, select a condition.
- In the Criteria Values column, click the Edit icon to specify the criteria.
- Click Save.
Create Min-Max Planning Policy Profiles
- In the Setup and Maintenance work area, go to the Manage Min-Max Planning Policy Profiles task:
- Offering: Manufacturing and Supply Chain Materials Management
- Functional Area: Inventory Management
- Task: Manage Min-Max Planning Policy Profiles
- On the Manage Min-Max Planning Policy Profiles page, click the Add (+) icon.
- On the Create Min-Max Planning Policy Profile page, do the following:
- Enter a policy name and description.
- Specify the required attributes in the Minimum Quantities, Maximum Quantities, and EOQ Calculation Inputs sections.
- Click Save.
Create Min-Max Planning Policy Profile Assignments
- In the Setup and Maintenance work area, go to the Manage Min-Max Planning Policy Profile Assignments task:
- Offering: Manufacturing and Supply Chain Materials Management
- Functional Area: Inventory Management
- Task: Manage Min-Max Planning Policy Profile Assignments
- On the Edit Policy Profile Assignments: Default page, click the Add (+) icon to add a row.
- In the Classification column, select a classification for the row you added.
- In the Organizations column, click the Edit icon to add one or more organizations.
- In the Subinventories column, click the Edit icon to add one or more subinventories.
- In the Policy Profile column, select a policy profile for the row you added.
- Click Save.
Nudges Overview
A nudge is a reminder sent to a worker to take a specific action on a certain event. Managers and employees can receive nudges for any overdue or pending tasks pertaining to events. Inventory replenishment value calculation is one such event where nudges can be configured to send reminders. You can configure nudges to send reminders through email or SMS.
Navigate to the Nudge Plans page by selecting the Nudge Configuration task from the quick actions.
Create a New Nudge Plan
- On the Nudge Plans page, click Create to add a new plan.
- On the New Nudge Plan drawer:
- Enter the nudge plan name
- Enter the nudge plan description
- Select the start date and end date
- Select the subscriber inventory
- Select the Min-Max Adjustment type
- Click Create Draft.
- After the nudge is in draft state, select the nudge and click the Add button to create a new nudge.
- Select the Min-Max Adjustment module
- Enter the organization for which you want to retrieve nudges when cross-dock opportunities exist
- Click Save.
Add Recipient Groups
- On the Inventory Replenishment page, click the Advanced tab of the draft nudge plan.
- In the Recipient Groups section, click Add to create the recipient groups that will receive notifications for nudges in the nudge plan.
- In the Users section, click Add to add users to the recipient group.
- Click Save.
Configure Notification Channel and Recipient
- On the New Nudge page, click the nudge name link to open its details.
- In the Channels section, click Add to create a new channel.
- On the New Channel page, choose whether to send notifications through email, SMS, or both, and select the recipient group to receive the notification.
- For email notifications, you can personalize the subject and body using user-defined content.
- After the nudge plan is configured, click Activate to enable the nudge plan.
Tips and considerations
- When grouping categories into classifications, the same min-max policies are applied to all items within a classification.
- Ensure that the grouping of items into categories, and categories into classifications, is well thought through.
Key resources
- Oracle Fusion Cloud SCM: Using Inventory Management guide, available on the Oracle Help Center.
- Oracle Fusion Cloud SCM: Implementing Manufacturing and Supply Chain Materials Management guide, available on the Oracle Help Center.
- Oracle Fusion Cloud SCM: Security Reference for Manufacturing and Supply Chain Materials Management guide, available on the Oracle Help Center.
Access requirements
Users who are assigned a configured job role that contains this privilege can access this feature:
- Review Min-Max Values and PAR Levels (INV_REVIEW_MIN_MAX_VALUES_PAR_LEVELS_PRIV)
This privilege is new in this update.
To set up this feature, you'll need a configured job role that contains this existing privilege:
- Manage Min-Max Planning Policies (INV_MANAGE_MIN_MAX_PLANNING_POLICIES_PRIV)
This privilege was available prior to this update.