Redwood: Use Improved Workflow
Workflow on Redwood pages has been improved to support new editing capabilities, enabling actions such as:
-
Create a duplicate workflow
-
Update context sensitive descriptive flexfields
-
Add and update change lines attachments
-
Calculate use-up date on the affected item
Here are the other new capabilities:
-
View the item redlines in change context.
-
Update the item class in change context.
-
Check for content on the workflow tabs using the upgraded data presence indicators.
-
Navigate to the affected object from workflow search results using the data presence indicators.
-
Check the participant elapsed time in workflow approval search.
-
Publish engineering and commercialization change orders, and change orders without revision control across all statuses.
-
Configure additional workflow controls to allow all participants to remove users, as well as to terminate and restart workflows.
Edit Workflow
Create a Duplicate Workflow
You can create a new workflow based on an existing one in Product Management. Use the workflow page-level action named Duplicate.

Duplicate Action on the Workflow
Click Duplicate to open the Duplicate <workflow name> drawer.
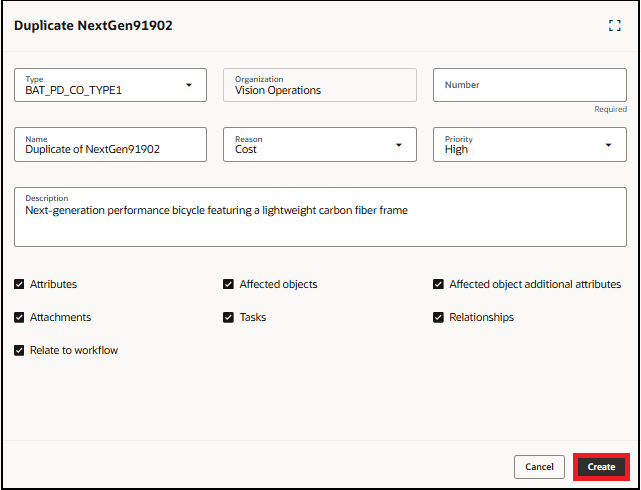
Duplicate Workflow Drawer
In this drawer, you can choose which entities— Attributes, Affected objects, Affected object additional attributes, Attachments, Tasks, Relationships, and Relate to workflow—you want to include or exclude when copying them to the new workflow. All entities are selected by default. Except for Relate to workflow, the others are organized into tabs within the new workflow.
You can also choose a different workflow type—engineering change order, change request, commercialization change order, change order without revision control, problem report, and corrective action—from the Type drop-down list. Only fields that are common between the existing workflow type and the new one will be copied.
If the Relate to workflow remains selected, then a relationship will be created between the source and the new workflow.
Edit Context Sensitive Descriptive Flexfields
You can now edit the context sensitive descriptive flexfields on change lines, navigate to the context sensitive segment of the change line, and click the specific attribute section to create or update the values in the Additional attributes drawer.
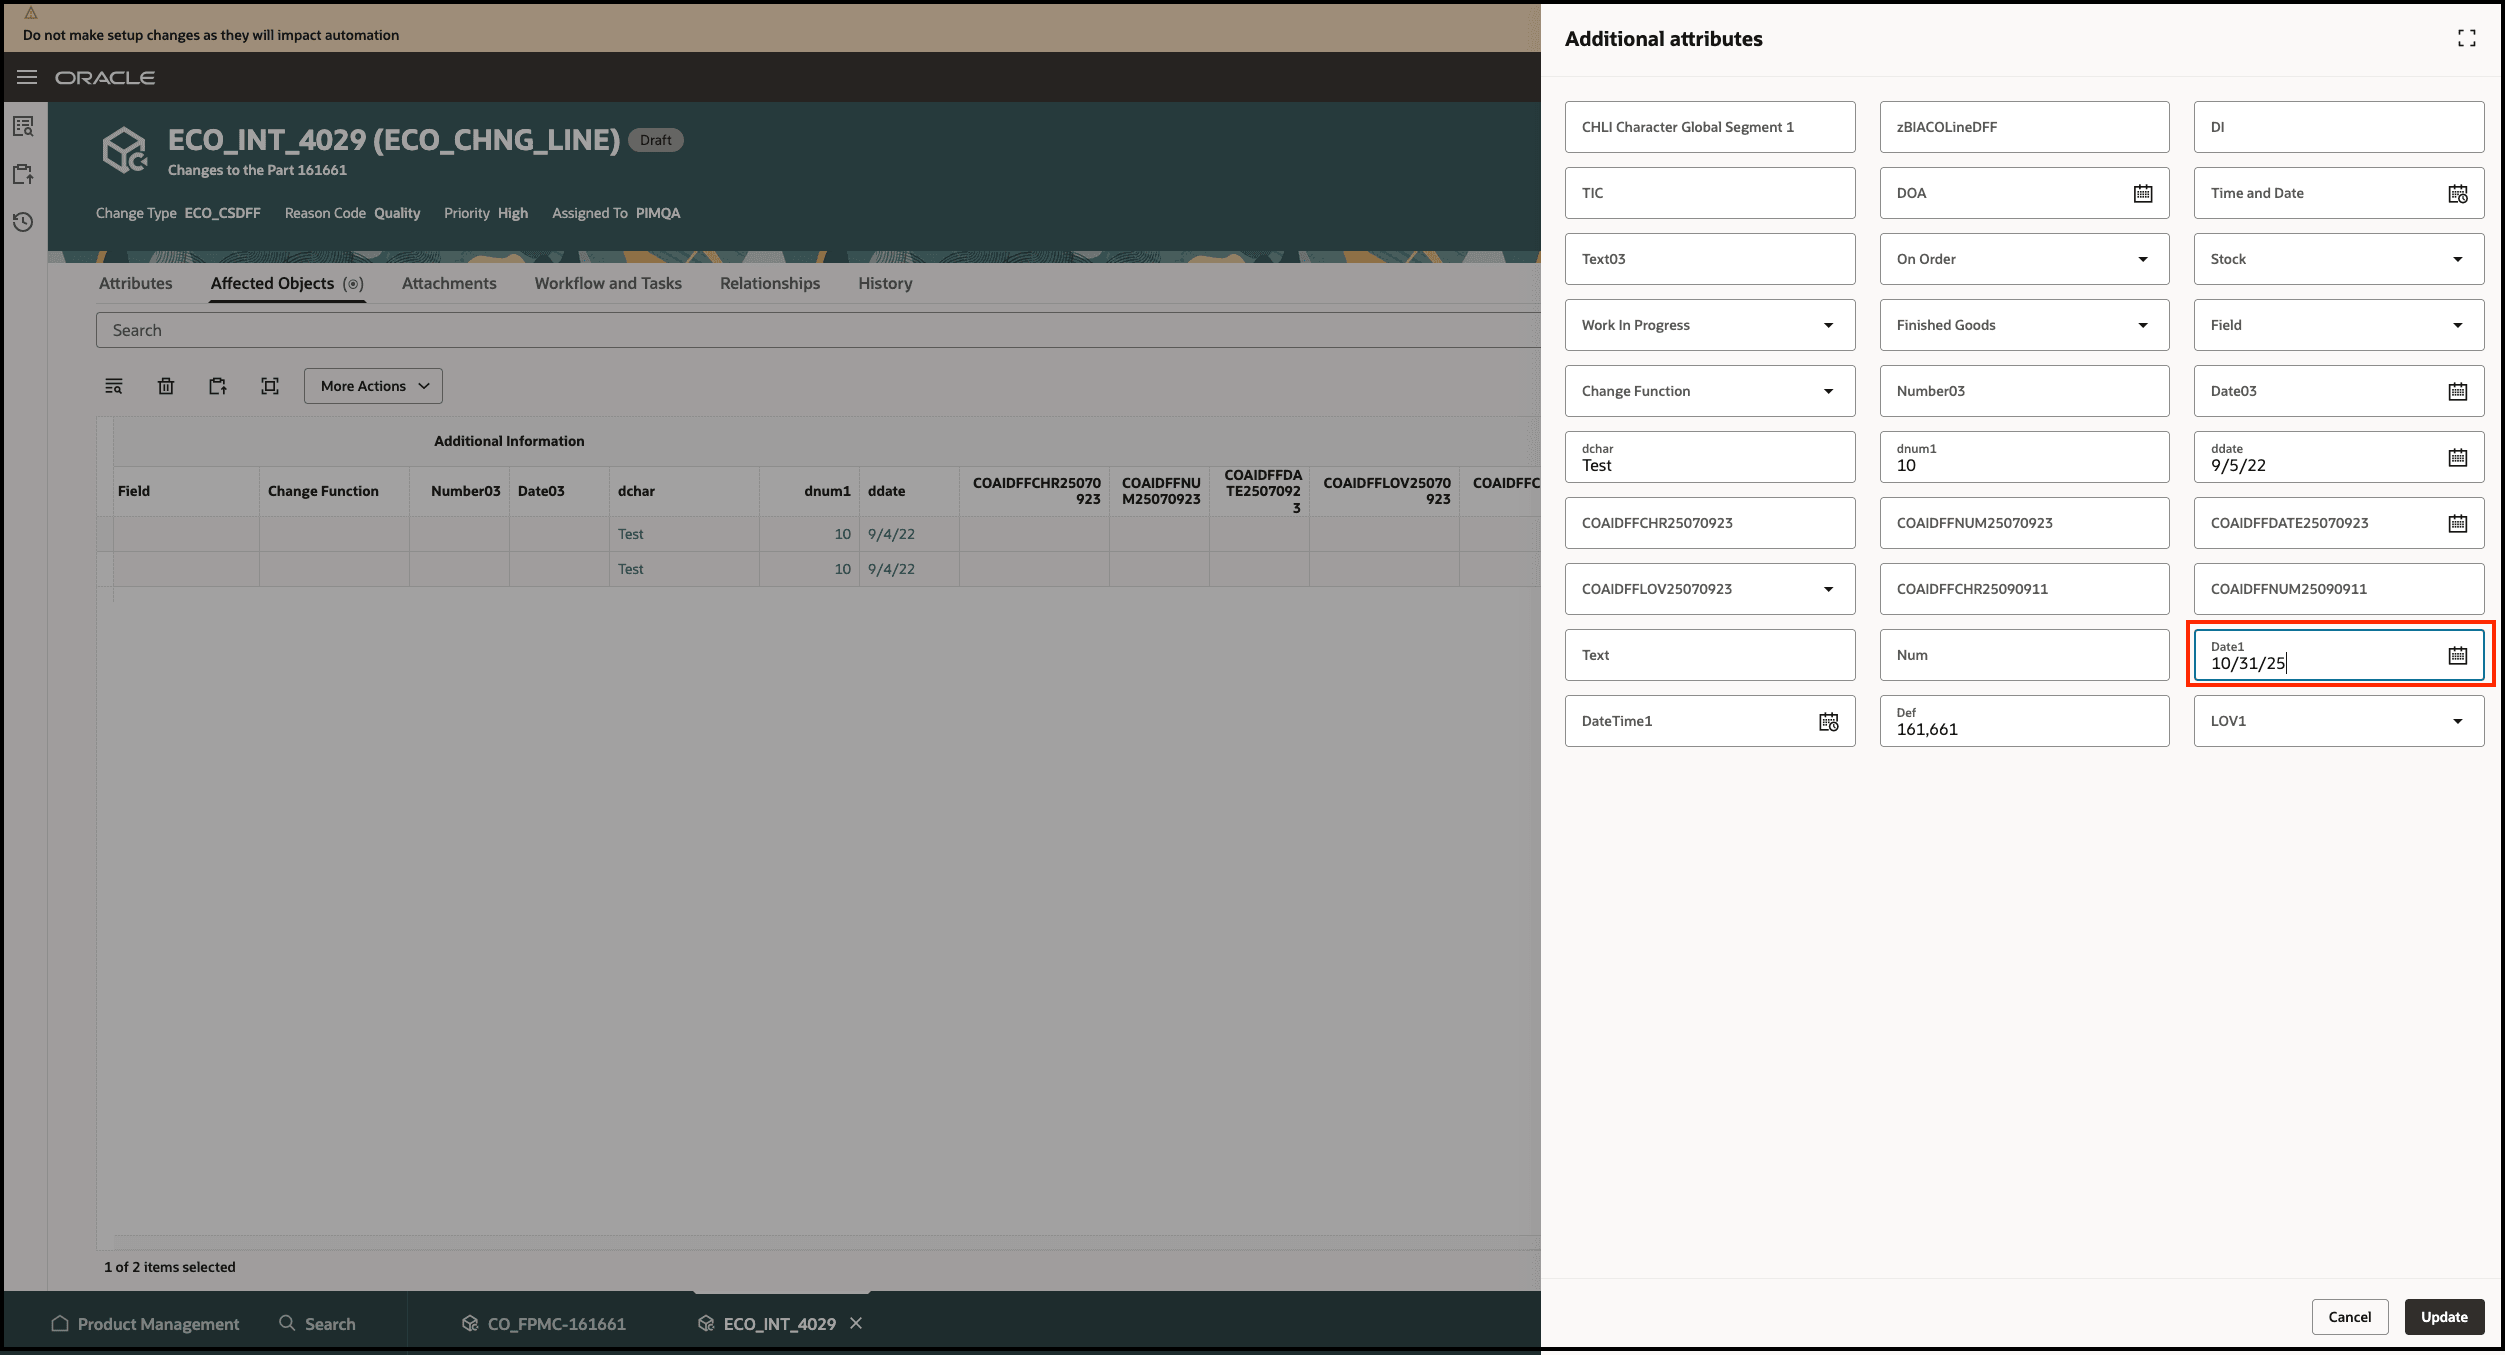
Edit Context Sensitive Descriptive Flexfields
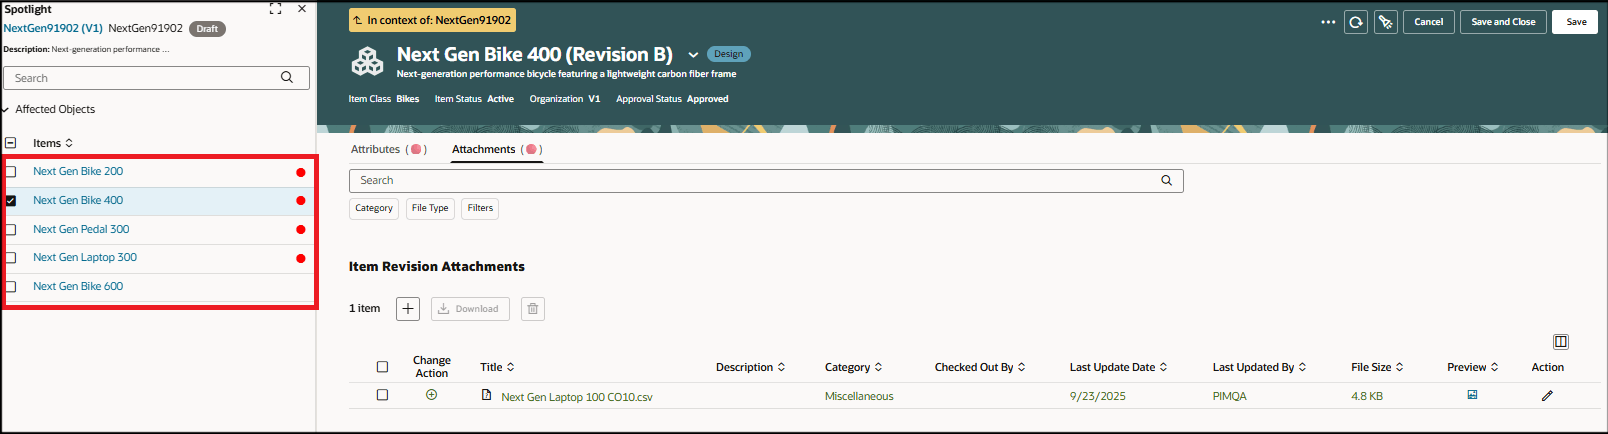
Add Attachments on Change Lines
You can now add attachments to the change lines on workflows such as change orders, change requests, problem reports, and corrective actions.

Add Attachments on Change Line
Calculate Use-Up Date
You can now calculate the use-up date and update effective dates on components.
If you’ve enabled the Supply Chain Planning offering, you can use the new Calculate Use-Up Date action on the change order’s affected objects table to view and select the use-up dates defined in the planning application. This helps you calculate the optimal effective dates for structure components that are being removed or replaced on engineering and commercialization change orders.
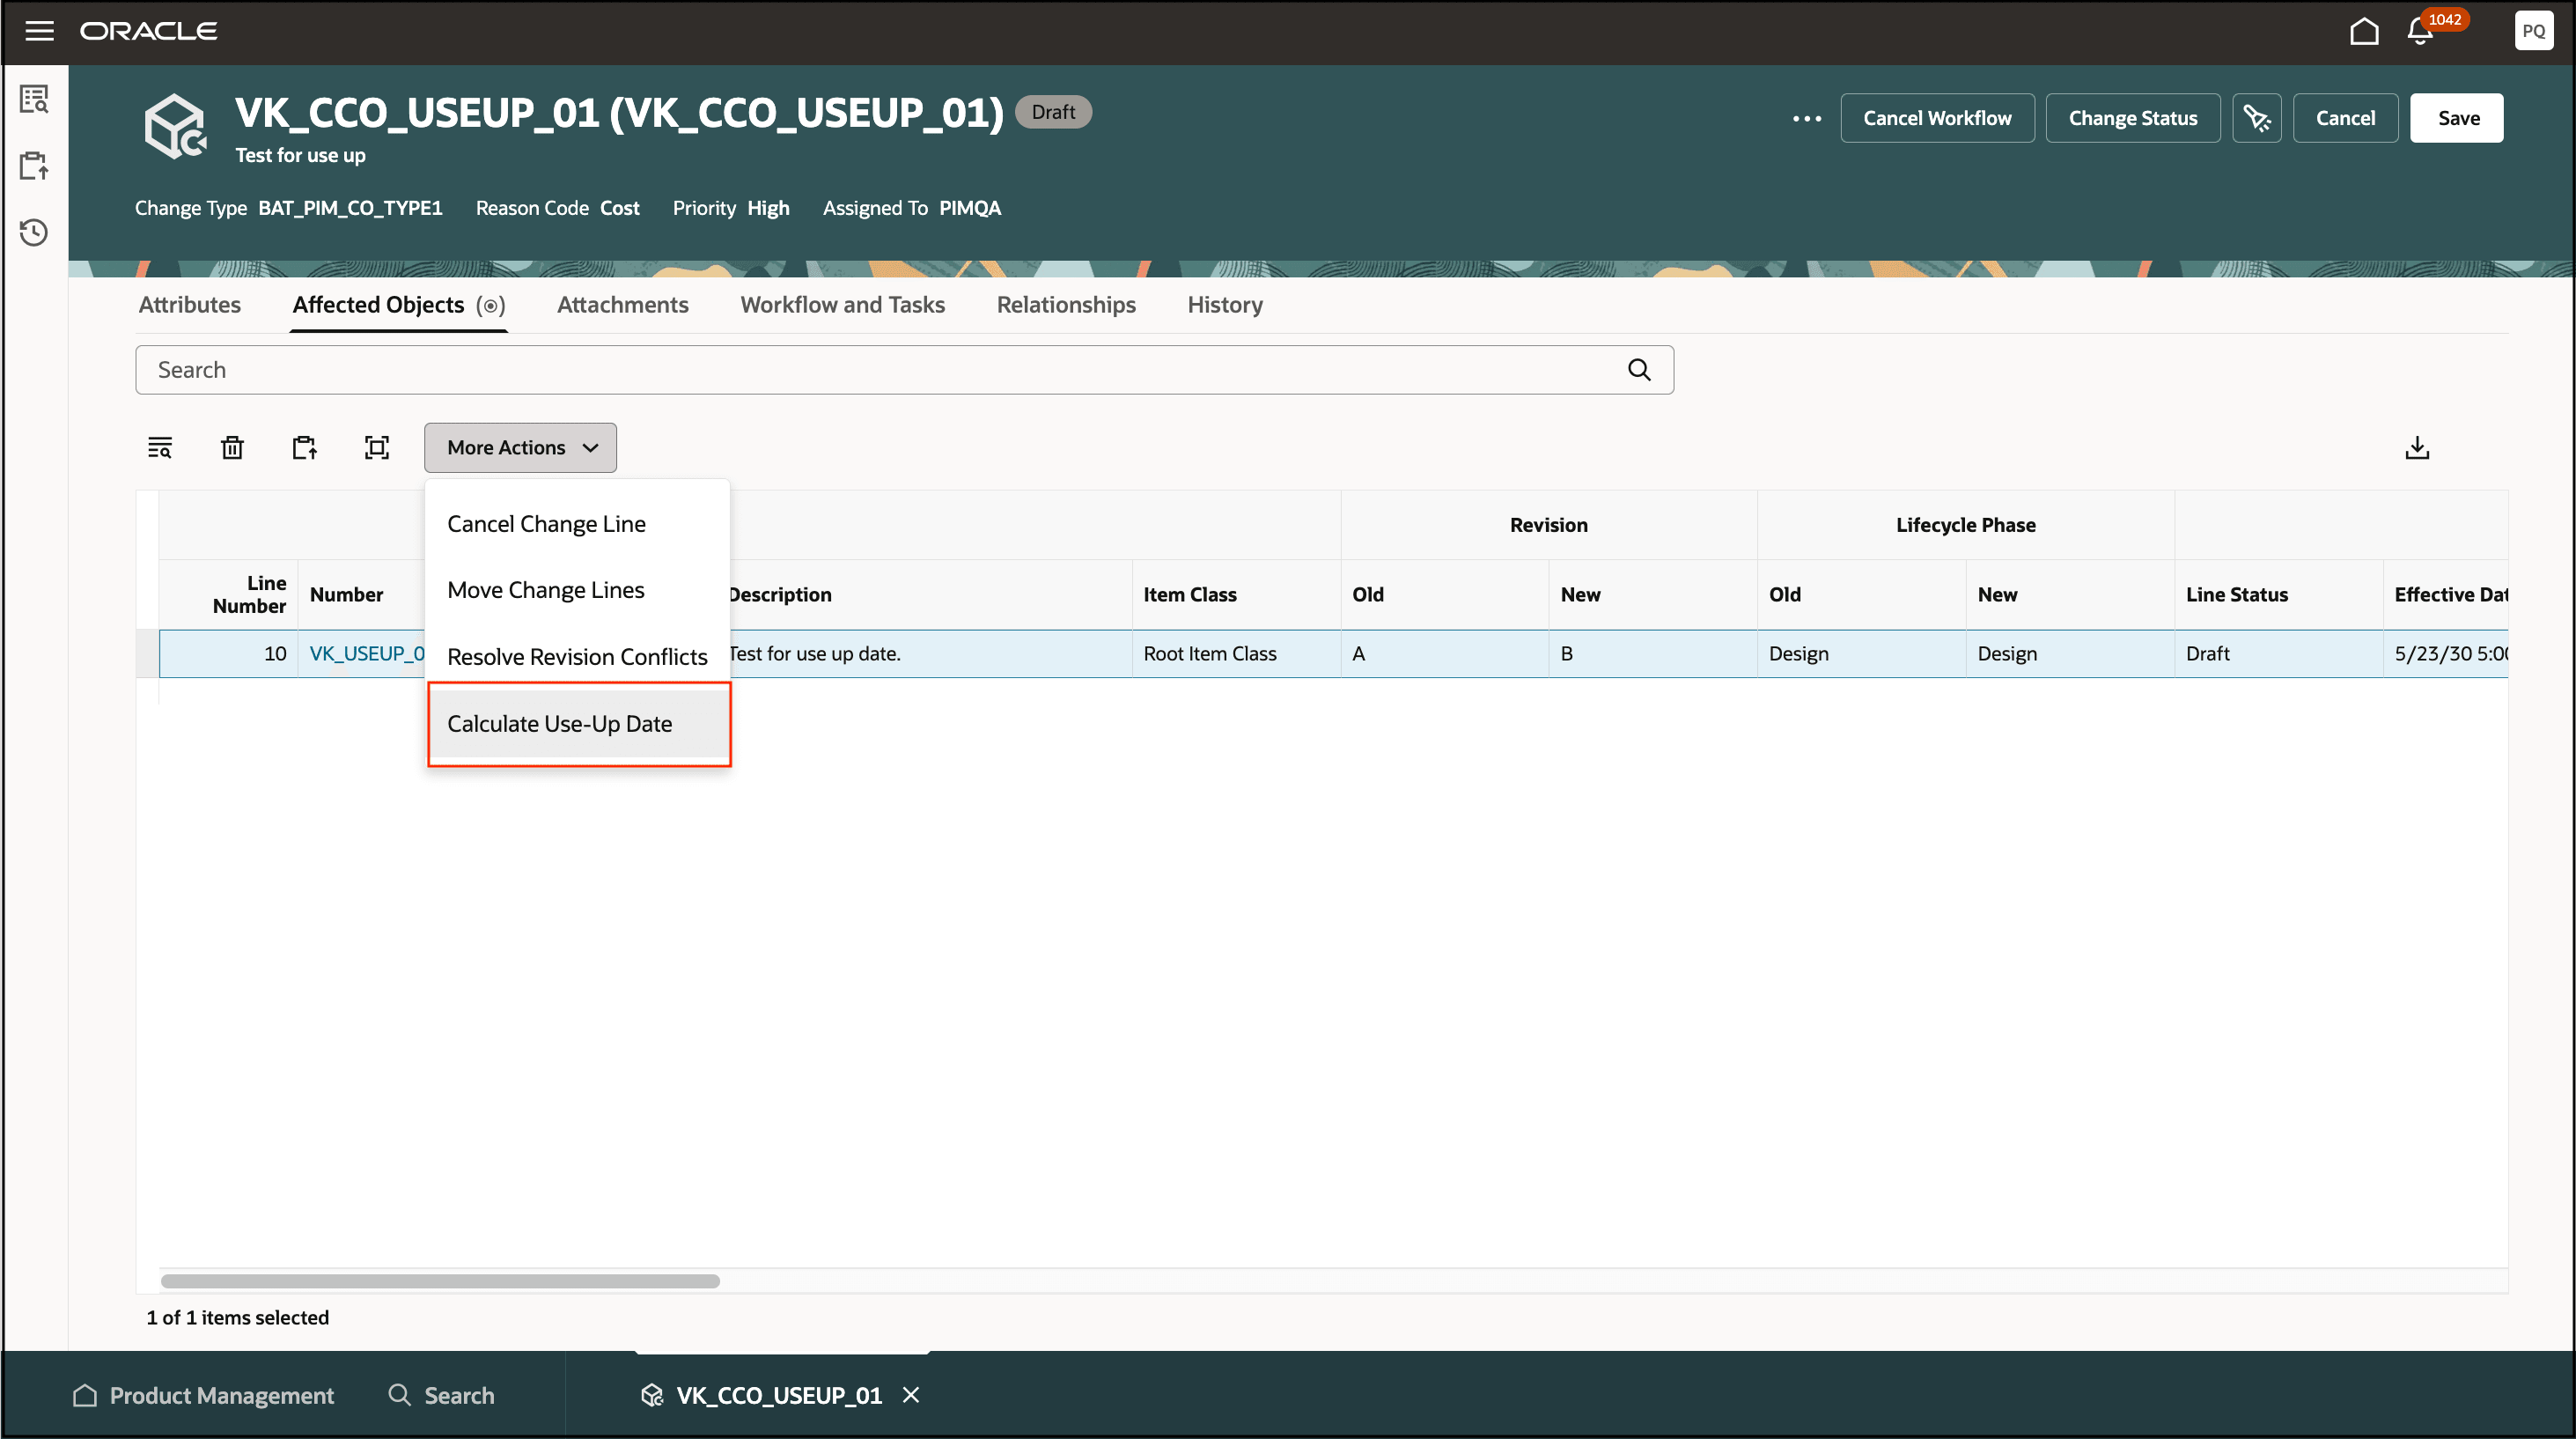
Calculate Use-Up Date Action on a Component
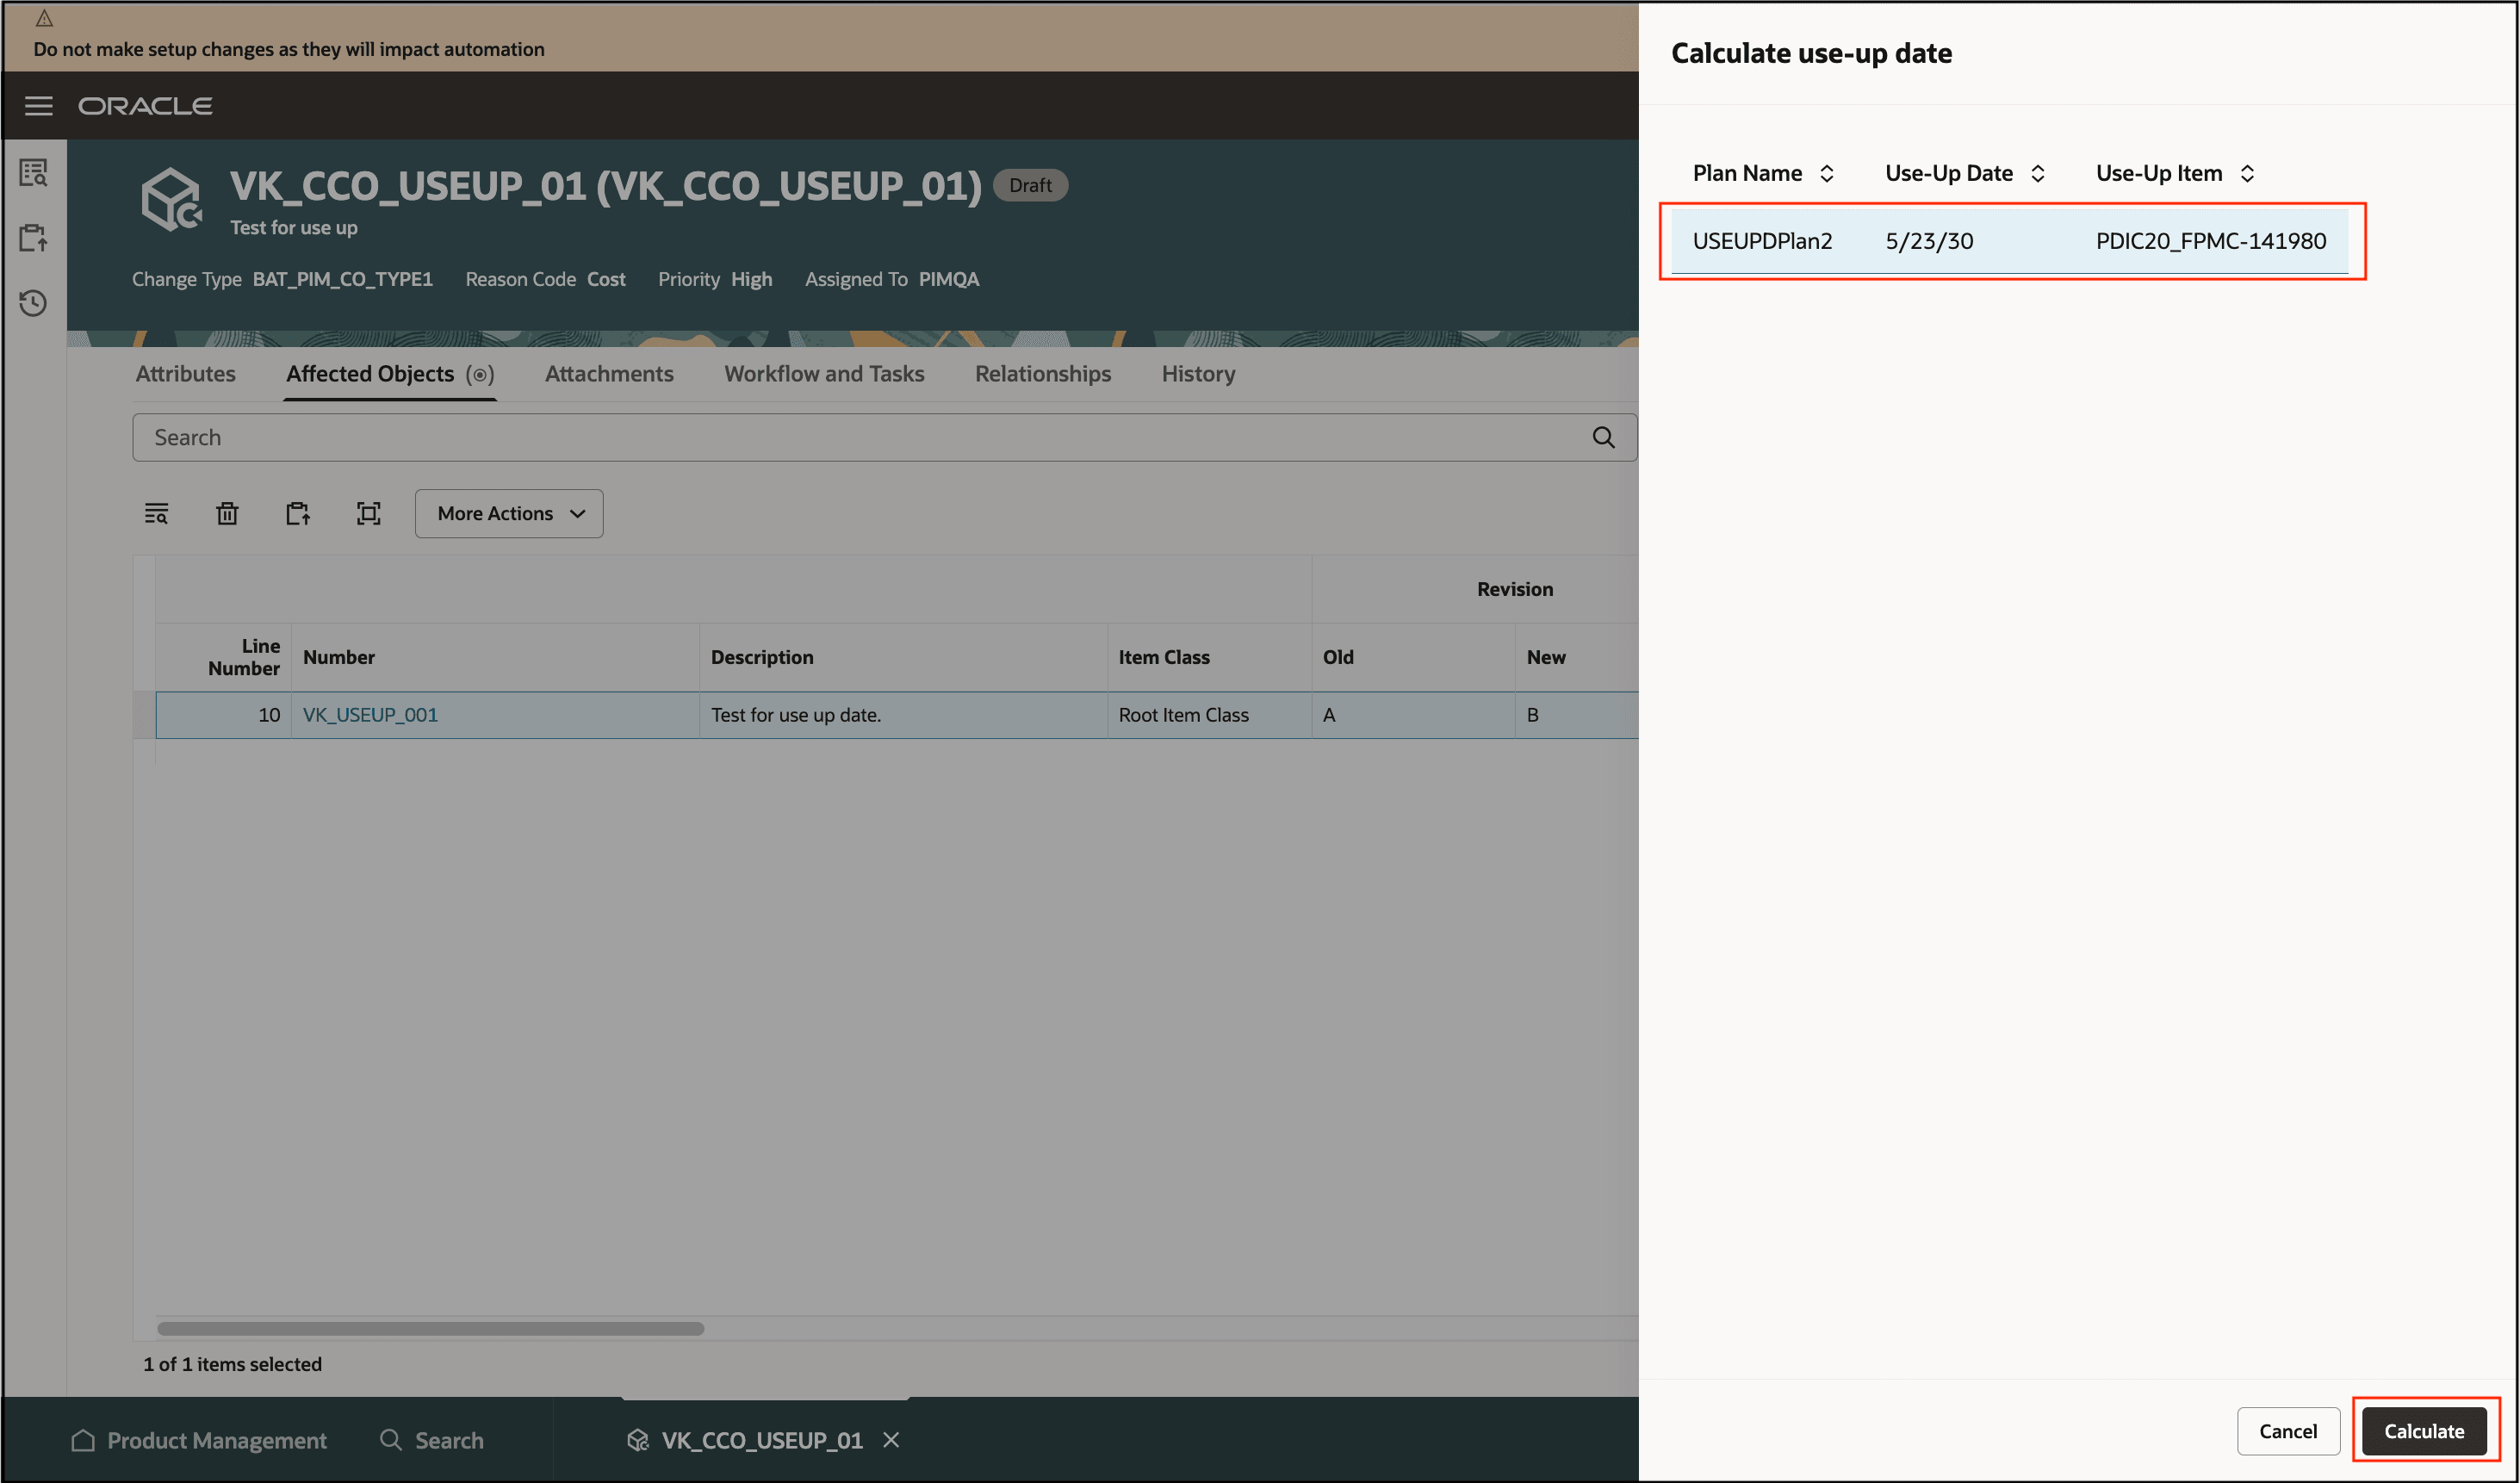
Select the Use-Up Plan and Calculate Use Up-Date
Has Content and Has Redlines Indicators
The Has Content and Has Redlines indicators have been upgraded to show icons.
-
Icon
 indicates Has Content
 -
Icon
 indicates Has Redlines.
Here’s a screenshot with presence indicators.
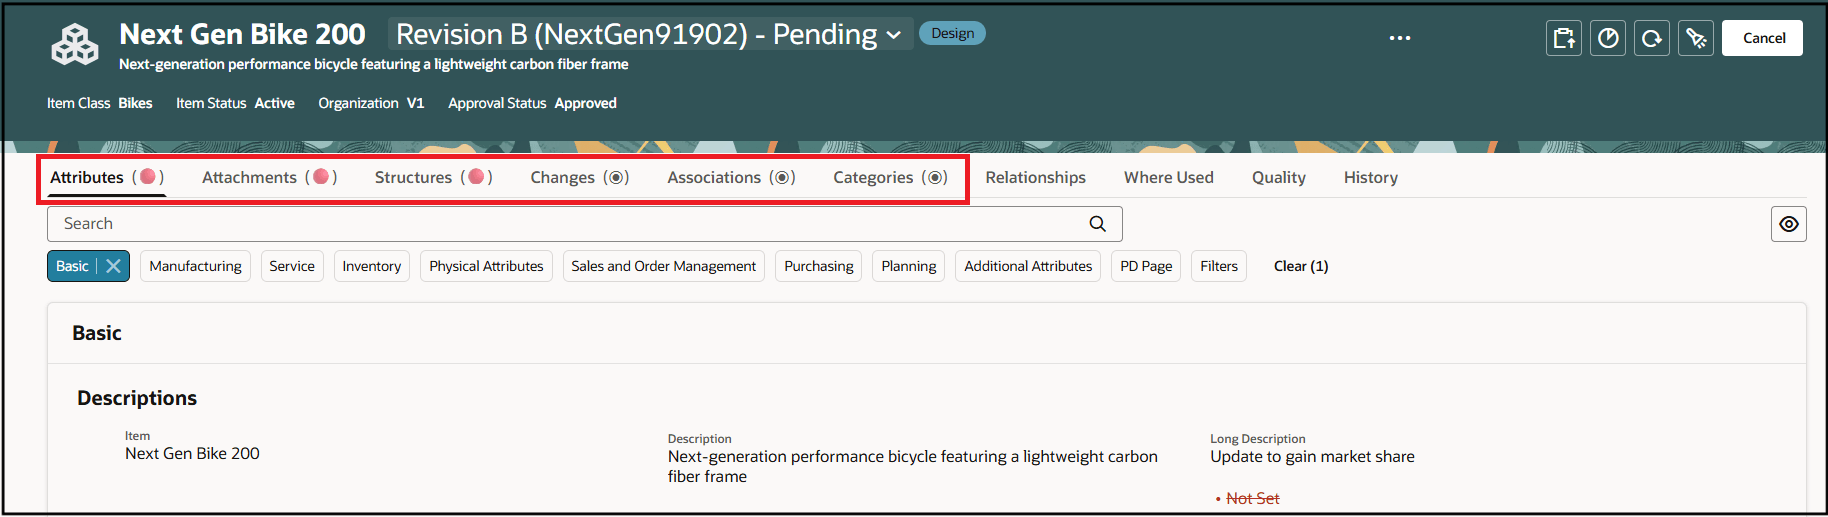
Has Content and Has Redlines Indicators
The Attributes, Attachments, and Structure tabs have redlines related to the selected revision on change order.
The Changes, Associations, and Categories tabs have content.
The Relationships, Where Used, and Quality tabs do not have any content.
View Redline information in Item Context
You can leverage the new item page level action Red Lines Only to view item redlines quickly.
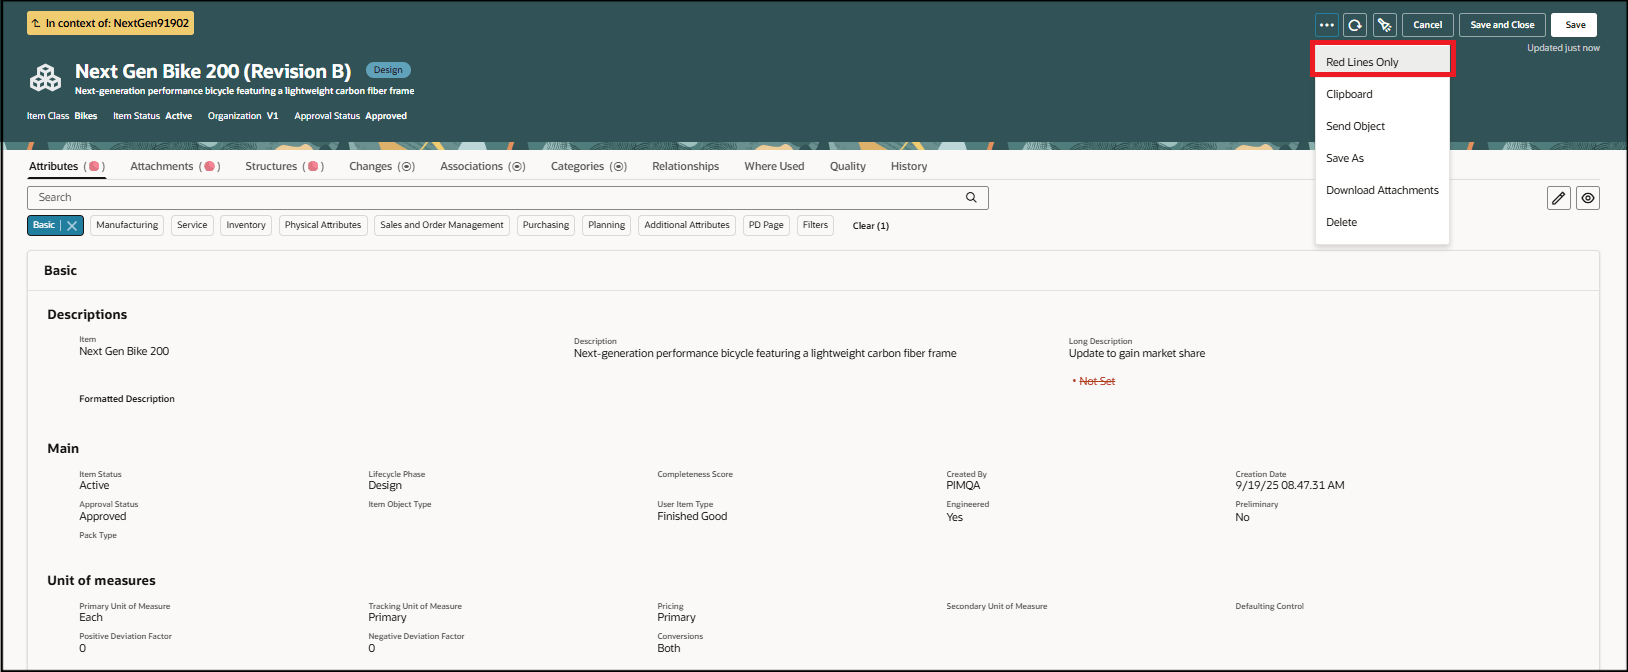
Redlines Only Action on the Item
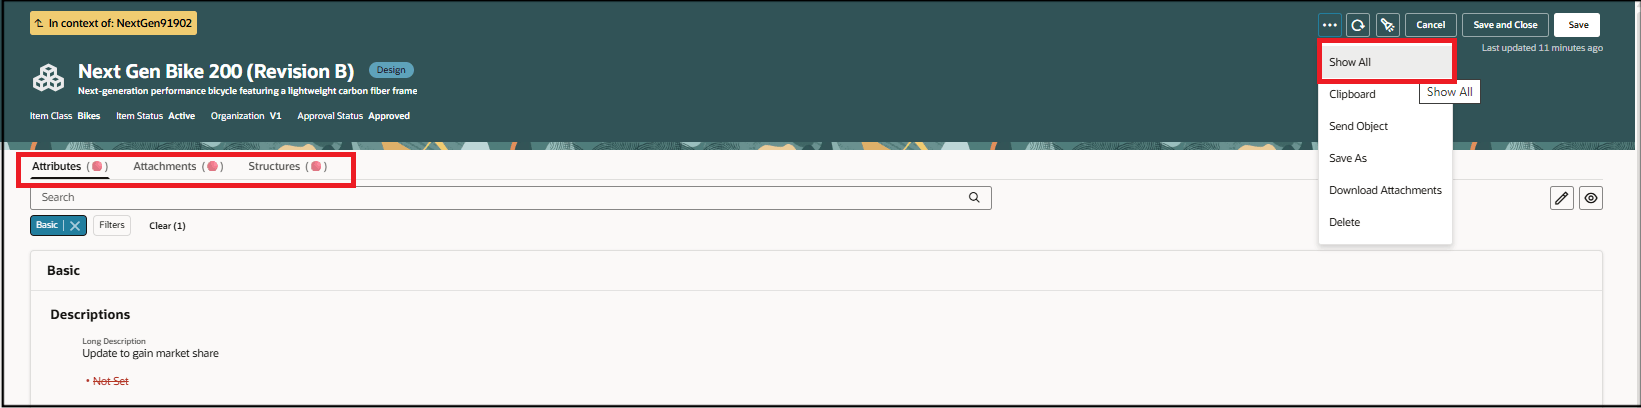
Selecting the Redlines Only icon highlights it in red (color) and shows only the tabs that contain redlined data for the selected revision, along with only the redlined fields in those tabs. To return to the standard view with all tabs and fields, select Redlines Only again.
Redlines Only Action on the Item
If the Redlines Only icon isn’t available in the page header, use the More Actions icon to access it and activate or deactivate the Redlines Only mode.
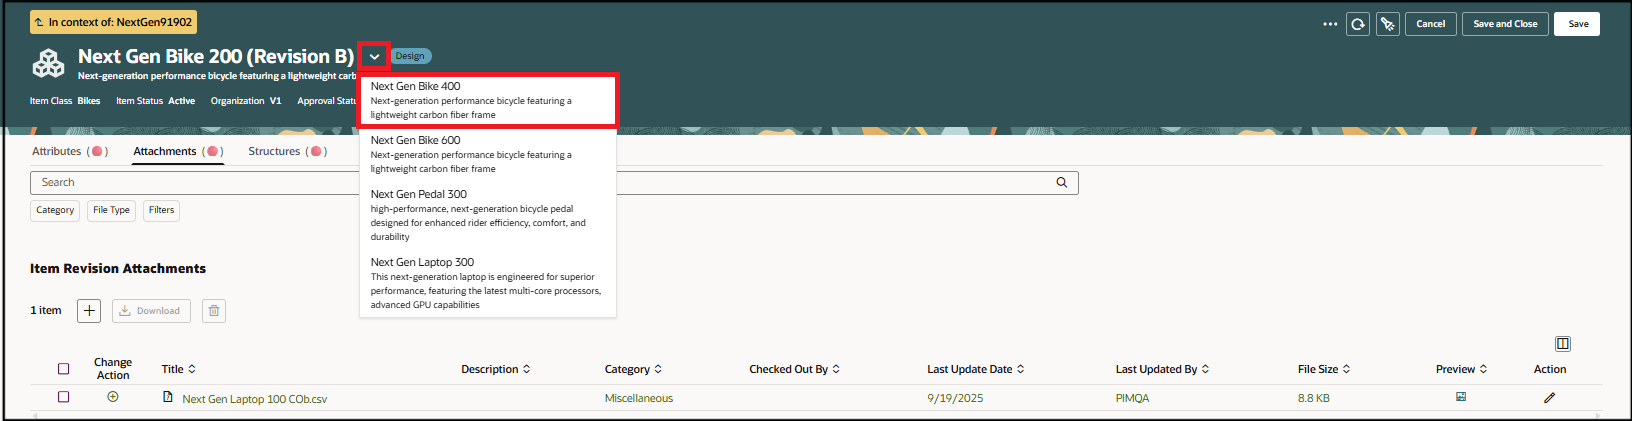
The Redlines Only action will still be selected when you navigate between items and item revisions in the following ways.
-
Navigate between affected object revisions.
Select a Revision When the Show All Action is Already Selected
-
Navigate between the items in spotlight.
Select Items in Spotlight When the Show All Action is Already Selected
-
Select pending revisions on the item.

Select Pending Revisions When the Show All Action is Already Selected
Change the Item Class on Pending Changes and Enable Needs Approval Rule
You can now modify the item class in a pending change. The modification will appear as a redline and be recorded in the change history. Additionally, you can configure a needs approval rule so that an item class change automatically triggers a change order.
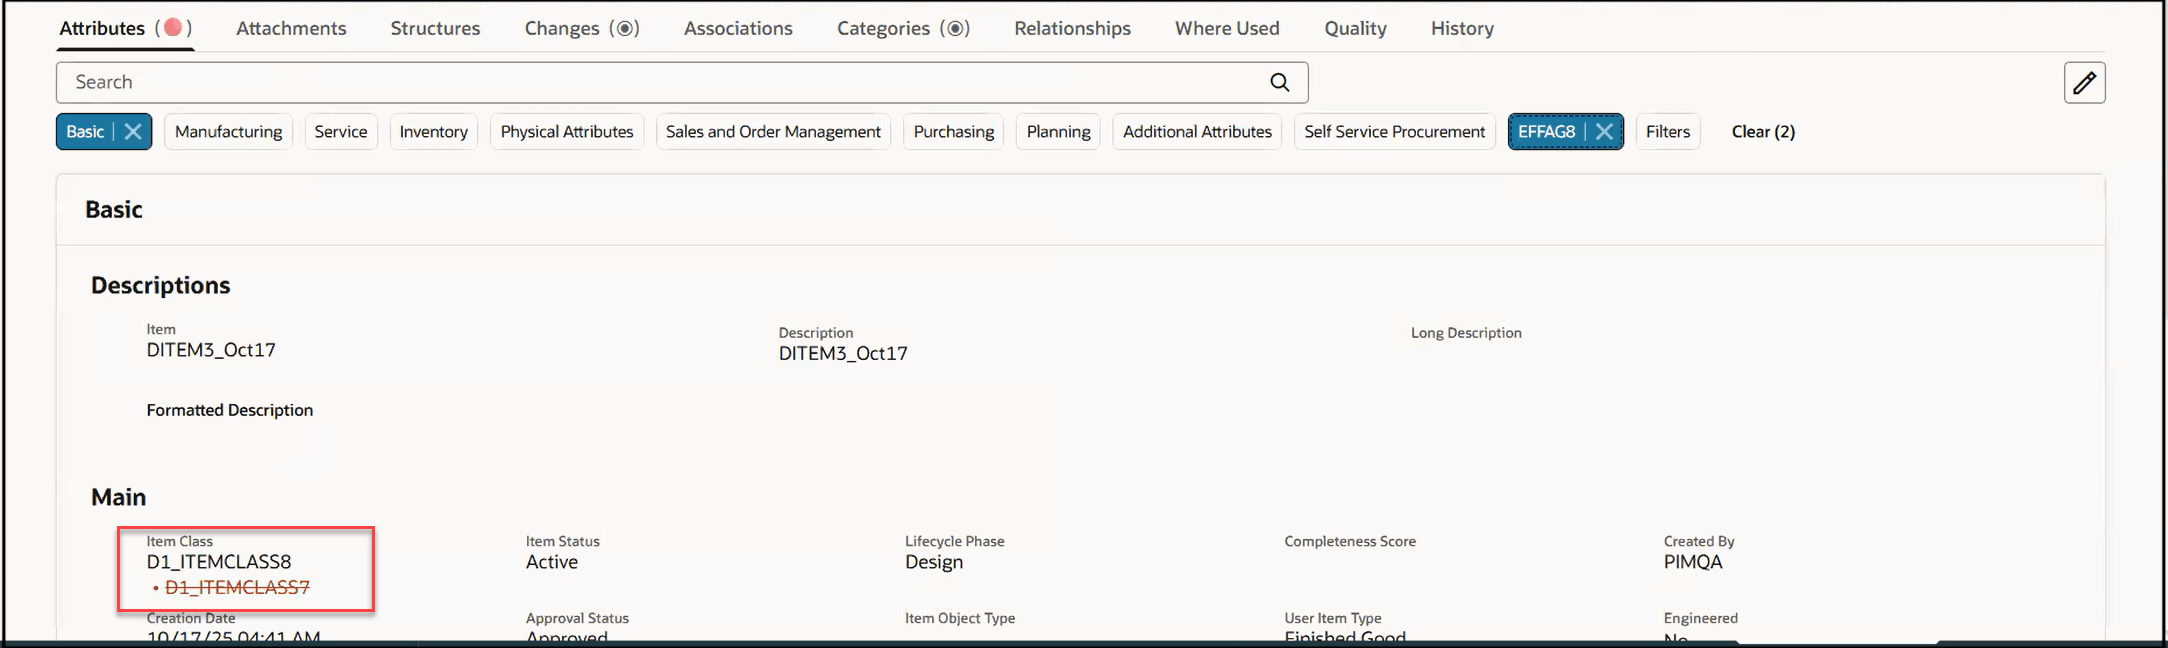
Redline an Item Class
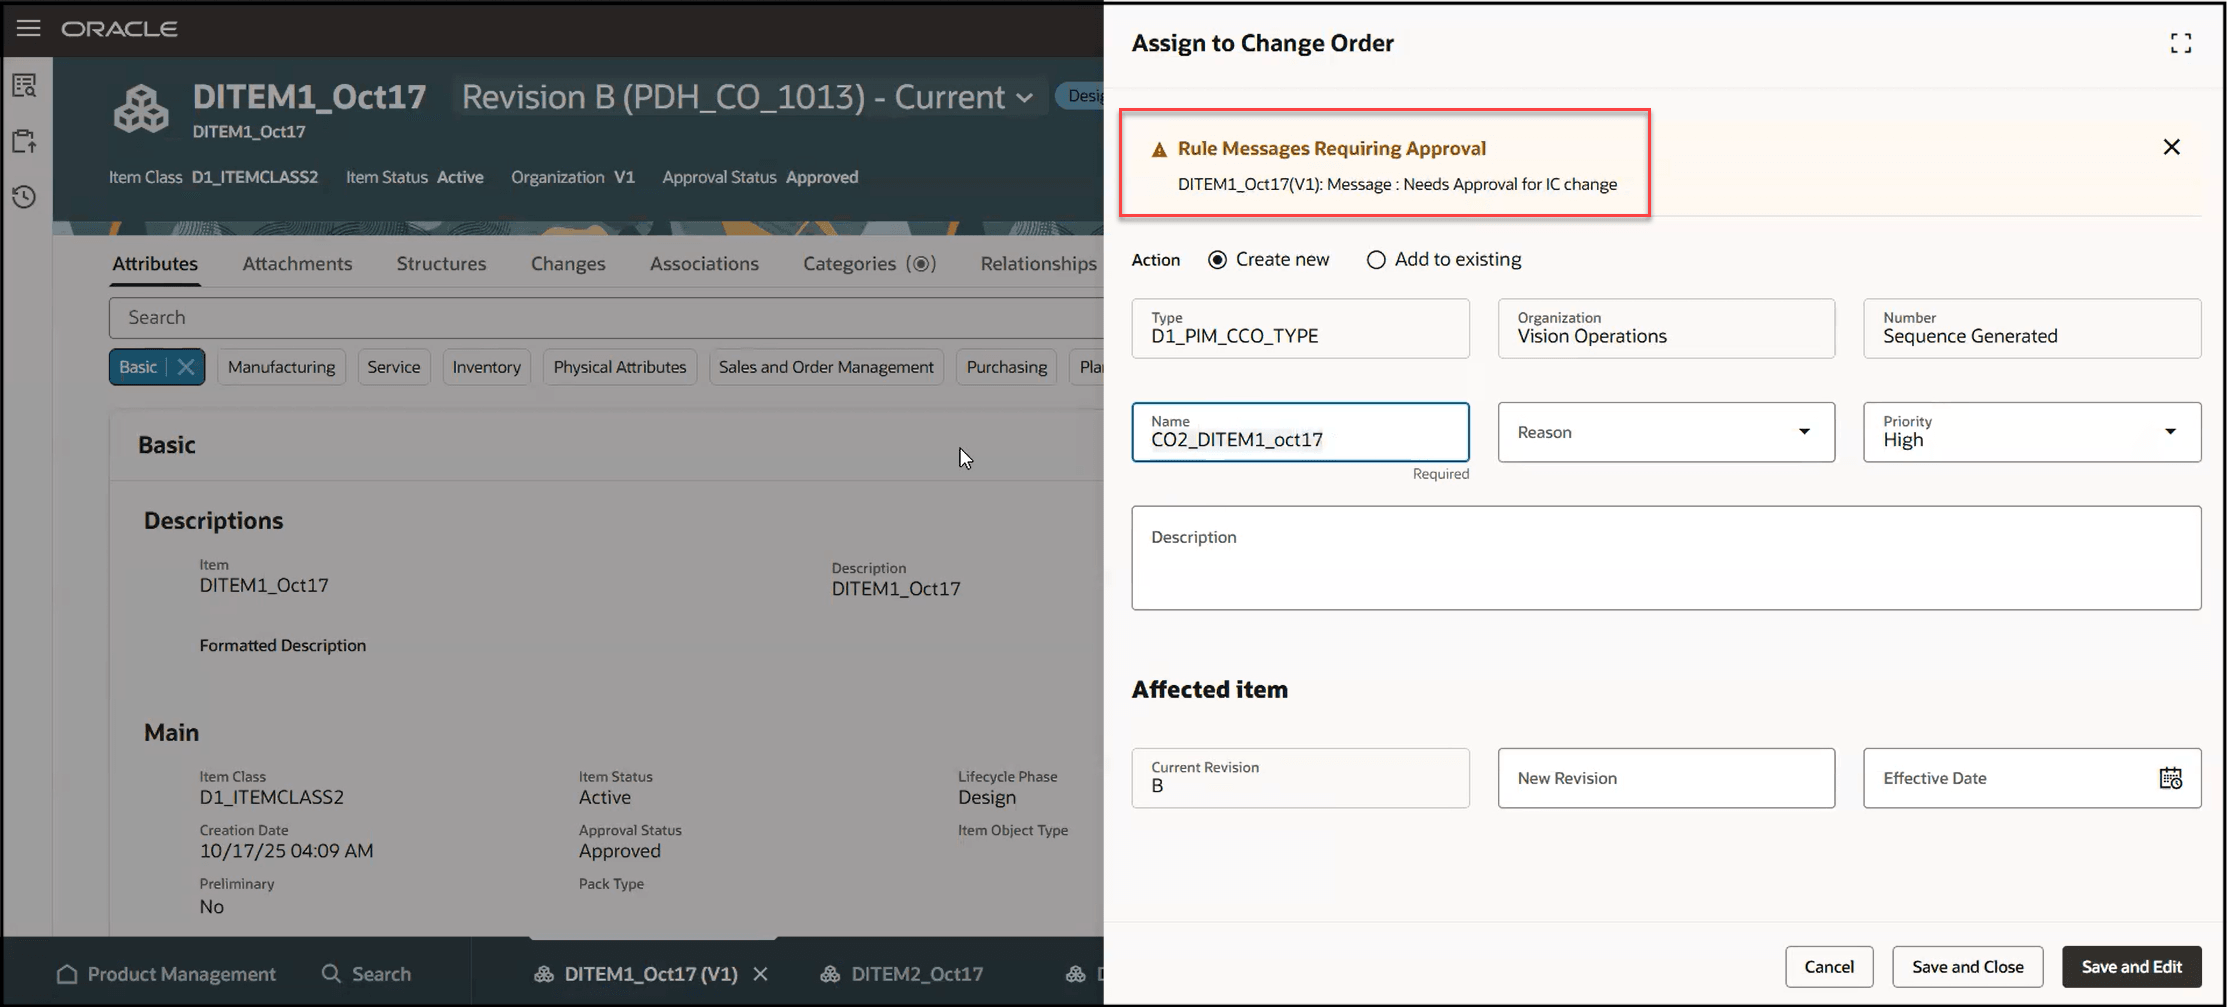
Needs Approval Rule Triggered on a Modified Item Class
View Data Presence Indicators on Search Workflow Page
You can now view the data presence indicator for affected objects on the Product Management Search Workflow page. Clicking the presence indicator icon in the search results takes you to the Affected Objects tab, if you have permission to access any of the affected items within the workflow.
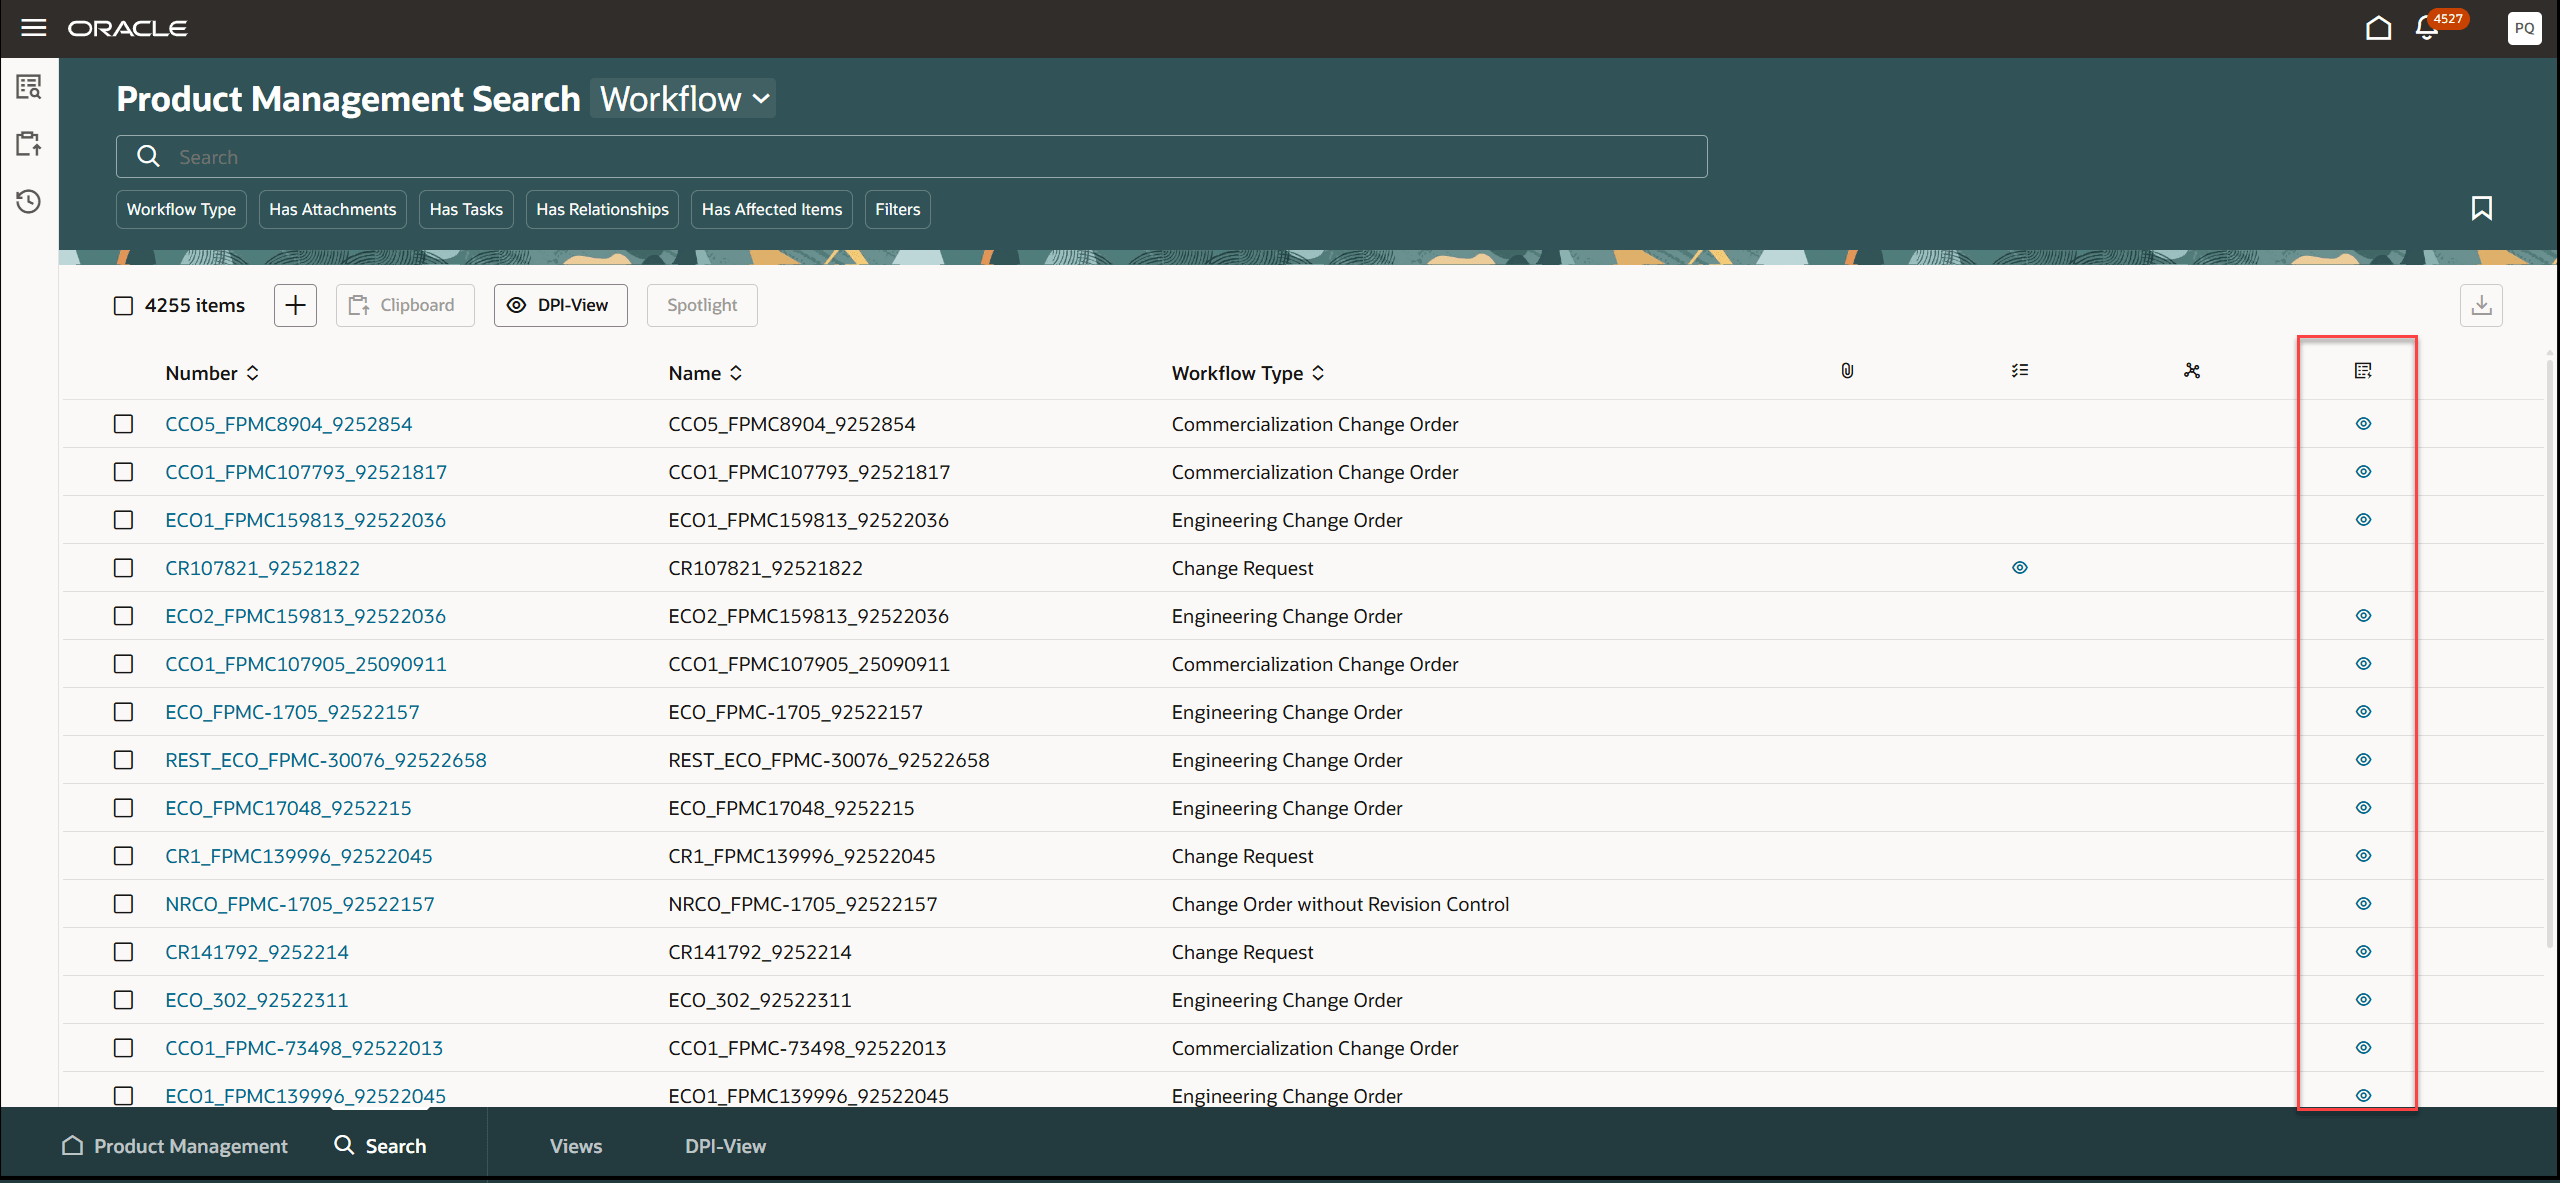
Data Presence Indicators in Workflow Search Results
Participant Elapsed Time in Workflow Approval Search
A new attribute titled Participant Elapsed Time has been added to the workflow approval index. This attribute represents the number of days a workflow has been awaiting approval from participants.
The elapsed time is measured in days for each participant and reflects the smaller value of the following two durations:
-
The time since the change most recently entered the workflow status.
-
The time since the user was last added as a participant in that workflow status.
The elapsed timer starts when a participant becomes an approver—either when the change first enters the signoff status or when the participant is added as an approver to the signoff status.
The timer increases by one day at a time and pauses under either of the following conditions:
-
The approver signs off the change for that status.
-
The change exits that workflow status.
If the change enters a specific signoff status multiple times, a separate elapsed duration is recorded for each occurrence.
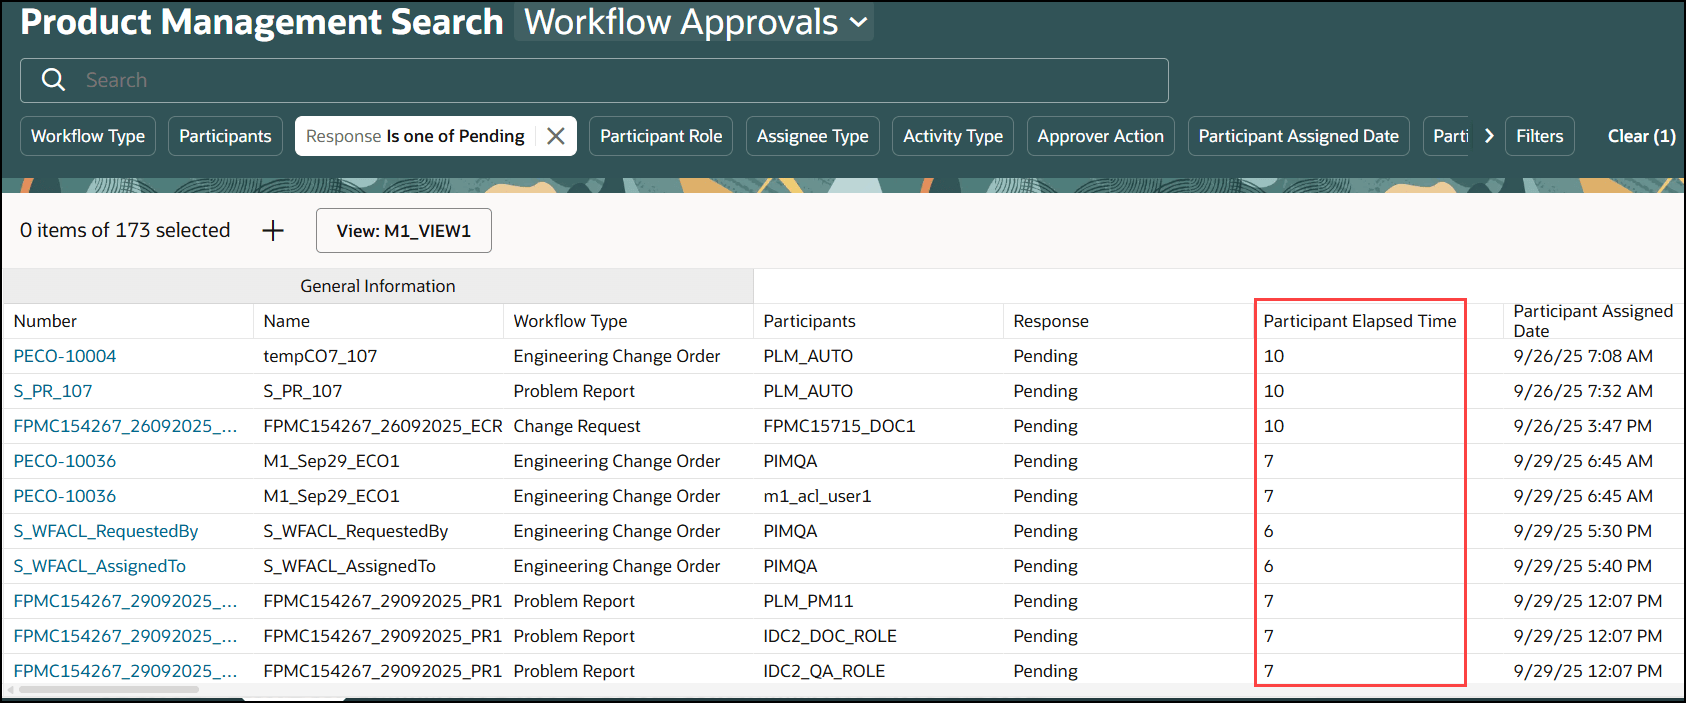
Participant Elapsed Time
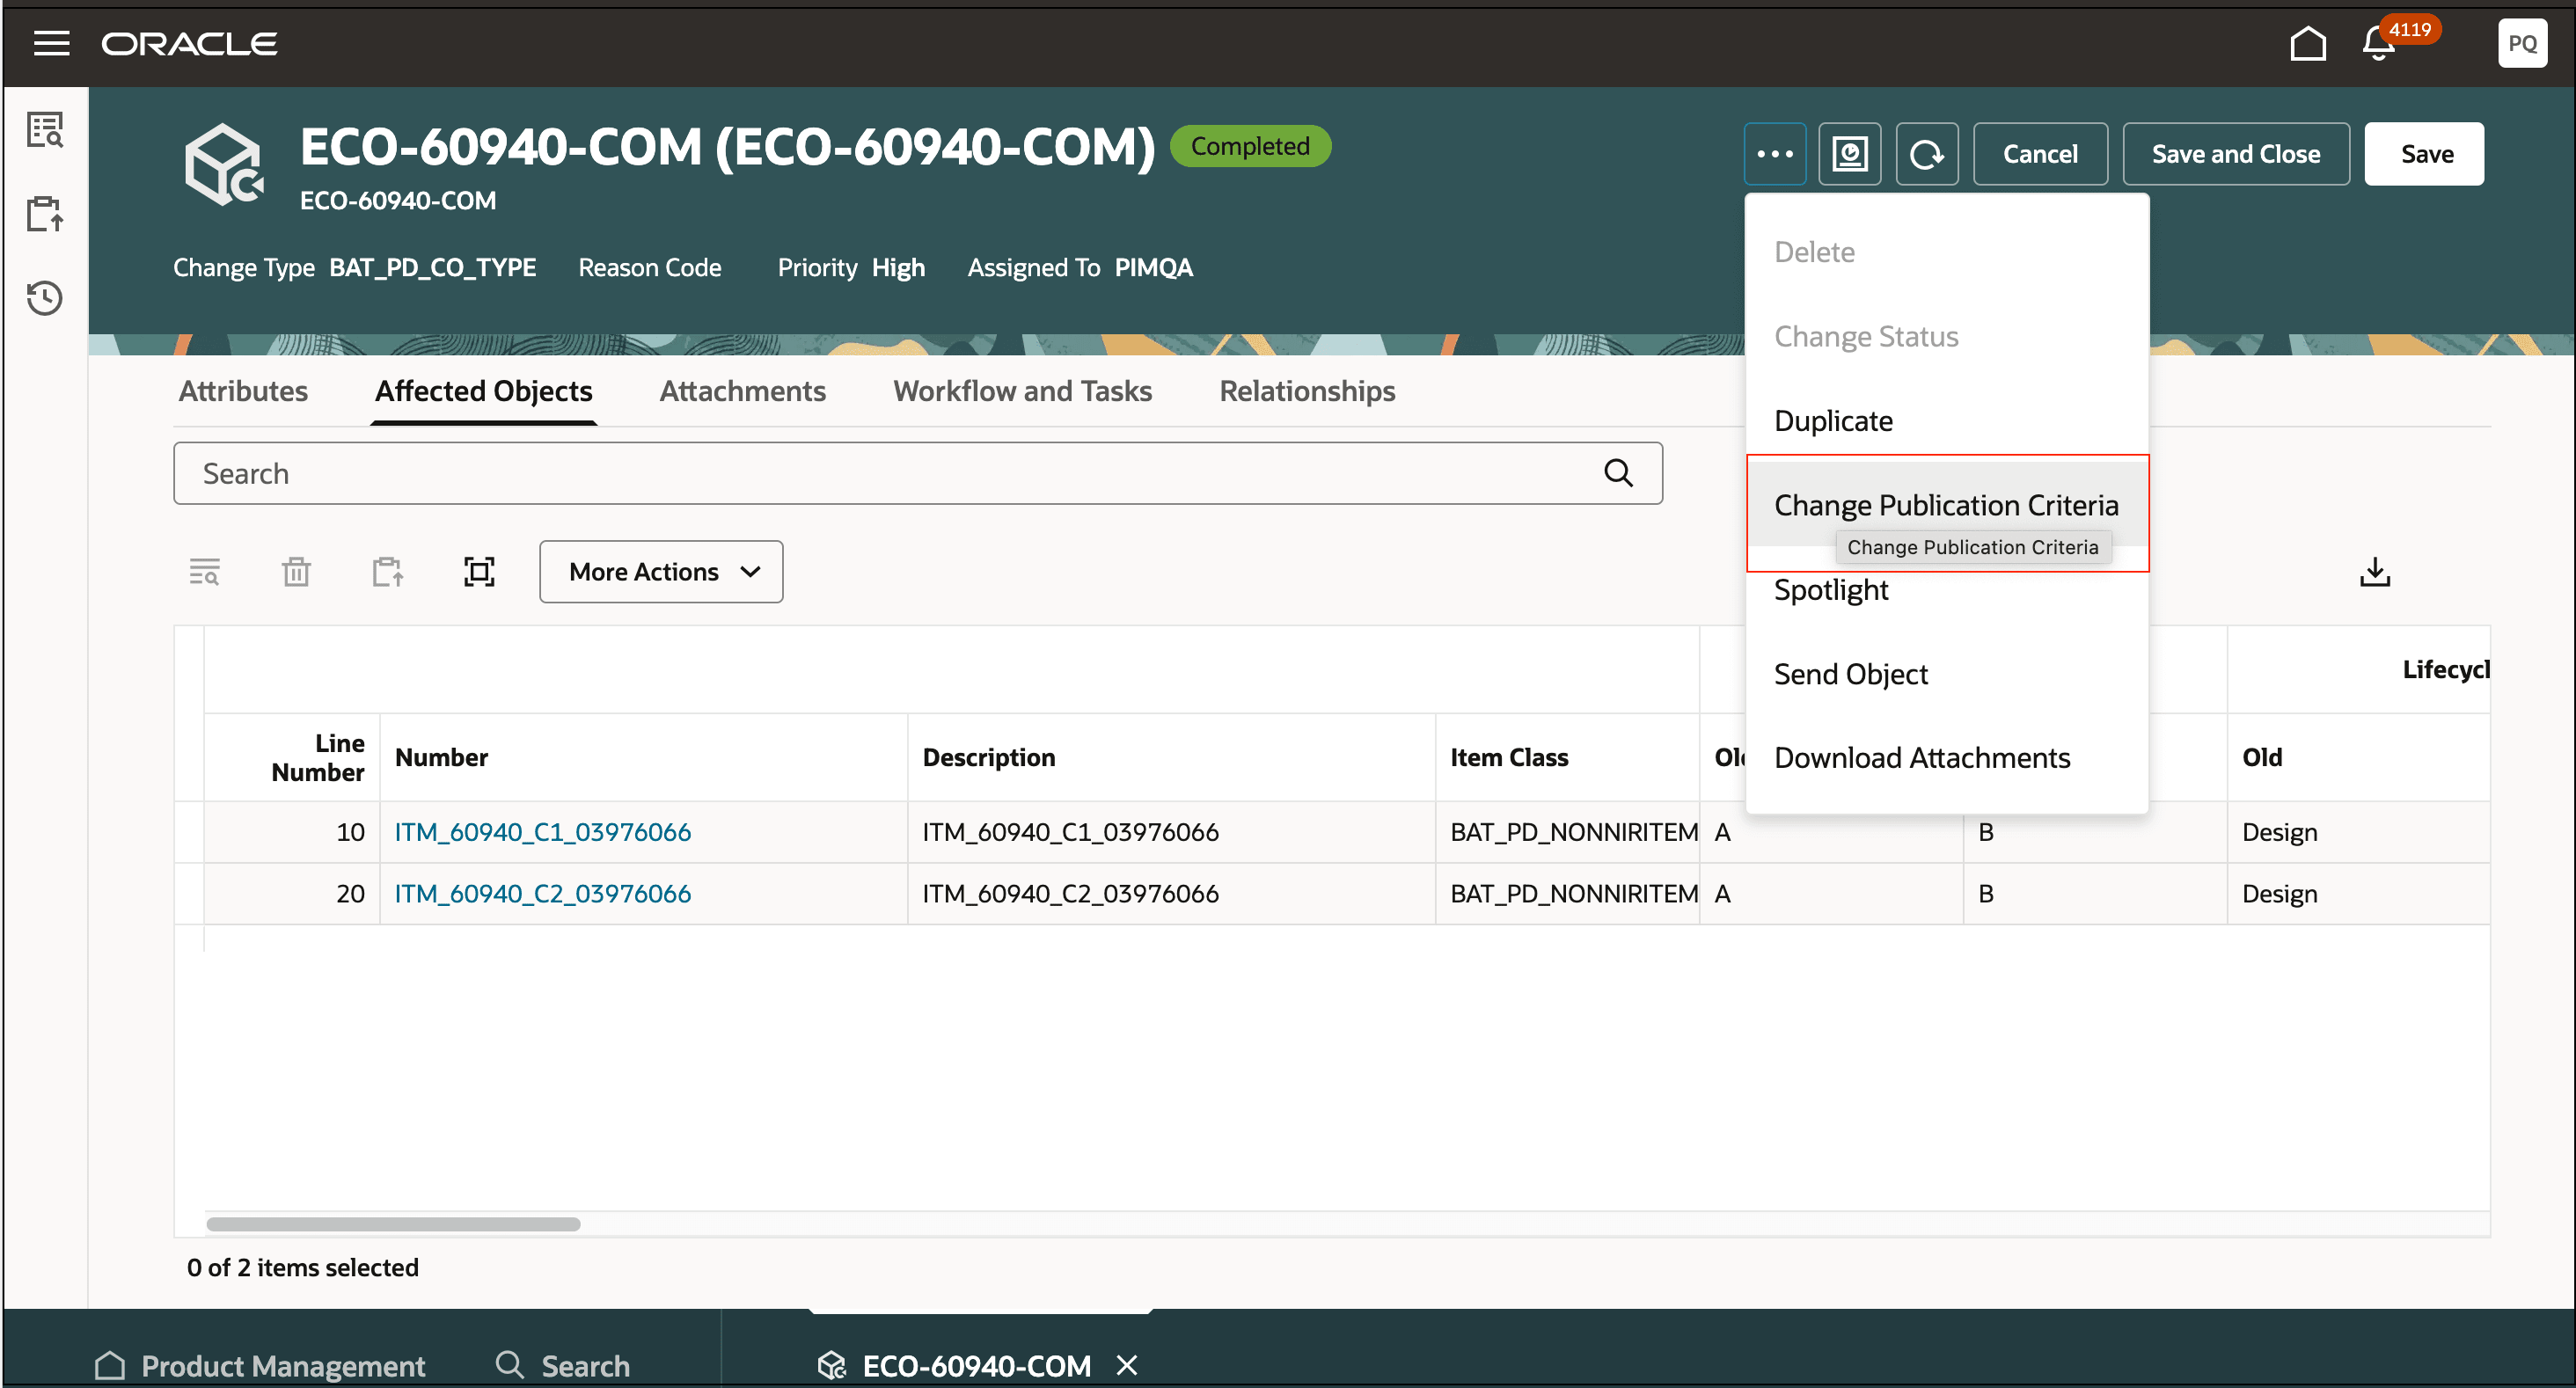
Publish Workflows
You can publish engineering and commercialization change orders, and change orders without revision control as an XML package by selecting all or one of the following entities:
-
General Information
-
Affected objects
-
Header attachments
-
Affected object redlines only
-
Affected object attachments
-
Affected object structures
-
Affected object AML
The improved publish feature allows you publish the change orders in any status.
Publish a Change Order
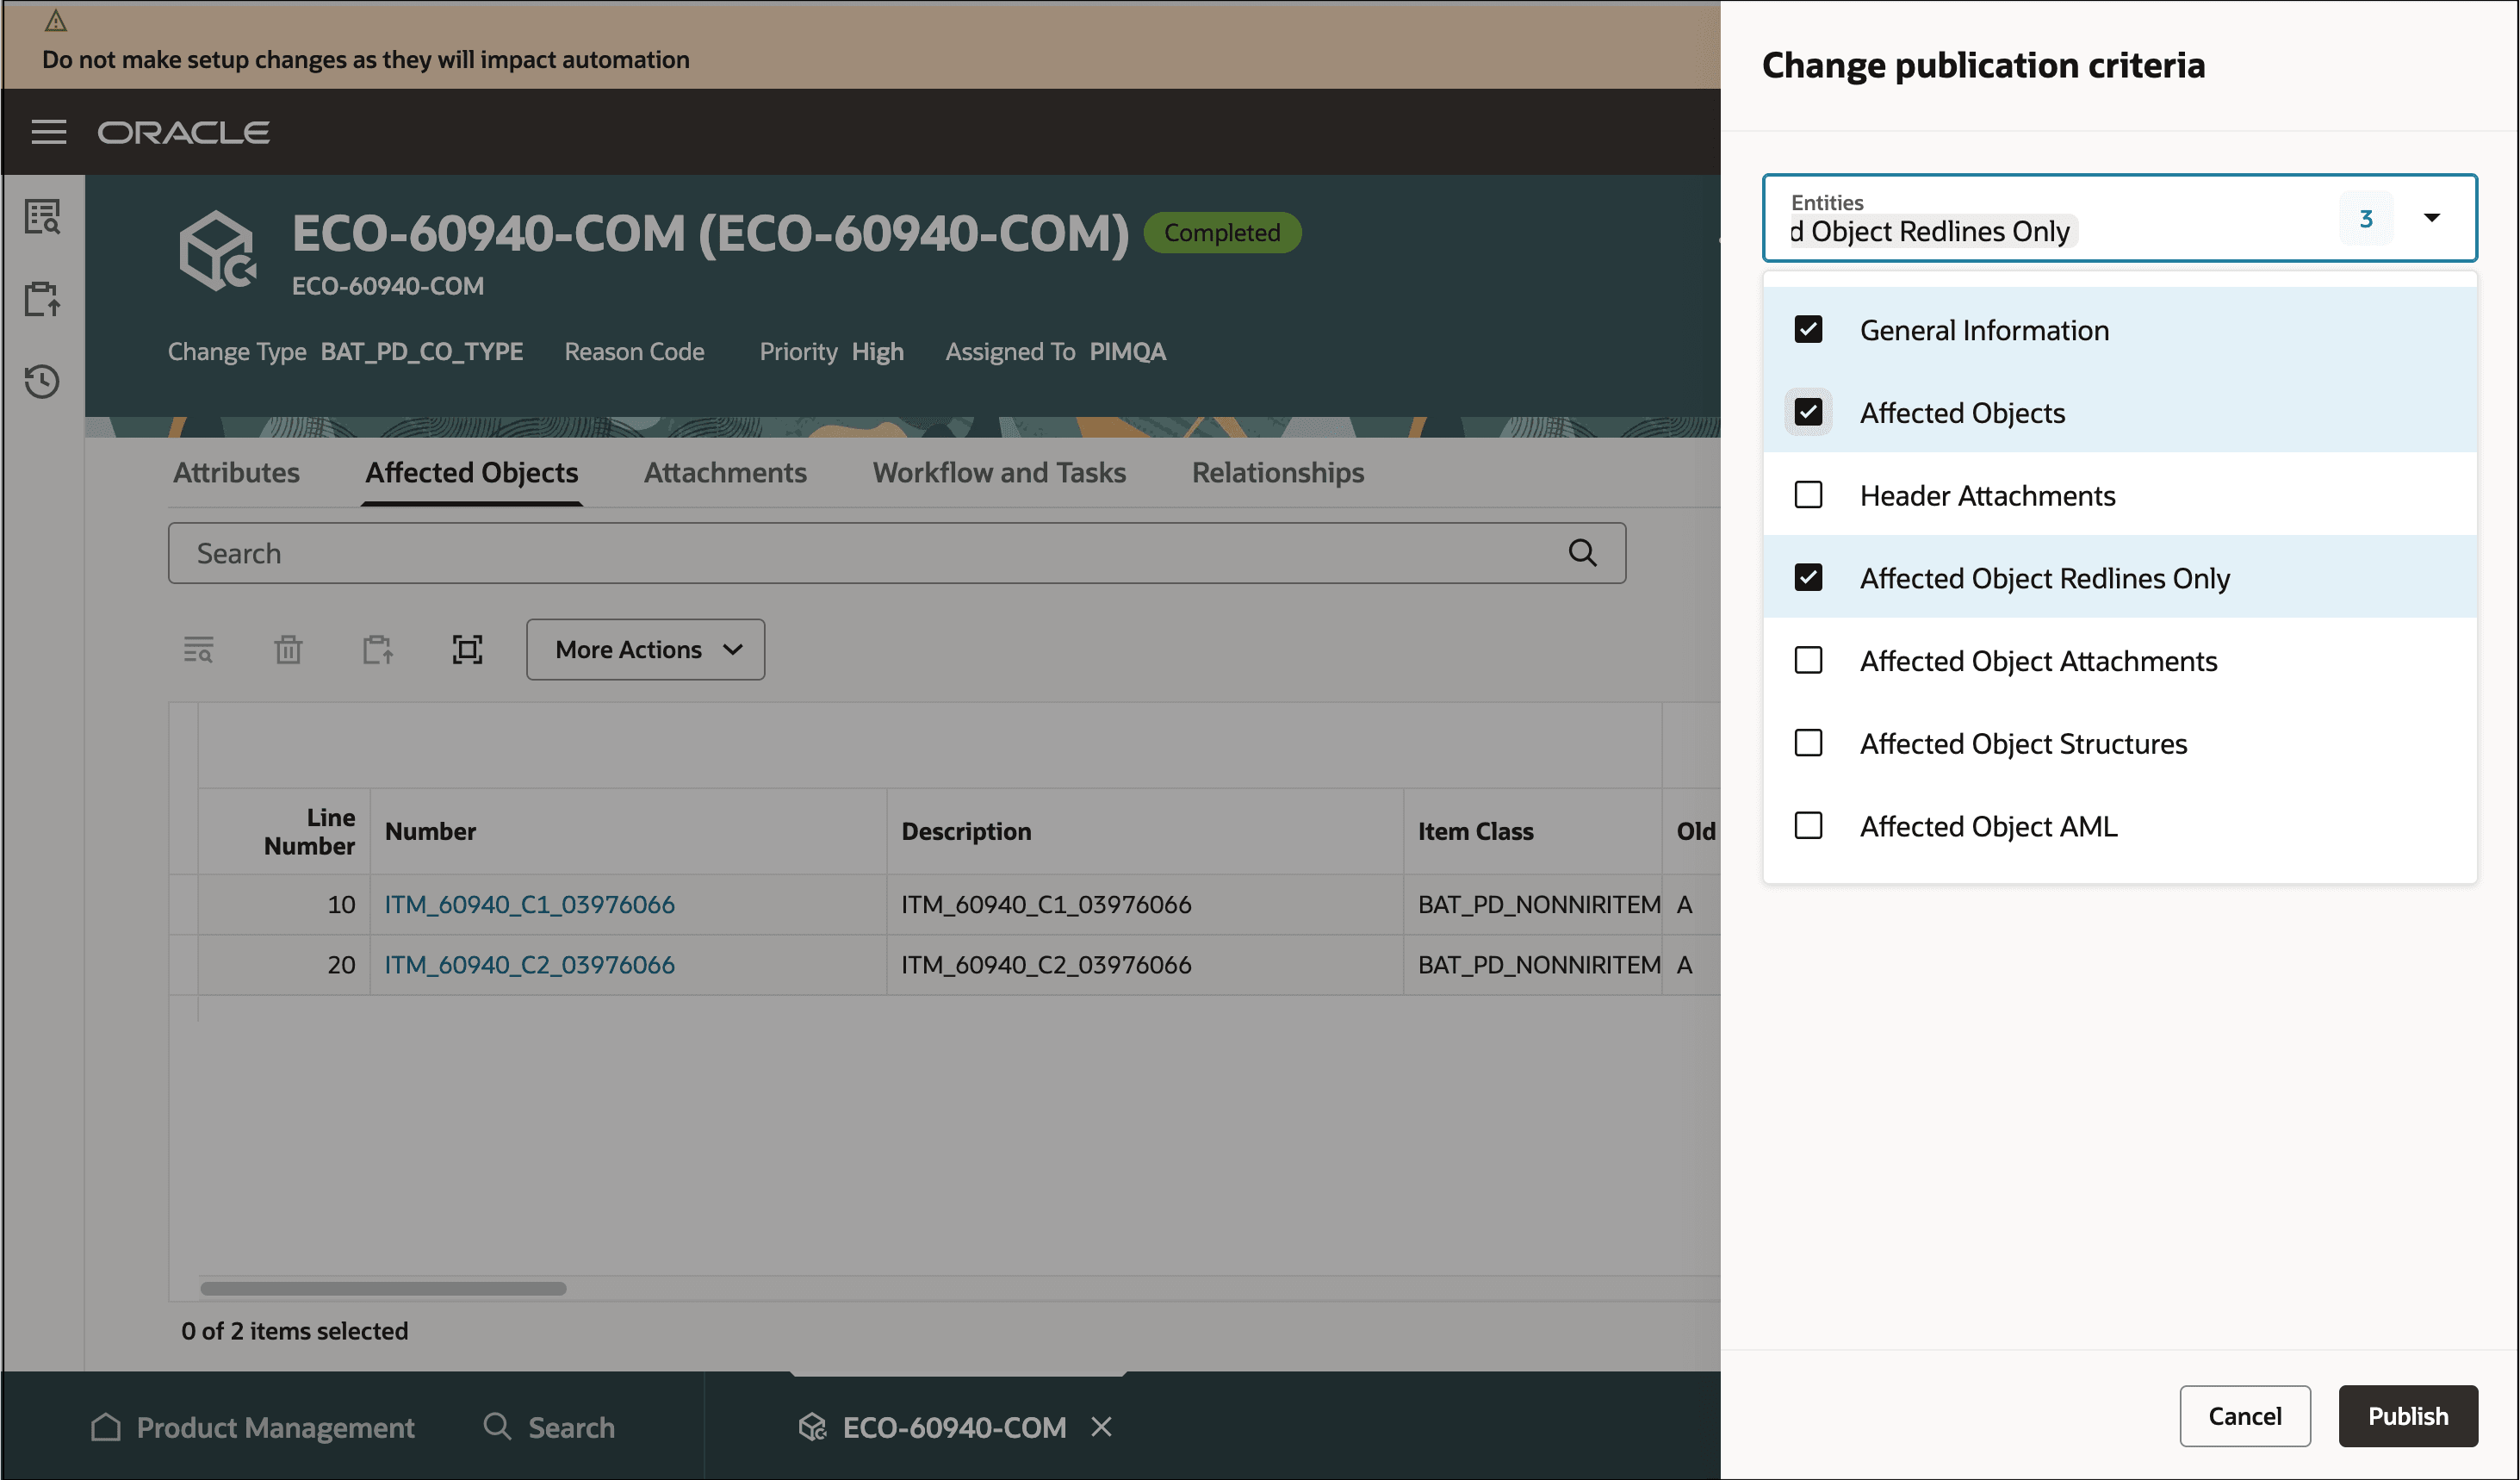
Select the Change Entities for Publishing
Workflow Setup Changes
An actor with access provided through additional workflow controls in the Manage Change Order Type task, for interim approval or approval status, can now perform the following actions:
-
Remove approver or reviewer
-
Terminate or Restart workflow
Prior to this update these actions were only available for the analyst.
Additional Workflow Controls for Approval Status
This feature benefits your business for the following reasons:
-
The Copy or Duplicate Workflow enables users to quickly duplicate existing workflows instead of building from scratch, saving time, reducing manual effort, and minimizing manual errors.
-
Update Context Segment Descriptive Flexfields, Attachments, and calculating use-up dates allows for flexible management of change lines directly in the Redwood pages, improving data accuracy and management of affected items.
-
The ‘Has Content’ icon within the workflow helps users immediately see whether workflow tabs contain content, streamlining navigation.
-
Viewing item redline information within change context allows clear visibility into changes for affected items, enabling faster review and decision-making during change processes.
-
The workflow search with data presence indicators and approval elapsed time information delivers quick insights into workflow status and approval progress, supporting faster bottleneck identification and increased process transparency.
-
The publish change feature for commercialization change orders and change orders without revision control for all workflow statuses ensures comprehensive and timely publication and dissemination of workflow updates across the organization.
-
Additional workflow controls for all participants allows for broader management by allowing additional users to remove participants, terminate, or restart workflows as needed, increasing flexibility and responsiveness in managing workflow lifecycles.
Steps to enable and configure
-
Set the administrator profile value for ORA_ACA_WORKFLOW_REDWOOD_ENABLED to Y.
-
Create a Data Security Policy
-
Sign in to Security Console.
-
Search for the configured role on which you want to configure the data security policy. Click Actions > Edit Role.
-
On the Edit Role page, click Data Security Policies.
-
Click Create Data Security Policy (plus icon). On the Create Data Security Policy dialog box, enter the following:
-
Policy Name: <unique name>
-
Data Resource: Search for and add the resource named EGO_ENGINEERING_CHANGES_B
-
Data Set: Select Select by Instance Set
-
Condition Name: Access the item changes for table EGO_ENGINEERING_CHANGES_B for the item changes they have access to
-
Actions: Select all the actions.
-
Click OK and click Next.
-
Save your changes.
Tips and considerations
-
To view change line context sensitive descriptive flexfields in the Additional attributes drawer on Redwood pages, you must change the Context Display Type to List of Values in the Descriptive flexfield setup page. For more information, see the Key Resources section.
-
The publish change criteria doesn't publish the following:
-
Structures on affected objects for change orders without revision control.
-
Attachments and approved manufacturers lists (AMLs) for commercialization change orders.
-
-
In update 25D, we released the feature to view the data presence indicators for redlines in the affected objects table. In this update you can upgrade the data presence indicators on existing change orders by running the following scheduled process.
-
Upgrade Product Management Data
-
Functional Area: Changes
-
Feature: Update data presence indicators for affected items
-
-
You can’t redline other fields when you redline an item class.
-
In this update, we introduced the Redwood: Organize Actions for Items and Workflows feature, which lets you control the sequence of actions shown on item and workflow pages. It is recommended that the Redlines Only action be sequenced so that it appears along with the page header actions.
Key resources
-
Oracle Fusion Cloud SCM Using Product Development guide, available on the Oracle Help Center.
-
Oracle Fusion Cloud SCM Using Product Master Data Management Guide, available on the Oracle Help Center.
-
The topic Configure Context Specific Attributes for Change Types in the Oracle Fusion Cloud SCM Implementing Product Management Guide, available on the Oracle Help Center.
Access requirements
Users who are assigned a configured job role that contains these privileges can access this feature:
To view or edit workflows on the new workflow pages, or to access notifications,
For change orders:
-
View Change Order (ACA_VIEW_CHANGE_ORDERS_PRIV) or
-
Manage Change Orders (ACA_MANAGE_CHANGE_ORDERS_PRIV)
For change requests:
-
View Change Request (ACA_VIEW_CHANGE_REQUESTS_PRIV) or
-
Manage Change Requests (ACA_MANAGE_CHANGE_REQUESTS_PRIV)
For problem reports:
-
View Problem Report (ACA_VIEW_PROBLEM_REPORTS_PRIV) or
-
Manage Problem Report (ACA_MANAGE_PROBLEM_REPORT_PRIV)
For corrective and preventive actions:
-
View Corrective Action (ACA_VIEW_CORRECTIVE_ACTIONS_PRIV) or
-
Manage Corrective Action (ACA_MANAGE_CORRECTIVE_ACTION_PRIV)
To create workflows from the search pages or when using links in Actions on the Product Management home page:
-
Create Change Order (EGO_CREATE_CHANGE_ORDER_PRIV)
-
Access Change Types Using a REST Service (EGO_GET_CHANGE_TYPES_REST_PRIV)
To create change order from the item, either through a Needs Approval rule or by using the Assign to action. In addition, in order to duplicate change order and create relationship between source and target workflow objects:
-
Create Change Order (EGO_CREATE_CHANGE_ORDER_PRIV)
-
Manage Change Orders (ACA_MANAGE_CHANGE_ORDERS_PRIV)
-
Access Change Types Using a REST Service (EGO_GET_CHANGE_TYPES_REST_PRIV)
To approve or reject workflows:
-
Approve Item Change Order (EGO_APPROVE_ITEM_CHANGE_ORDER_PRIV)
To terminate change workflow approvals:
-
Terminate Change Order (EGO_TERMINATE_CHANGE_ORDER_PRIV)
To move change order lines to a new change order:
-
Create Change Order (EGO_CREATE_CHANGE_ORDER_PRIV)
-
Manage Change Orders (ACA_MANAGE_CHANGE_ORDERS_PRIV)
To move change order lines to an existing change order:
-
Manage Change Orders (ACA_MANAGE_CHANGE_ORDERS_PRIV)
To reschedule change lines, resolve revision conflicts, and use fill-up and fill-down actions on the affected objects:
-
Manage Change Orders (ACA_MANAGE_CHANGE_ORDERS_PRIV)
To publish changes orders:
-
View Change Order (ACA_VIEW_CHANGE_ORDERS_PRIV) or Manage Change Orders (ACA_MANAGE_CHANGE_ORDERS_PRIV)
and
-
Publish Change Order (ACA_PUBLISH_CHANGE_ORDER_PRIV)
To change status, delete, terminate, restart, or cancel a workflow:
-
Manage Change Orders (ACA_MANAGE_CHANGE_ORDERS_PRIV)
-
Manage Change Requests (ACA_MANAGE_CHANGE_REQUESTS_PRIV)
-
Manage Problem Report (ACA_MANAGE_PROBLEM_REPORT_PRIV)
-
Manage Corrective Action (ACA_MANAGE_CORRECTIVE_ACTION_PRIV)
To select or be selected as an Assigned To user or assignee role on a workflow:
-
Manage Assignee (EGO_MANAGE_ASSIGNED_TO_PRIV)
To view the history tab on the workflow:
-
View Change History (EGO_VIEW_CHANGE_HISTORY_PRIV)
To run the change order details report:
-
Generate Item Change Order Report (EGO_GENERATE_ITEM_CHANGE_ORDER_REPORT_PRIV)
-
Get BIP Report Definitions (EGI_GET_BIP_REPORT_DEFINITIONS_REST)
To send a workflow object:
-
Use REST Service - Users and Roles Lists of Values (PER_REST_SERVICE_ACCESS_USERS_AND_ROLES_LOVS_PRIV)
-
Manage HR Name Format (PER_MANAGE_HR_NAME_FORMAT_PRIV) (optional)
To select users managing participants or changing workflow status:
-
Use REST Service - Users and Roles Lists of Values (PER_REST_SERVICE_ACCESS_USERS_AND_ROLES_LOVS_PRIV)
-
Manage HR Name Format (PER_MANAGE_HR_NAME_FORMAT_PRIV) (optional)
To calculate use-up date:
-
View Planning Items (MSC_VIEW_PLANNING_ITEMS_PRIV)
To search for items on Redwood pages:
-
Product Search (ORA_EGI_PRODUCT_SEARCH_DUTY)
To search for workflow objects in Redwood pages:
-
Get Search View REST (EGP_GET_SEARCH_VIEW_REST_PRIV)
-
GET Product Management Index REST (EGP_GET_PM_INDEX_REST_PRIV)
-
Access Product Management Change Search(EGO_VIEW_PRODUCT_MANAGEMENT_CHANGE_SEARCH_PRIV)
To configure Business Rules:
-
Manage Item Rule Set (EGO_MANAGE_ITEM_RULE_SET_PRIV)
These privileges were available prior to this update.
To run workflow OTBI reports, you need the following:
-
Product Catalog Transaction Analysis Duty (FBI_PRODUCT_CATALOG_TRANSACTION_ANALYSIS_DUTY)
-
Product Transaction Analysis Duty (FBI_PRODUCT_TRANSACTION_ANALYSIS_DUTY)
-
BI Consumer Role (BIConsumer)
Additionally, you will require the new privilege Access Users (EGP_ACCESS_USERS_PRIV), to select users in:
-
Requested By or Assigned To attributes in the Attributes tab.
-
Task assignee in Workflow and Tasks > Create or Edit Task drawers.
-
Manage Participants or Change Status drawer.
-
Send Object drawer.