 AI Agent: Receipt Creation Assistant - Create Receipt Through Email
In some situations, you need to create a receipt for ordered goods, but strict oversight isn't required. In these cases, it’s acceptable to generate the goods receipt using a proxy, like a carrier’s delivery confirmation email. For example, you order promotional items for a conference and have them shipped directly to the event venue. When the items are delivered to the venue, you receive a delivery confirmation email from the carrier that contains all the necessary information to create a receipt. Rather than entering the receipt details manually, you want the delivery confirmation email to automatically trigger the creation of the receipt. Now the Receipt Creation Assistant AI agent is able to automatically create a receipt based upon the content sent in an email.
Receipt Creation Assistant (Email)
The Receipt Creation Assistant AI agent can automatically create a receipt based upon the content sent in an email. After processing, an email notification is sent to the specified email address indicating the receipt creation status. The email includes details such as the receipt number, order type, and order number. Additionally, item level details are displayed such as item number, item quantity received, and lot and serial number details. In the event you want to view additional receipt details, the receipt number link is provided and allows you to access the Received Lines page.
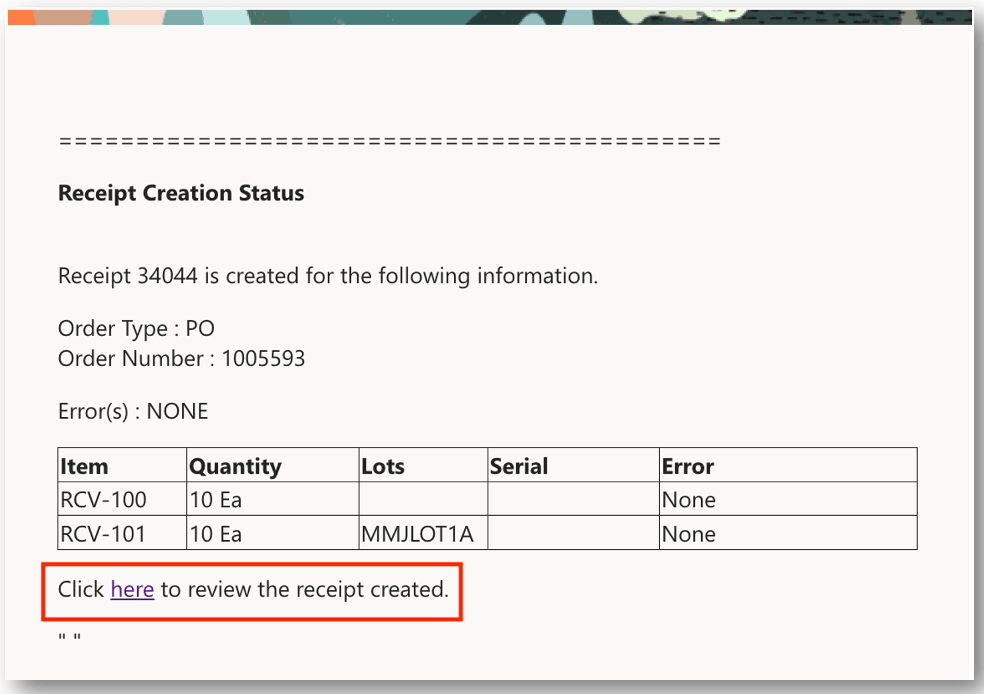
Receipt Creation Status
The Received Lines page allows you view receipt details such as ordered quantity, received quantity, and delivered quantity. You also have the ability to access the Receipt Summary and Receiving Transaction History pages. Lastly, you can view the source document details for documents such as purchase orders and transfer orders.
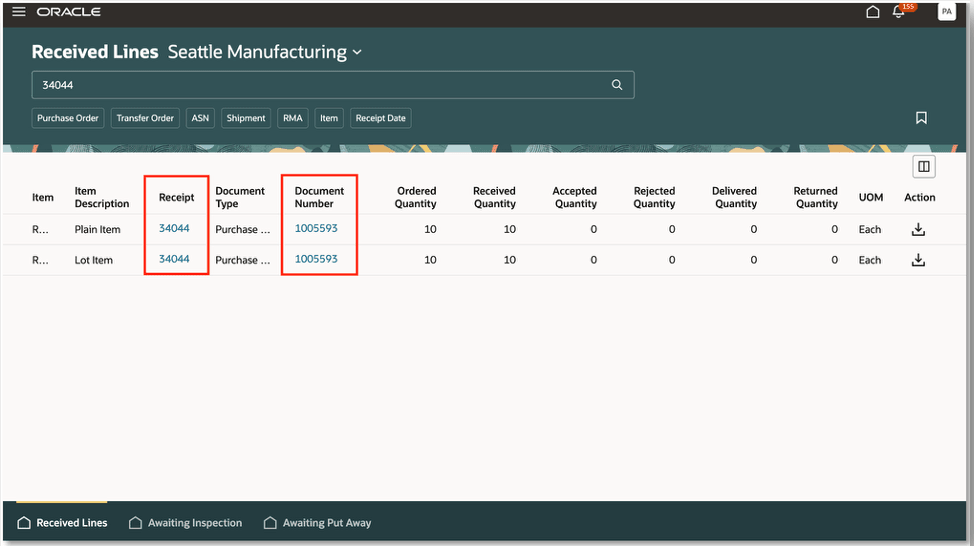
Received Lines
This feature streamlines the process by minimizing manual effort in creating receipts for goods that don't need strict oversight, while still ensuring a receipt is generated for the complete order lifecycle.
Steps to enable and configure
To use the Receipt Creation Assistant AI agent (Email), you need to create an email account. Follow these steps to create an email account:
- On the AI Agent Studio landing page, select the Credentials tab.
- Select the Email Accounts tab.
- Click the Add Account button.
- In the Create drawer, select your email provider.
- Select the Inbound radio button and provide the following information:
- Account Name: Account name for the email account.
- Email Address: Email address from from where receiving documents are retrieved by the agent.
- Email Folder: Email folder from which receiving documents are to be picked up by the agent. It's advisable to create a separate folder for receiving document emails and to move the receiving document emails to this folder, rather than providing Inbox as the folder name.
- Polling Interval: Interval at which emails should be looked into by the agent to create receipts.
- Description: Description for the account.
- Tenant ID, Client ID, Client Secret: Email credentials.
- Click the Create button to create the inbound account.
NOTE: The Manage Communication Responses scheduled process polls the email folder and call the agents registered for each new email. The process to poll the account runs once for every interval selected in the inbound email account. Once the emails are processed, they're set to Read status.
Receipt Creation Assistant (Email) - Agent Team Settings
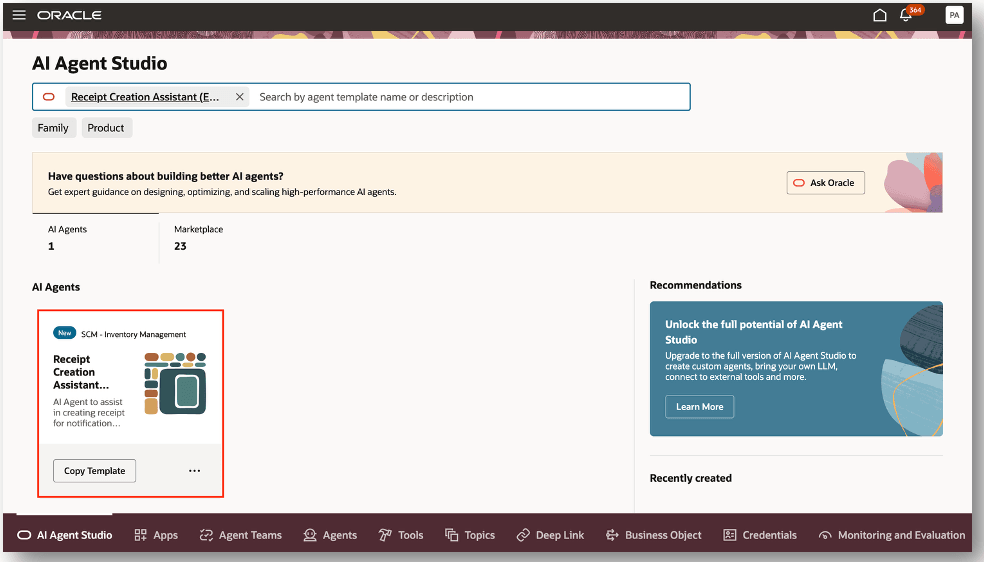
You can access the AI Agent Studio to use or copy the preconfigured agent template to create agents for your business processes. To automatically add a suffix to all artifacts in your agent team, you can use the Copy Template instead of Use Template button. When you copy a template, you're directly taken to the agent team canvas where you can edit the agent team settings, agents, tools, and topics. The Use Template option takes you through a step-by-step process for configuring each artifact in the agent team.
- Select the AI Agent Studio tab and search by Agent Team Name, Family, Product, or Created By.
- Select the Receipt Creation Assistant (Email) and click the Copy Template button.

Receipt Creation Assistant (Email)
- Provide an Agent Team Suffix and click Continue.
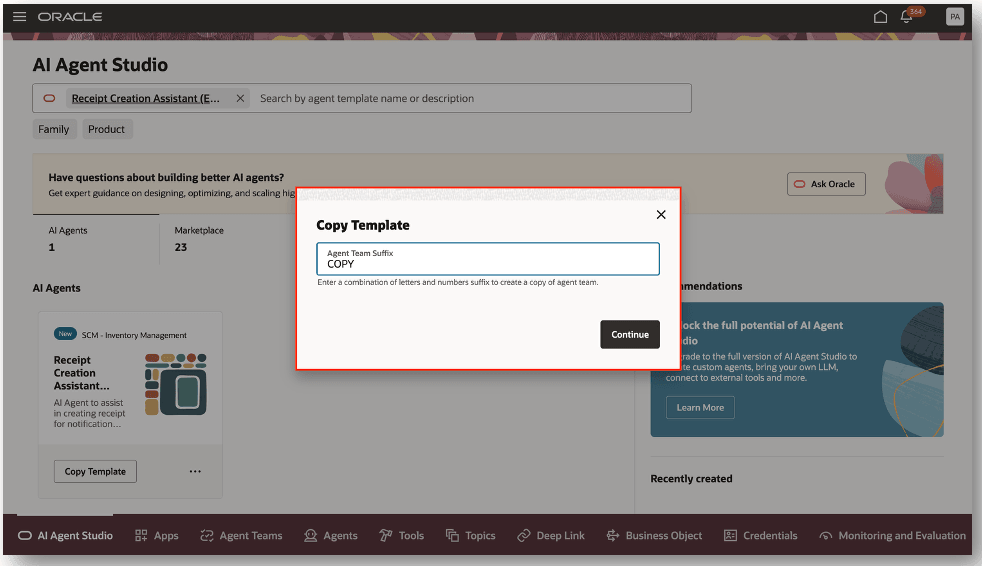
Copy Template
- Perform theses actions to configure the email trigger for the agent team. This step is performed to register an agent against an inbound email account.
- Select the Settings icon.
- Select the Triggers tab.
- Click Add in the Email region.
- Select the Email Account.
- Click the Update button.
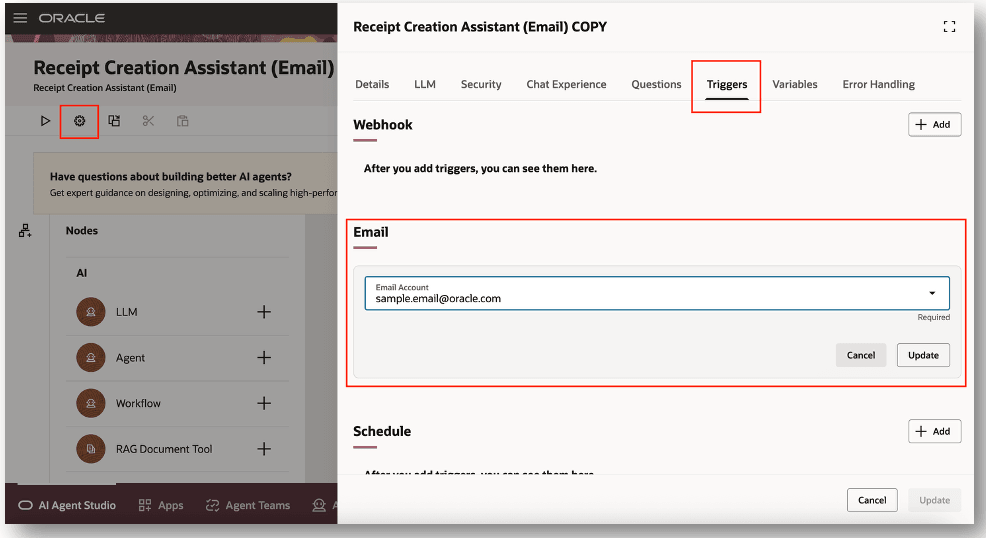
Email Trigger
Configure Input Variables
Define the email address to receive receipt creation status emails. Once the receipt creation is requested through email, a response is sent to the specified recipient email.
- Select the Set Input Variables node to edit.
- Edit the receipientEmail variable.
- Enter a valid email address in the Value field.
- Click the Apply button.
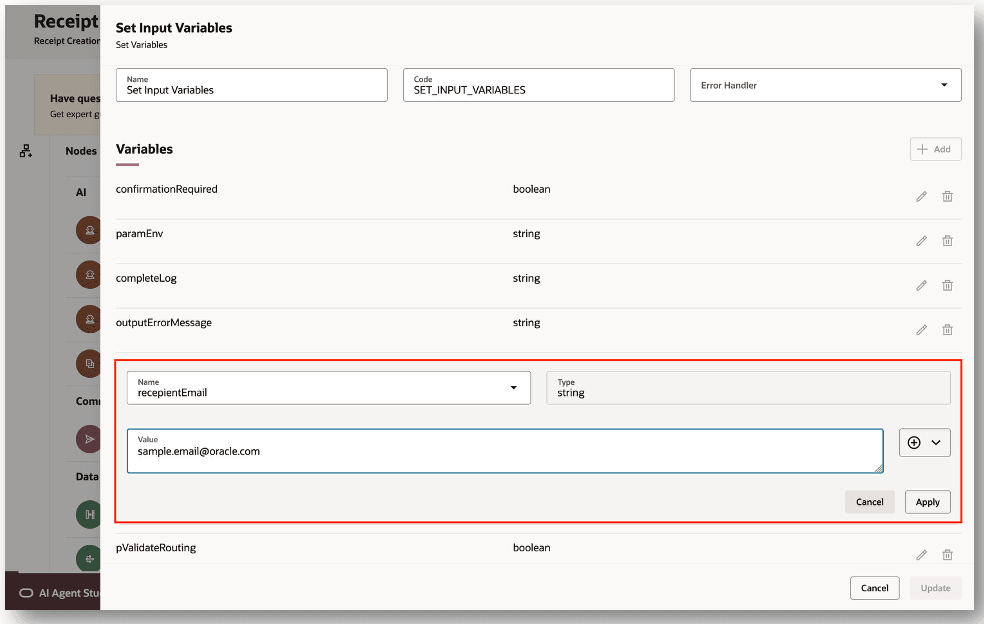
Configure Input Variables
- Once you have modified the agent. Click the Publish button.
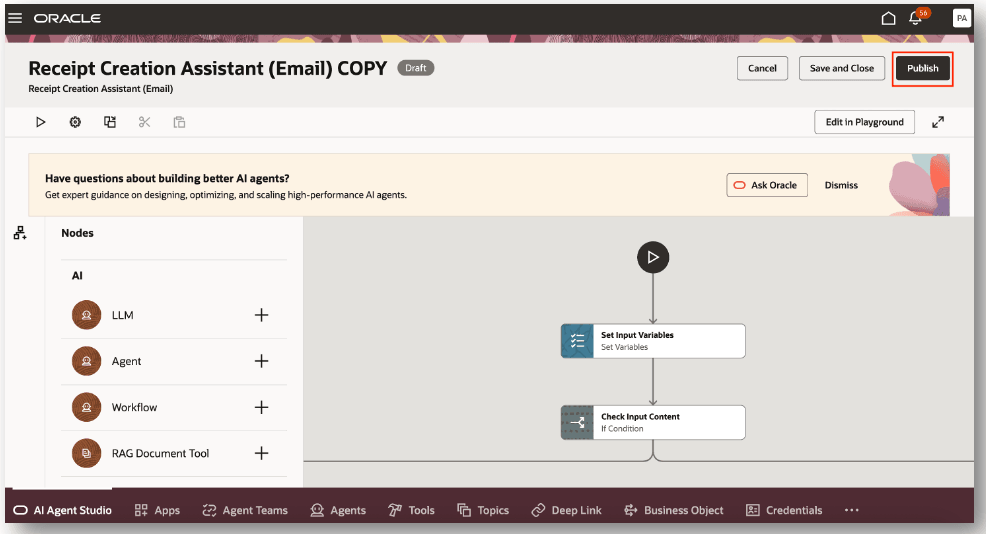
Publish AI Agent
Receipt Creation Confirmation (Optional)
The agent by default doesn't ask for any confirmation before creating the receipt. If users want to receive confirmation before creating the receipt (through email), perform these steps in the agent:
- Create an approver email account
- On the AI Agent Studio landing page, click the Credentials tab.
- Click the Add Account button.
- In the Create drawer, select your email provider (as of 26B, Microsoft and Google accounts are supported).
- Select the Approver radio button and provide the required information.
- Provide a valid Account Name.
- Enter the Email Address and Email Folder. The email folder will have all the approval emails or further information provided emails for which the receipt should be created. Note that the agent will first send a confirmation email to a provided recipient email. When the recipient approves or provides further information, that reply will come to the email account provided here. It's advised to create a separate folder and move all approval emails to that folder instead of using Inbox as the folder name. A dedicated scheduled process job will look through these unread emails and invoke the original agent using the information provided.
- Select a Polling Interval of your choice. Note that polling happens once for each interval.
- Provide a Description.
- Provide the email credentials in Tenant ID, Client ID, and Client Secret.
- Click Create to create the approver account.
Add Human Approval Node
- Remove the TAKECONFIRMATION node (we need to change this from chat-based confirmation to email-based confirmation).
- Add the Human Approval node after the Confirmation Email Body node.
- Enter the details of the Human Approval node:
- Enter the TAKECONFIRMATION name and select the Channel as Email.
- Select the number of iterations the confirmation needs to be taken (set to 1).
- Select the Loop Back node as Set Approval Option Variables.
- Select the Approval Email account created in Step 1.
- Select the appropriate Timeout units and value.
- Edit the Receipt Creation Assistant (Email) - Message Template:
- Set the Recipient Email as {{$context.$variables.recepientEmail}}.
- Provide CC and BCC, if required.
- Provide the valid Subject (for example, Receipt Confirmation). You can use the expression builder to provide a subject for the input email.
- In the Message Content, use the value as {{$context.$variables.confirmationEmailBody}}.
NOTE: If the Node name is different from TAKECONFIRMATION, edit the Set Approval Option Variables and change the node name accordingly in the value of the paramInputMessage variable.
- Click Update to save the message template.
- Click Update to save the TAKECONFIRMATION node.
- Click Publish to publish the agent.
Tips and considerations
- After publishing your agent, you can add it to a page by including it in the guided journey of that page. To do this, create an Agent task of type Workflow Agent for the agent, and add it to the guided journey. Once your emails are accessed by the agent, it automatically sets the email as read.
- If the Redwood: Use Approvals for Receipts feature is enabled, then the status email will provide details of the receipt transactions sent for approval along with a deep link to review the approval request.
Key resources
- Oracle Fusion Cloud SCM: Using Receiving guide, available on the Oracle Help Center.
- Oracle Fusion Cloud SCM: Implementing Manufacturing and Supply Chain Materials Management guide, available on the Oracle Help Center.
- Oracle Fusion Cloud SCM: Security Reference for Manufacturing and Supply Chain Materials Management guide, available on the Oracle Help Center.
- Access Requirements for AI Agent Studio
- How can I give users access to AI agents?
- For information on using AI Agent Studio, see How do I use AI Agent Studio?
Access requirements
To access the Oracle AI Agent Studio for Fusion Applications and manage SCM AI agents, users must be assigned a configured job role that contains these duty roles:
- SCM Intelligent Agent Management Duty (ORA_RCS_SCM_AI_AGENT_MANAGEMENT_DUTY)
- SCM Intelligent Agent Management Duty (ORA_RCS_SCM_AI_AGENT_MANAGEMENT_DUTY_HCM)
- Fai Genai Agent SCM Administrator Duty (ORA_DR_FAI_GENERATIVE_AI_AGENT_SCM_ADMINISTRATOR_DUTY)
To interact with AI agents in product pages, users must be assigned a configured job role that contains this duty role:
- Fai Genai Agent Runtime Duty (ORA_DR_FAI_GENERATIVE_AI_AGENT_RUNTIME_DUTY)
To allow users to interact with agents, you must also enable permission groups in the Security Console on those users' configured job roles that contain the Fai Genai Agent Runtime Duty role. You can enable permission groups when you manage the basic information of your configured job roles.
Users' configured job roles must also contain privileges that allow access to the pages where AI agents are enabled.
See Access Requirements for AI Agent Studio (for administrators) and How can I give users access to AI agents (for end-users) for more information.
Users who are assigned a configured job role that contains these privileges can access this feature:
- Privilege Name (RCV_RECEIVE_RECEIVING_SHIPMENT_LINE_PRIV)
- Privilege Name (RCV_CREATE_RECEIVING_RECEIPT_WEB_SERVICE_PRIV)
- HRC_ACCESS_HCM_COMMON_COMPONENTS_PRIV or PER_VIEW_NOTIFICATION_DETAILS_PRIV (PRIV for HCM businessProcessApprovalOptions)
These privileges were available prior to this update.