Redwood: Use Credit Cards to Pay for Transactions
Use the redesigned pages to speed up and validate credit card transactions while processing orders. User can select customer credit cards directly on a sales order and use that card for payment after the invoice is processed. Order Management now integrates with Oracle Payments to communicate with the issuing bank to verify that the funds are available, validate expiration dates, and manage authorization.
Get these benefits
- Quickly select from a list of existing credit cards associated with the bill-to customer.
- Add a new credit card directly in the Order Management work area without having to use other work areas.
- Set the Payment Method to Credit Card, and Order Management automatically sets the primary card default value according to how it is specified in Accounts Receivable.
- Apply a single credit card to the entire sales order.
- Use a different credit card for each order line.
- Reduce the number of clicks when you create a sales order.
Reduce errors
- Display only valid, tokenized credit cards associated with the customer account.
- Avoid manual entry for sensitive payment data.
- Minimize the risk of incorrectly selecting a card.
- Let Oracle Payments handle expired or invalid cards.
- Reduce downstream billing issues, rework, and processing delay.
Integrate Order Management with Oracle Payments to make sure your payments are secure and compliant
- Authorize transactions in real time.
- Communicate with issuing banks.
- Validate card expiration and available funds.
- Support tokenized card storage.
- Align with the PCI DSS compliance standards.
Get more flexibility in payment processing
- Use a single credit card for the entire sales order.
- Override and use a different credit card on each order line.
- Import a transaction that's already authorized.
What it looks like
Once all the setup access requirements are completed, this is how users will process credit card transactions.
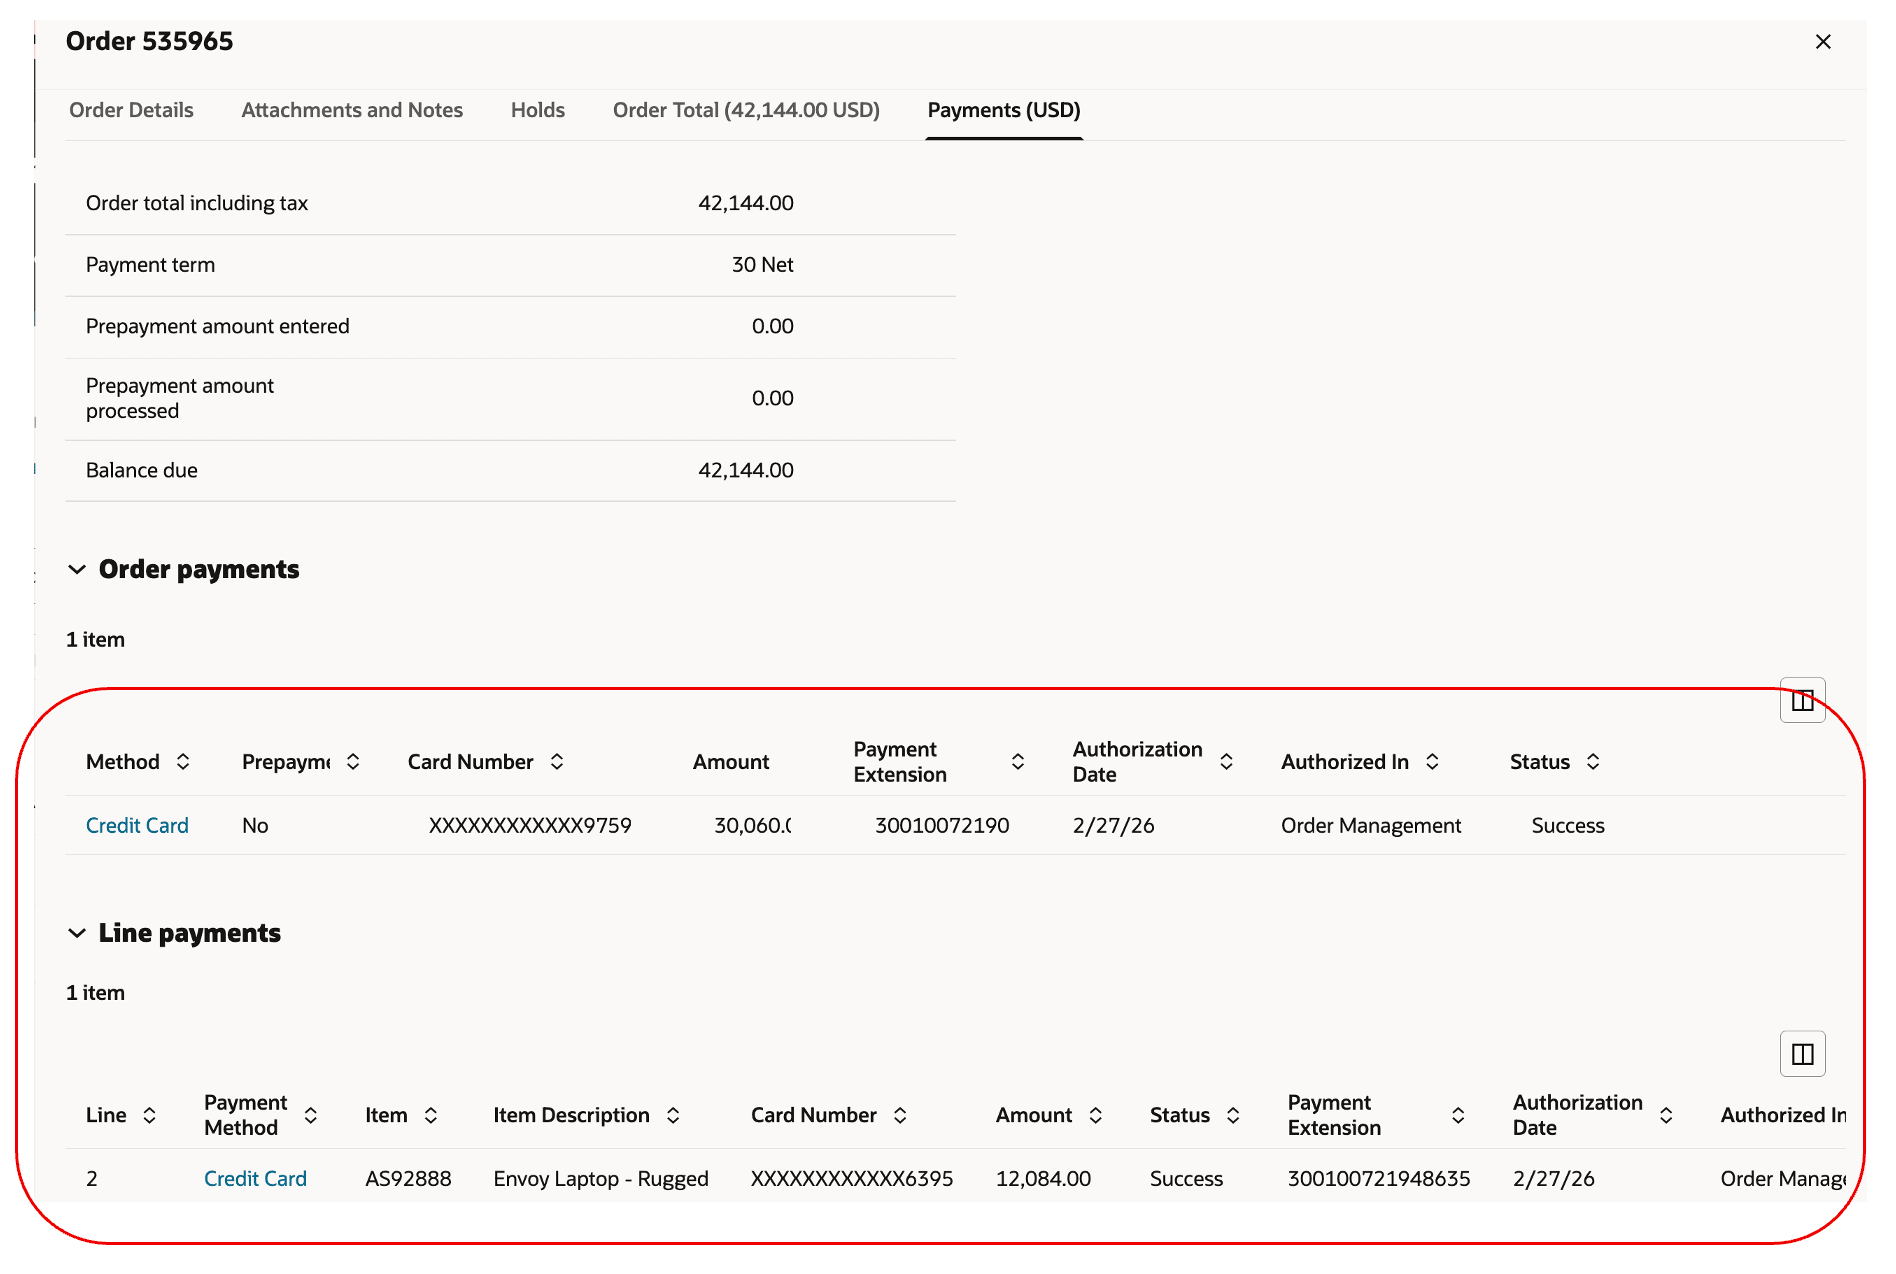
When users create a sales order in the Order Management work area, they simply click Additional Order Details > Payments, then click Add under Order Payments:
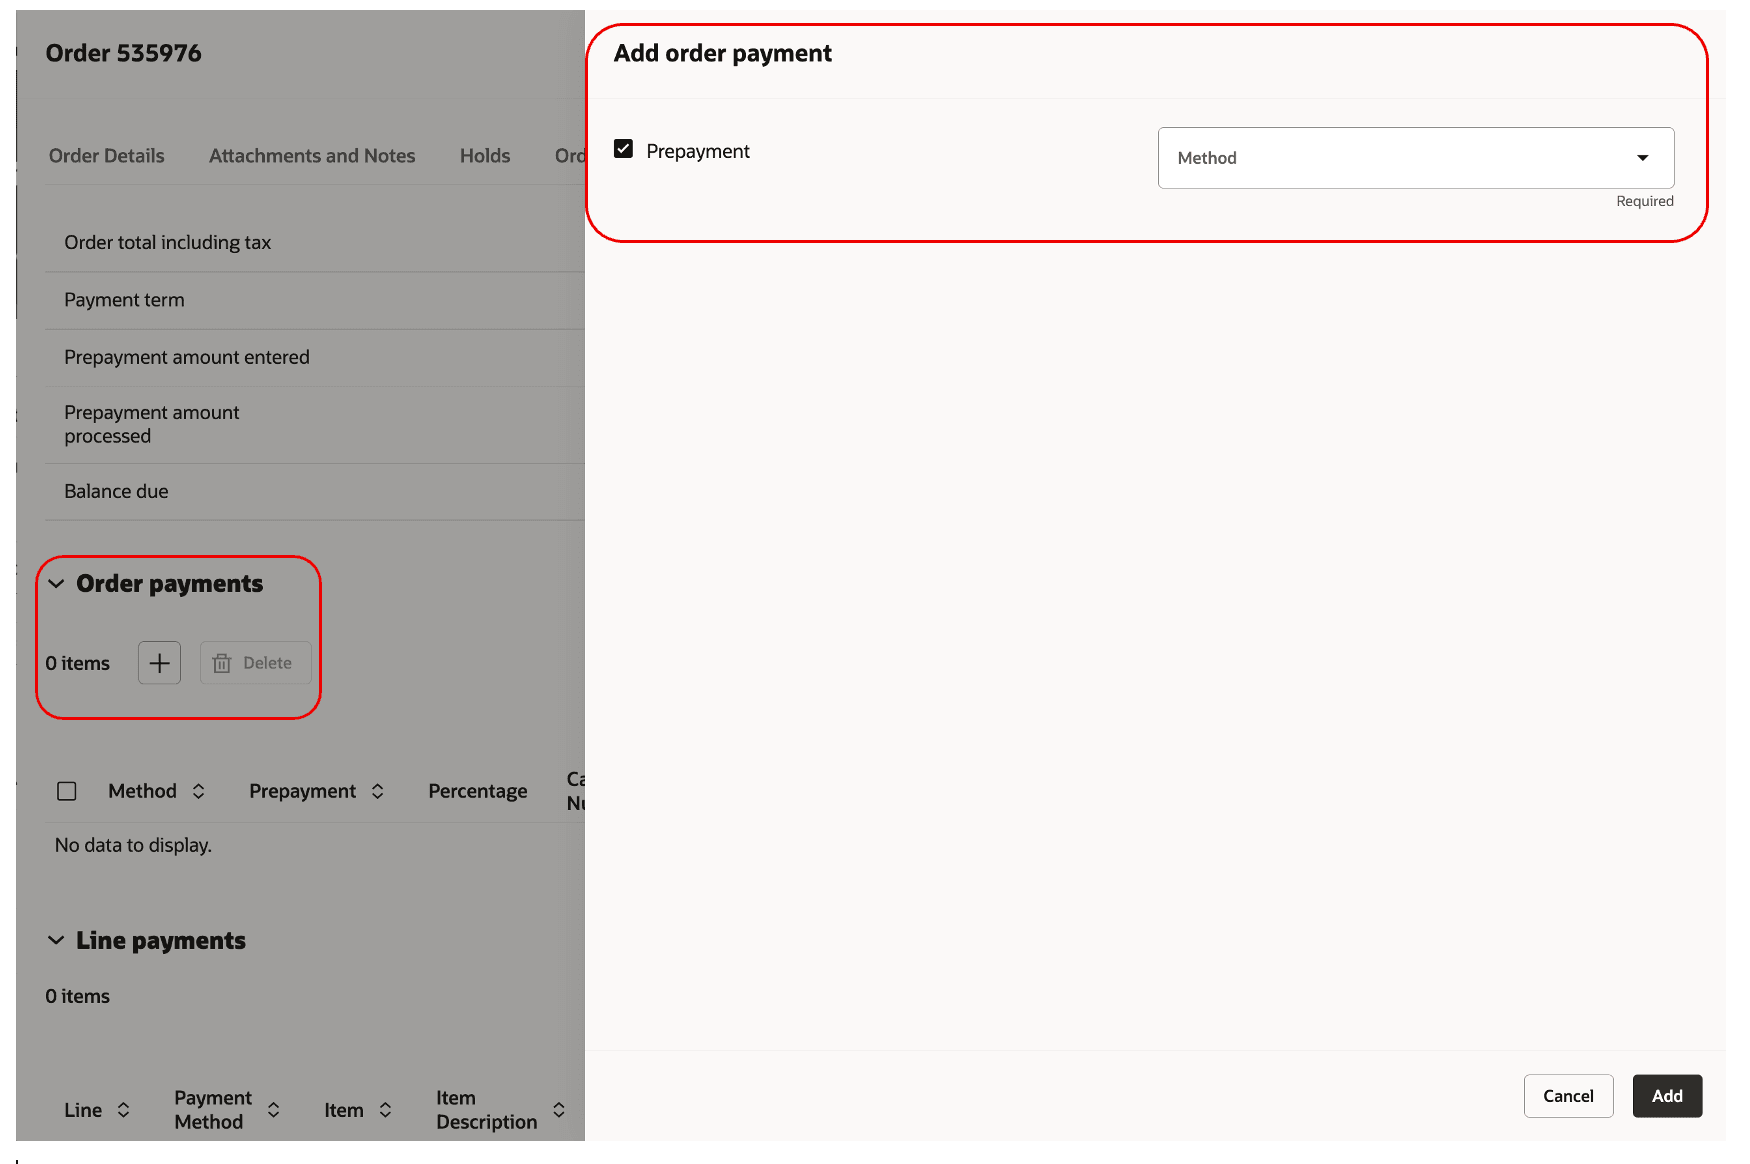
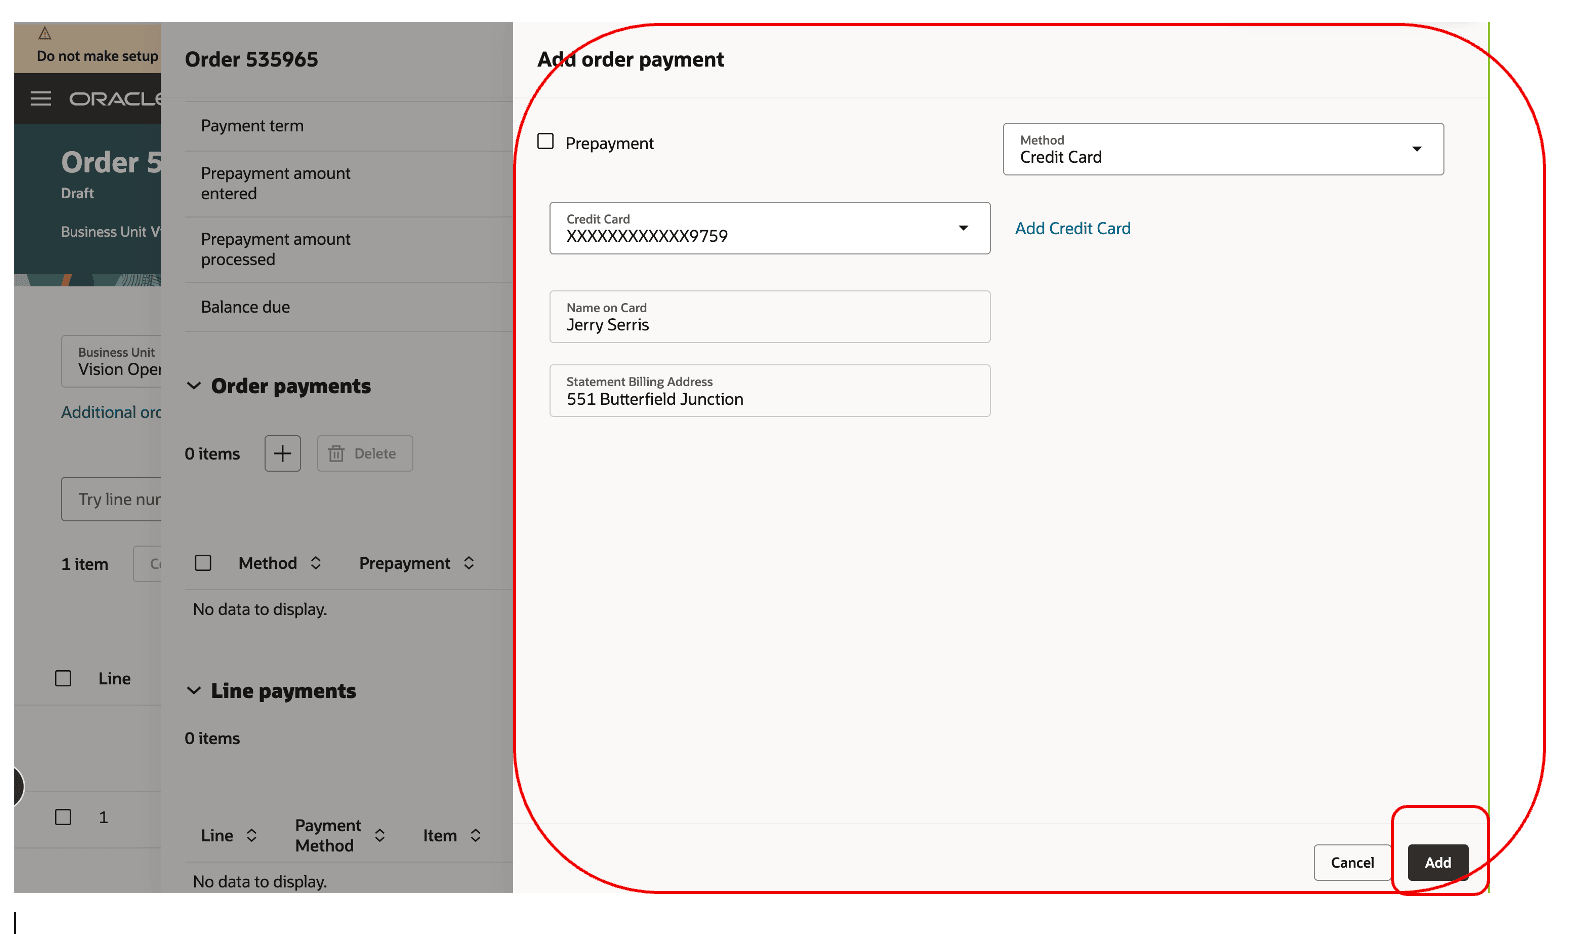
You can't use a credit card when the order has a prepayment, so remove the check mark from the Prepayment option and set the Method to Credit Card:

Select a value in the Credit Card attribute, then click Add:
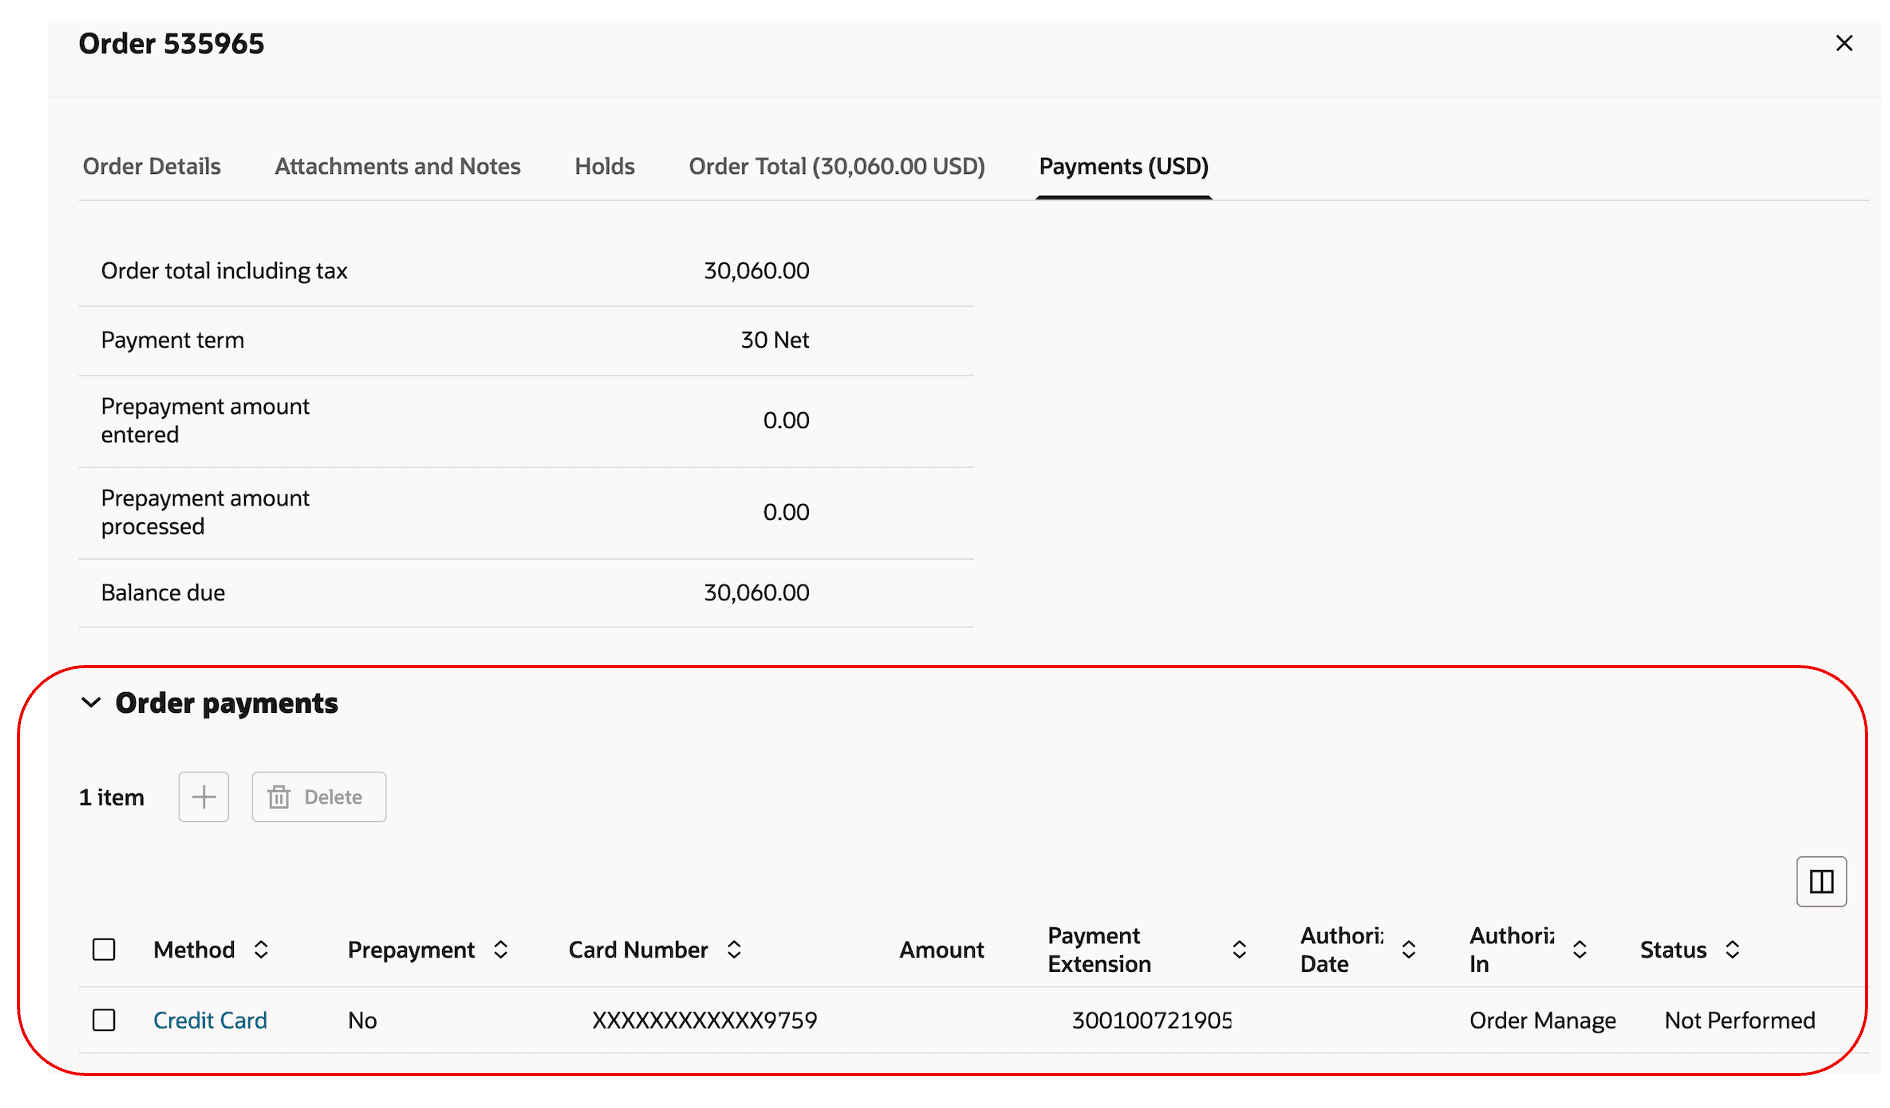
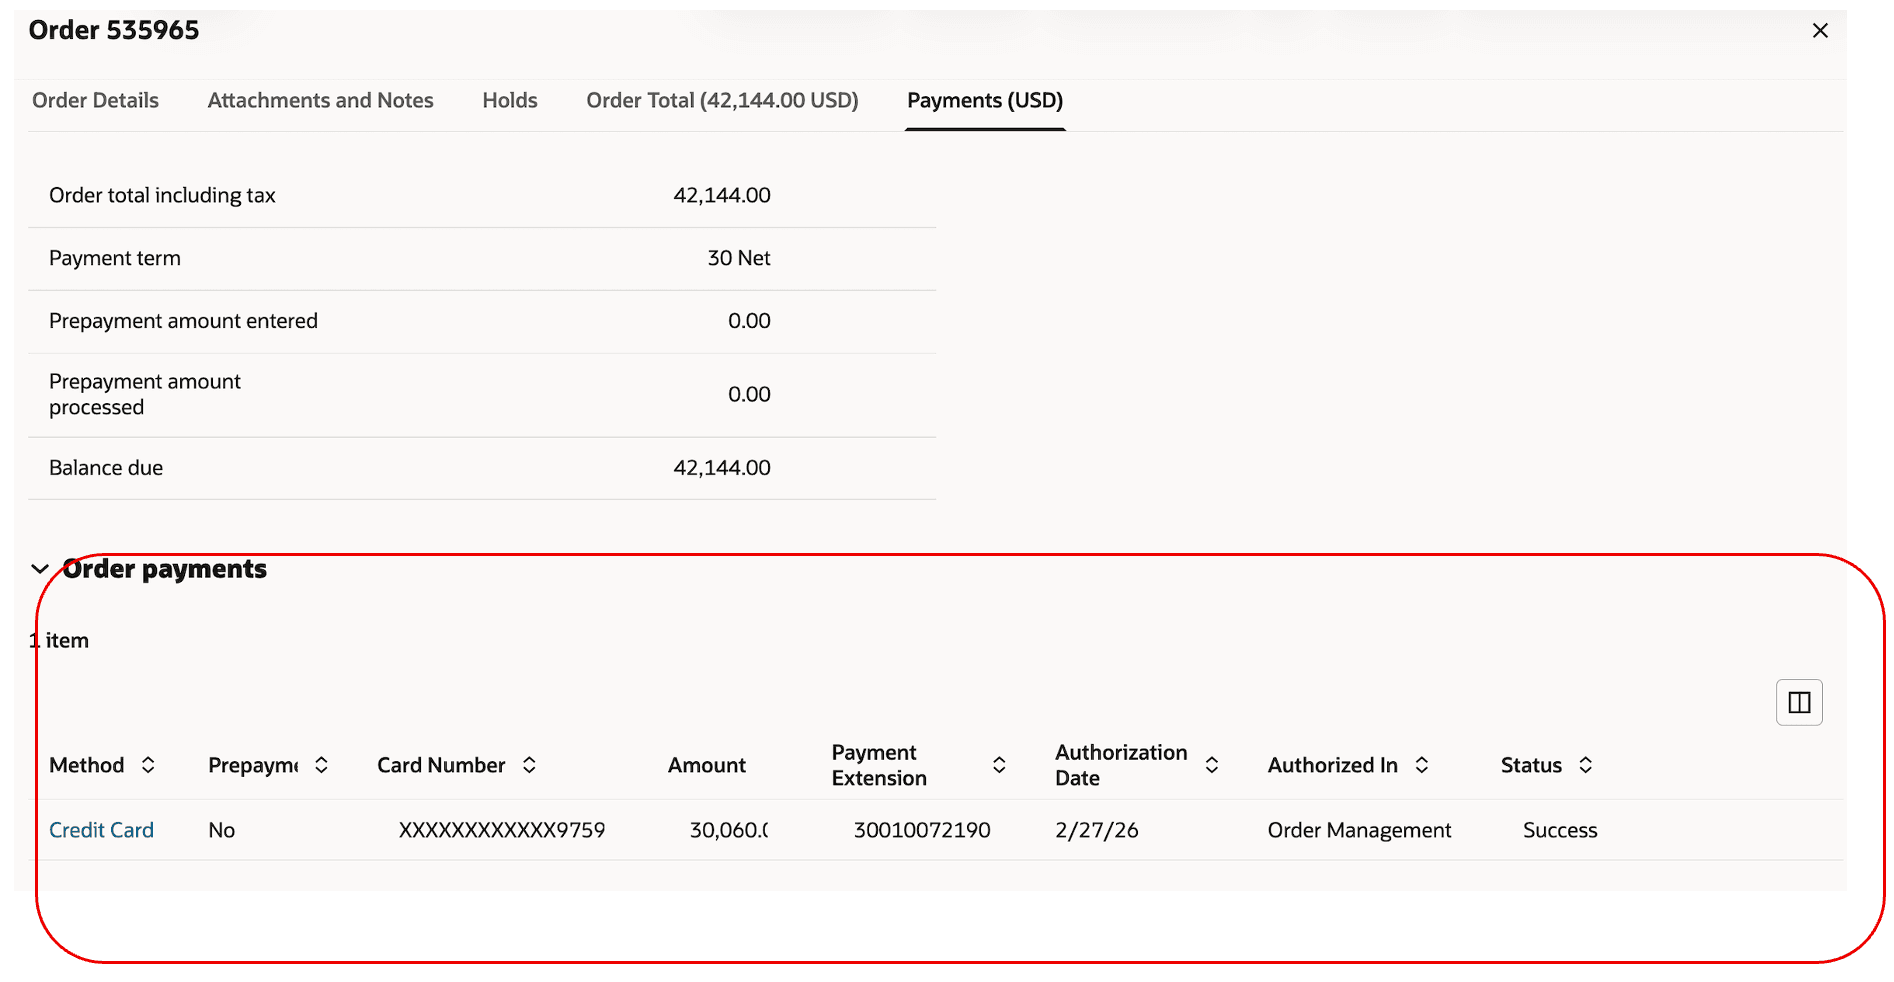
Order Management authorizes the credit card only after you submit the sales order, so the Status attribute contains Not Performed and the Amount and Authorized Date is empty:
Submit the order, then notice that Status contains Success and Amount contains authorized amount and Authorized Date contains a date:
To set payment on the order line, select the line, then click More Actions > Apply Line Level Payment:
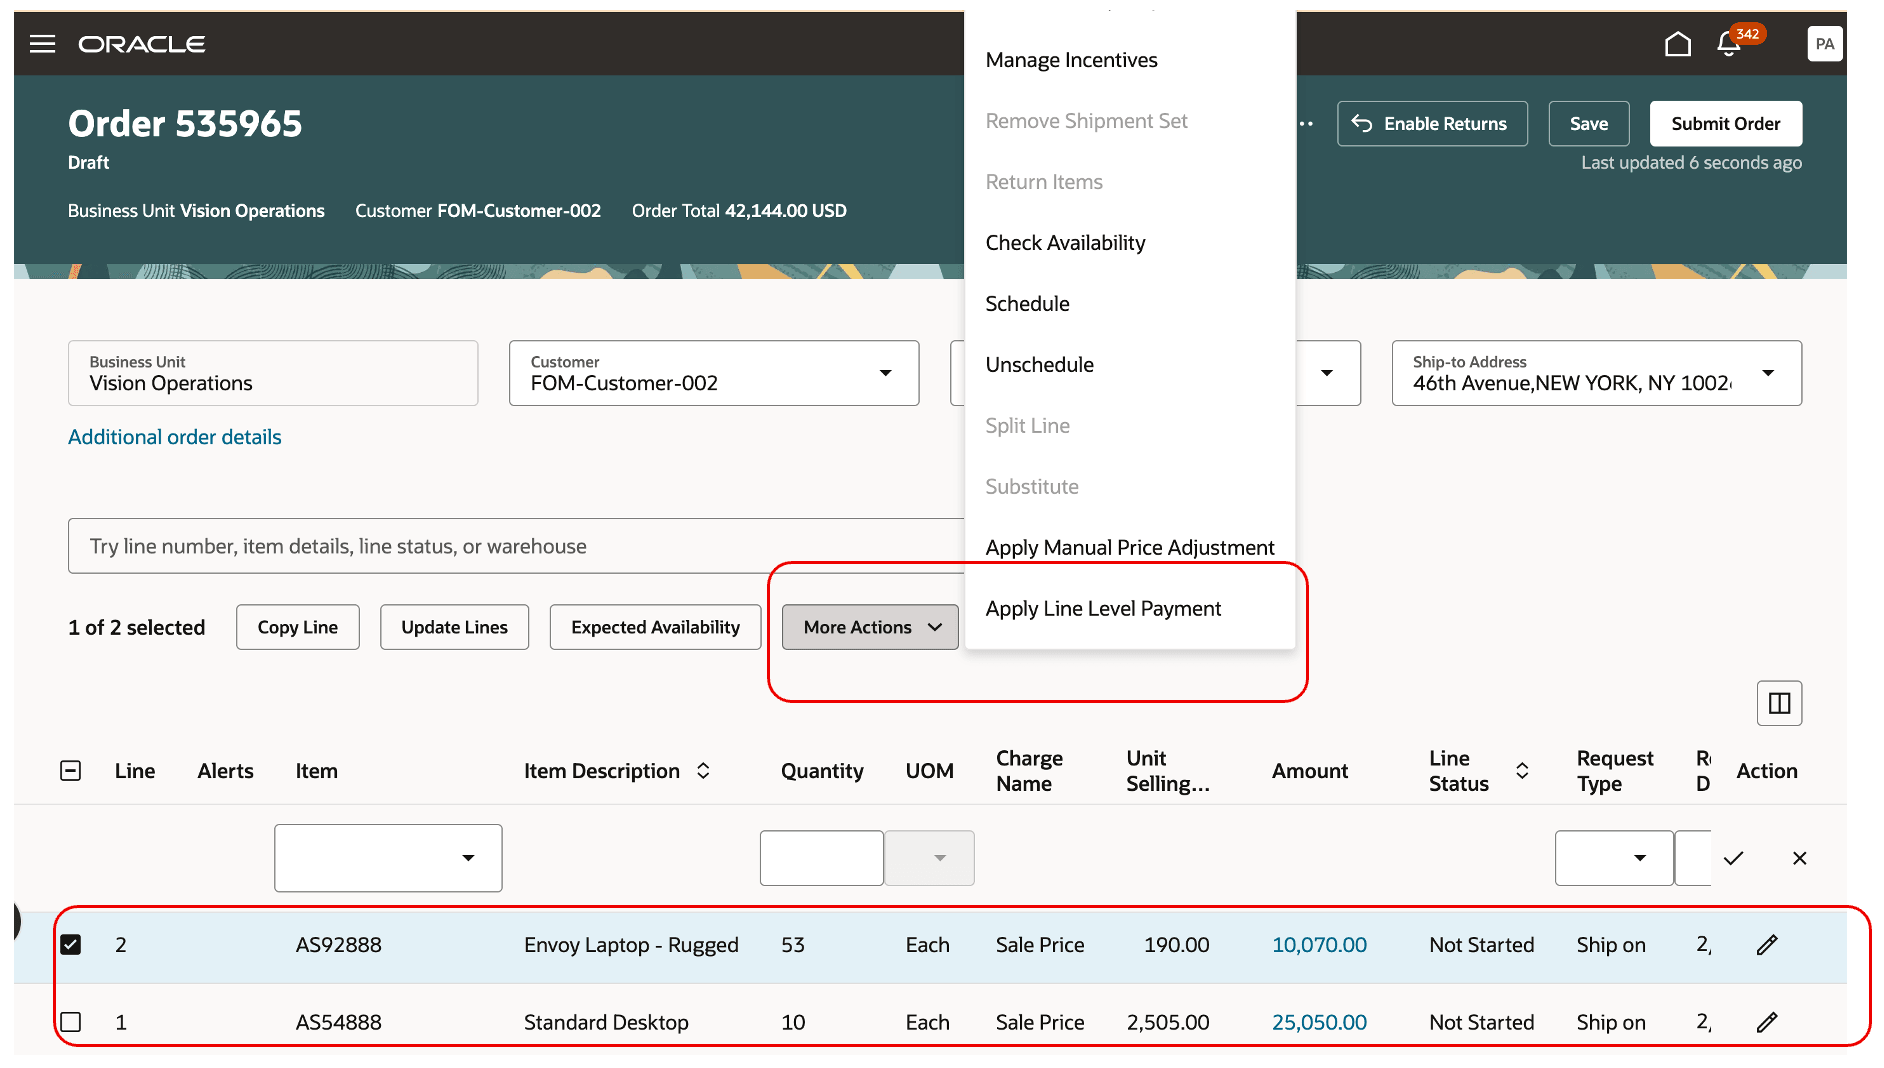
You can you use this action only for a single order line, and you must select a Credit Card on the order header before you use the action.
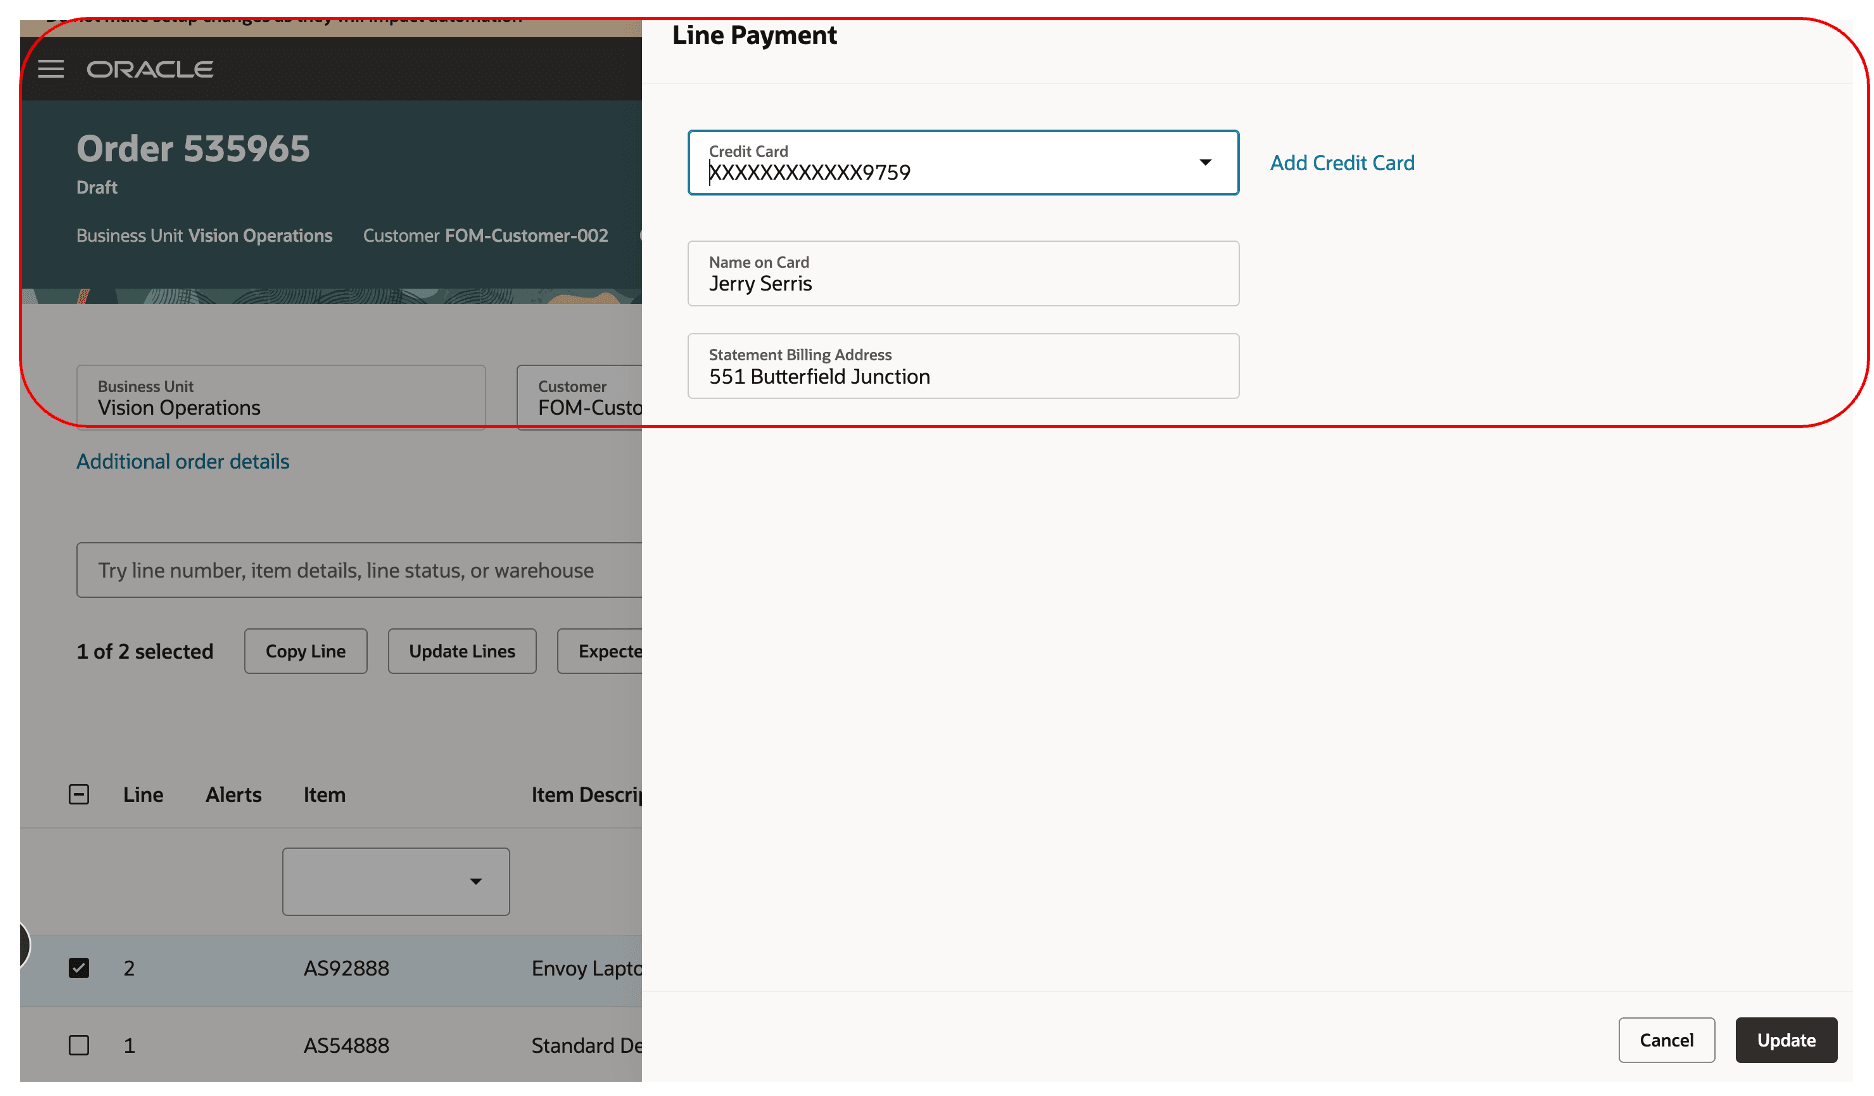
Select a card then click Update:
Notice the values in the Line Payments section are different than the ones in the Order Payments section:
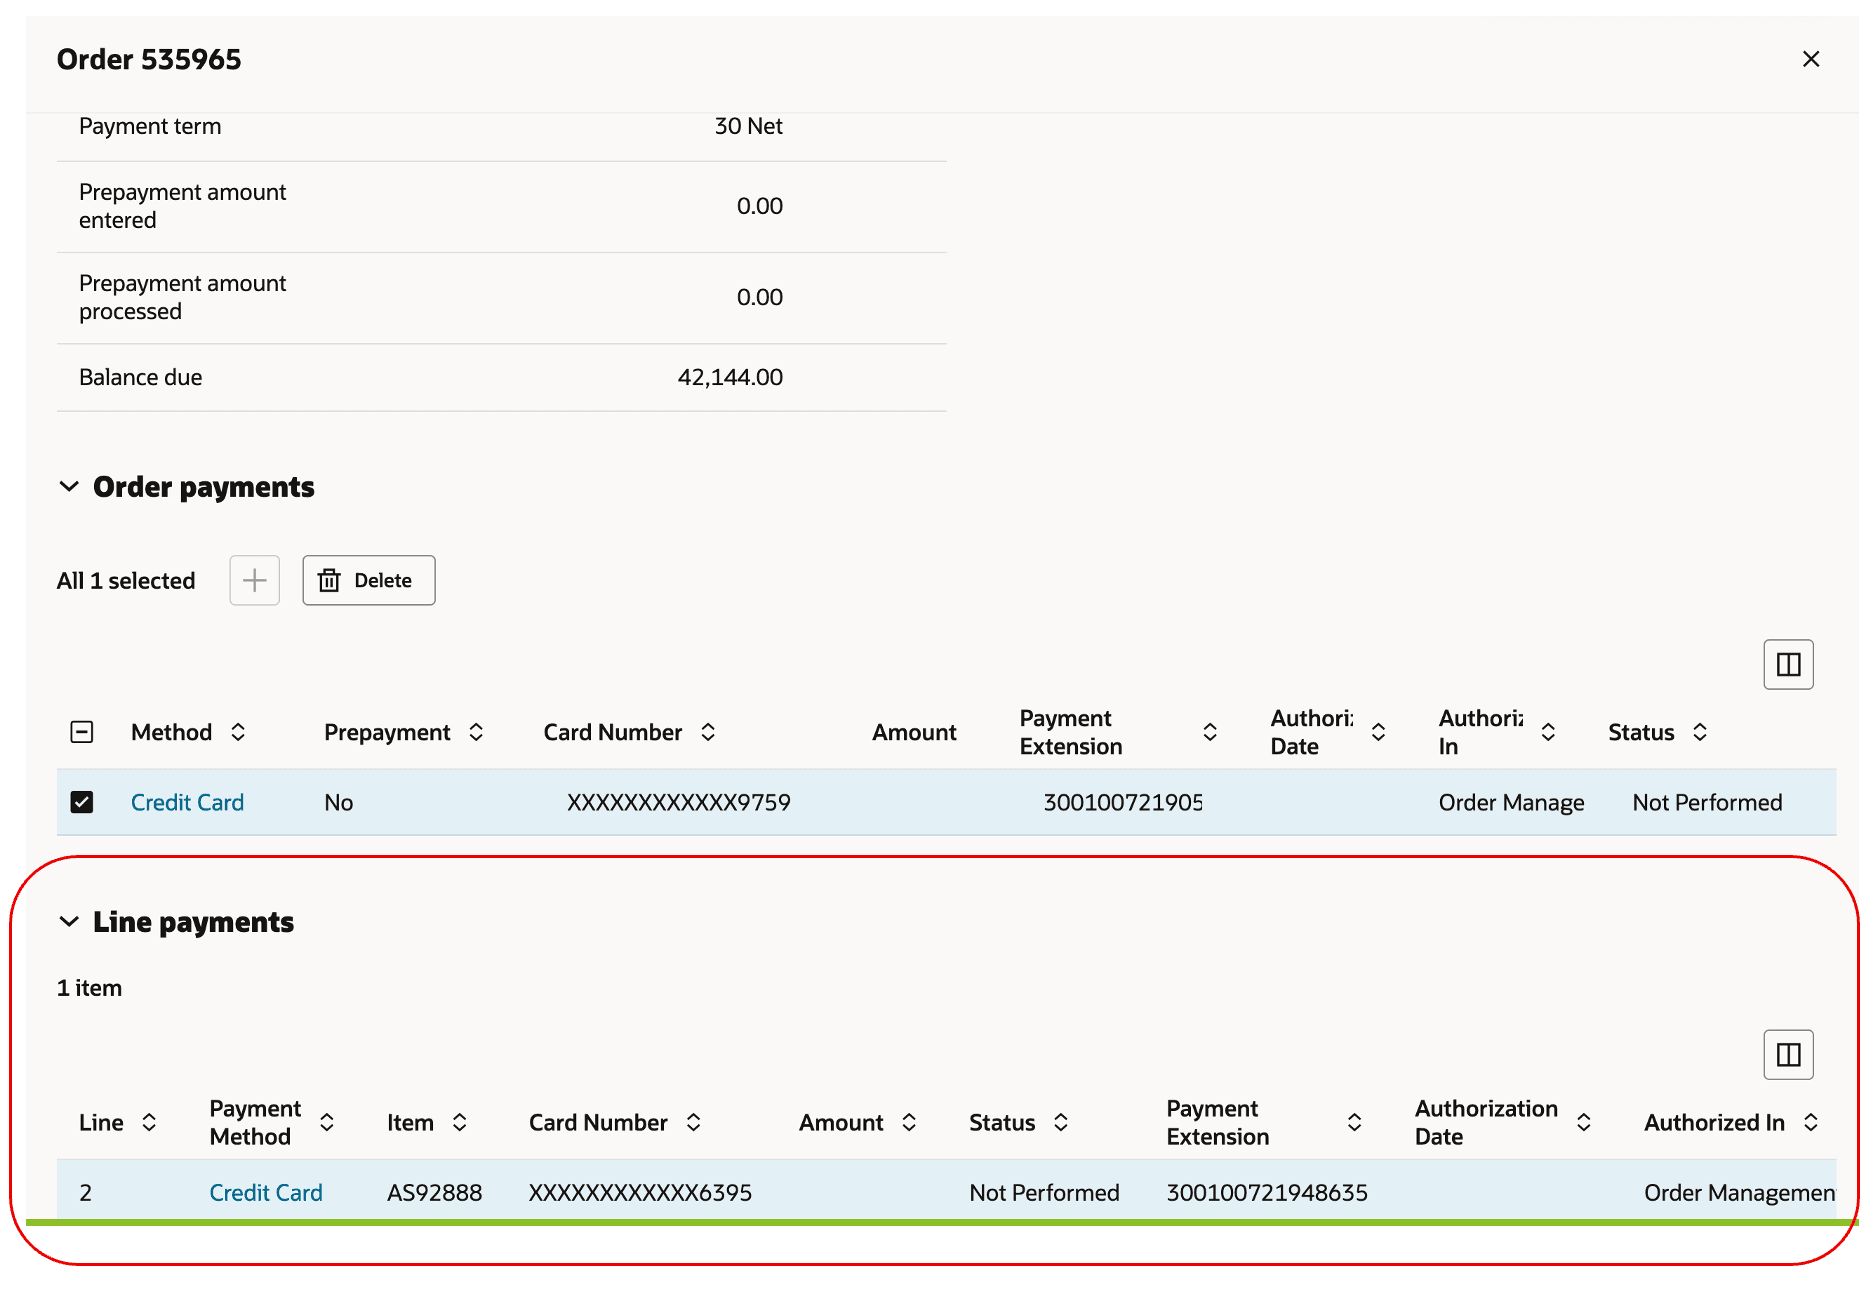
Submit the sales order, then notice the Status on the line contains Success for the header and line:
Steps to enable and configure
- Integrate Order Management with Oracle Payments:
- Configure your payment system integration between Order Management and Oracle Payments.
- Make sure you set up your payment service providers and that they're active.
- Create and enable the FOM_ENABLE_CARD_PAYMENT order profile at the site level.
- Manage credit cards:
- Go to the Accounts Receivable work area.
- Add credit cards to the customer account.
- As an option, specify one card as the primary.
- Make sure you correctly tokenize each card.
Tips and considerations
- You must make sure each credit card number that you send to an Oracle Application is tokenized. You must consult with your Qualified Security Assessor (QSA) to make sure you comply with Payment Card Industry Data Security Standard (PCI DSS).
- You must make sure that you correctly configure all required payment service providers and security policies before you enable this feature in your production environment.
- You can use only one payment method for each sales order. You can't modify the method after you submit the order or when you revise an order.
- You can only use credit cards that you set up at the bill-to site level. With the latest AR data security implementation, the Redwood IBY fragment supports only bIll-to site level cards and no longer supports cards defined at the bill-to account level. If you are using cards at the account level, they will need to be added at the bIll-to site level. For more information, please refer to the AR data security documentation and fusion payments documentation.
This feature works similar to how credit card features work in Order Management before this update. You can add a card on a customer account in Order Management classic pages and skip authorization. You can also do these things for each sales order that you import:
- Pay by primary card on customer account.
- Use the card's token to pay with a specific card.
- Send an authorization that you already obtained to pay for the sales order.
Key resources
- Implementing Order Management
- Using Order Management
- Security References for Financials
- Implementing Receivables Credit to Cash
Access requirements
To access the payments feature in the Redwood UI, the following SAS duty roles and permission groups must be configured and assigned to either the seeded order management job roles that you are using or to the configured job roles that you are using to access order management features. There is also a monolith duty role that must be added.
1. Create a Duty Role and Assign Permissions
Name: IBY_CUSTOMER_PAYER_CREDIT_CARD_MANAGEMENT_DUTY
Assign the following permission groups to this duty role.You can use another name for the duty role also but following permission groups must be assigned the duty role that you create.
Permission Group for SAS duty Role IBY_CUSTOMER_PAYER_CREDIT_CARD_MANAGEMENT_DUTY
| S.No | Business Object | Description |
CRUD Enabled |
Permission Groups | Security View |
| 1 | External Payer | External payer is the business object that represents external payers details, such as bank charge bearer, debit instruction code, debit advice delivery option, local instrument, purpose code and service level | Yes | Read/Create | AllRowsHighlyRestrictedEssentialFields |
| 2 | Customer Payer | Inherited BO derived from External Payer | Yes | Create/Read | Reference Data Set Rows and unrestricted restricted and highly Restricted Fields |
| 3 | Payer Credit Card Assignment | A credit card assignment contains information such as credit card number, expiry date, cardholder's name, billing address, card brand, purchase card subtype, inactive date, and other related attributes. It also maintains details about payment instrument assignments | No | Read | Reference Data Set Rows and unrestricted restricted and highly Restricted Fields |
| 4 | Address | Addresses include details about attributes that describe a physical address or location associated to a party. | No | Read | All Rows and All Fields |
| 5 | Customer Account | The Customer Account business object provides the details of the specific business activities that the deploying company engages in with a customer party of type Organization or Person. | No | Read | All Rows and All Fields |
| 6 | Customer Account Site | The Customer Account Site business object provides the details of all customer account sites across all business units. A customer account site is one specific location belonging to a customer account. A single customer account can have multiple sites | No | Read | All Rows and All Fields |
| 7 | Customer Account Site Business Purpose |
The Customer Account Site Business Purpose business object provides the details of the business purposes assigned to customer account sites, for example Bill-to, Ship-to, and Statements. Each customer account site can have one or more business purposes | No | Read | All Rows and All Fields |
| 8 | External Payment Party | External Payment Party stores basic information about parties. It captures external party identifiers for both payer and payee use cases. | No | Read | AllRowsAllFields |
| 9 | External Payment Party Address Usage |
External Payment Party Address Usage stores information about how a external payment party site is used. Party sites can have multiple uses, for example Ship-To and Bill-To. | No | Read | AllRowsAllFields |
| 10 | Standard Lookup Code | The standard lookup codes list of values resource is used to query the list of standard lookup codes. | No | Read | All Standard Lookup Codes Security View |
| 11 | PaymentSystem | No | Read | ALLROWALLFIELD | |
2. Create a Second SAS Duty Role and Assign Permissions
Name: IBY_CUSTOMER_PAYER_TXN_EXTENSION_MANAGEMENT_DUTY
And assign the following permission groups to this duty role. You can use another name, but following permission groups must be assigned the duty role name you create.
| S.No | Business Object | Description | CRUD Enabled | Permission Groups | Security View |
| 1 | Funds Capture Payment Transaction Extension | This business object stores information about Payment attributes for a given funds capture transaction. | No | Read/Create/Update | Reference Data Set Rows and Unrestricted Fields |
| 2 | Customer Payer | Inherited BO derived from External Payer | No | Read | Reference Data Set Rows and unrestricted restricted and highly Restricted Fields |
| 3 | External Payer | External payer is the business object that represents external payers details, such as bank charge bearer, debit instruction code, debit advice delivery option, local instrument, purpose code and service level | No | Read | AllRowsHighlyRestrictedEssentialFields |
| 4 | Payer Credit Card Assignment | A credit card assignment contains information such as credit card number, expiry date, cardholder's name, billing address, card brand, purchase card subtype, inactive date, and other related attributes. It also maintains details about payment instrument assignments | No | Read | Reference Data Set Rows and unrestricted restricted and highly Restricted Fields |
| 5 | Funds Capture Payment Method | This business object defines all payment methods for the funds capture flow. Payment methods are categorized by instrument types BANKACCOUNT, CREDITCARD, and DEBITCARD. Each payment method includes attribute-level applicability settings for payment attributes on documents receivable.This business object stores information about each payment request. It's used for both online and offline payment transactions. The information stored is generic to accommodate various payment instruments and operations. Specific details are maintained in related tables such as IBY_TRXN_CORE, IBY_TRXN_EXTENDED, and IBY_TRXN_FI, based on the type of operation and payment instrument used. | No | Read | AllRowsAllFields |
| 6 | Funds Capture Transaction | This business object stores information about each payment request. It's used for both online and offline payment transactions. The information stored is generic to accommodate various payment instruments and operations. Specific details are maintained in related tables such as IBY_TRXN_CORE, IBY_TRXN_EXTENDED, and IBY_TRXN_FI, based on the type of operation and payment instrument used. | No | Read | AllRowsAllFields |
| 7 | Funds Capture Transaction Operations Assignment | A funds capture transaction operations assignment links a transaction extension entity to its corresponding authorization or settlement transaction. | No | Read | AllRowsAllFields |
| 8 | Standard Lookup Code | The standard lookup codes list of values resource is used to query the list of standard lookup codes. | No | Read | All Standard Lookup Codes Security View |
3. Create a Custom SAS Job Role
(Suggested Name: FOM_IBY_CREDIT_CARD _JOB_ROLE) and assign these SAS and Monolith duty roles.
- IBY_CUSTOMER_PAYER_CREDIT_CARD_MANAGEMENT_DUTY
This is the SAS Duty role created in steps mentioned above. If you created this by another name, please use that duty role.
- IBY_CUSTOMER_PAYER_TXN_EXTENSION_MANAGEMENT_DUTY
This is the SAS Duty role created in steps mentioned above. If you created this by another name, please use that duty role.
- ORA_IBY_CUSTOMER_PAYMENT_INSTRUMENT_MANAGEMENT_DUTY
This is seeded Monolith duty role.
- Assign the custom job role created above (FOM_IBY_CREDIT_CARD _JOB_ROLE) to OM User
- Enable Manage Data Security Access (MDA) for the OM user and job role to required set id.
- Step 1 - Go to Setup and Maintenance
- Step2 - Search for "Manage Data Access for Users"
- Step3 - Click on Add button
- Step4 user name – OM user who has been granted with the IBY Job Role as mentioned in step 4.
role - JOB role (FOM_IBY_CREDIT_CARD _JOB_ROLE) created in step 3.
security context - Reference data set
security Context value – Set IDs that user needs to access. - On Save, ESS is triggered to synch required data access to the user.
If any permission group is changed/added, then MDA access step (step 5) needs to repeated again by removing and adding data access to the user and role combination so that ESS can be automatically triggered to synch the data. This ESS can’t be triggered manually.
END USER These privileges were available before this update.
- Initiate Order (FOM_CREATE_ORDER_PRIV)
- View Orders (FOM_VIEW_ORDERS_PRIV)
- Revise Order (FOM_REVISE_ORDER_PRIV)
- FOM_IBY_CREDIT_CARD _JOB_ROLE (Custom job role created in above mentioned steps must be assigned to the OM users)
How to Create a SAS Duty Role
- Enable ‘Security Console’ to work with permission groups and related objects
- Click Navigator > My Enterprise > Setup and Maintenance.
- Expand the Tasks panel tab and click Search.
- In the Search Tasks field, enter Manage Administrator Profile Values. Click the Search icon.
- In the list returned by the search, click the Manage Administrator Profile Values item.
- The Search area of the Manage Administrator Profile Values page includes a Profile Option Code field. In it, enter ORA_ASE_SAS_INTEGRATION_ENABLED. Click the Search button.
- A record of the ORA_ASE_SAS_INTEGRATION_ENABLED profile value appears. In the row for the Site profile level, select Yes in the Profile Value field.
- Click Save and Close.
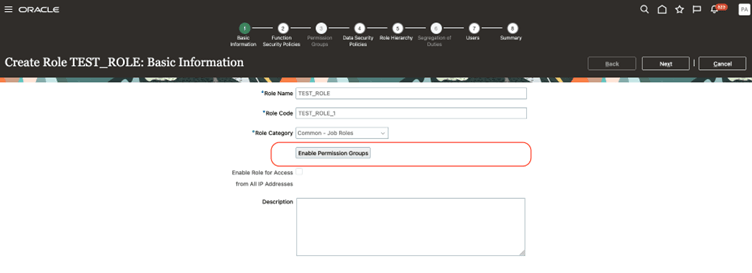
- Navigate to Tools > Secutity Console > Create Role
- From the navigator, select Tools > Security Console.
- On the Roles tab, click Create Role.
- Enter the basic information of the custom job role name.
- Verify that Enable Permission Group is selected for the custom role.
- Click Next to move through the subsequent pages.
For a SAS role you must Enable Permission Group
Navigate to Permission Group train stop and search for the permission groups.
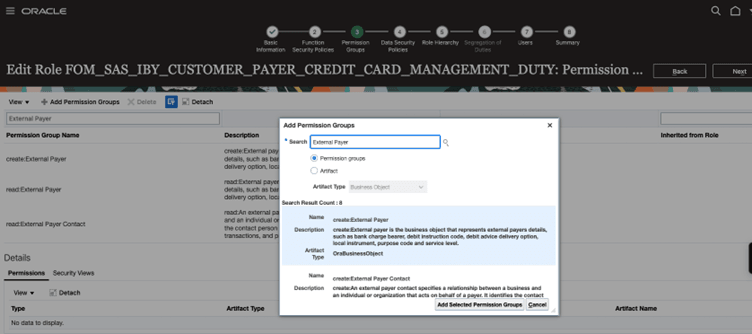
These examples are one sample of permission group addition. After adding all the permission groups mentioned in the document for the both the duty roles, add these duty roles. Create a custom or configured job role and assign it to the order management user that you plan to give access to.
How to assign SAS and Monolity Duty roles to the custom job role (FOM_IBY_CREDIT_CARD _JOB_ROLE).
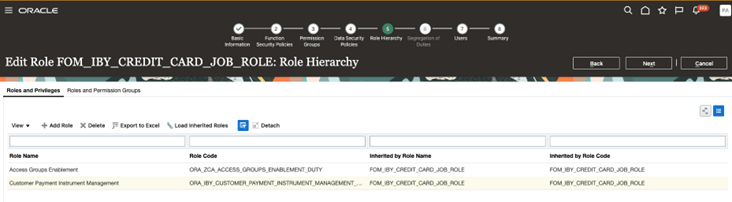
- Navigate to the Role Hierarchy train stop and in the Roles and Privilege tab
- Click Add Roles. Add Role Membership dialog opens; use it to search Monolith duty role.
Name - ORA_IBY_CUSTOMER_PAYMENT_INSTRUMENT_MANAGEMENT_DUTY
- Assign the Monolith Duty role
- Now Select the Roles and Permission Groups tab.
- Click Add Roles.
- Add Role Membership dialog opens; use it to search SAS duty roles
- IBY_CUSTOMER_PAYER_CREDIT_CARD_MANAGEMENT_DUTY and IBY_CUSTOMER_PAYER_TXN_EXTENSION_MANAGEMENT_DUTY
These are the SAS Duty role created in the previous steps. If you created roles with another name, please use those duty roles.