Redwood: Manage Attribute-Based Netting Rules Using a New User Experience
You can now use the Redwood user experience to view, create, edit, duplicate, or delete an attribute-based netting rule. The Netting Rules page provides a streamlined user experience and a guided process to define rule scope, optional segment group, and up to 10 netting sequence steps. You can also reorder netting sequences on this page. The page enforces key validations and provides confirmations for deleting sequences or changes made. Rules created in the classic (non-Redwood) user interface are visible and manageable on the Redwood page.
The Redwood Netting Rules page enables you to:
- Create, edit, duplicate, and delete netting rules
- Review netting rules and their associated netting sequence steps and additional details
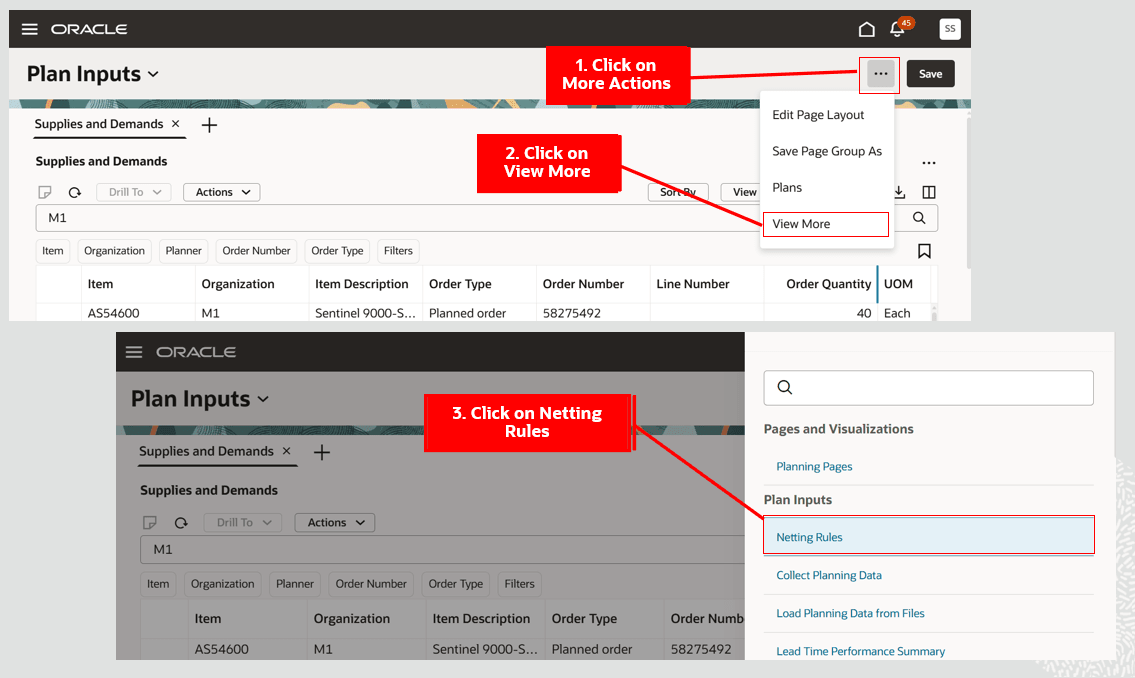
The Netting Rules page can be accessed from Plan Inputs, supply plans, and demand and supply plans in the Redwood Supply Chain Planning work area.
To access the Netting Rules page:
- Click the More Actions (...) icon.
- Click View More.
- Click Netting Rules in the Plan Inputs section.
The Netting Rules page opens in a new browser tab.
Navigate to the Netting Rules Page
Netting Rules Page
Netting Rules Page
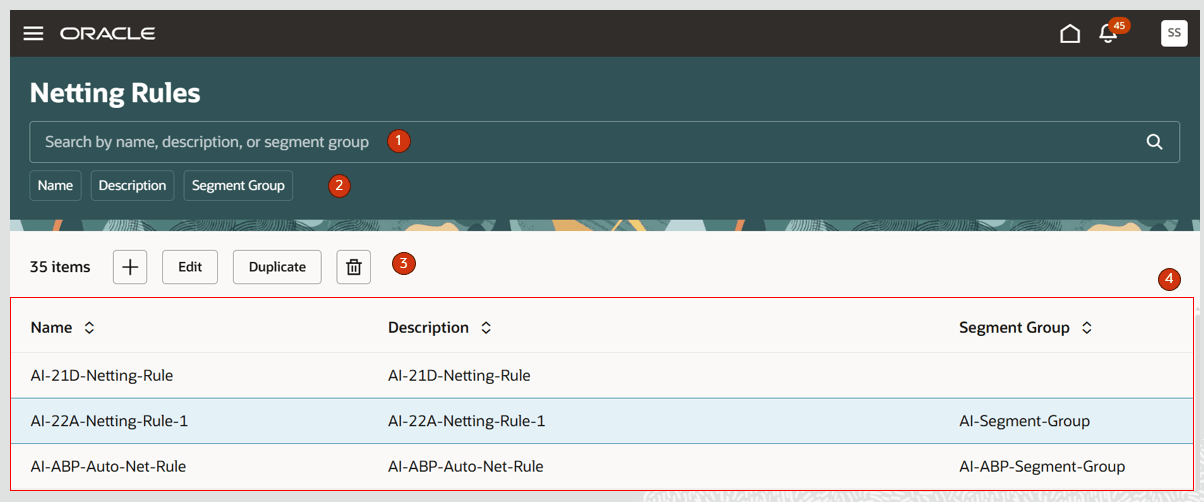
The Netting Rules page contains the following:
- Keyword search – Lets you search across the Netting Rules page by netting rule name, description, or segment group name. The search is case insensitive and uses the contains operator.
- Suggested filters - Filters the Netting Rules page by Name, Description, and Segment Group column details.
- Action toolbar – Lets you create, edit, duplicate, and delete netting rules.
- Netting Rules table - Displays the netting rules on the page.
Netting Rules Actions
Let’s now look at actions you can take on the Netting Rules page.
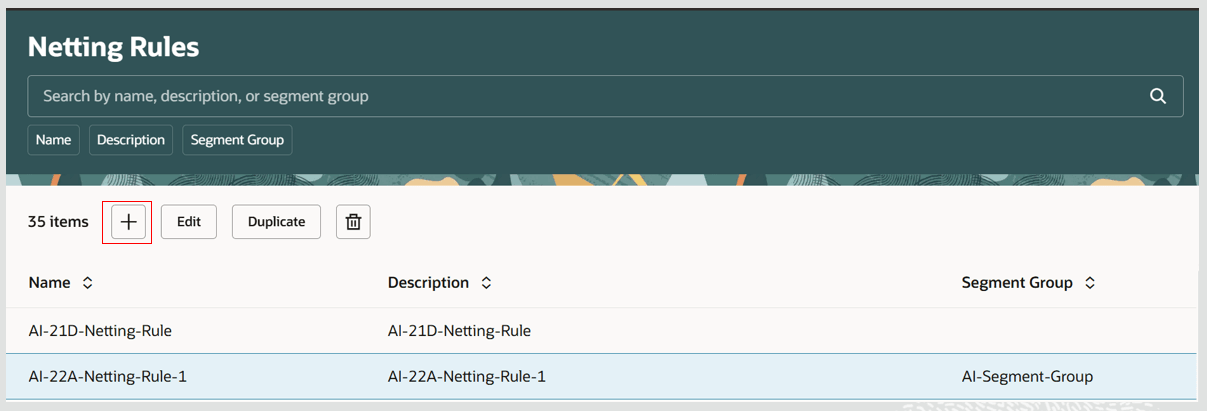
Create Netting Rule
To create a netting rule:
- Click the Add (+) icon on the Netting Rules page.
Create Netting Rule
- A New Netting Rule guided process opens, with pages for General and for Netting sequence and attributes for planned orders.
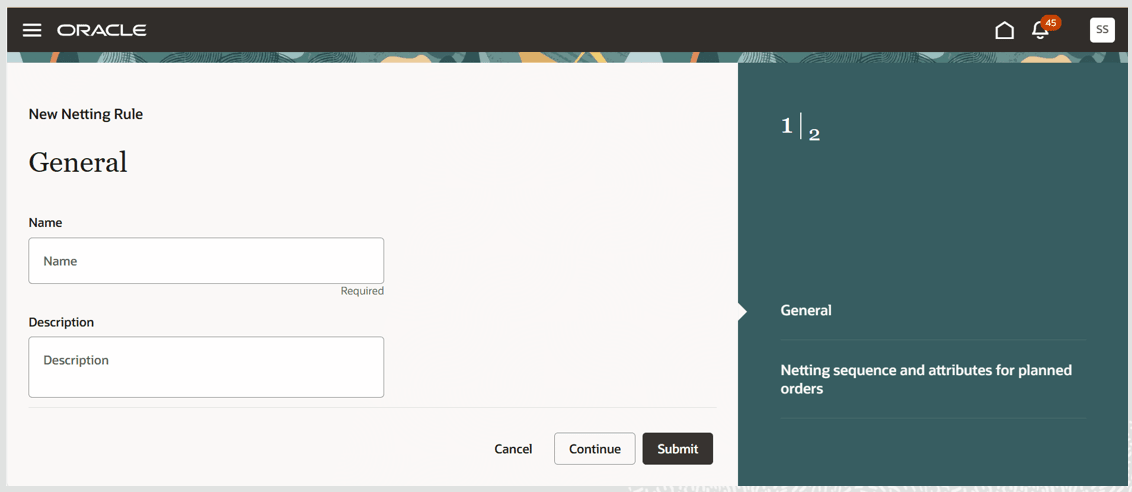
New Netting Rule Guided Process
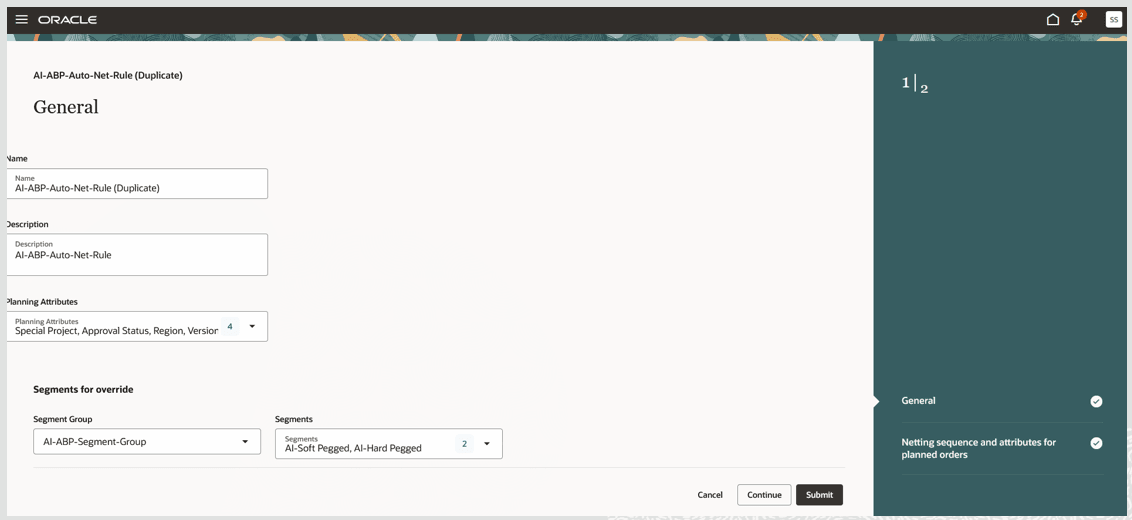
- On the General page, provide a unique netting rule name and description. Then select the planning attributes and a segment group and associated segments. Selection of a segment group and associated segments is optional.
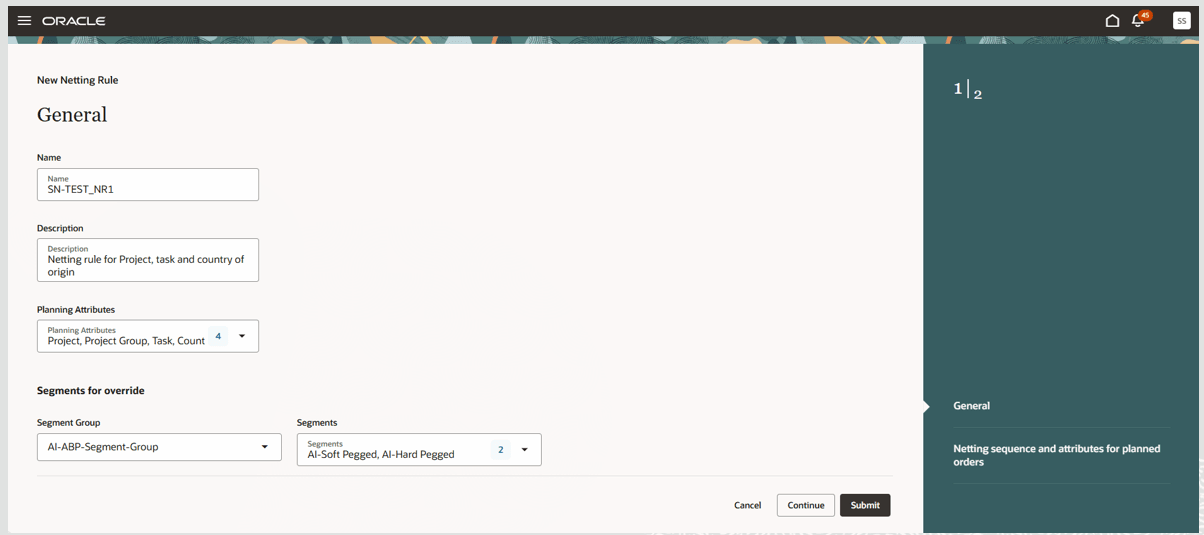
General Netting Rule Information and Optional Segments for Override
- Click Continue to go to the next page.
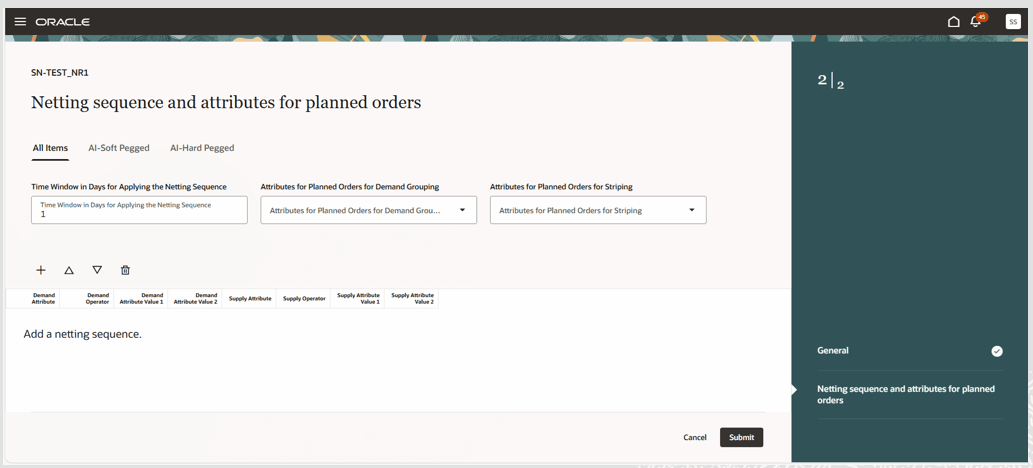
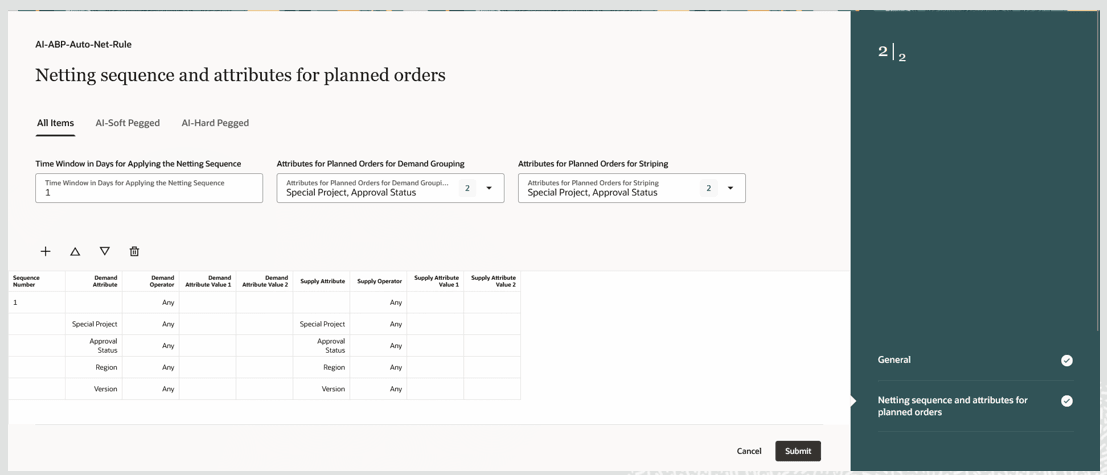
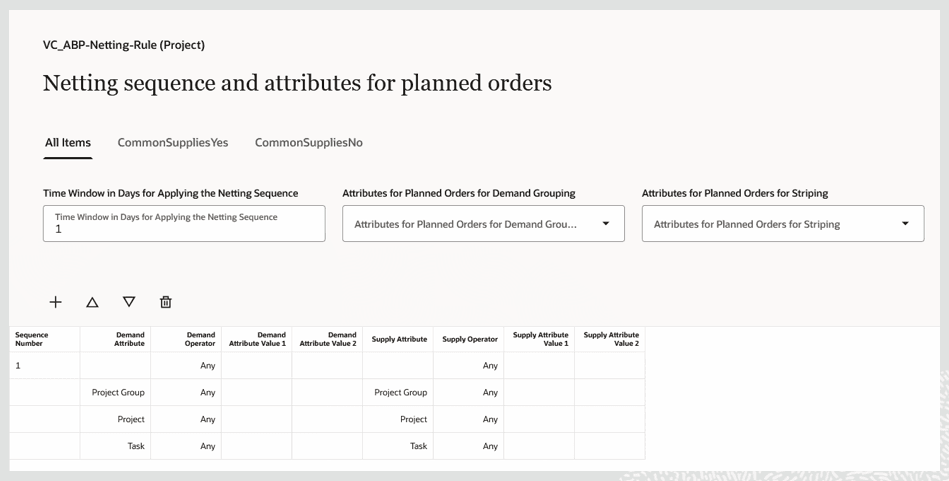
- The Netting sequence and attributes for planned orders page displays multiple tabs. All Items is the default tab, and there are additional tabs for each segment.
Netting Sequence and Attributes for Planned Orders Page
- In each tab, do the following:
a. Enter a positive integer in the Time Window in Days for Applying the Netting Sequence field.
b. Select relevant planning attributes to group unmet demands for planned order creation from the Attributes for Planned Orders for Demand Grouping list.
c. Select relevant planning attributes to stripe the attribute values for planned orders created in a plan from the Attributes for Planned Orders for Striping list.
d. Add netting sequences. Adding netting sequences will be discussed in detail later in this document.

Enter Details on the Netting Sequence and Attributes for Planned Orders Page
- Click Submit.
The netting rule is now created and displayed on the Netting Rules page.
Delete Netting Rule
To delete a netting rule:
- Select the netting rule to delete.
- Click the Delete icon.
Note: You can’t delete a netting rule if it’s assigned to a plan. Unassign the netting rule from all plans before deleting it.

Delete Netting Rule
- The netting rule is deleted and a confirmation message is briefly displayed.

Delete Confirmation Message
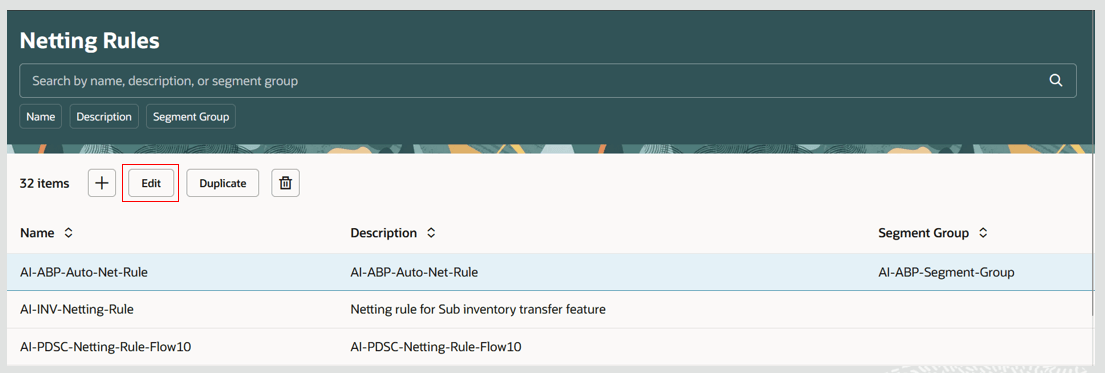
Edit Netting Rule
To edit a netting rule:
- Select the netting rule to edit.
- Click the Edit button.

Edit Netting Rule
- The Netting Rules guided process page opens in the same browser tab.
- Make your desired edits on the General page. And then either click Continue to make additional edits on the Netting sequence and attributes for planned orders page, or click Submit to save your changes.
- Make any desired edits on the Netting sequence and attributes for planned orders page and click Submit to save your changes.
Edits on Netting Rule Page
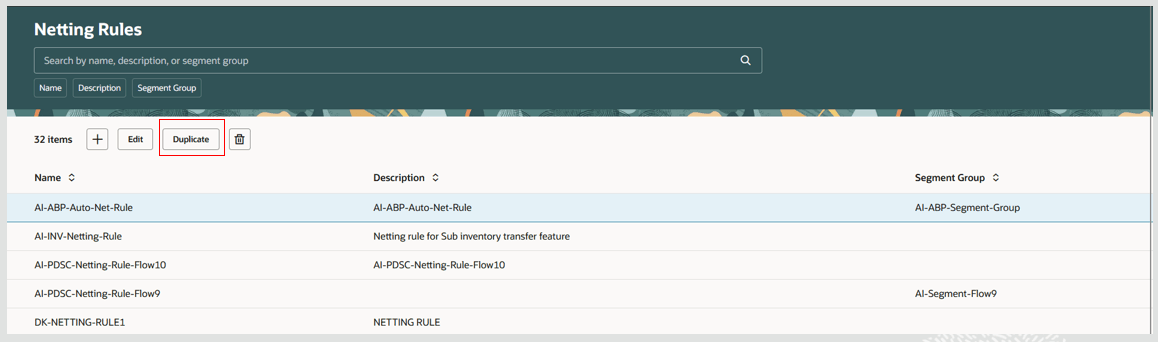
Duplicate Netting Rule
To duplicate a netting rule:
- Select the netting rule to duplicate.
- Click the Duplicate button.
Duplicate Netting Rule
- The Netting Rules page opens in the same tab, with a netting rule name duplicated from the source netting rule.
- Update the name for the duplicated netting rule.
- Make any desired edits on the General page and on the Netting sequence and attributes for planned orders page.
Details in a Duplicate Netting Rule
- Click Submit to save the new netting rule.
The duplicated netting rule with changes is now displayed on the Netting Rules page.
Additional Details for Netting Rules
Let’s now go over the details on the guided process pages used by the create and edit actions.
General Page
On the General page, you can enter or edit the netting rule name, description, netting rule planning attributes, and select a segment group and associated segments.
To enter or edit planning attributes:
- Select one or more planning attributes from the list of values.
- You can select a maximum of 4 planning attributes of the Netting and allocation attribute type.
- For Project-Driven Supply Chain related scenarios, you must select either Project Group plus Project attributes or Project Group, Project plus Task attributes.
For segment group and segments selection:
- Selection of segment group and segments is optional.
- Only segment groups that have Product and Organization dimensions can be selected.
- You can select a maximum of 10 segments for a netting rule.
Netting Sequence and Attributes for Planned Orders Page
On the Netting sequence and attributes for planned orders page, you can configure netting sequence details for All Items and for each segment selected on the General page.
Each segment selected on the General page has a tab, along with the default All Items tab.
You can configure the following on each tab:
- Time Window in Days for Applying the Netting Sequence
- Attributes for Planned Orders for Demand Grouping
- Attributes for Planned Orders for Striping
- Netting sequences
Specifying Attributes and Netting Sequences
Additional Details for Attributes for Planned Orders for Demand Grouping and Attributes for Planned Orders for Striping
- You can select one or more planning attributes from those which you selected on the General page in the Attributes for Planned Orders for Demand Grouping field.
- All of the attributes selected in the Attributes for Planned Orders for Demand Grouping field also will be automatically selected in the Attributes for Planned Orders for Striping field, and they must remain selected in order for attribute-based planning to work properly.
- For a Project-Driven Supply Chain netting rule:
- In the Attributes for Planned Orders for Demand Grouping field, you can select Project Group; or Project Group and Project; or Project Group, Project, and Task planning attributes.
- You must select the same set of Project-Driven Supply Chain attributes in the Attributes for Planning Orders for Striping field.
- You can select a combination of Project Group, Project, Task, and user defined planning attributes in the Attributes for Planned Orders for Demand Grouping and Attributes for Planned Orders for Striping fields.
Netting Sequences
Let’s cover Netting Sequences configuration.
Netting Sequence Details
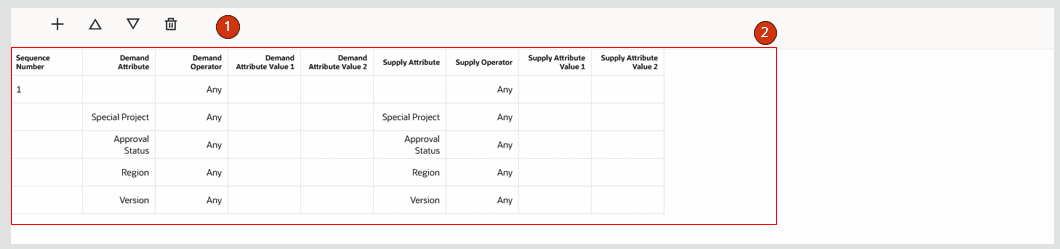
The netting sequences section of the page contains the following:
- Toolbar – You can create, delete, move up, or move down a netting sequence step.
- Netting sequence steps – A table that contains netting sequence steps with applicable data, such as sequence number, demand attribute, demand operator, demand attribute value 1, demand attribute value 2, supply attribute, supply operator, supply attribute value 1, and supply attribute 2.
Additional Details for Netting Sequences
- You can create a maximum of 10 netting sequences on a tab.
- Netting sequence steps are added in ascending order, starting at 1 and continuing up to 10.
- Each netting sequence step has rows with a demand attribute name, demand operator, demand attribute value 1, demand attribute value 2, supply attribute, supply operator, supply attribute value 1, and supply attribute value 2.
- You can select a demand operator for a demand attribute in a netting sequence. Based on the operator selected, either demand attribute value 1 or both demand attribute value 1 and demand attribute value 2 are enabled for selection of values.
- You can select a supply operator for a supply attribute in a netting sequence. Based on the operator selected, either supply attribute value 1 or both supply attribute value 1 and supply attribute value 2 are enabled for selection of values.
- During creation of a netting sequence, the Any operator is defaulted for all demand and supply attributes.
- Deleting a netting sequence will renumber the remaining netting sequences in ascending order starting from 1.
- For details on Time Window in Days for Applying the Netting Sequence, Attributes for Planned Orders for Demand Grouping, Attributes for Planned Orders for Striping, and supported operators for demand attributes and supply attributes, refer to the Update 21C feature “Introduction to Attribute-Based Planning in Supply Planning and Plan Supplies and Demands.”
To create a netting sequence:
- Click the + icon.
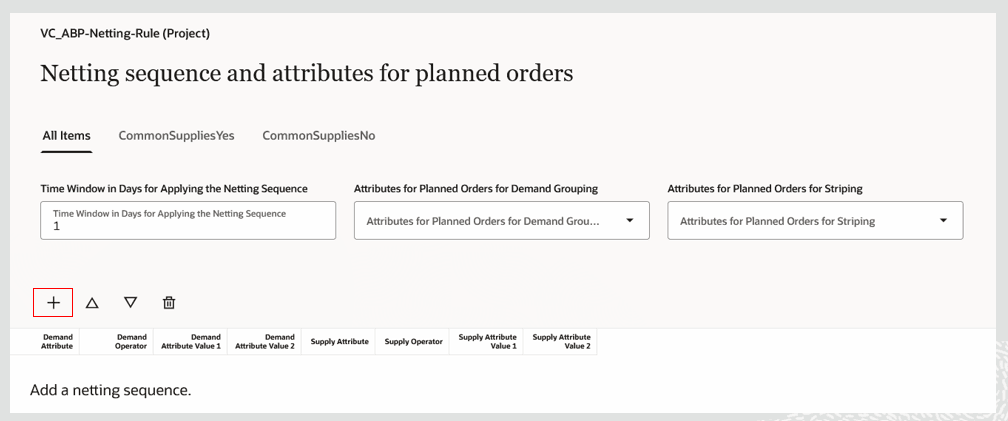
Create Netting Sequence
- A new netting sequence is created, with demand and supply operators defaulted to Any.
Initial Netting Sequence Created
- Select the relevant demand operators and values for demand attribute value 1, demand attribute value 2, supply operator, supply attribute value 1, and supply attribute value 2.
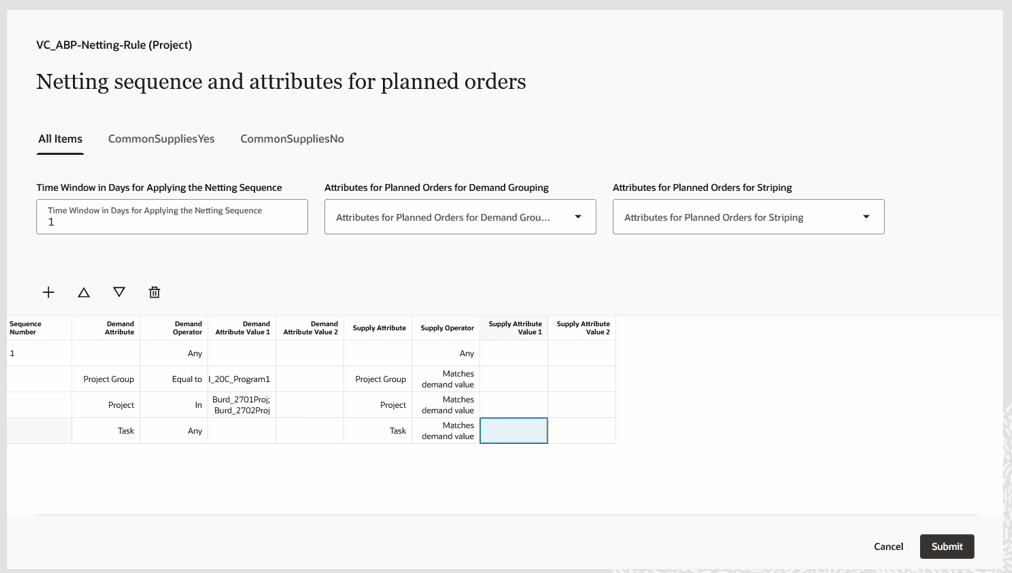
Specify Details for Netting Sequence
- Click Submit to save the netting sequence.
To delete a netting sequence:
- Select a netting sequence and click the Delete icon.
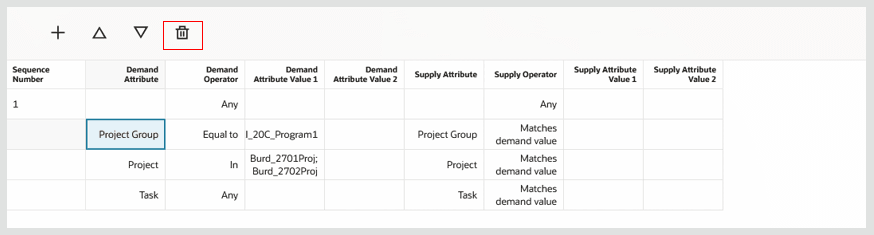
Delete Netting Sequence
- The Netting sequence is deleted from the grid.
- Click the Submit button to save the changes.
Move Netting Sequences Up and Down
To move a netting sequence up or down in the list on the page:
- Select any row in a netting sequence.
A netting sequence contains one or more rows based on the number of planning attributes selected in the netting rule.
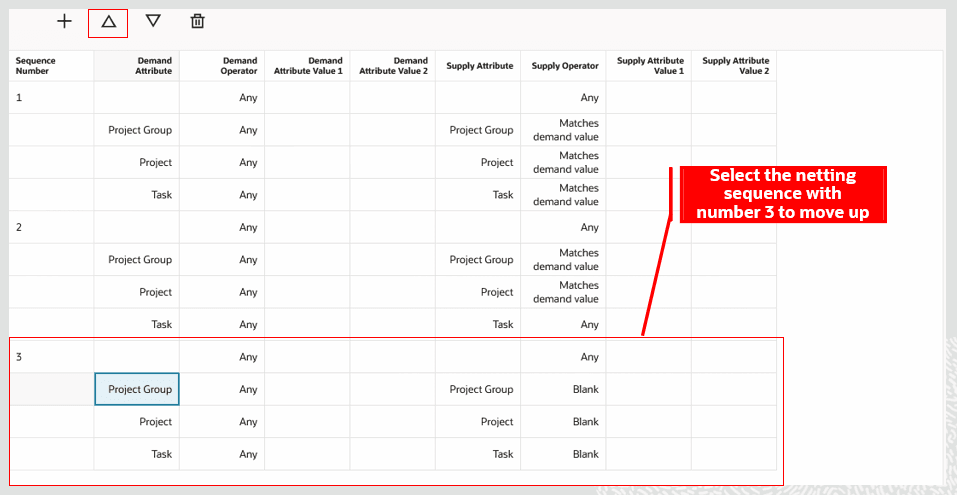
Select a Netting Sequence to Move
- Click the up or down arrow icon.
- The netting sequence moves up or down by a sequence number.
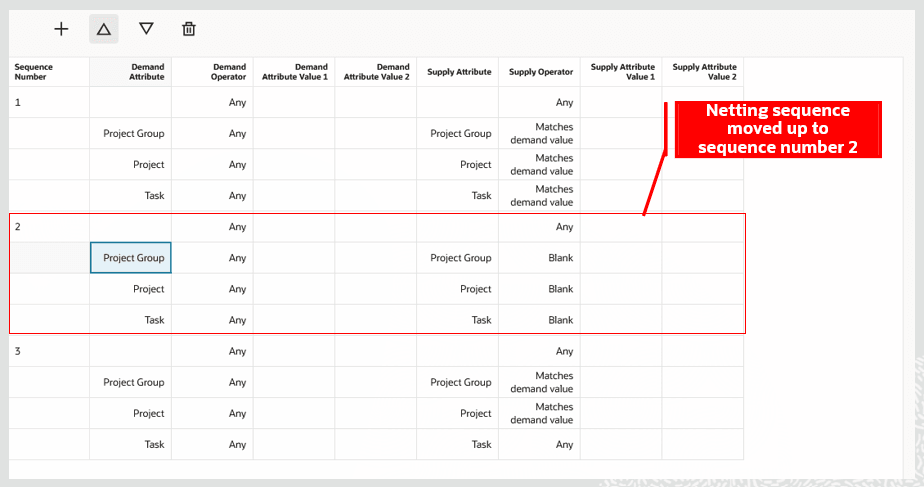
Netting Sequence Moved Up
Quick Actions
You can now navigate to the Netting Rules page from Quick Actions. To enable this navigation:
- Go to Navigator > My Enterprise > Setup and Maintenance.
- Search for and select the Manage Administrator Profile Values task.
- Search for the profile display name Redwood Page for Attribute-Based Netting Rules Enabled.
- Set the Profile Value to Yes and save. (You can set this profile at the User or Site level.)
Steps to enable and configure
You don't need to do anything to enable this feature.
Tips and considerations
- You can enable guided journeys for the Netting Rules page.
- You must opt-in to Project-Driven Supply Chain or Attribute-Based Planning to create netting rules on the Netting Rules page.
- You can only assign the Netting and allocation attribute planning attribute type to a netting rule.
Key resources
- Refer to the 21C feature “Map and Collect Supply Demand Entities with User-Defined Attributes” for additional details on enabling Attribute-Based Planning opt-in and additional details on planning attributes configuration.
- Refer to the 21C feature “Introduction to Attribute-Based Planning in Supply Planning and Plan Supplies and Demands” for additional details on attribute-based netting rules.
- Refer to the 22B feature “Create Attribute-Based Netting Rules with Valid Associations” for additional details on configuring attribute-based netting rules for Project-Driven Supply Chain.
Access requirements
Users who are assigned a configured job role that contains these privileges can access this feature:
- Monitor Supply Planning Work Area (MSC_MONITOR_SUPPLY_PLANNING_WORK_AREA_PRIV)
- Monitor Demand and Supply Planning Work Area (MSC_MONITOR_DEMAND_AND_SUPPLY_PLANNING_WORK_AREA_PRIV)
- Manage Projects (MSC_MANAGE_PROJECTS_PRIV)
These privileges were available prior to this update.