Redwood: Manage Supply Chain Bill Using a New User Experience
You can now use the Redwood user experience to analyze an assembly’s end-to-end supply chain bill, displaying item-structure links and sourcing rules. You can expand or collapse levels, highlight upstream or downstream path, view substitutes, co-products, or by-products, focus on a node in its layout, and view where they are used. This page can be accessed to and from Items, Item Structures, Supplies and Demands, Exceptions, Material Plan, Late Demand Analysis, and Order Comparison pages, helping teams diagnose impact and trace supply paths faster.
With this update you can view the multi-level supply chain bill for an assembly or multiple assemblies using the Redwood user experience. You can open the Supply Chain Bill independently by providing an assembly’s name and organization, or you can drill into it from the visualizations mentioned above.
With Supply Chain Bill you can analyze an assembly’s end-to-end supply chain, displaying item-structure links and sourcing rules. In the given screenshot, Level 1 (on the right) shows the most downstream end of supply chain. For example, it can show an assembly in a distribution organization that is sourced from manufacturing facilities in Level 2 or purchased from different suppliers. You can further expand Level 2 to show the upstream components at different levels required to manufacture the assembly.
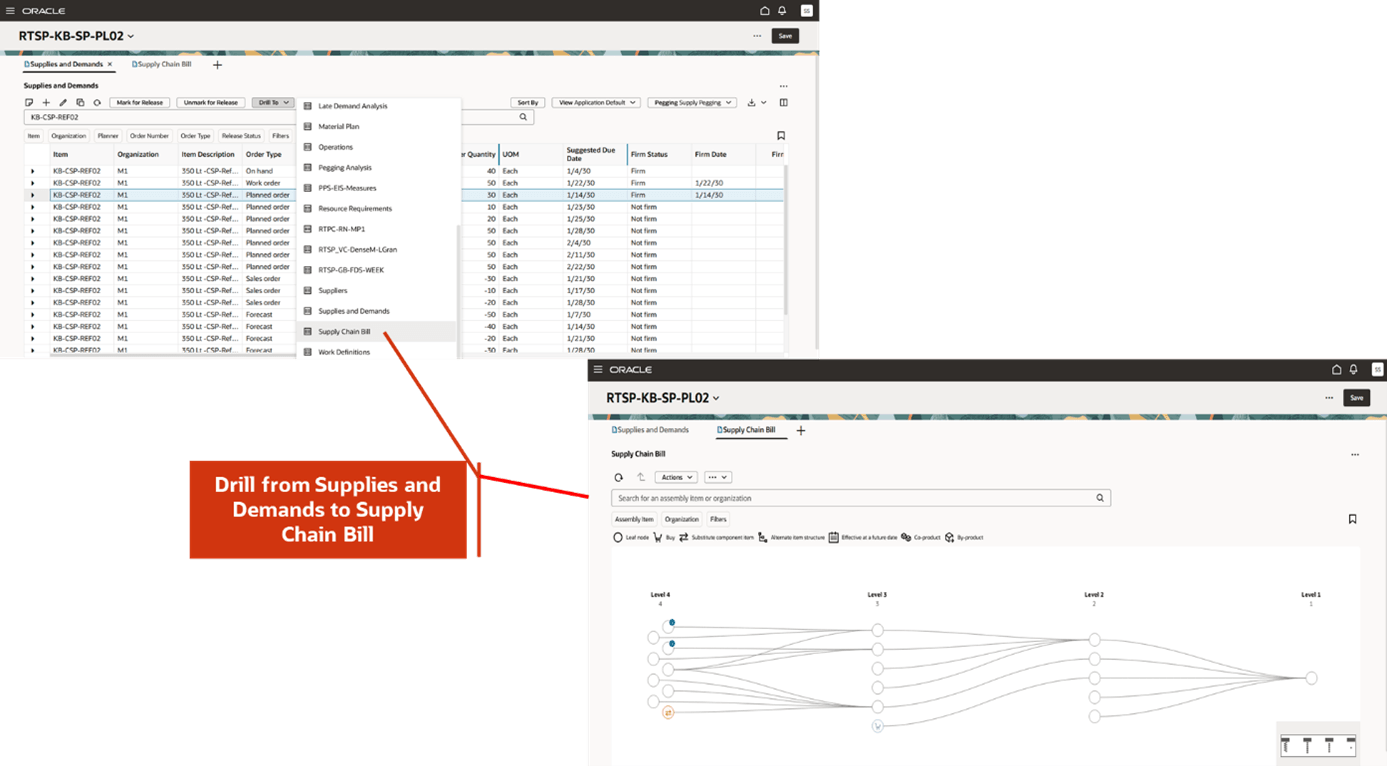
Accessing Supply Chain Bill from Other Tables Such as Supplies and Demands
A node in the Supply Chain Bill view can be an assembly in a distribution or manufacturing facility, a primary or substitute component of an assembly, related items such as co-products and by-products, or a supplier. Different nodes are connected by links or arcs that represent material movement. For example, a supplier providing raw material to an organization or a component that is being sourced from another organization.
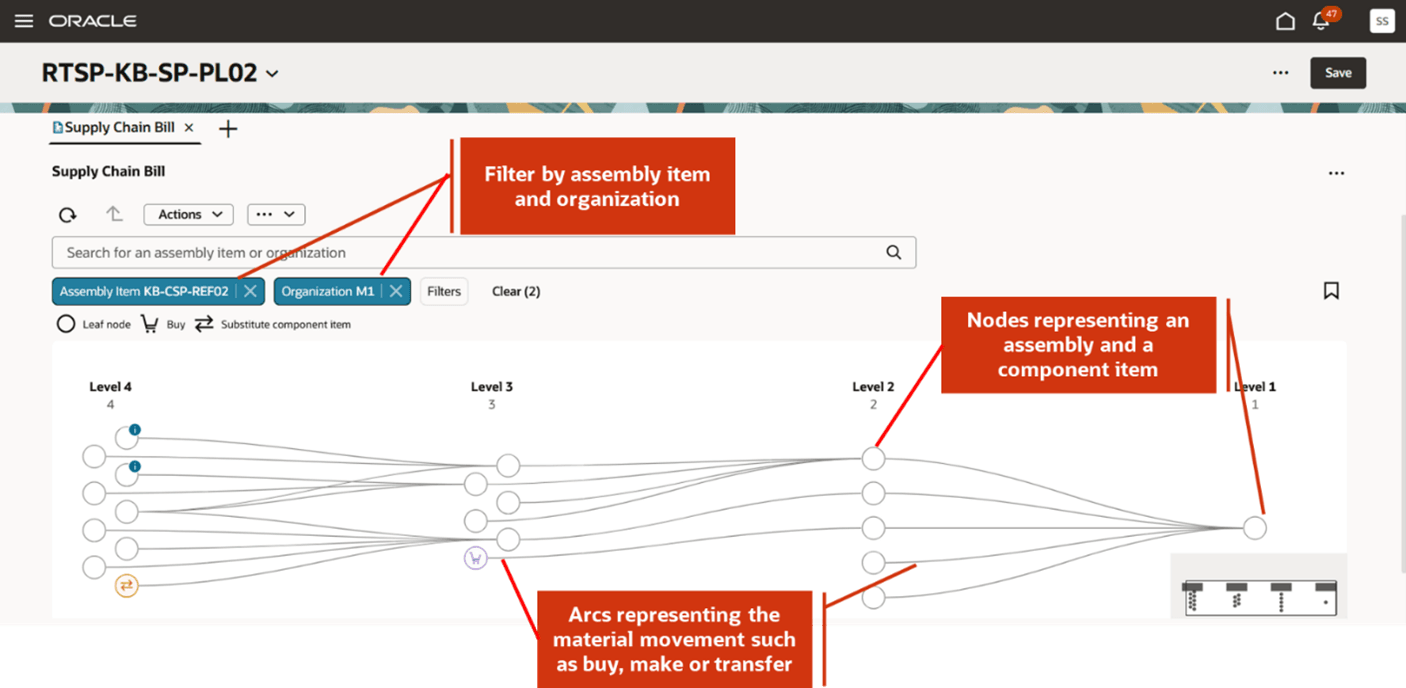
Nodes and Arcs
When you hover over a node it shows the detailed information of that node.
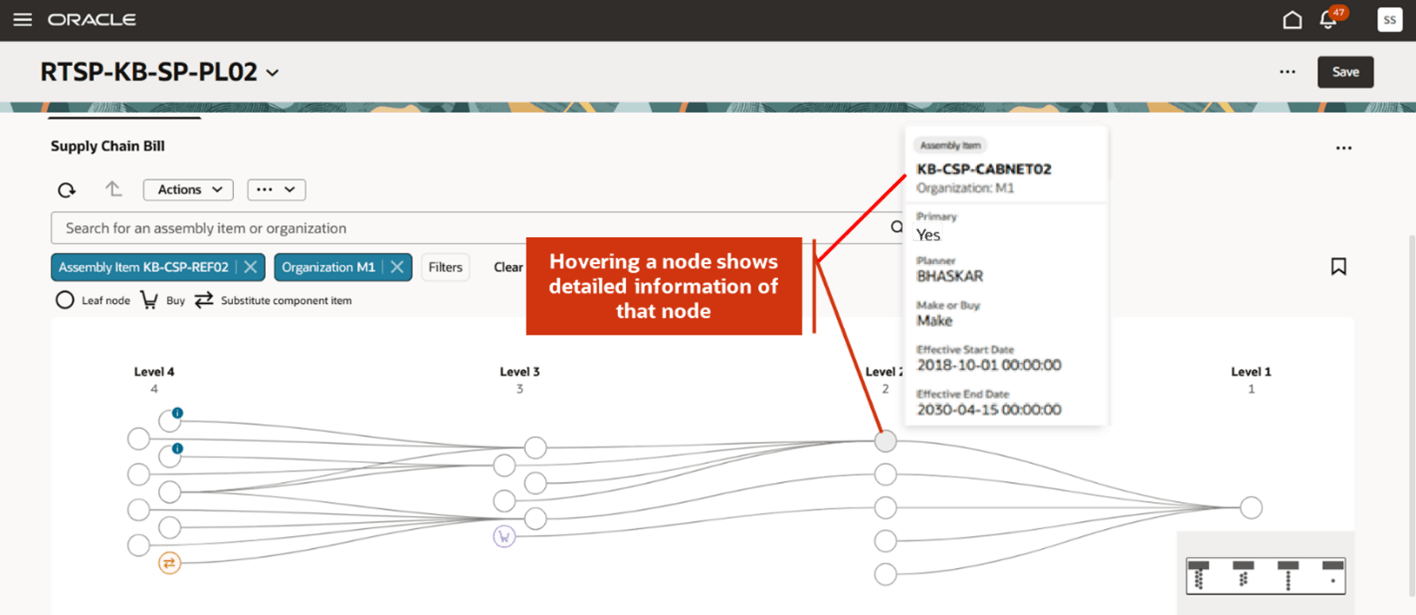
Node Details
Similarly, when you hover over an arc, it shows the material movement details between two connected nodes such as whether the relationship is a make, buy, or transfer. The job card shows the respective sourcing rule along with its rank and allocation percentage.
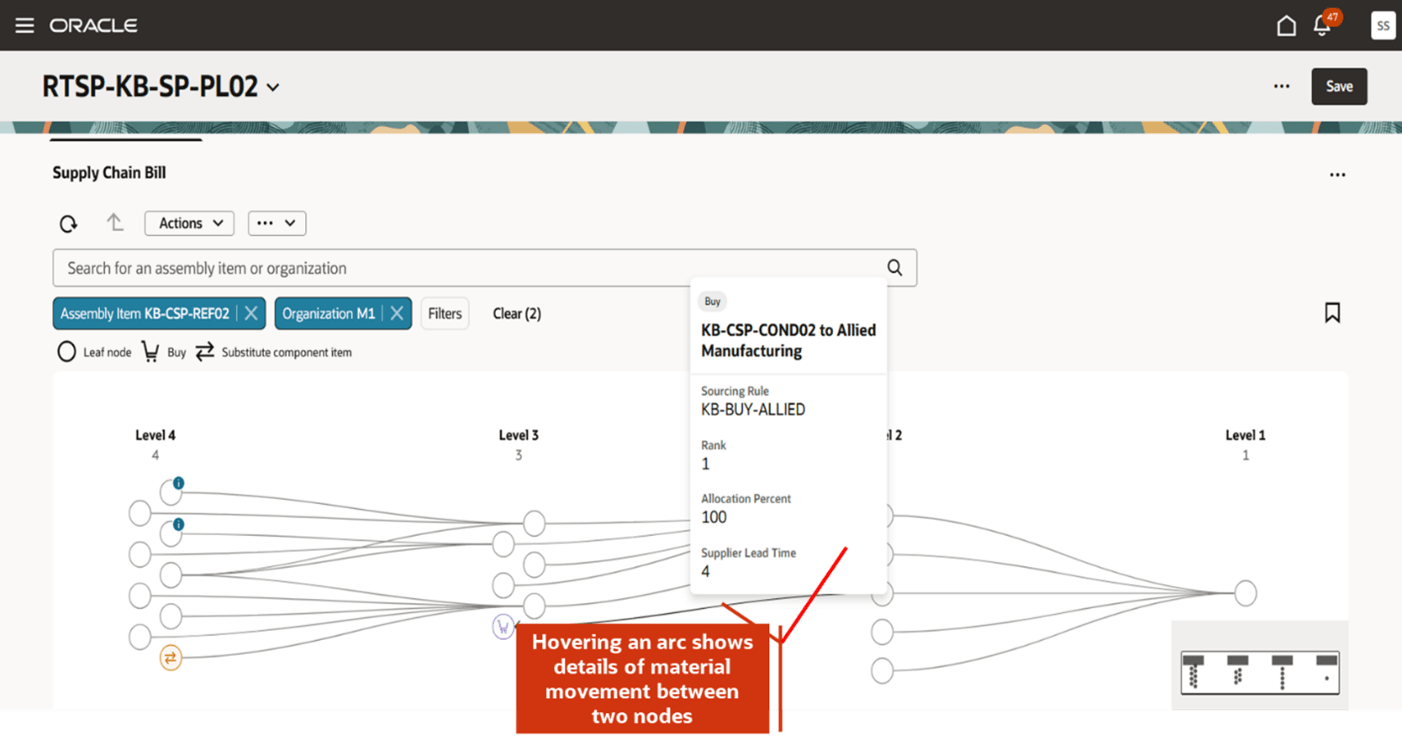
Arcs Details
In the supply chain bill network diagram, node icons and the associated legend identify the type of node, for example, specifies if a node represents a substitute component or a supplier.
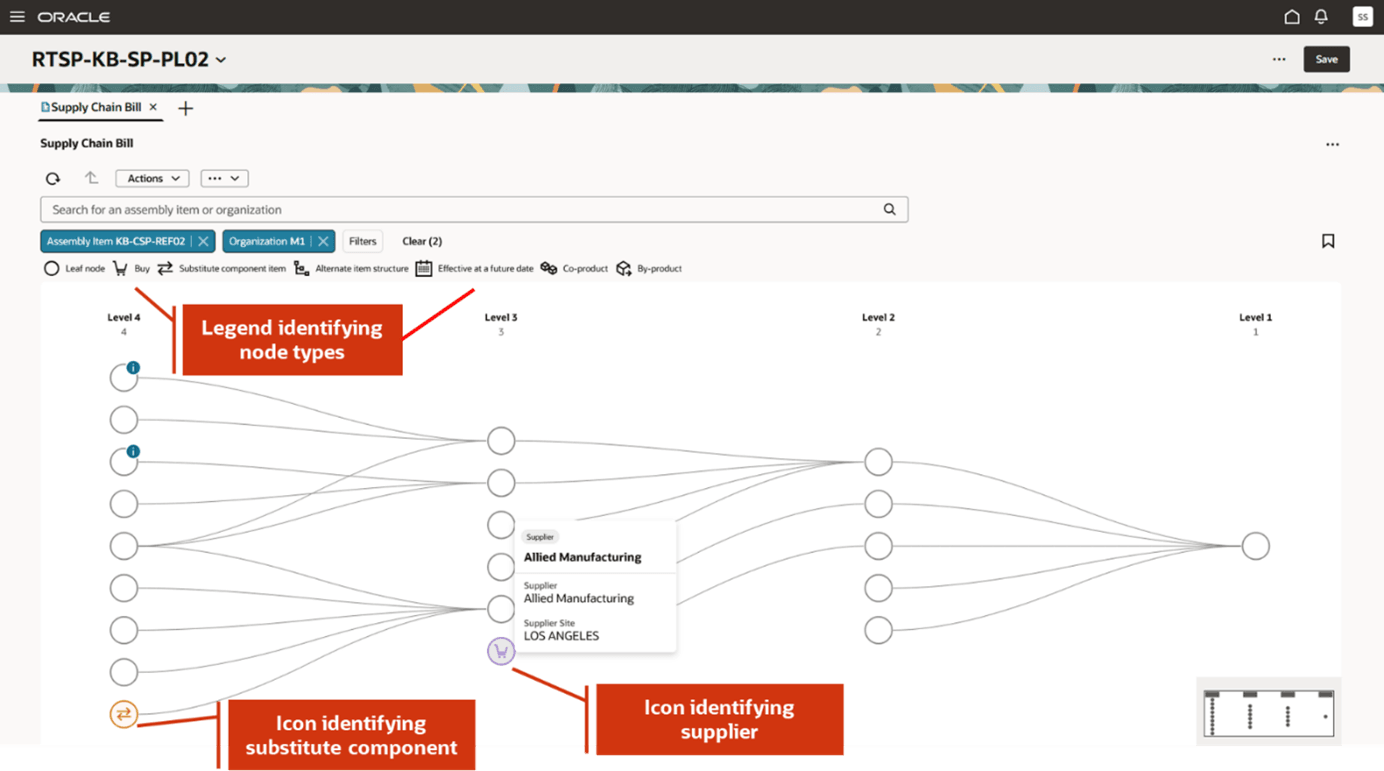
Legend in Supply Chain Bill
You can expand or collapse a supply chain bill level by selecting Expand or Collapse level from the Actions menu. When you select Expand Level, the network diagram is expanded to show the next upstream level of the supply chain bill. It shows all the nodes of that level. You can further expand to another level by again selecting Expand Level. Similarly, when you select Collapse Level, it collapses the most upstream level.
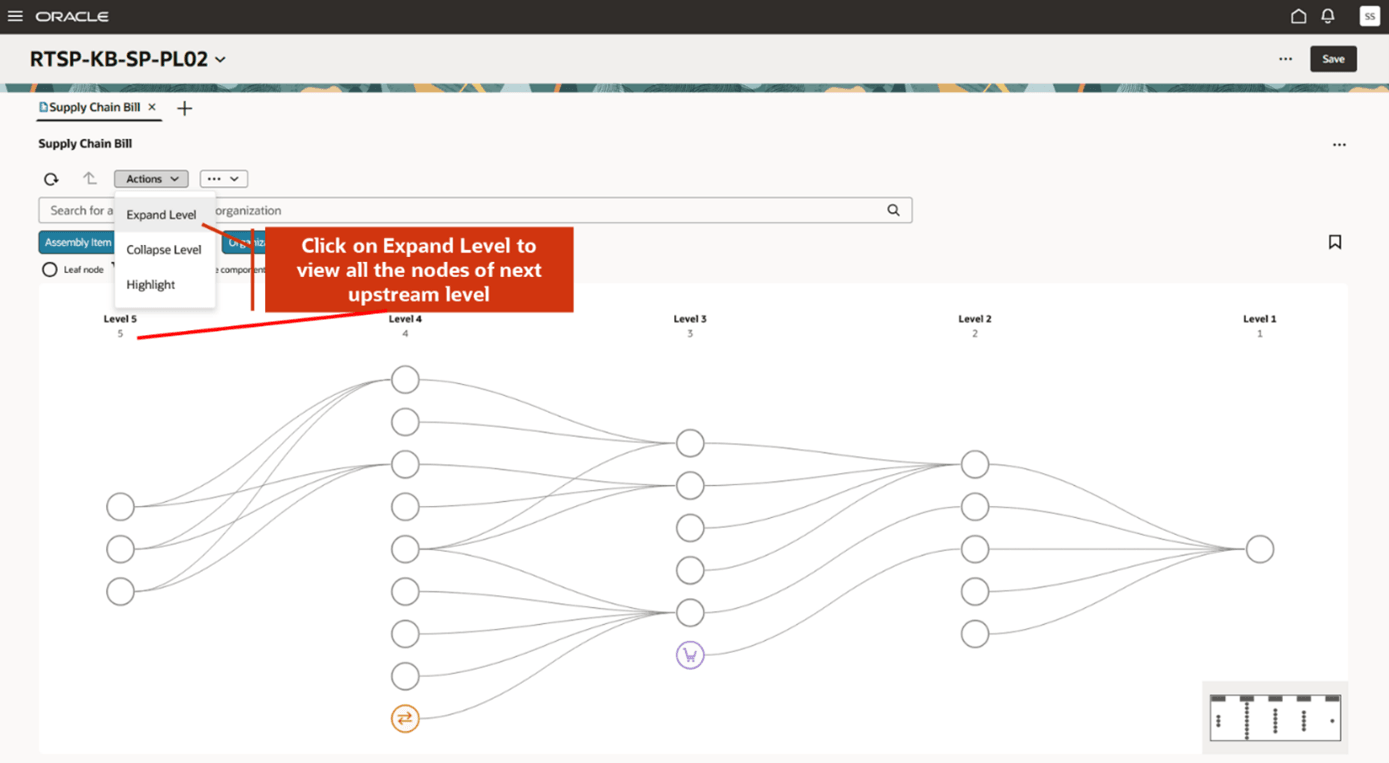
Expand and Collapse Level
You can highlight certain items or suppliers in the network diagram. Select Highlight from the Actions menu. A drawer opens for you to search for item or suppliers.

Highlight an Item or Supplier
Highlighted items are shown in solid circles.
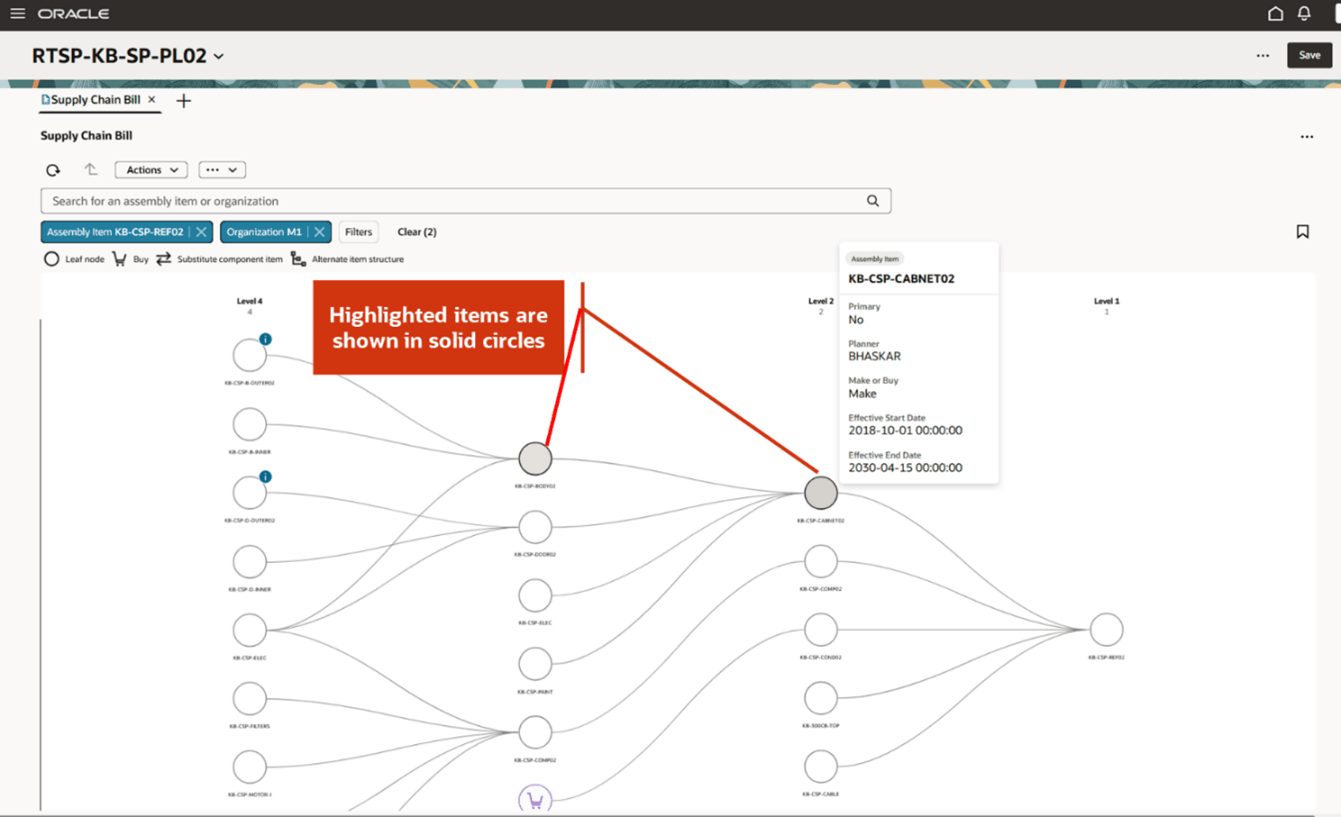
Highlighted Items
You can select which entities are shown in the supply chain bill. For example, you can show Transfers and Substitute components but not Buys or Alternate item structures or Related items. When you deselect any of these entities, the nodes and corresponding arcs are removed from the network diagram.
To select entities to show, select the More Actions icon. Only selected entities appear in the legend.

Select Entities to be Displayed in Supply Chain Bill
When you select Effective at a future date, items that are effective on a future date are displayed. Similarly, when you select Related items, coproducts and byproducts of a primary product are displayed.
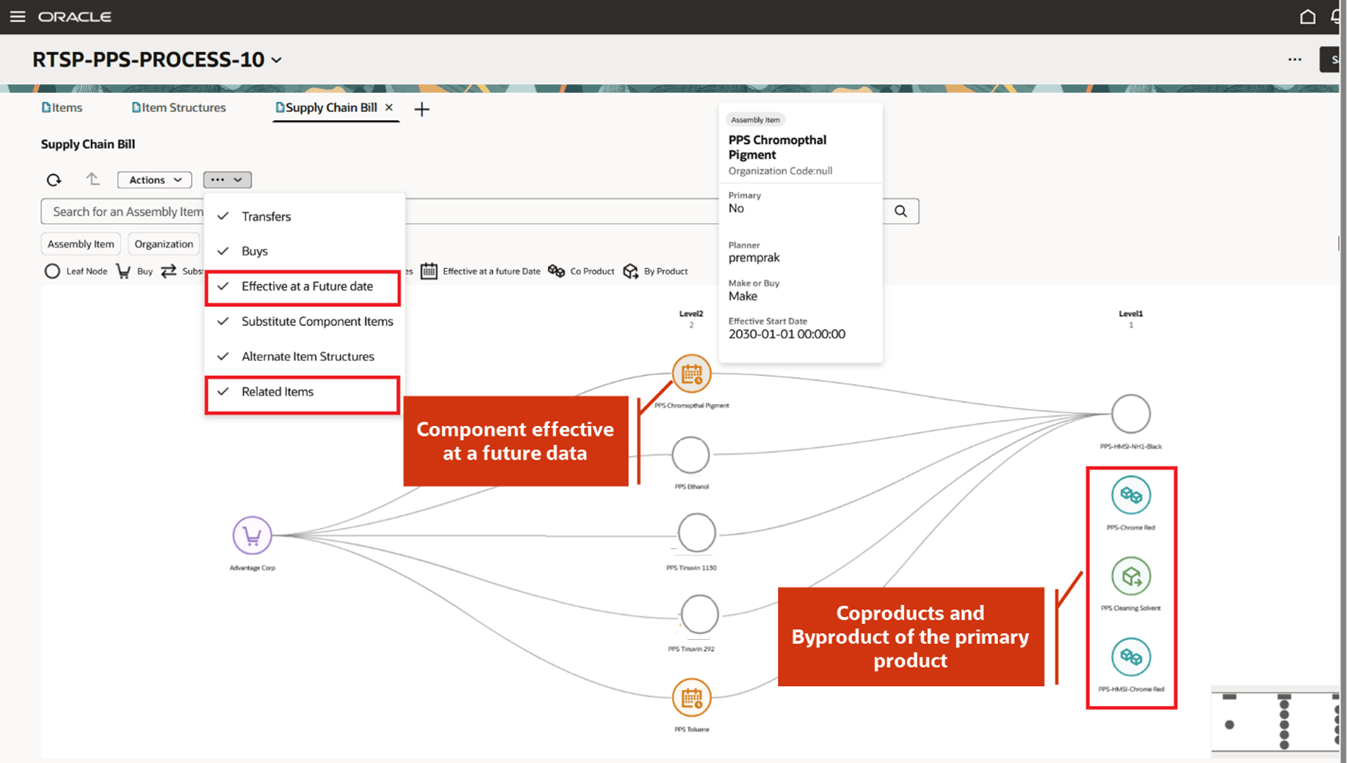
Related Items and Components Effective on a Future Date
Node Actions
You can view additional details of a node by drilling to other tables such as Items, Supplies and Demands, Item Structure, Exceptions and Material Plan. For example, you can view the various lead times of an item by navigating to the Items table.
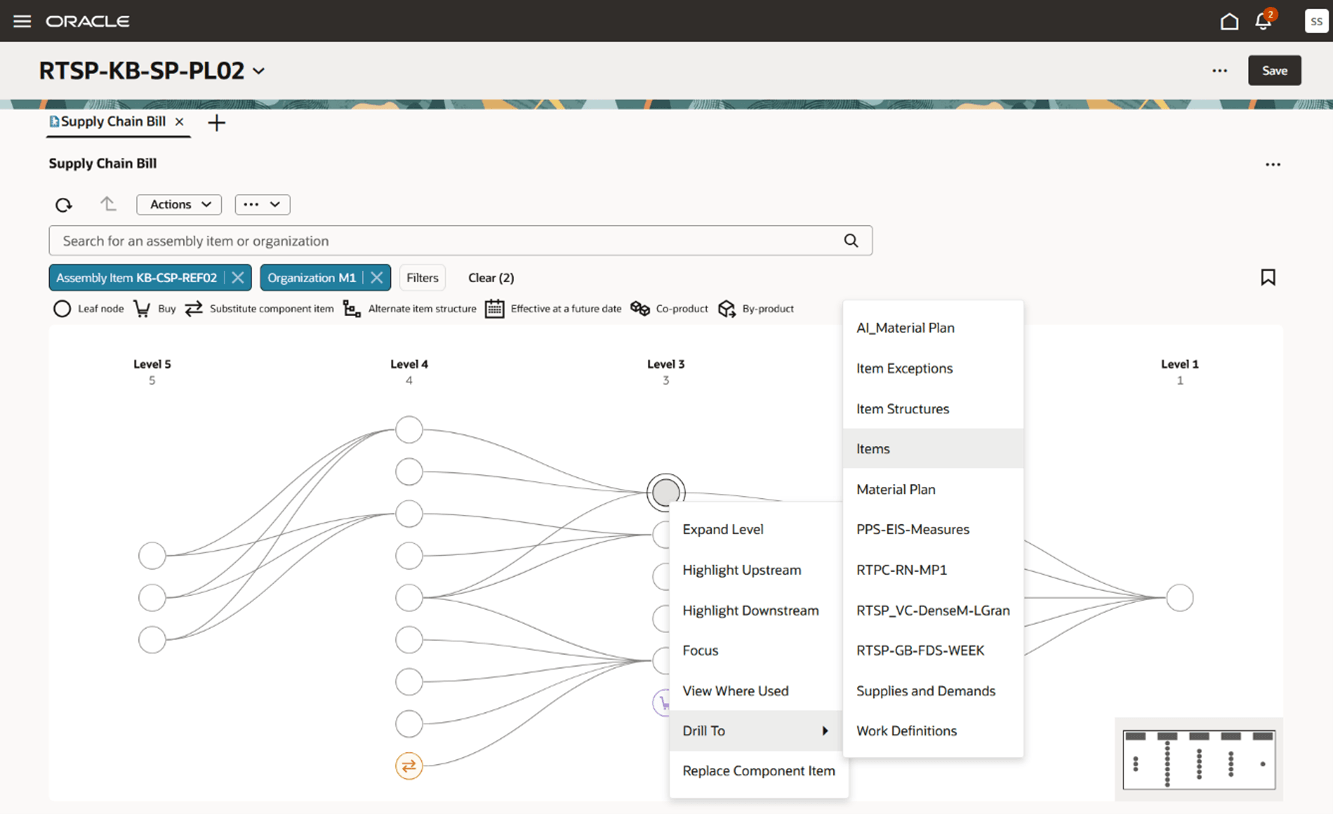
Drill to Other Tables from Supply Chain Bill
You can expand a node to its upstream level by selecting the Expand Level option for a particular node.
You can view and analyze the upstream supply chain of a node by right clicking the node and selecting Highlight Upstream. The upstream supply chain is displayed in thicker arcs.
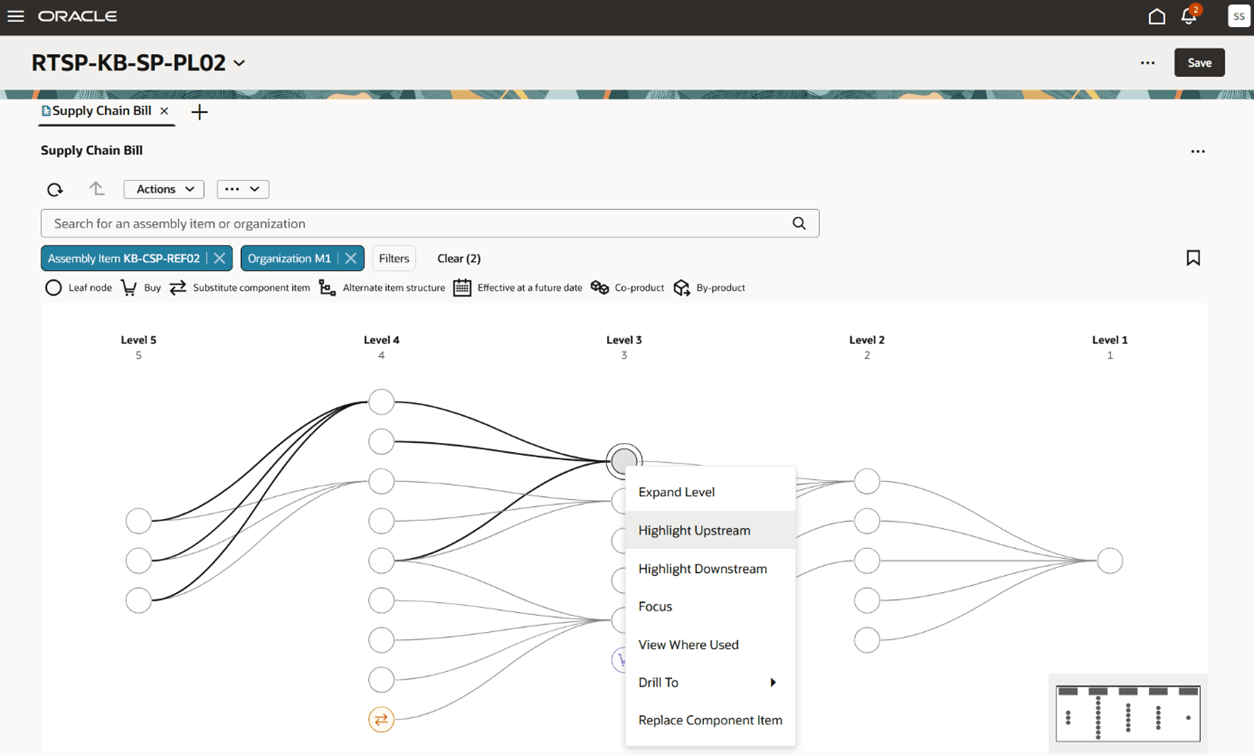
Highlight Upstream
Similarly, you can view the downstream supply chain of a node by right clicking the node and selecting Highlight Downstream.
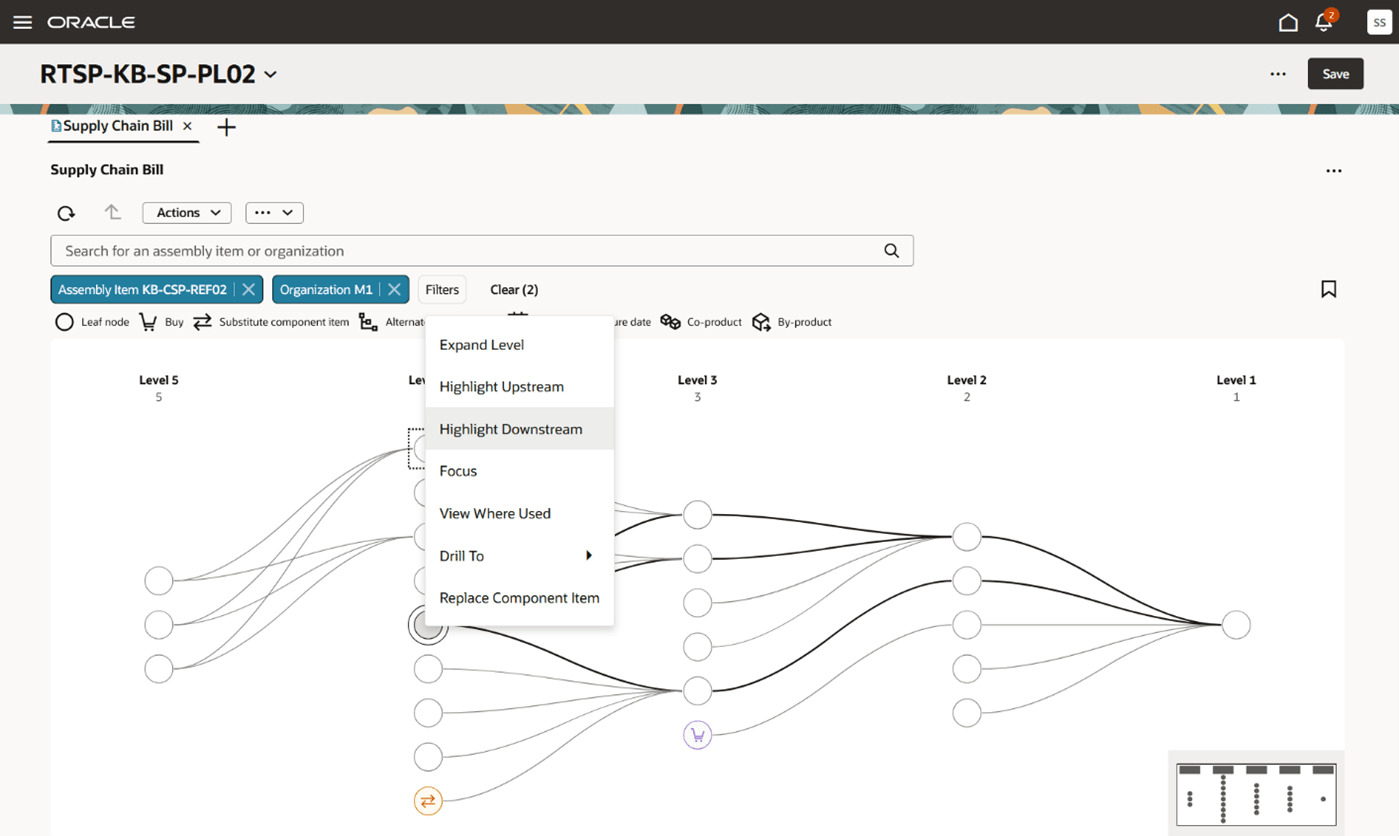
Highlight Downstream
You can analyze the supply chain of a particular node separately in a fresh pane. Select the node and right click. From the menu select the Focus option.
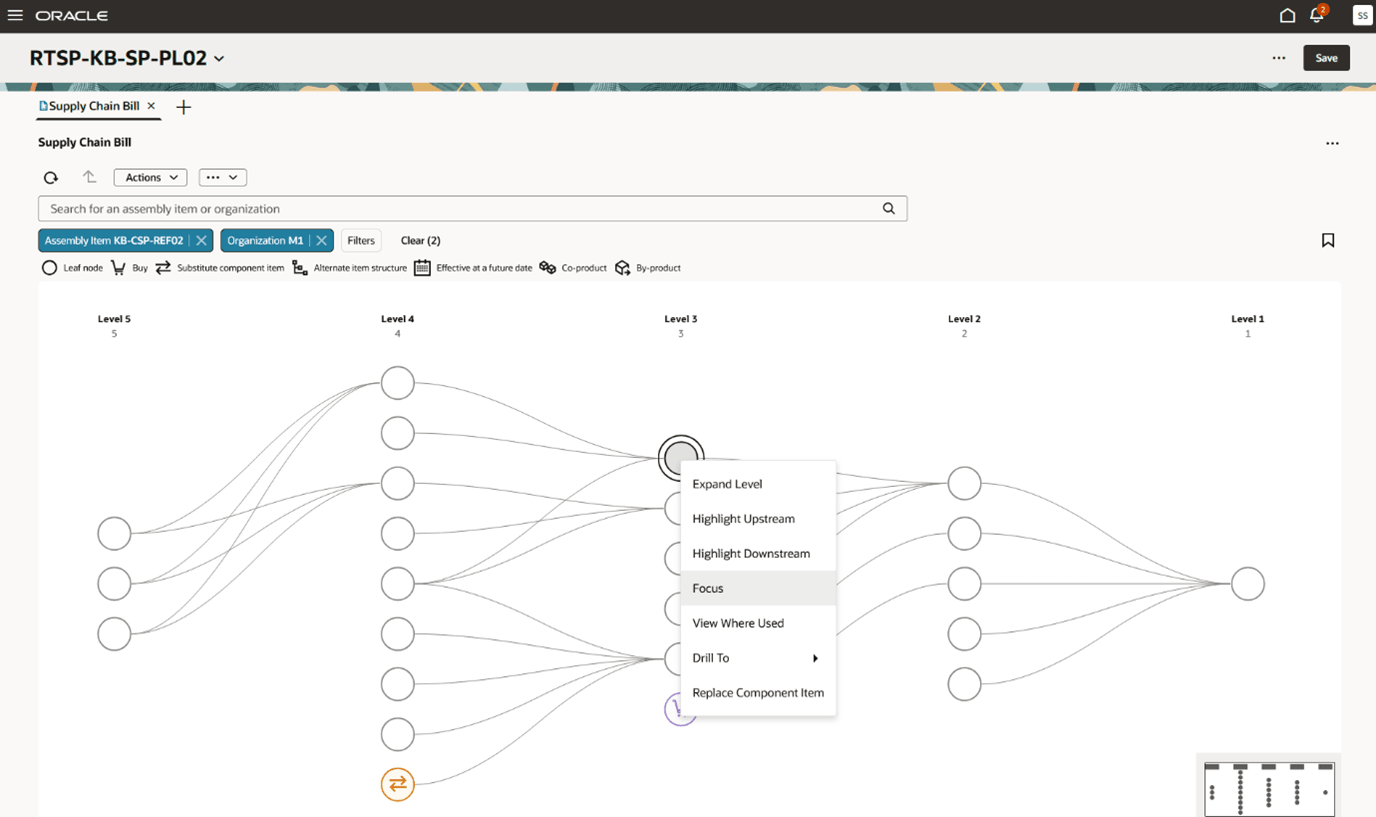
Analyze Supply Chain Bill using Focus
After you select Focus, its upstream supply chain is opened on top of the existing pane. The selected node is level 1 now. You can further expand the levels for further analysis of the supply chain. You can switch back to the original view by selecting the Restore icon.
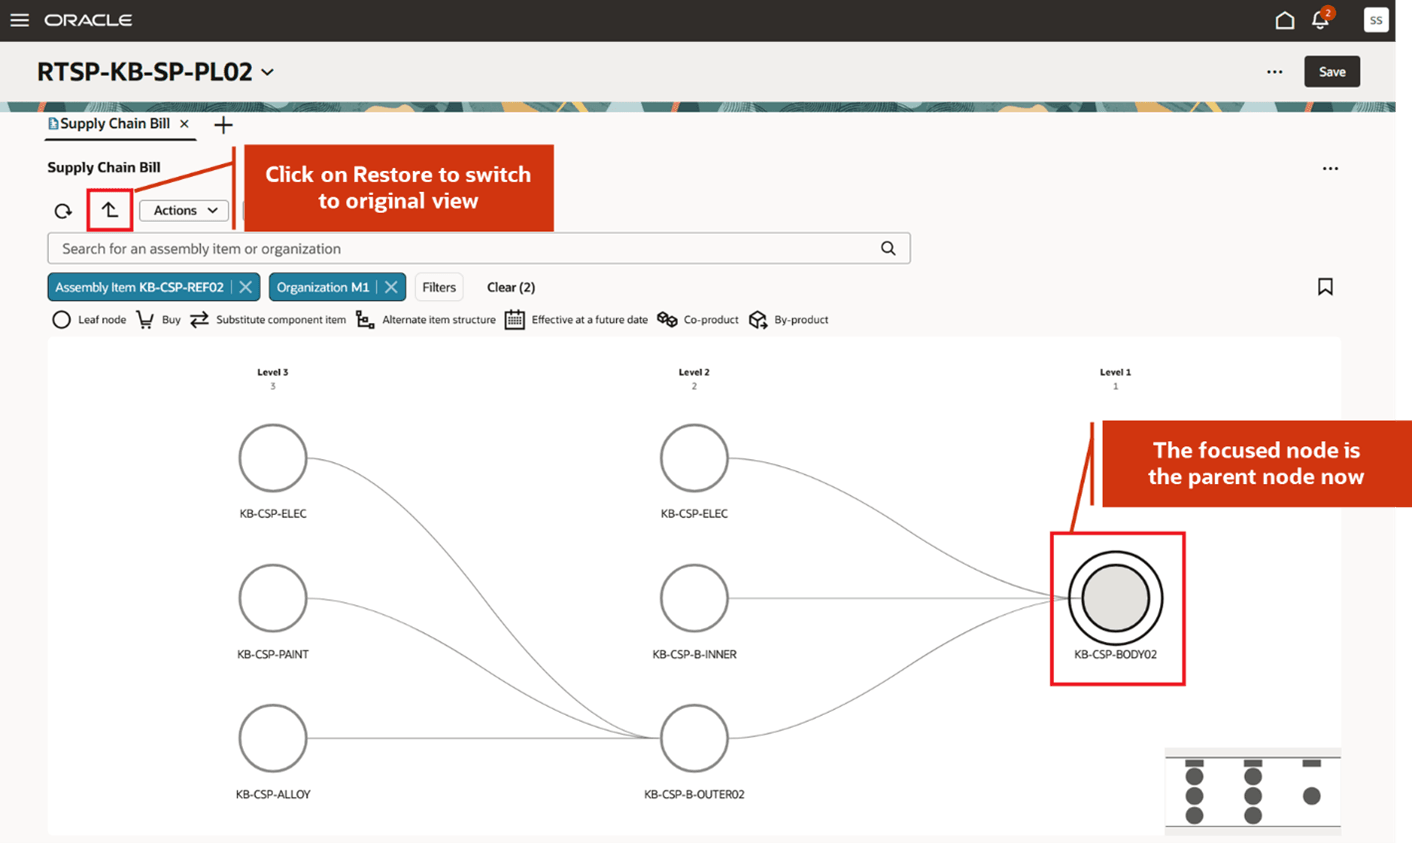
Analyze Focused Item in a Separate Pane
You can check where a particular component is used in different assemblies or subassemblies. Select a particular node and right click. On the menu, select View Where Used.
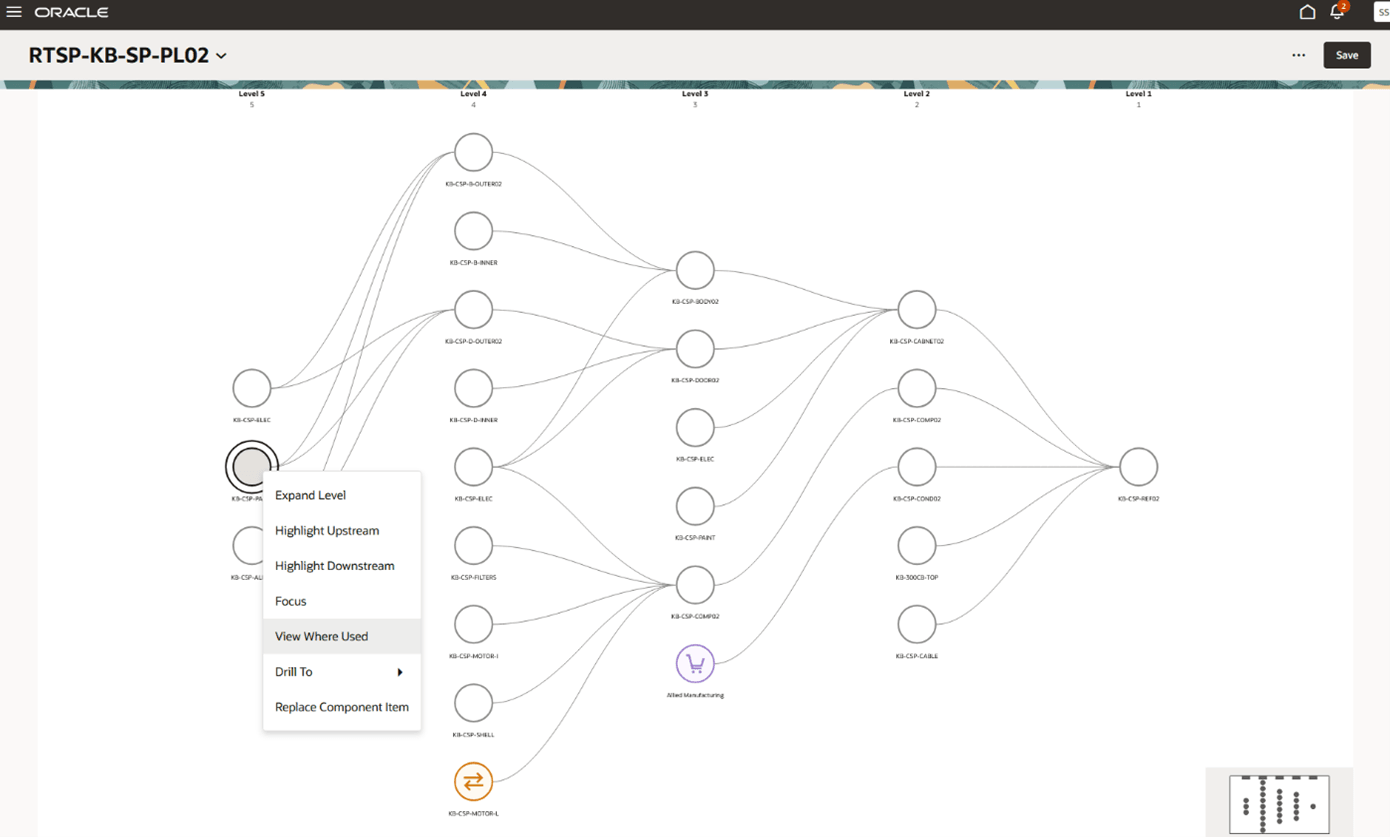
View Where Used
The component KB-CSP-PAINT is used in multiples assemblies as shown in the network diagram.
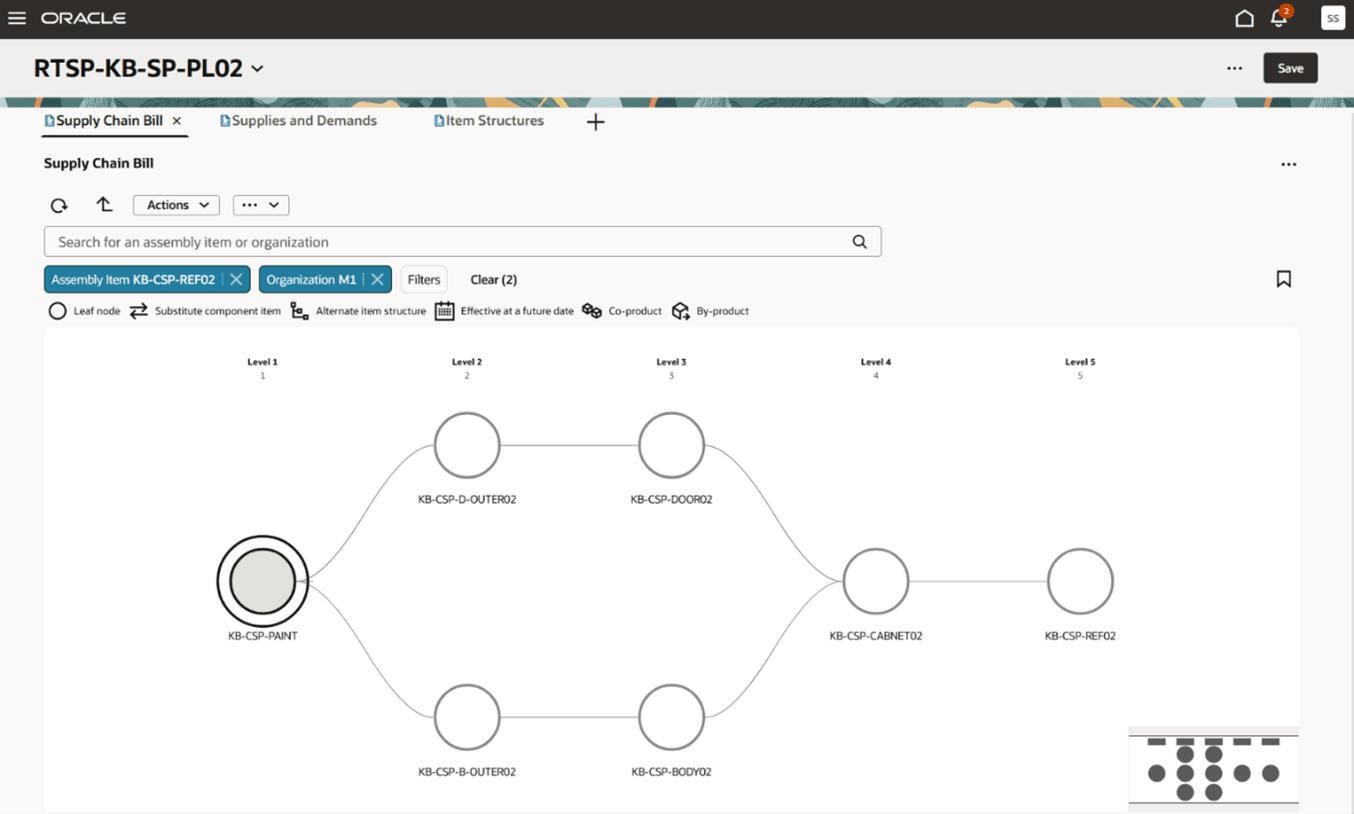
View the Assemblies Where Component is Used
Select the Restore icon to switch back to the original view.
Edit Properties
You can configure the default settings of the Supply Chain Bill view by selecting Edit Properties.
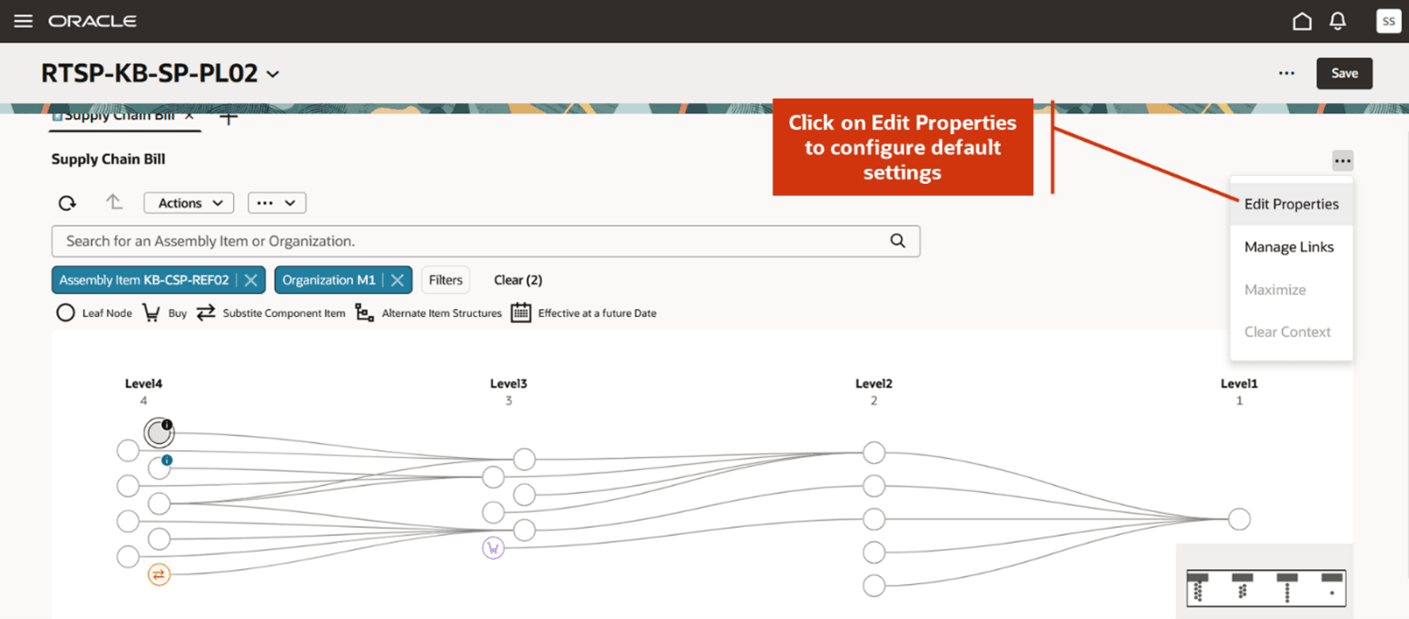
Edit Properties
After you select Edit Properties, a drawer opens. You can set the number of supply chain levels to be displayes by default in the network diagram by selecting a value in the Default Settings field. You can also select which item types are displayed by default in the network diagram. For example, you can select substitute components and buys to always be displayed by default. The primary components of the primary item structure are displayed by default in the supply chain bill. These default settings are available in More Actions and there you can select or deselect certain item types for quick analysis.
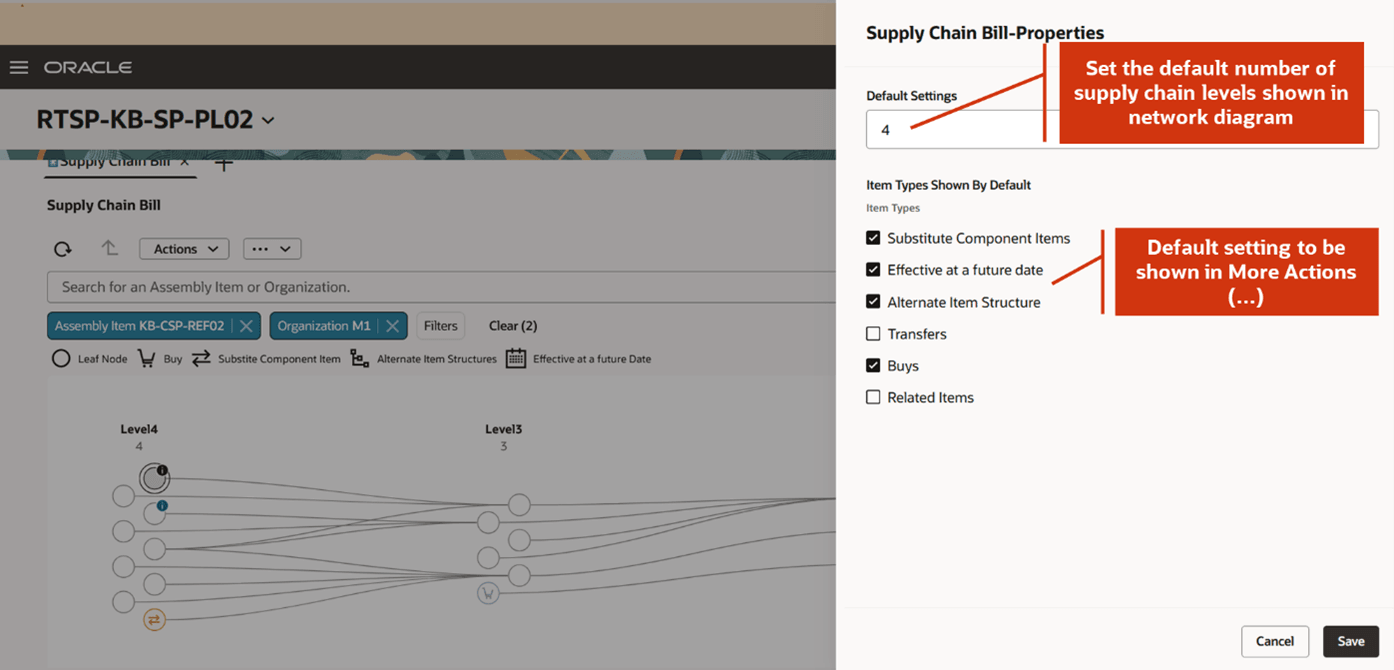
Default Settings for Supply Chain Bill
Steps to enable and configure
You don't need to do anything to enable this feature.
Tips and considerations
- This feature is supported for both unconstrained and constrained supply plans.
- This feature is supported for Supply plans and Demand and Supply plans.
- The maximum node limit on network diagram is 3000 nodes. If you exceed this limit, you get an error message. If you would like to further drill upstream on a particular node, then you can use Focus to further analyze it on a separate pane.
- When you select Highlight Upstream or Highlight Downstream, it shows the supply chain for the nodes present in the view port only.
- Shared components are shown only once in a level.
- You can zoom the network diagram in or out by using the keypad or mouse. When you zoom in, each node shows the item name and organization represented by the node.
Access requirements
Users who are assigned a configured job role that contains these privileges can access this feature:
- Review Supply Chain Bill (MSC_REVIEW_SUPPLY_CHAIN_BILL_PRIV)
- View Supplier Information (MSC_VIEW_SUPPLIER_INFORMATION_PRIV)
These privileges were available prior to this update.