Redwood: Manage Project Groups Using a New User Experience
Project groups enable you to specify planning rules for a group of projects such as inventory that can be shared across the projects in the group.
You can now use the Project Groups page in the Redwood user experience to manage project groups. You can use this experience to view, create, edit, or delete a project group. Projects can be selected from the default ungrouped bucket or moved across other groups, and the page prevents duplicate or unsaved reassignments to maintain data integrity.
The Project Groups page enables you to:
- Create, edit, and delete project groups
- Review project groups and their associated projects
- Add or remove projects from project groups
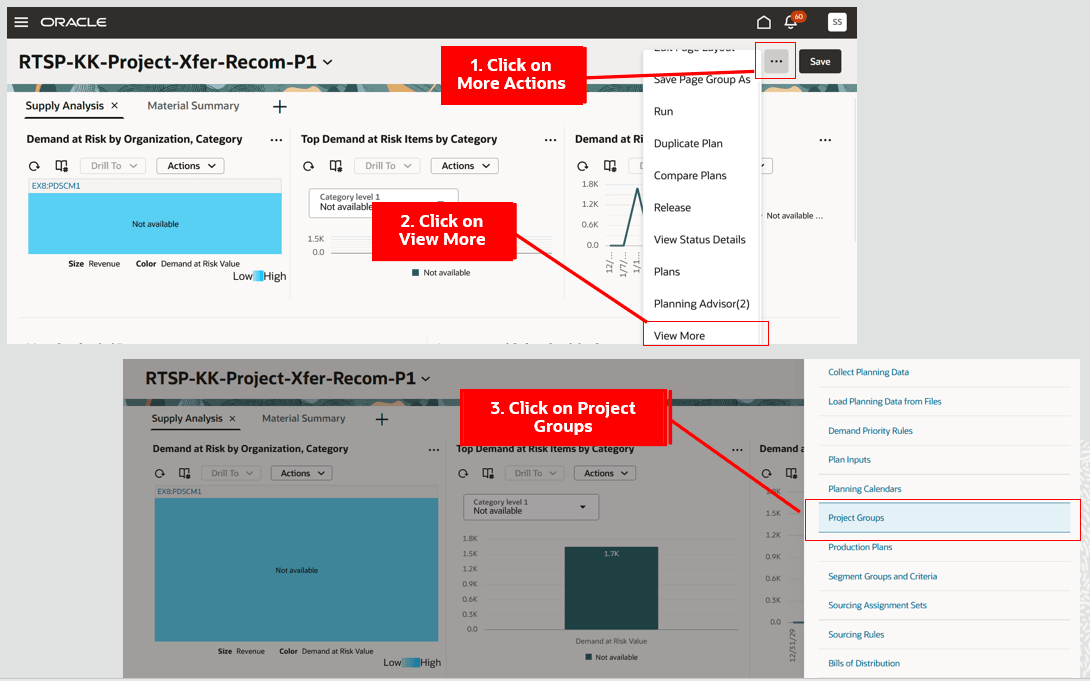
The Project Groups page can be accessed from Plan Inputs, supply plans, and demand and supply plans in the Redwood Supply Chain Planning work area.
To access the Project Groups page:
- Click the More Actions (...) icon.
- Click View More.
- Click Project Groups in the Plan Inputs section.
The Project Groups page opens in a new browser tab.
Navigate to the Project Groups Page
Project Groups Page
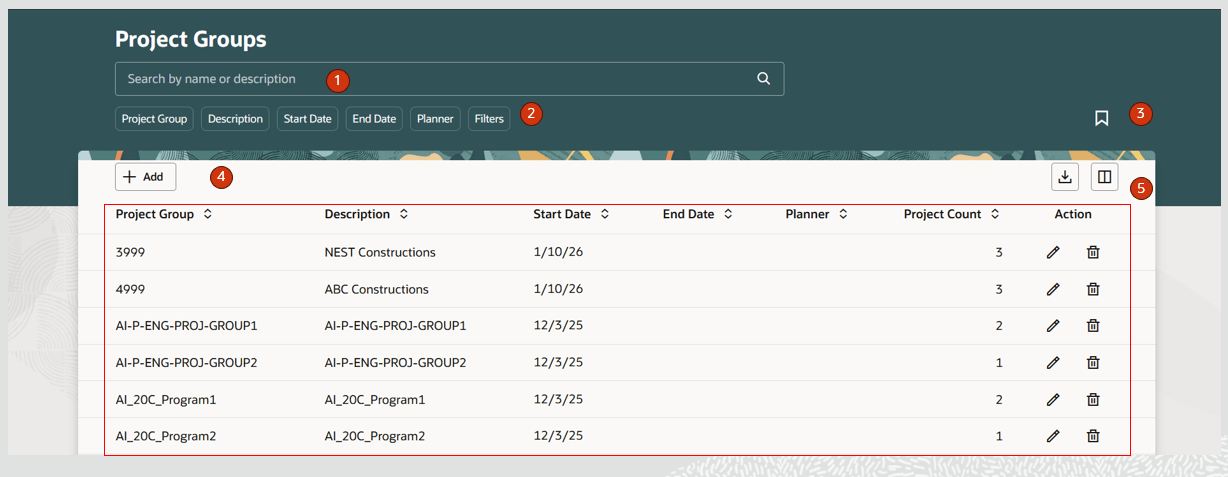
Project Groups Page
The Project Groups page contains the following:
- Keyword search – Lets you search across the Project Groups page by project group name or description. The search is case insensitive and is performed using the contains operator.
- Suggested filters - Filters the Project Groups page by Project Group, Description, Start Date, End Date, and Planner column details.
- Saved searches – Saves search criteria .
- Action toolbar – Lets you create and manage columns.
- Project Groups table - Displays the project groups created on the page or collected using file-based data import (FBDI).
Project Groups Actions
Let’s now understand the actions you can take on the Project Groups page.
Create Project Group
To create a project group:
- Click the Add (+) button on the Project Groups page.
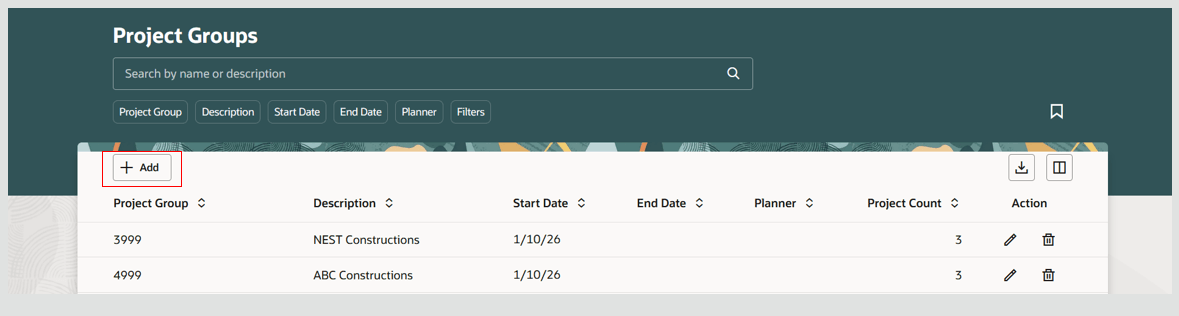
Create a Project Group
- A New project group drawer opens, which contains General and Projects tabs.
- In the General tab, provide a unique project group name and a description. Start date defaults to system date and can be edited to be a future date. Optionally provide an end date. Select a planner from the list of values.
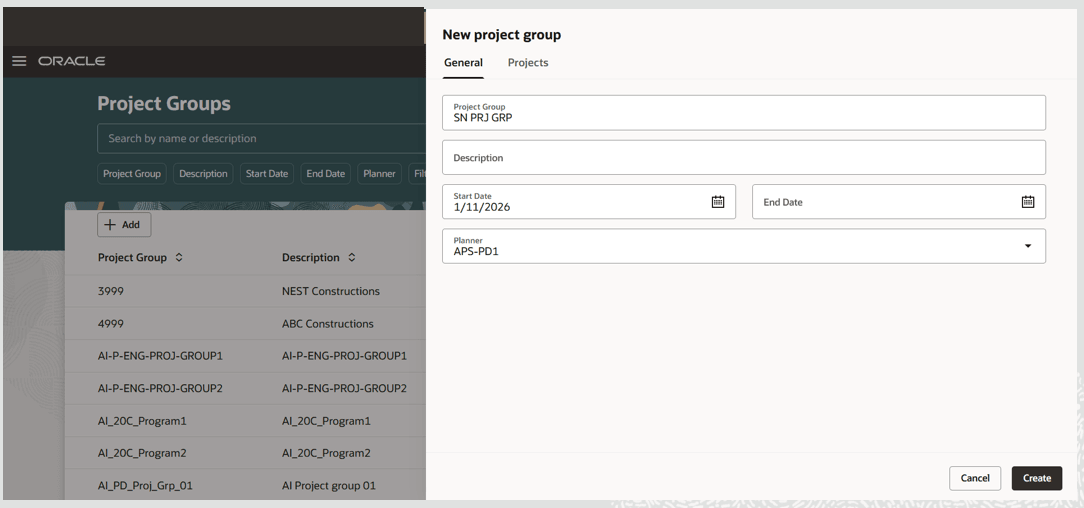
The New Project Groups General Tab
- Switch to the Projects tab and select the projects that you want to add to the project group. You can use the Ungrouped and All toggle buttons to view either all projects or only those projects that are currently not in a project group. You can also associate projects later using edit project groups.
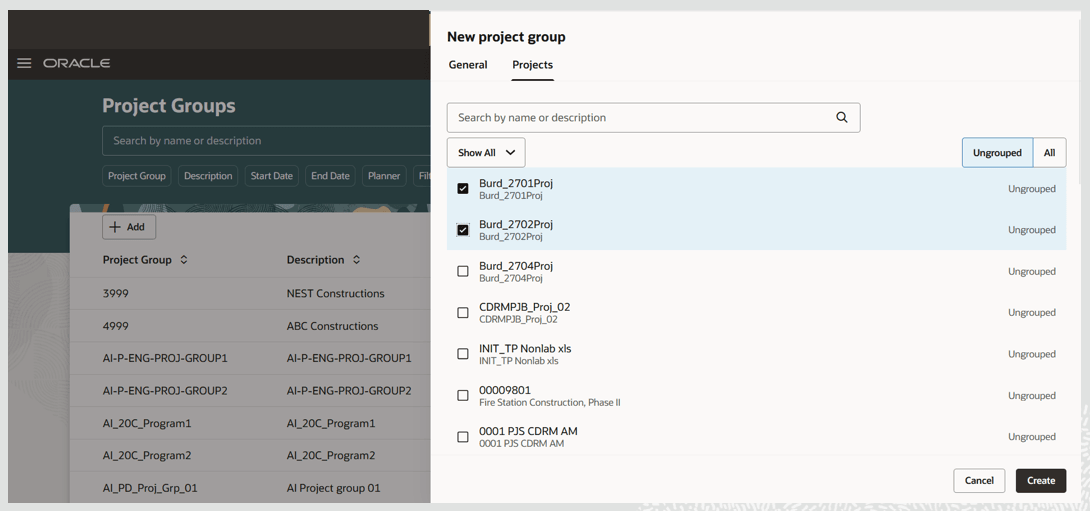
Select Projects to Associate to a Project Group
- Click Create.
The newly created project group is now displayed on the Project Groups page.
Once the project group is created, the Create Tree Structures schedule process for the Project dimension is submitted in net change mode. This allows visualizations in the Supply Chain Planning work area to display measure values at the project and project group levels.
Delete Project Group
Note: You can’t delete a project group if it has projects currently assigned to it.
To delete a project group:
- First, unassign all the projects assigned to the project group, as follows:
a. In the desired project group row, click the Edit icon in the Action column.
b. A drawer opens and displays the details of the selected project group. Navigate to the Projects tab and deselect the selected projects.
c. Click Update.
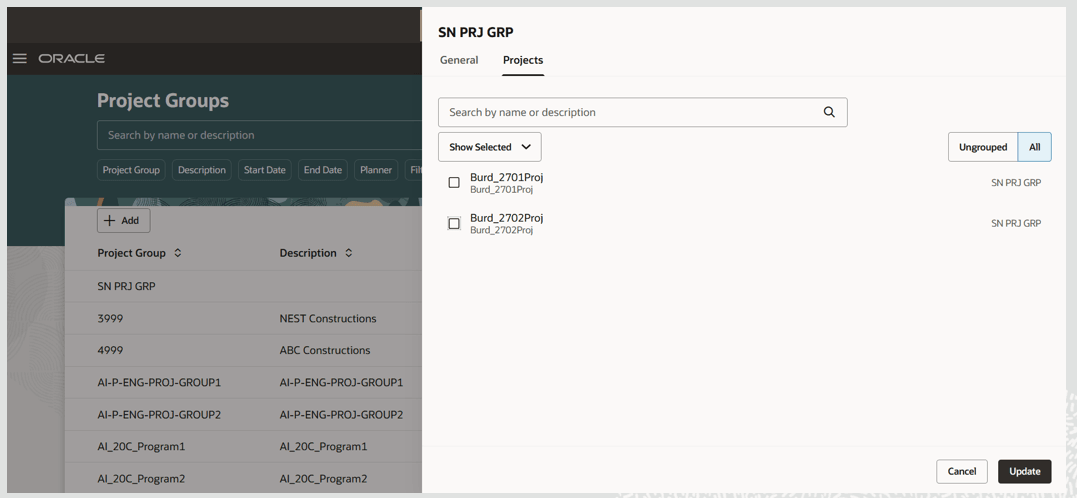
Unassign Projects from Project Group
- In the desired project group row, click the Delete icon in the Action column.
- A confirmation message is displayed. Click the Delete button to confirm that you want to delete the project group.
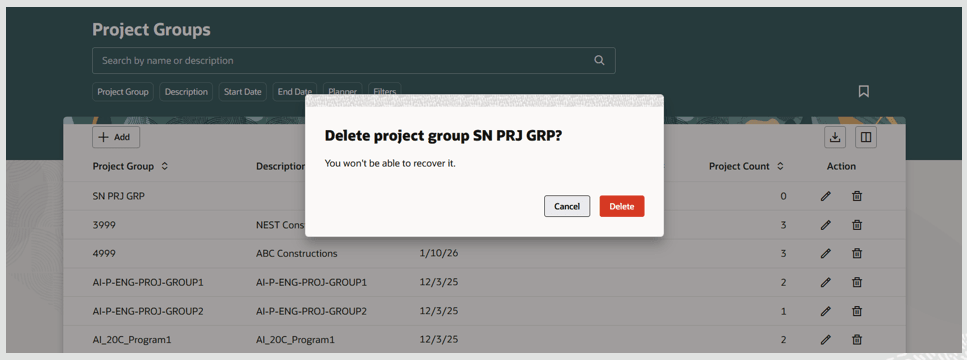
Confirmation to Delete Project Group
- Once the project group is deleted, the Create Tree Structures schedule process for the Project dimension is submitted in net change mode..
Edit Project Group
To edit a project group:
- In the desired project group row, click the Edit icon in the Action column.
- In the General tab, edit the project group name, description, start date, end date, and planner as desired.
- In the Projects tab, assign or unassign projects to the project groups as desired. See the following section for details.
- After you’ve completed your edits, click Update.
- Once the project group has been edited, the Create Tree Structures schedule process for the Project dimension is submitted in net change mode.
Managing Projects in a Project Group
The Projects tab in the Project Groups drawer contains the following:
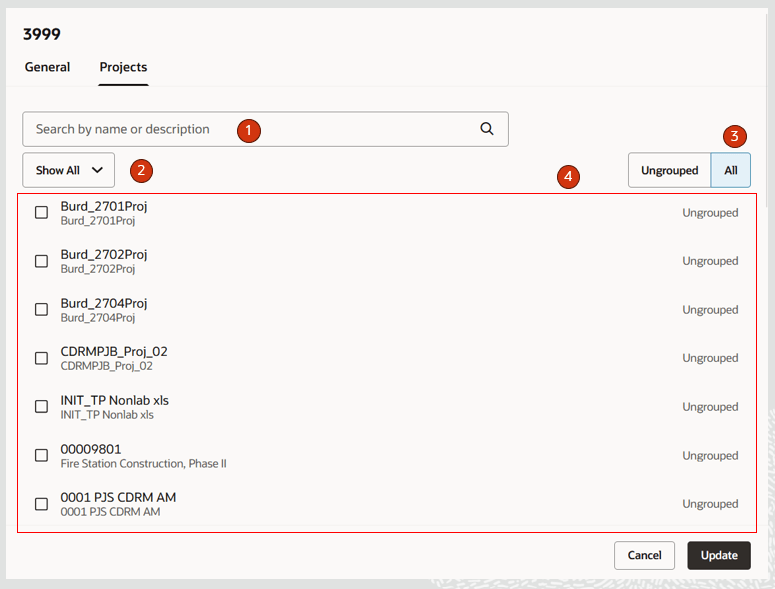
Projects Tab in the Project Groups Drawer
- Keyword search – Lets you search by project name or description. The search is case insensitive and uses the contains operator.
- Display option – Show All or Show Selected. The default is Show All.
- Projects display option – Show Ungrouped or All. The default is All.
- Projects display section – Displays the project name, description, and project group name.
These options allow for the following scenarios:
- When display option Show All and projects display option All are selected, projects from ungrouped and other project groups are displayed.
- When display option Show All and projects display option Ungrouped are selected, only projects from the Ungrouped project group are displayed.
- When display option Show Selected and projects display option All are selected, projects associated with the project group in context are displayed.
- When display option Show Selected and projects display option Ungrouped are selected, no projects are displayed.
To assign projects from Ungrouped to a project group:
- Select the display option as Show All and the projects display option as Ungrouped.
- Select the checkbox next to all the projects to be assigned to the project group and then click Update. You can also search for projects using the keyword search.
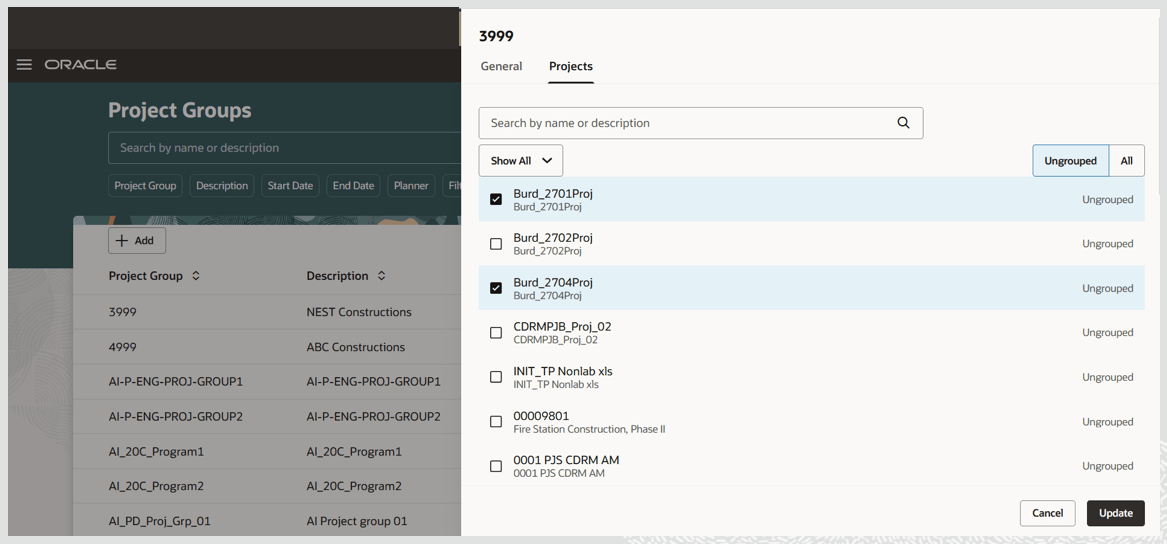
Assign Projects from the Ungrouped Projects
To assign projects from another project group:
- Select the display option as Show All and the projects display option as Ungrouped.
- Select the checkbox next to the projects to be assigned from other project groups to this project group and then click Update. You can also search for projects using keyword search.
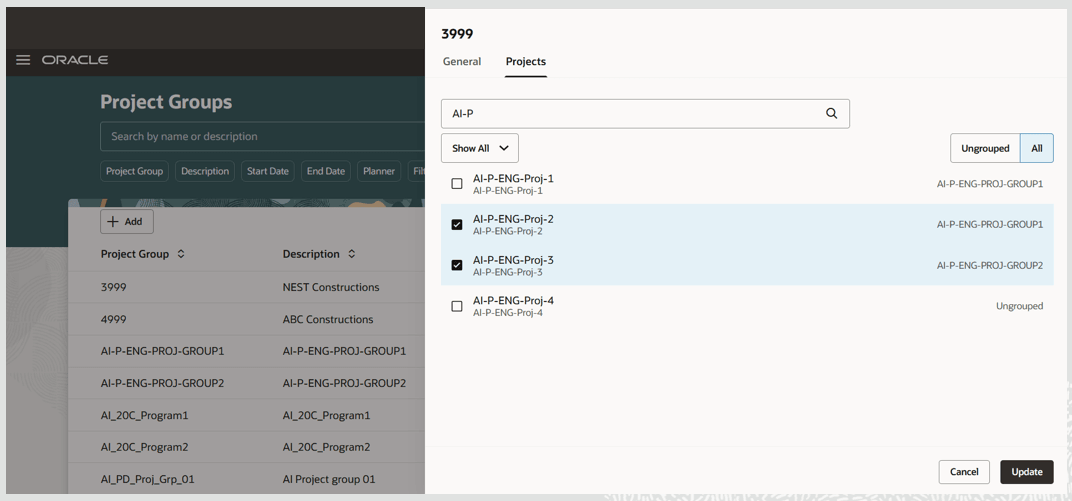
Assign Projects from Other Project Groups
Quick Actions
You can now navigate to the Project Groups page from Quick Actions. To enable this navigation:
- Go to Navigator > My Enterprise > Setup and Maintenance.
- Search for and select the Manage Administrator Profile Values task.
- Search for the profile display name Redwood Page for Project Groups.
- Set the Profile Value to Yes and save. (You can set this profile at the User or Site level.)
Steps to enable and configure
You don't need to do anything to enable this feature.
Tips and considerations
- You can enable guided journeys for the Project Groups page.
- You must opt-in to Project-Driven Supply Chain or Attribute-Based Planning to create projects on the Project Groups page.
- The Project Groups page implicitly submits a Create Tree Structures schedule process for project dimension when a project group is created or edited, in order to update the project hierarchy for use in Supply Chain Planning visualization and analysis. Try to consolidate the changes for multiple project groups and save the changes all together before triggering the implicit submission of the Create Tree Structures for the Project dimension.
- The Project Group page displays the count of projects assigned to a project group.
Access requirements
Users who are assigned a configured job role that contains these privileges can access this feature:
- Monitor Supply Planning Work Area (MSC_MONITOR_SUPPLY_PLANNING_WORK_AREA_PRIV)
- Monitor Demand and Supply Planning Work Area (MSC_MONITOR_DEMAND_AND_SUPPLY_PLANNING_WORK_AREA_PRIV)
- Manage Projects (MSC_MANAGE_PROJECTS_PRIV)
These privileges were available prior to this update.