Configure the Supervisor Dashboard to Monitor Help Desk Queues & Agent Performance
The Supervisor Engagement Channels Dashboard provides near real time updates and recent data for key metrics relating to agent performance and interaction handling across channels in the employee Help Desk contact center. This allows supervisors to monitor the quality of chat and help desk requests service, diagnose operational issues and identify solutions. For example, you can see how many employees are currently waiting and current wait times and review wait times for the recent past. To access the Supervisor Dashboard, you'll add a card icon under the Help Desk area.
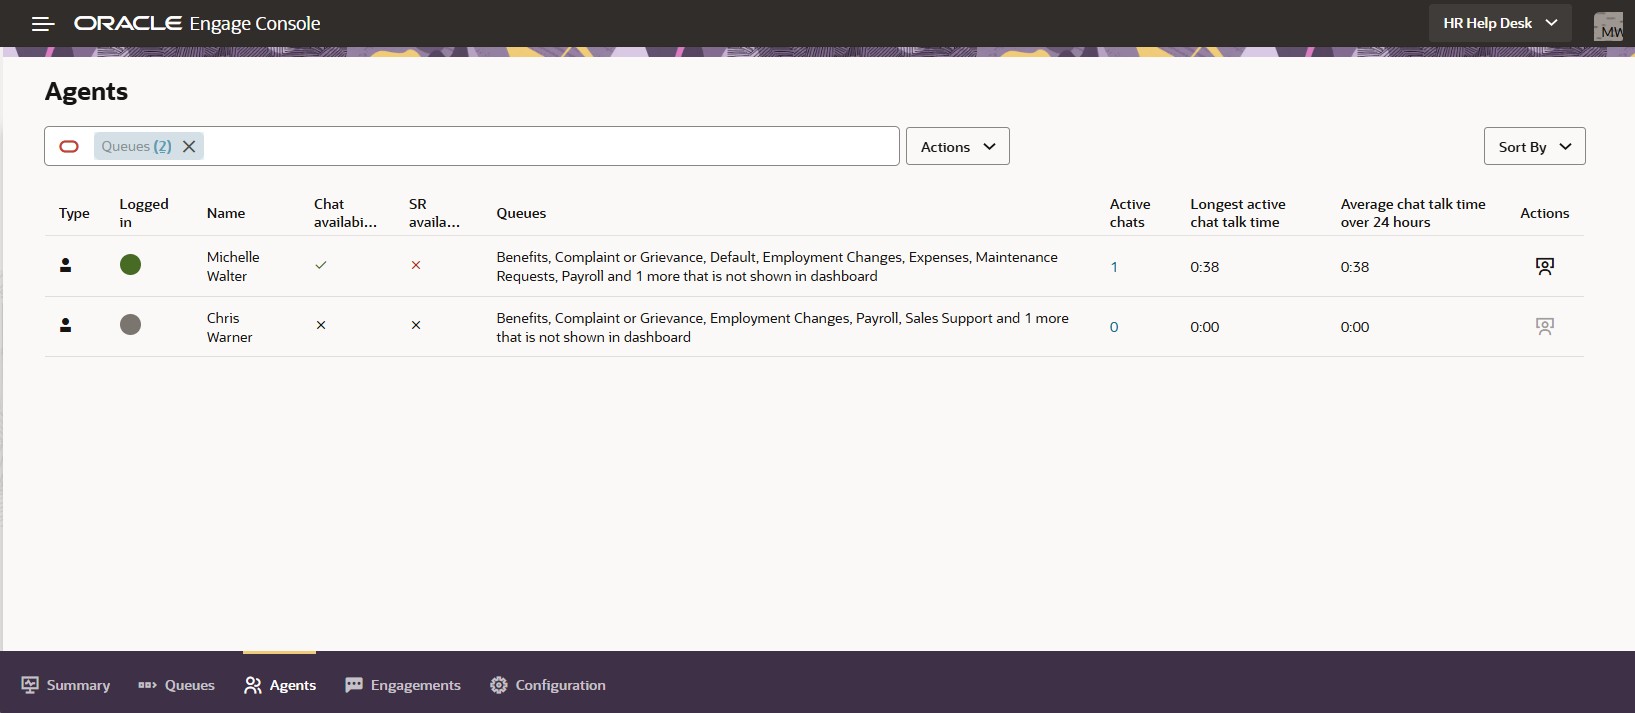
Active Chat in Supervisor Dashboard
Supervisors can quickly identify and resolve chat and SR service issues leading to a better customer experience and more effective use of resources.
Using the data on the dashboard, you can monitor employee service levels to ensure performance targets are met and to identify when you need to take action. You can also optimize agent usage by viewing real-time resource constraints. Here are some of the features the dashboard provides:
- Displays statistics relating to interactions for specific queues and agents
- Highlights areas requiring attention, such as low service levels
- Let's you drill down to view details relating to a specific queue or agent
Steps to enable and configure
To use the Digital Engagement Channels dashboard, enable the Digital Engagement Channels Service feature with the following steps:
- Opt-in to the Digital Engagement Channels Service
- Give Supervisors the appropriate privilege
- Add the Help Desk Supervisor Dashboard Card
- Give privileges through IDCS
- Dashboard Onboarding
Opt-in to the Digital Engagement Channels Service
NOTE: If you've already configured chat, you can skip to the next step, as this will have already been done.
- Sign in to the Fusion application as a setup or administrator user.
- Navigate to the Setup and Maintenance work area and select the Service (not Help Desk) offering.
- Click the Change Feature Opt In link.
- On the Opt In: Service page, find the Communications Channels functional area and enable it.
- Click the Edit icon to select the specific communications features you want to enable.
- On the Edit Features page, enable the Digital Engagement Channels Service feature.
- Click Done, then click Done again.
Give Supervisors the appropriate privilege
NOTE: If you are using the default roles or inheriting them, then you may skip this step. If you are using custom roles that do not include standard roles, then you will need to add these specific roles to your custom roles or to individual users.
- The Help Desk Engagement Channel Supervisor role is given to the Next Gen Human Resources Help Desk Manager and Internal Help Desk Manager roles.
- The Help Desk Engagement Channel Administrator role is given to the Next Gen Human Resources Help Desk Administrator and Internal Help Desk Administrator roles.
The instructions below are adding this role to an individual user.
- Navigate to Tools -> Security Console.
- Click on the User tab.
- Search for the person who should have access.
- Edit the user account.
- Search for and select Help Desk Engagement Channel Application Administrator and/or Help Desk Engagement Channel Supervisor role.
- Click Add Role Membership.
- Click Done.
- Save and Close.
- Click Done.
- Log out and back in for this change to take effect.
Add the Help Desk Supervisor Dashboard Card
- Navigate to Configuration -> Sandboxes.
- Create or Enter a Sandbox that has the Structure tool available.
- From the tools drop-down go to Structure.
- Expand the Service (not Help Desk) offering.
- Click on the Supervisor Dashboard under Service.
- Click Create Duplicate.
- Change the Group to Help Desk.
- Click Save and Close.
- Preview as if Published to confirm that the Supervisor Dashboard can now be found under the Help Desk tab grouping.
- Publish the Sandbox when you are ready to introduce the Dashboard Card.
Give privileges through IDCS
- Log into Oracle Identity Cloud Service (IDCS).
- Click Domains on the left-hand side.
- Click the Oracle cloud services tab.
- Search for ENGAGE.
- Click on the resulting ENGAGE-env Engagement Services link.
- Select the Application roles tab.
- Select one of the Engagement Service roles which will be associated to a Fusion Help Desk Role.
- From the meatball menu on the right, select Manage groups.
- (You can check if the group is already assigned by searching the assigned groups.)
- Click on the Assign groups tab.
- Search for and assign the appropriate Fusion Help Desk Job Role to the Engagement Service role. The following table shows the mapping for out-of-the-box Help Desk roles, but if you have custom roles, you may use those instead:
Engagement Role to Help Desk Role Mapping
| Help Desk Type (Stripe) | Engagement Services Role | Fusion Help Desk Role |
|---|---|---|
| HRHD | Oracle Engagement Service Help Desk Administrator | Next Gen Human Resource Help Desk Administrator |
| HRHD | Oracle Engagement Service Help Desk Supervisor | Next Gen Human Resource Help Desk Manager |
| ISR | Oracle Engagement Service Internal Help Desk Administrator | Internal Help Desk Administrator |
| ISR | Oracle Engagement Service Internal Help Desk Supervisor | Internal Help Desk Manager |
NOTE: If these roles are not available within IDCS, please open an SR with Technical Support, as your IDCS may need to be updated to the latest version.
The setup is now complete. However, when you first go into the Help Desk Supervisor Dashboard, you may want to configure which queues will be seen.
Dashboard Onboarding
- Under Help Desk, click the Help Desk Supervisor Dashboard. (Note that if you've not yet published your sandbox, you will need to access this through the sandbox.)
- Click Continue.
- To review or change the particular queues you are interested in monitoring, slide the All queues slider to off. This will show all of the available queues associated with the Help Desk type.
- Use the slider in the Show in Dashboard column to turn off any queues that you are not interested in monitoring and/or are not applicable to your role.
- Click Continue.
- Click Done.
You are now ready to use the Supervisor Dashboard.
Tips and considerations
Supervisor dashboard requires Engagement Channels to be enabled.
Note: If chat and omnichannel routing is being used, then Engagement Channels should already be enabled
Key resources
- To assign roles see the "Roles" section in the Security Reference guide.
- For more information on how to set up and use the Supervisor Dashboard, see the playbook.
- See the Engagement Channels Dashboard online help.
Access requirements
Administrator Access is required to Opt-in to Digital Engagement Channels Service.
To access to the dashboard, resources must have at least one of the following roles.
- Engagement Channel Application Administrator
- Engagement Channel Supervisor
These job roles are given access to the dashboard through the roles indicated:
- ORA_SVC_HUMAN_RESOURCE_HELP_DESK_ADMINISTRATOR_NG - Engagement Channel Application Administrator
- ORA_SVC_HUMAN_RESOURCE_HELP_DESK_MANAGER_NG - Engagement Channel Supervisor
- ORA_SVC_INTERNAL_HELP_DESK_ADMINISTRATOR - Engagement Channel Application Administrator
- ORA_SVC_INTERNAL_HELP_DESK_MANAGER - Engagement Channel Supervisor
To assign roles see the "Roles" section in the Security Reference guide.
Once the above roles are granted to the users, the same roles must be assigned to the users in IDCS, as described above.