Support Event Handling from the AI Conversation panel
The inline AI Conversation panel now supports interactive event handling, enabling AI agents to return rich UI components such as chips and cards instead of plain text. These components are clickable and emit structured events when users interact with them.
Service Center pages can listen to these events, access the payload (including metadata and content), and then trigger custom logic such as navigation, data retrieval, or UI updates. This bridges conversational AI with application workflows, making interactions more dynamic and actionable.
Example Use Cases
-
Guided Navigation from AI Responses: Display a “View Details” chip that, when clicked, opens a Service Request or related page.
-
Contextual Actions from Conversations: Present options like “Create SR” or “Escalate Issue” and trigger workflows directly from the AI conversation.
-
Dynamic Content Display: Show a card with summary information and load full details in the Service Center upon a click.
-
Integration with External Logic: Use event payload data to call APIs, retrieve data, or update application stat
This feature allows you to move beyond text-only chatbot responses to build more interactive experiences:
- Improve user engagement by presenting clickable, guided options instead of text-only responses
- Enable seamless workflows by triggering actions directly from AI responses
- Increase automation by connecting AI conversations to backend processes or navigation
- Enhance extensibility by allowing developers to implement custom logic based on user interactions
Steps to enable and configure
Leverage the Visual Builder Studio to expose your applications. To learn more about extending your application using Visual Builder, visit Oracle Help Center > your apps service area of interest > Books > Configuration and Extension.
Steps to Enable
In this example, the steps demonstrate how to invoke an AI agent chat in inline mode from the Service Home page and display the postback content of chip type response from the AI chat in the Service Center.
Event Payload:
| Paramenter | Type | Example |
|---|---|---|
| agentTeamCode | String | "SHOW_CARD" |
| content | Object |
This is the response from AI chat: {"type": "chip", "icon": "oj-ux-ico-detail-view", "primaryText": "Welcome!", "secondaryText": "Click to learn more", "headerText": "Greetings", "postback": "<p><b>Welcome to our service!</b></p><ul><li>Explore features easily</li><li>Get personalized support</li><li>Enjoy seamless experience</li></ul>" } |
| conversationId | String | "4C48261A799DBDF7E063834F060A6D12_SHOW_CARD_PUBLISHED" |
| msiTabId | String |
" fd6qj" |
| msiTabId | String | "redwood" |
Prerequisites
- You should have the required roles for creating and invoking AI agents
- You should have an AI agent created that returns a JSON. The output specification of JSON should be :
Output Specification Expand source
{
    "$schema": "http://json-schema.org/draft-04/schema#",
    "type": "object",
    "properties": {
        "postback": {
            "type": "string"
        },
        "icon": {
            "type": "string"
        },
        "secondaryText": {
            "type": "string"
        },
        "primaryText": {
            "type": "string"
        },
        "headerText": {
            "type": "string"
        },
        "type": {
            "type": "string",
            "defaultValue": "chip"
        }
    }
}
- You should have the required roles for creating and publishing application extensions
Steps
Add a button to invoke the AI chat
- Create a service application extension from your environment
- Open service-home page and create a new section for Metrics Container
- In the newly added section, add a Button and provide necessary Label
- Add an on ojAction event listener for the button
- Replace the code in ButtonActionChain with the following code:
define([
'vb/action/actionChain',
'vb/action/actions',
'vb/action/actionUtils',
'vx/oracle_cx_serviceUI/ui/self/resources/functions/aiagentinteractionutil/aiagentinteractionutil'
], (
ActionChain,
Actions,
ActionUtils,
aiAgentInteractionUtil
) => {
'use strict';
class ButtonActionChain extends ActionChain {
/**
* @param {Object} context
* @param {Object} params
* @param {object} params.event
*/
async run(context, { event }) {
const { $page, $flow, $application, $base, $extension, $constants, $variables, $modules } = context;
const callLaunchAIAgent = await aiAgentInteractionUtil.launchAIAgent('SHOW_CARD', null, null, $application?.currentPage, 'Hi', null, null, null);
}
}
return ButtonActionChain;
});
launchAIAgent function syntax
This function is used to launch an ai agent from service application in inline mode.
Following are the parameters passed to the function:
Paramenters
| Parameter | Type | Description | Example |
|---|---|---|---|
agentTeamCode |
String | Agent team code of the agent that needs to be invoked | CHAT_SNIPPET_RETRIEVAL_ASSISTANT |
| agentTeamConfiguration | Object |
Configurations of the agent team.
|
{ title: 'UPDATED TITLE', status: 'PUBLISHED', fileUploadConfig: { chatExpLocalFileUploadEnabledFlag: true }, draftVersion: 6 } |
context |
Object | Additional context that needs to be passed to the agent | |
drawerState |
String |
Can be 'maximize' or 'minimize'. Default value: minimize |
|
initialUserMessage |
String | Initial message that should be passed to the ai agent | |
listOfStarterQuestions |
String[] | List of starter questions that needs to be passed to the ai agent | |
mode |
String |
The mode in which ai agent should be invoked. It can be Inline or Drawer.
|
Drawer |
parameters |
Object |
Additional parameters that needs to be passed to the agent. File upload configurations can also be provided here. |
{ 'SrNumber': 'SR000012', 'SrId': '12121213213', 'fileUploadConfig': { 'additional_context': {} } |
uefContext |
Object |
UEF context of the current page. Notee: You can pass the $application.currentPage object as uefContext for pages where uefContext is not available. |
{
'objectId': 'SR000012', 'sourceTabId': 17688989789 }; |
Add an event listener for aiAgentChatResponseEvent event
- Open service-home page > Event Listeners > Add Event Listener
- Choose aiAgentChatResponseEvent and click "Next"
- Click "Create Page Action Chain" > Finish
- Make sure to map the input parameter from event listeners tab
- Go to action chain > Code and the following code:
define([
  'vb/action/actionChain',
  'vb/action/actions',
  'vb/action/actionUtils',
], (
  ActionChain,
  Actions,
  ActionUtils
) => {
  'use strict';

  class aiAgentChatResponseEventListener extends ActionChain {

    /**
     * @param {Object} context
     * @param {Object} params
     * @param {{agentTeamCode:string,conversationId:string,tabId:string,msiTabId:string,content:any}} params.event
     * @return {{stopPropagation:boolean}}
     */
    async run(context, { event }) {
      const { $application, $base, $extension, $constants, $variables } = context;

      await Actions.fireNotificationEvent(context, {
        summary: event.content.postback,
        type: 'info',
      });

      return { stopPropagation: true };
    }
  }

  return aiAgentChatResponseEventListener;
});
Instead of displaying the notification described above, you can implement your own custom logic.
Why returning stopPropagation: true?
If you are using this AI chat from a Service Request detail page, clicking the chip renders the postback content within the page by default, as shown below.
To override this default behavior and invoke your custom logic, return stopPropagation: true from the aiAgentChatResponseEventListener.
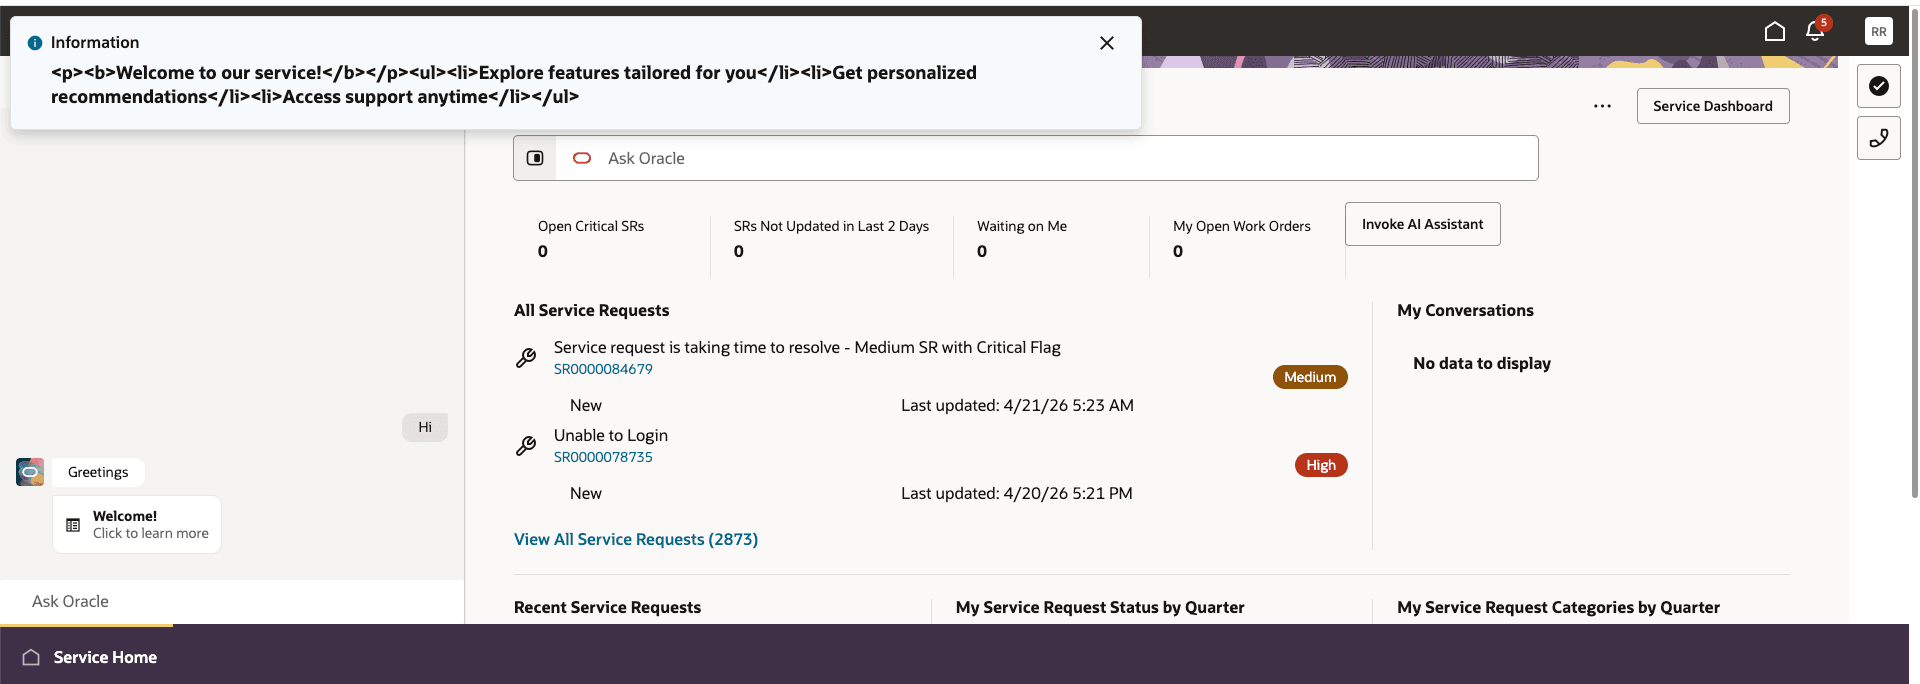
Verification
- Take preview of the application from service app ui
- From the service-home page, click on the "Invoke AI Assistant" button you have created
- It will open up the inline AI chat. Click on "Welcome!" chip (Or whatever label based on your ai agent implementation)
- You will be able to see the postback contents showing in a notification popup
Please note that this is just a reference implementation. You can implement your own custom logic upon receiving the event instead of displaying the notification.
Tips and considerations
n/a
Key resources
n/a
Access requirements
- Oracle Visual Builder Studio for Application Extension