Start the Employee Help Desk Self Service Assistant from the search bar
In prior releases, administrators could configure AI Assistance on the My Help page and the option would show up as a separate hyperlink on the page, "Get AI Assistance." Now, the Employee Help Desk Self Service Assistant can be found at the left-hand side of the Search Bar, and will open much like the functionality of the Agentic Apps.
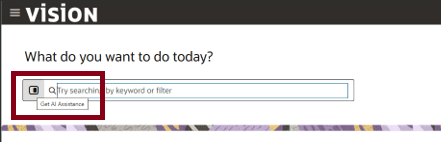
Get AI Assistance
For the 26C release, clicking on this icon will open a "floating" window that can be moved to not obstruct the page behind it.
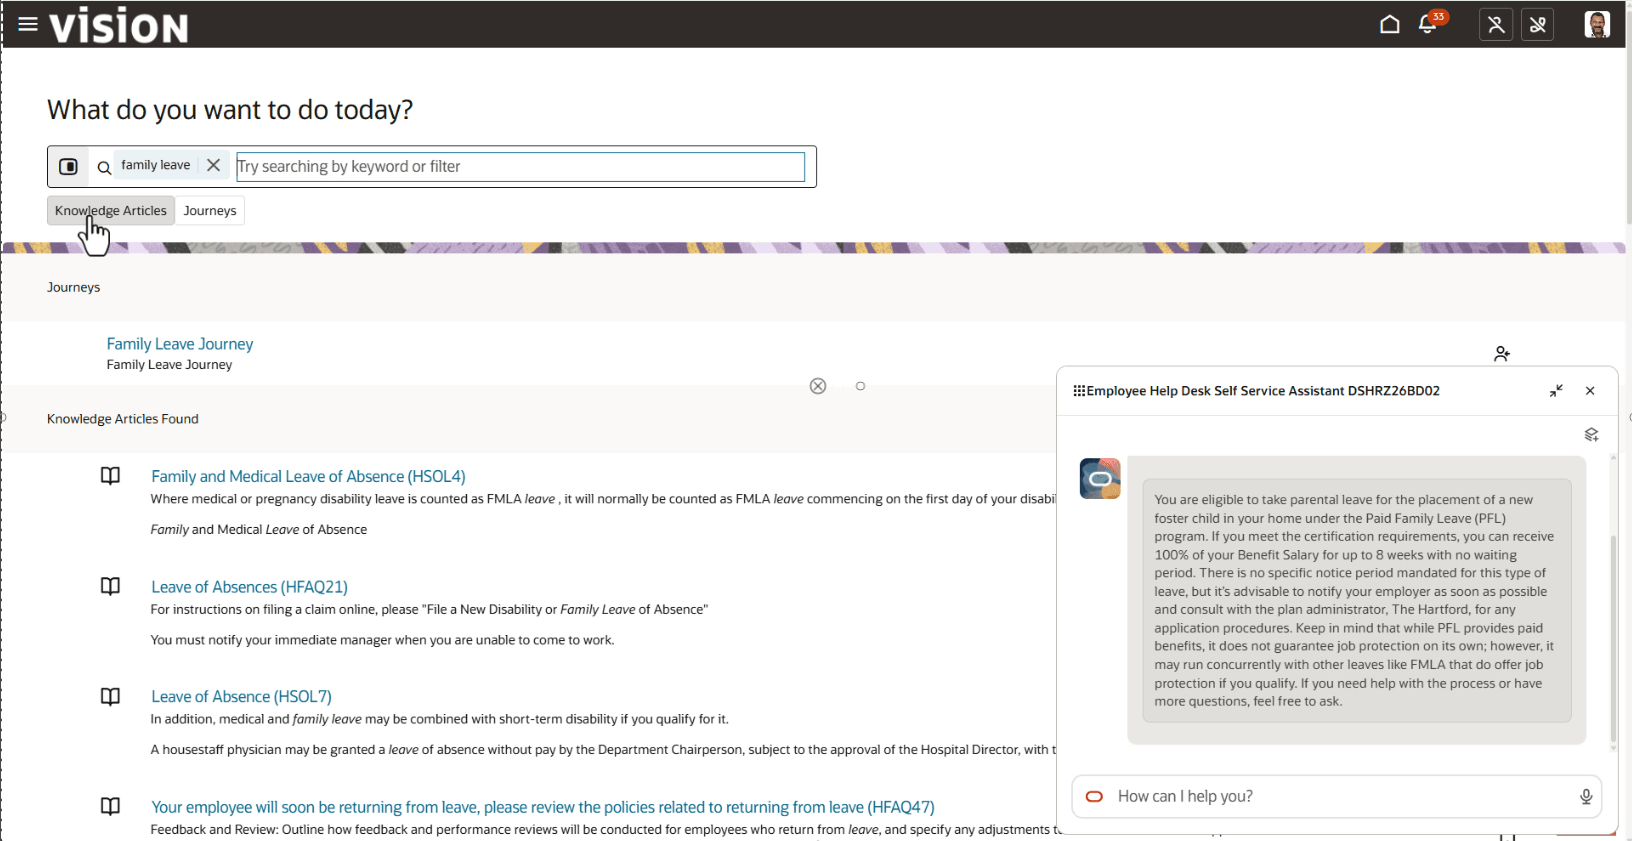
Floating Window
This feature provides a more consistent experience for the employees when opening an AI Assistant, and allows the employee to take other actions (like performing a knowledge search) and not be blocked by the Employee Help Desk Self Service Assistant.
Steps to enable and configure
If you have already enabled the Employee Help Desk Self Service Assistant, then it will move to the search bar automatically.
If you have not already enabled the Employee Help Desk Self Service Assistant, use the following instructions:
There are a number of steps required.
- Set up Permissions
- Load Products and/or Categories
- Customize the AI Agent
- Decide upon and register the Agents for the Team
- Configure the Profile Option to indicate the AI Agent team to be used
Set up Permissions
For those not already using the Employee SelfService Assistant, you should first create a custom role that will allow employees to use AI Features. If you have already completed this previously, you can skip this step.
These instructions assume that you have a custom role set up based on Next Gen Human Resource Help Desk User that will be enhanced with the new role created below.
- Enable ORA_ASE_SAS_INTEGRATION_ENABLED to allow permissions groups to be set.
- Go to Setup and Maintenance.
- Click the Tasks icon.
- Click Search.
- Search for Manage Administrator Profile Values.
- Click the resulting link.
- Enter the Profile Option Code ORA_ASE_SAS_INTEGRATION_ENABLED.
- Set the Profile Value to the value that enables the option.
- Click Save and Close.
- Click Done.
- Create a new Custom Role for your Employee AI User.
- Navigate to Tools -> Security Console.
- Under the Roles tab, click Create Role.
- Create a custom Role using the following recommended values:
Recommended Values for Custom Role
Field Recommended Value Role Name Help Desk Employee AI User Role Code HELP_DESK_EMPLOYEE_AI_USER Role Category Common-Abstract Roles Enable Permission Groups Yes Description Allows Help Desk Employee Users to use AI Assistance for Employee Self Service.
- Associate the Custom Role to your custom role for Help Desk Users (based on the default Next Gen Human Resource Help Desk User or Internal Help Desk User roles).
- Find and edit (or create) the custom role used for Employee users of Help Desk.
- Click Next until you've reached Roles and Permissions Groups.
- Click Add Role.
- Search for ORA_DR_SVC_GEN_AI_AGENT_HD_SELF_SERVICE.
- Select this role and click on Add Role.
- Click Next until you reach Users.
- If you have created a brand new custom role and would like to add the users who will be testing,
- Click Add User.
- Search for the username, and Add User to Role. If you are adding these new roles to an existing custom role, then you may skip this step. Click Cancel.
- Click Next.
- Click Submit and Close.
- Click OK.
- Click on the Administration Tab.
- Click on Role Status to see that your new Role has been updated and is Complete.
- Run the processes to update the Security Roles.
- Navigate to Tools -> Scheduled Processes.
- Run each of the Jobs listed below in sequential order, allowing the previous one to complete before continuing:
- Click Schedule New Process.
- Click the drop-down for the Name field and click Search...
- Search for and select the appropriate job to be run (in the order given).
- Import User and Role Application Security Data
- Send Pending LDAP Request
- Retrieve Latest LDAP Changes
- Click OK, OK.
- Click Submit.
- Copy the Process ID, and click OK.
- Monitor the progress.
- Expand the Search section.
- Enter the copied Process ID into the Process ID field and click Search.
(You may also want to clear out the Submission Time values if nothing is returned.) - Occasionally Refresh the process status until you see that it Succeeded (or failed).
(This job can take a long time. If it fails, please open an SR with Tech Support.)
- Return to Step 2 to run the next job, until all have been completed successfully.
Load Categories (if desired and not done previously)
The category and product are set automatically when the user logs a ticket only if they are present in RAG. If this has not yet been done, you can use an ingestion agent to upload the categories (or products):
- Navigate to Tools -> AI Agent Studio.
- Click on the Workflows tab on the left.
- Search for SR Product and Category Ingestion Assistant.
- Click the View (eye) icon to see the workflow for the assistant.
- Click the Debug button at the bottom of the page.
- Click on the Profile (lightening bolt) icon.
- Click Create new profile.
- Edit, providing the following values (to update categories):
- Name: Update HR Help Desk Categories
- Type: REST
- Parameters:
{

      "operation": "ingest",

      "entityType": "category",

      "objectType": "HRHelpDeskRequest",

      "query": "(StripeCd='ORA_SVC_HCM') and (CSSFlag = true) and (EnabledFlag = true) "

      }
- Click on the Back button.
- Now highlight the line for your newly created profile, Update HR Help Desk Categories.
- Click on the Play button at the bottom.
The Profile and parameters used can change to upload products, as well, and this ingestion agent can be used for both the InternalServiceRequest and HRHelpDeskRequest objects.
If you've already completed this in support of some other AI Agent (such as the Triage Agent), it doesn't have to be done again, if the products and categories have not changed.
Customize the AI Agent
Because of the name change, anyone wanting the latest version will need to do the following instructions, unless otherwise noted.
- Navigate to Tools -> AI Agent Studio.
- Use the search bar to find the "Employee Help Desk Self Service Assistant" agent.
- Copy the AI Assistant.
- Click Copy Template on the Employee Help Desk Self Service Assistant.
- Enter HD (for Help Desk) for the Agent Team Suffix.
- Click Continue.
- Click Publish.
- Click on the Agent Teams tab at the bottom of the AI Agent Studio.
- Click on the Published button on the right hand side of the page.
- Use the search bar to find the new copy of the AI Agent that you just created.
- Note the Agent Team Code for future reference. It is likely EMPLOYEE_HELP_DESK_SELF_SERVICE_ASSISTANT_HD.
- Now click on the Pencil icon to edit the AI Agent.
- Click on the Agent Teams Settings wheel on the top left-hand side.
- In the pop-up, click the Security sub-tab.
- Click Add.
- For the Role, select the Help Desk User role(s) being used.
- Click Apply.
- Click Update.
- In the first node of the AI agent, setAgentCodes, click on the dots and choose to Edit.
- Set the workflowCodes by editing the variable agentcodes to include any AI Agents that should be used for responding to the employee.
- IMPORTANT: Agents defined for use MUST have proper description, since that description is used by the Employee Self Service Assistant to pick the appropriate agent(s) to resolve the user query.
- Note: You can generally find employee-facing AI Agents by searching for published agents by searching for "employee" or "worker."
-
Remove the registered AI Agents previously included on the Team (only applicable if you are currently using Employee SelfService Assistant which was deprecated in 26B)
- Navigate to Configuration -> Visual Builder.
- Under App UIs, navigate to Customer Experience (CX) -> Help Desk -> helpdesk -> employee.
- Under the Variables tab, select the Constant ESSRoutingAgentCodes.
- Click on the Function Editor.
- In the Expression Editor, remove all values.
- Click Save.
- Publish your changes after all other steps are complete.
- Click Apply.
- Click Update.
- Publish the AI Agent.
Configure the Profile Option to indicate the AI Agent team to be used
- Go to Setup and Maintenance.
- Click on the Tasks icon.
- Click Search.
- Search for Manage Administrator Profile Values.
- Click the resulting link.
- Enter the Profile Option Code ORA_SVC_HELP_DESK_SUPERVISOR_AGENT_TEAM_CODE.
- Enter the Site Profile Value to be the Agent Team Code that you created in the setup section Customize the AI Agent. This is likely EMPLOYEE_HELP_DESK_SELF_SERVICE_ASSISTANT_HD.
- Click Save and Close.
- Click Done.
Once you log out and back in, you should be able to test your changes.
Key resources
A demo of this new functionality is found at: Help Desk - Oracle Video Hub
To learn more about AI Agent Studio, consider these resources:
- Load Contextual Data (documentation)
- Oracle AI for Fusion Applications (documentation)
- Introduction to AI Agents in Oracle Cloud HCM and SCM (recorded presentation, account required)
- Oracle AI Agent Studio for Fusion Applications Foundations Associate (training and certification, account required)
Access requirements
All Help Desk Users must use a custom role that includes the Service Gen AI User and Help Desk Employee AI User roles.
For AI Agent Studio access, refer to Access Requirements for AI Agent Studio.