Add Links to External Documents and Systems from Help Desk Requests
Help Desk human agents can now create and manage external links from a help desk request, making related information in other systems available directly from the help desk request. Links can point to URL-accessible resources such as Jira issues, Confluence pages, SharePoint or Google documents and folders, Oracle Fusion pages, NetSuite records, or other enterprise systems.
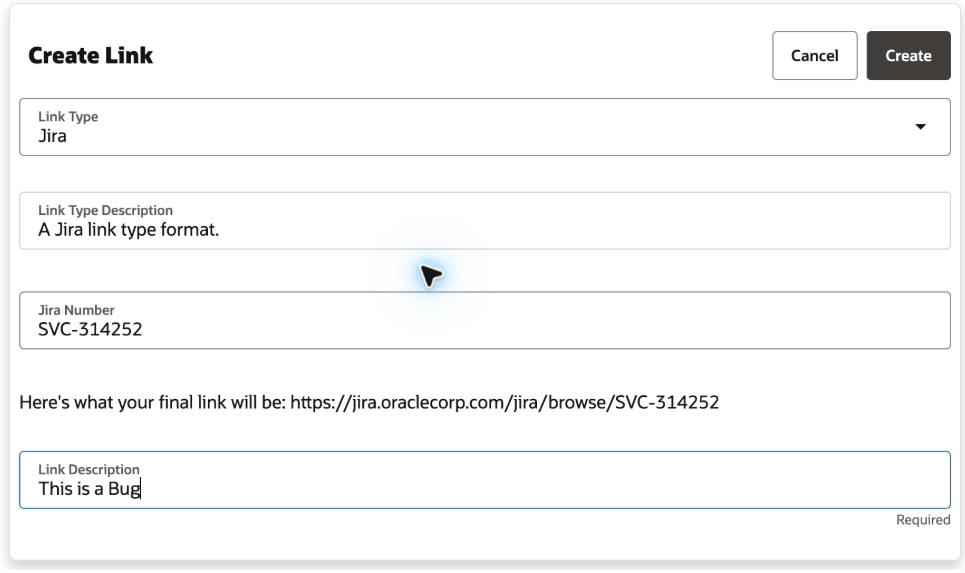
Screenshot of Create Link interface
Employees with the appropriate privileges (see 'Access Requirements' below) can create and access links in the following ways.
1. Open a Help Desk request.
2. Use the smart action, Create Links, to create an external link.
3. Choose the link type.
4. Enter the token value, if required by the selected link type (for instance Jira Number or Document ID).
5. Enter a description that helps users understand the purpose of the link.
6. Save the link.
Administrators can define link types that standardize how links are created. A link type can use a complete URL or a URL format with a token, so agents only need to provide the required value, such as a Jira issue number or document ID. Agents can then create links from the Help Desk request using the external links smart action and view existing links from the request details page.
External links reduce navigation time and helps keep related work, documents, and third-party system records connected to the request without duplicating external content or storing external data in the help desk request. Administrators can also configure link types for the systems their organization uses most often, giving agents a consistent way to connect requests to related resources.
Steps to enable and configure
Review delivered link types
Review the link types available in your environment before creating additional link types. Delivered link types can include common destinations such as Jira, Basic Link, Google Document, Google Directory, SharePoint Document, and Oracle Fusion.
Create a new link type
- Log on as a Help Desk Administrator.
- Under the Navigator, under the Service section, choose Service Center Administration -> Service General Setup -> Manage Reference Links. If you don't have access to the Service section, you can also go directly to the link at:
http://[yourEnvironment]/fscm/UI/redwood/service/ec/admin/svc-link-types - Click the Create button to create a new link type.
- Enter a Link Type Name and Link Type Description.
- Enter the URL for the Link Type Format. If the link format requires a token value, add this by enclosing the token name in braces, such as `{Jira Number}`.
- Click Create to save the link type.
- Test the link type by creating a link from a Help Desk request using the Create Link SmartAction.
For example, an administrator can create a Jira link type with this format:
https://jira.example.com/browse/{Jira Number}
When an agent selects that link type, the agent enters the Jira number, and the application creates the full link.
Enable the SmartAction
- Create or enter a Sandbox that has Application Composer as a chosen tool by going to Navigator -> Tools -> Sandboxes.
- From the Tools drop-down choose Application Composer.
- Click on the Smart Actions link.
- Type "Create Link" and Enter to search.
- Change the value for Enabled to Yes for the Smart Action "Create Links" for HR Help Desk Request.
- Close the Tab and return focus to the Application Composer.
- Under the Sandbox Mode drop-down, choose Preview as if Published.
- Click Yes to continue to enter the preview mode.
- Navigate to Help Desk -> Help Desk Requests.
- Navigate to Help Desk Request.
- In the Action Bar, type Create Links to make certain the option is shown in the list.
- Add a link.
- Return to Edit Mode in Application Composer.
- Publish the Sandbox.
Tips and considerations
Users:
- You cannot create duplicate links for the same object and link value.
- Links must be fully qualified URLs or network paths. Relative paths aren't supported.
- Links open in a new browser tab or window. The target system controls its own authentication and authorization.
- External links are one-way references from the help desk request to a web destination. They aren't Fusion object relationships and do not create a reverse relationship in the target system.
- All required tokens in a link type must have values when a link is created or updated. Extra token values are accepted but aren't used by the link format.
Administrators:
- Link types already used by links can't be deleted.
- The stored link format and link value each have a 2000-character limit. The final runtime URL can be longer after token substitution.
Key resources
Developers or administrators can also use the svcLinks and svcLinkTypes svcLinkTypes REST resources to create, update, view, and delete links and link types:
-
/crmRestApi/resources/11.13.18.05/svcLinks
-
/crmRestApi/resources/11.13.18.05/svcLinkTypes
Common REST queries include:
-
/crmRestApi/resources/latest/svcLinks?q=LinkTypeCd=JIRA
-
/crmRestApi/resources/latest/svcLinks?q=ObjectReferenceNumber=<HELP_DESK_NUMBER>
Access requirements
Administrators who configure service link types need the **Setup Service Link Types** privilege, `SVC_SETUP_LINKS_PRIV`.
Users who work with links on Help Desk requests need these privileges, depending on the actions they perform:
- View Service Link, `SVC_VIEW_LINK_PRIV`, to view service links.
- Create or Update Service Link, `SVC_CREATE_LINK_PRIV`, to create or update service links.
- Delete Service Link, `SVC_DELETE_LINK_PRIV`, to delete service links.
The delivered Help Desk administration roles include privileges to create, view, update, delete, and set up service links.
Delivered Help Desk request management and analysis roles include the privileges needed to create, view, update, and delete service links. If your organization uses custom roles, review those roles and add the required service link privileges as needed.