Manage My Web Conference
Here's how you can edit and delete web conference appointments. For example, you might want to add or remove participants, change the scheduled date and time, or modify the meeting contents.
Edit Web Conference Details
Here’s how to edit the details of a pending web conference meeting.
- From the Activities page, select the meeting that you want to update.
- Click Actions > Edit (the Actions menu is the icon with the three
vertical dots).
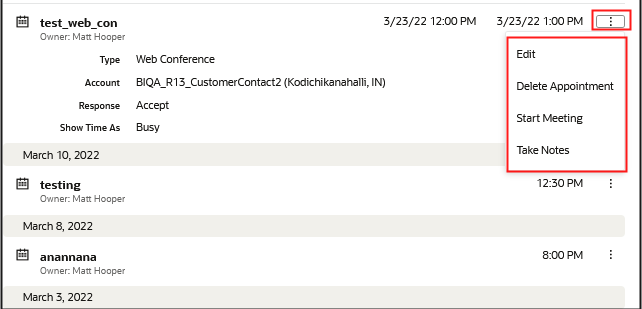
- Make your changes and click Save when done.
Only changes to the appointment owner, time, and subject are updated on the corresponding web conference meeting.
Add or Remove Web Conference Participants
When you create a web conference type appointment, the Primary email address is used for both contacts and resources (sales team members). You can add additional contacts and resources when initially creating your web conference or you can add or remove them from your pending web conference. You can also change a contact and mark a different contact as a primary contact. Likewise, you can add resources to the web conference and mark as owner.
Here are the steps to add or remove participants to your web conference.
- From the Activities page, select the web conference appointment that you want to modify.
- Click Actions > Edit and expand the Appointment Details section.
- From the Contact – Actions menu (the Contact-Actions menu is the icon
with the three horizontal dots), you can select from the following contact
lists:
- All Contacts
- My Business Contacts
- My Contacts
- Primary contact of the Lead, Opportunity, Account, or the Contact's primary email address
- Owner of the Lead, Opportunity, Account, or Contact if different from the signed in user
- Select additional contacts that you want to participate in or remove from the web conference. You can also choose to mark a contact as your primary contact.
- Next, select any additional resources that you want to include, remove, or change.
- Click Save.
If you have enabled the setting to send a meeting invite via email, the web conference meeting URL link and invite details are sent to all invitees. You can add invitees (participants) while scheduling a web conference meeting. You can also invite additional participants while the meeting is ongoing.
Delete a Web Conference
You can delete a web conference appointment that hasn't yet started. You can also delete a web conference meeting that has already started but a warning dialog is display for you to confirm that you want to delete the appointment.
- From the Activities page, select the web conference meeting that you want to delete.
- Click Actions > Delete Appointment to remove the corresponding web conference meeting.
Start a Web Conference
If you have access to the Account, you can view all feed items (pending, ongoing, or completed meetings) and can both start or join a web conference. Here’s how.
- Locate and select the Web Conference appointment in the Activities page.
- Click Actions > Start Meeting to start the corresponding web conference meeting.
Once the meeting host has started the meeting, anyone who has access to the web conference appointment record can click Join to attend the web conference.
Add Notes During an Ongoing Web Conference
The user hosting the meeting or any participant who has joined a meeting can add notes such as meeting minutes to the web conferencing meeting or add action items while the meeting is in progress.
Here’s how.
- Locate and select the Web Conference appointment in the Activities page.
- Click Take Notes and a communications panel as shown opens to the right of your
screen. Note: The communications panel lets you and other participants take notes about the on-going web conference. The panel remains in place while you continue to perform other tasks and remains open after your web conference ends.

Once other participants join, they can also add notes so ensure that you click Save after entering some notes periodically. Click Refresh to ensure you're viewing or editing the latest version of the meeting notes.
Invite Participants
Once you have started the meeting for all participants, you can invite additional participants while the meeting is ongoing.
- From the communications panel, click the Actions menu (3 horizontal dots icon) and select Invite Participants
- Add the participants you want to invite to the ongoing web conference as
follows:
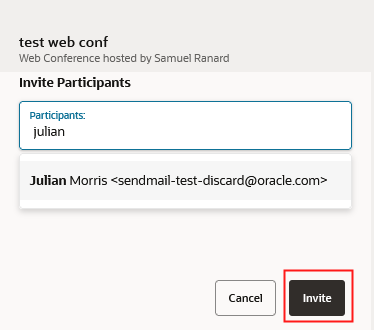
- Click Invite.
Wrap Up a Web Conference
Here are the steps to wrap up and give an outcome of your web conference.
- Insert the final comments agreed at the meeting in the communications panel.
- Select an outcome from the Outcome drop-down list. You can select
from one of the following outcomes:
- Left message
- Positive outcome
- Provided information
- Answered question
- Call answered
- Known issue
- Documentation issue
- At risk
- Click Save.
- Click Mark as Closed to set the interaction status to closed.Note: You can click Close to dismiss the communications panel at any stage. You can reinstate the panel by expanding an ongoing communications panel or performing the Take Notes or Start Meeting actions.