Make Values of a DCL Field Dependent on the Values of Another Field
You can create a field, such as a dynamic choice list field (DCL), that displays different values depending on the values of a different field. In this example, we'll create a DCL field for the Create Contact page that shows addresses for the account associated with the contact. Salespeople can use the field to select an address for the contact from the available account addresses.
Create the Dynamic Choice List Field
- Open Application Composer in a sandbox.
- In the left panel, make sure that CRM Cloud is selected in the Application field.
- Expand the Contact standard object.
- Click Fields.
- In the Fields page, click .
- Select the Choice List (Dynamic) option.
- In the Create Dynamic Choice List: Basic Information page, enter the
following:
Field Sample Entry Explanation Display Label Bill-To Address The label users see in the UI. Display Width 40 Width of the box displaying the address elements. Name BillToAddress Unique internal name. - Leave the Constraints with the default selected values.
- Click Next.
- On the List of Values page, make these entries:
Field Sample Entry Explanation Related Object Address The source of the values. List Selection Display Value Country You can select any of the values as these aren't used for this use case. - You can leave the other sections blank.
- Click Submit.
Specify the DCL Field Behavior and Add It to the Layout
- Open Visual Builder Studio.
- Click the Layouts tab.
On the Layouts tab, click .
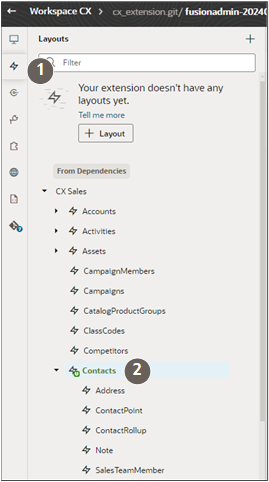
Click .
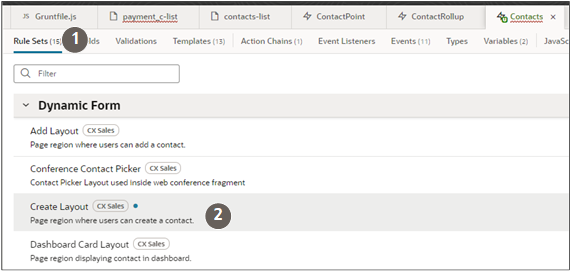
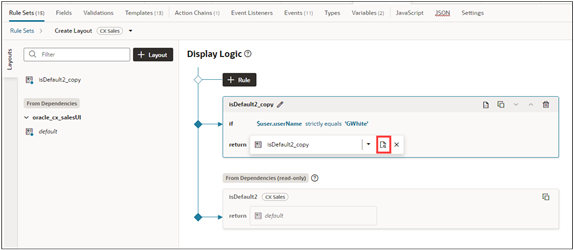
- Duplicate the default rule with the Also create a copy of the layout option selected.
- Add a rule condition to the new rule.
Click Open on the new layout rule to open the layout copy.
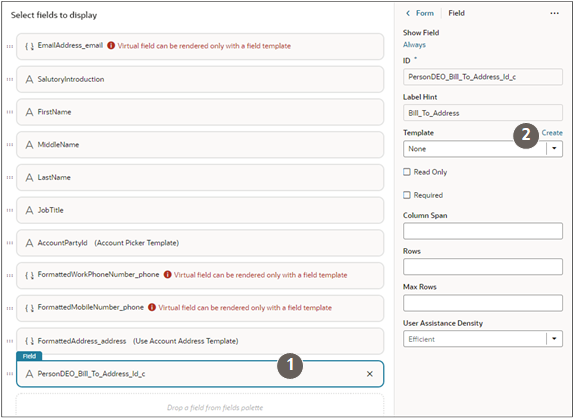
- Find the PersonDEO_Bill_To_Address_id_c (Bill-to Address) field and add it to the layout (highlighted by callout 1 in the following screenshot)
-
Create a variable for the field template:
-
Still in the Contact layout tab, click Variables
- Click Create Variables (callout 1 in the following screenshot).
- Enter a variable ID, such as billToAddresses.
- For Type, select Any.
-
-
Create a field template that you'll need for the layout:
- Click the Rule Sets tab.
Click Create for the Template field (callout 2) in the Field (right-hand) pane.
- In the Create Template window, enter a name with no spaces, such as billToAddressTemplate and leave the Enable Extension option selected.
- Click Create.
- Click the Code option
-
Here's sample code to enter:
<template id="billToAddress">
  <oj-select-single label-hint="billToAddressID" data="[[$variables.billToAddresses]]" value="{{$value}}"></oj-select-single>
</template>
-
Create an action chain that does the following:
- Check if the updated field in the record is the account Party ID.
- If the account Party ID is updated, then store that Party ID in the constant accountPartyNumber
- Create a REST call that returns all of the addresses for that Party ID
- Store the returned addresses (FormattedAddresses) in an array.
- Assign the values in the array to the variable billToAddresses which will be part of the Create Contact UI.
On the Contacts tab, click Action Chains.
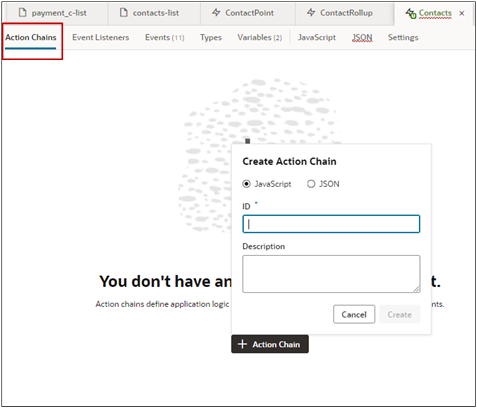
- Click Create Action Chain (+Action Chain).
- In the Create Action Chain window, leave the Java Script option selected and enter any name as an ID, in this example: GetAddresses.
- Click Create.
- Switch to the Code view and enter the code:
-
Here's a sample:
define([
  'vb/action/actionChain',
  'vb/action/actions',
  'vb/action/actionUtils',
  'ojs/ojarraydataprovider',
  ], (
  ActionChain,
  Actions,
  ActionUtils,
  ArrayDataProvider
) => {
  'use strict';
  class test extends ActionChain {
    /**
     * @param {Object} context
     * @param {Object} params
     * @param {{row:object,related:object[],fieldsToShow:string[]}} params.previous
     * @param {{row:object,previousRow:object,modifiedField:string,pickedRowsData:object,parentRow:object,mode:string}} params.event
     * @return {{row:object,related:object[],fieldsToShow:string[]}}
     */
    async run(context, { previous, event }) {
      const { $layout, $extension, $responsive, $user } = context;
      if (event.modifiedField === 'AccountPartyId') {
        const accountPartyNumber = event.pickedRowsData ['accounts.AccountPartyId'];
        const addressesResponse = await Actions.callRest(context, {
        endpoint: 'oracle_cx_salesUI:cx/getall_accounts-Address',
        uriParams:{
           'accounts_Id': accountPartyNumber.PartyNumber,
        },
        });
       if (addressesResponse.ok){
       const billToAddresses = addressesResponse.body.items.map((address)=> {return {label:address.FormattedAddress,value:address.FormattedAddress}});
             $layout.variables.billToAddresses = new ArrayDataProvider(billToAddresses,{keyattributes:"value"});
       }
      }
      if (event.modifiedField === 'PersonDEO_BillToAddress_Id_c'){
       debugger;
      }
    return previous;
    }
  }
  return test;
});
-
Create an event listener for the field template:
- Click the Event Listeners tab.
- Click the Create Listener button (+Event Listener).
- In the Create Event Listener page, select ContactsOnFieldValueChangeEvent.
- Click Next
- Select the action chain you just created. In this example, GetAddresses.
- Click Finish.
-
Test your field:
Click the Preview button to test your newly-created field.

- On the Contacts list page, enter Create Contact in the Action Bar.
- Select an account that includes a number of addresses.
- Click in the Bill-To-Address field to select an address.