Change Navigation to Pages in Your Sales Application
Using the Dispatcher feature in Application Composer, you can change which page opens when a salesperson clicks on a record name link on pages in both standard and custom objects. You can redirect links on the list pages, detail pages, and the edit/create pages. The redirected link can open standard or custom pages and subviews. You can specify different destinations for different job roles.
Clicking the opportunity name link on the opportunity list page, for example, normally opens the opportunity detail page, which provides an overview of key activities, contacts, products, and other information. Getting to what a customer is interested in purchasing requires an extra click. If salespeople are more interested in what the customer is buying than in a general overview, then you can open the subview that lists the opportunity products and revenue directly, saving that extra click.
If you created a simple custom object, you can even skip the detail page altogether and open the edit page instead.
How Dispatcher Works
Using the Dispatcher, you can create a set of rules that can open different pages for different job roles. Each dispatcher rule replaces the URLs pointing to the same location. Dispatcher doesn't identify individual links on the page. If a page includes multiple links that go to the same destination, all are replaced. You can even redirect a URL in all the pages in the application to a new destination with one rule.
- Rule Details, where you specify if the rule applies to everyone in the organization or to specific job roles.
-
Navigation Details, where you enter the scope of the redirection rule and both the old and the new destination.
- Overlapping Rules, where you specify the order in which to process any overlapping rules.
- Review and submit.
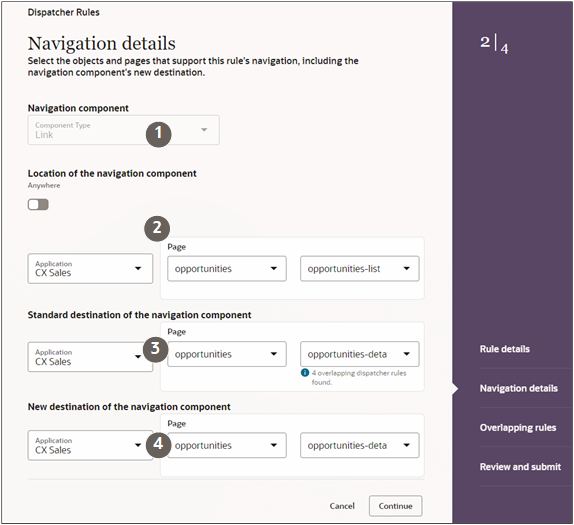
What you enter in the Navigation Details step is key, so here's an overview of the 5 sections in this step. You must scroll down to see the last section. Detailed instructions for creating rules follow.
| Section | Description |
|---|---|
| Navigation Component (1) | In this release, you can redirect only links from the object name link. |
| Location of the Navigation Component (2) | The scope of the links you want to redirect. You can redirect the links in all the pages of the Sales application, in a specific object, or narrow the scope to a specific page. |
| Standard Destination of the Navigation Component (3) |
The current destination for the link you're redirecting. You can redirect the links on the list page, the detail page, the edit page, and the create page. Note: Using Dispatcher, you can't redirect
links in subviews.
|
| New Destination of the Navigation Component (4) | The new destination page for the link. Subviews are part of the
detail page. So, if you're redirecting the link to a subview, you select the detail page. |
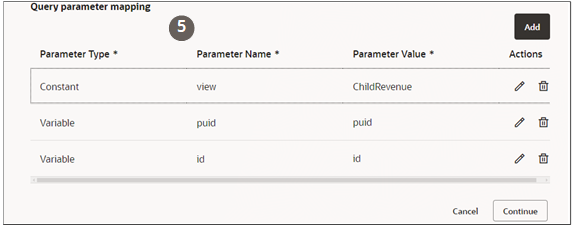
| Query Parameter Mapping (5) |
If you're redirecting a link to a subview, then you identify the subview by adding a constant with a value that you obtain from the subview URL. If you're redirecting to an edit page, you add the constant: mode = edit. The variables are standard for all standard objects and custom objects created by the CX Extension Generator. |
Example Entries for Redirecting Opportunity List Page Links to the Product Revenue Page
Here's what to enter in the Navigation Details step sections to redirect the opportunity name links on the opportunity list page to the Products subview.
-
Location of Navigation Component
You're restricting the redirection to the links on the opportunity List page, so make these entries:
Field Entry Application CX Sales Page opportunities 2nd Page field opportunities-list -
Standard Destination of the Navigation Component
Normally, the application opens the detail page when users click the opportunity name on the List page.
Field Entry Application CX Sales Page opportunities 2nd Page field opportunities-detail -
New Destination of the Navigation Component
You're redirecting the navigation to a subview of the detail page, so your entries are the same as for the standard destination. Subviews are part of the detail page.
Field Entry Application CX Sales Page opportunities 2nd Page field opportunities-detail -
Query Parameter Mapping
To redirect to the Product subview, you add a constant with the value of ChildRevenue:
Field Entry Parameter Type Constant Parameter Name view Parameter Value ChildRevenue
Steps to Create and Activate Dispatcher Rules
- Open Application Composer outside a sandbox.
- Click Dispatcher.
- On the Dispatcher page, click Create.
- In the Rule Details page, enter a name for the rule.
- In the Rule Conditions section, specify the audience for
the rule. You have two options:
- Make the rule apply to the all job roles in the organization by turning on Apply Rule Globally.
- Apply the rule to specific job roles you enter in the Role Filter field.
-
Click Continue to move to the Navigation Details step.
- In the Location of the Navigation Component section,
specify the scope of the rule:
- To have the link redirected on all pages, turn on Anywhere.
-
Narrow the scope of the redirection to an object and page:
- In the Application field, select either CX Sales for standard pages, or CX Custom.
-
In the Page fields, make these selections:
- In the first Page field, select the object.
-
In the 2nd Page field, specify the page type:
Available Values Description any Redirects links on all pages for the object. list Redirects links on the list page. edit Redirects links on the edit and create pages.
detail Redirects links on the detail page.
-
In the Standard Destination of the Navigation Component section, enter the current navigation destination. Your entries identify the URL to be replaced.
-
In the first Page field, select the object.
-
In the 2nd Page field, select the page.
Available Values Description detail The detail page (called the Overview page at runtime). edit The edit/view page. list The list page.
-
-
In the New Destination of the Navigation Component section, enter the new navigation destination.
-
In the first Page field, select the object.
-
In the 2nd Page field, select the page.
Available Values Description detail Redirects to the detail page or subview. edit Redirects to the edit or the create page.
If you're redirecting to the edit page, then you must also add the constant mode = edit in the Query Parameter Mapping section.
If you don't add a constant, the user is redirected to the Create page.
list Select to redirect to the list page.
-
If you're redirecting the link to a subview or to the edit page, then you must add a constant in the Query Parameter Mapping section:
- Click Add.
-
If you're redirecting to the edit page, then make the following entries:
Field Entry Parameter Type Constant Parameter Name mode Parameter Value edit -
If you're redirecting to a subview, then enter the following:
Field Entry Parameter Type Constant Parameter Name view Parameter Value Enter the last part of the subview URL following view=.Here's an example of a URL for the Products subview on an opportunity:
https://<domain>/fscmUI/redwood/cx-sales/application/container/opportunities/opportunities-detail?id=300000009863286&puid=39003&view=ChildRevenue
Note: For standard subviews and subviews generated by the CX Extension Generator, the application automatically adds 2 parameters: the variables puid and id. These parameters are required.Here's a screenshot of the Query Parameter Mapping section
Callout Description 1 The Add button. 2 Constant entry. 3 The 2 required variables are included automatically. 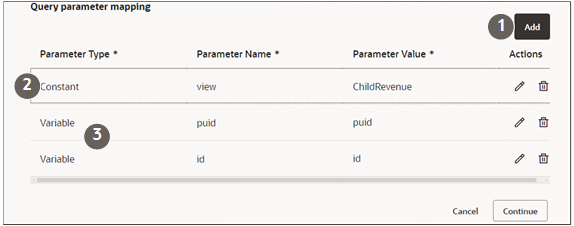
- Click Continue to move to the Overlapping Rules step.
-
Review the order of any rules with overlapping functionality and specify the order of priority by dragging them into position using the handles on each row. The rule at the top gets executed first.
- Click Continue to move to the Review and Submit step.
- Click Submit.
- On the Dispatcher list page, select .