How do I update employee information using import management?
You can update a resource by changing the resource information such as first name, last name, and email address. You can also update a resource with additional information such as fax number, phone number, middle name, and so on.
How to update the last name of a resource?
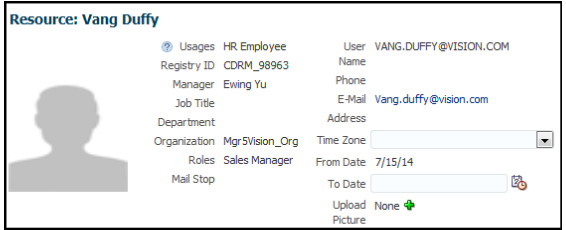
Vang Duffy is a Sales Manager in Sales and Fusion Service. You can view the resource details of Vang Duffy from the Resource Directory. From the Navigator, click Resource Directory and search for Vang Duffy in the Search section, his resource details appears as shown in this image.

The reporting hierarchy and organization details of Vang Duffy are as follows:

In this scenario, Vang Duffy changes his name to Vang Smith. To update Vang's last name, you must use the Resource Party Number and Last Name attributes in your source file. To update Vang's last name from Duffy to Smith, create a source file (CSV) with these attributes and import it using import management.
|
Attribute Name |
Value |
|---|---|
|
ResourcePartyNumber |
|
|
LastName |
Smith |
You can import the source data file.
-
Go to .
-
Click Create Import Activity in the Manage Imports page.
-
In the Enter Import Options page, provide a name for the import activity, and select Resource from the Object drop-down list.
-
Select the CSV file in the File Name field, and click Next.
-
The source and target attributes are automatically mapped in the Map Fields page. Review and edit the mappings if required.
-
Check the file for unmapped columns or data format issues by clicking Validate Data. Click Next.
Note:Validation errors, if any, are displayed on the Mapping Validation screen. If you get warnings about unmapped columns, then you can ignore these columns and proceed to submit the import job. Validations are for informational purposes and applicable only for low-volume imports.
-
Review the import details on the Review and Submit page, and click Submit when you're ready.
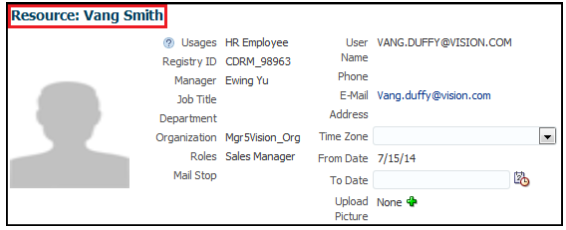
After running the import file, navigate to Resource Directory and search for Vang in the Search section. The resource details of Vang after the last name is updated appear as shown in this image:

Also, note that Vang's last name is updated in the reporting hierarchy.

How to update the email address of a resource?
Rina Nash is a Sales Representative in Sales and Fusion Service. You can view the resource details of Rina Nash from the Resource Directory. From the Navigator, click Resource Directory and search for Rina Nash in the Search section. Rina's resource details are displayed.
In this scenario, Rina Nash changes her name to Rina Pinto Jacob after marriage. Rina not only wants to change her last name, but also wants to update her email ID and middle name.
To update Rina's last name, email address, and middle name, you must create a source file (CSV) with these attributes and import it using import management. However, in this scenario, to update Rina's email ID, you must provide the email address in your CSV file.
|
Attribute Name |
Value |
|---|---|
|
ResourcePartyNumber |
|
|
ResourceEmail |
|
You can import the source data file.
-
Go to .
-
Click Create Import Activity in the Manage Imports page.
-
In the Enter Import Options page, provide a name for the import activity, and select Resource from the Object drop-down list.
-
Select the CSV file in the File Name field, and click Next.
-
The source and target attributes are automatically mapped in the Map Fields page. Review and edit the mappings if required.
-
Check the file for unmapped columns or data format issues by clicking Validate Data. Click Next.
Note:Validation errors, if any, are displayed on the Mapping Validation screen. If you get warnings about unmapped columns, then you can ignore these columns and proceed to submit the import job. Validations are for informational purposes and applicable only for low-volume imports.
-
Review the import details on the Review and Submit page, and click Submit when you're ready.
-
Navigate to Resource Directory and search for Rina in the Search section.
Rina's email address will be updated and visible in the resource pages, such as the resource directory.
How to update the phone number of a resource?
Rina Nash is a Sales Representative in Sales and Fusion Service. You can view the resource details of Rina Nash from the Resource Directory. From the Navigator, click Resource Directory and search for Rina Nash in the Search section. Rina's resource details are displayed.
In this scenario, Rina Nash changes her name to Rina Pinto Jacob after marriage. Rina not only wants to change her last name, but also wants to update her work phone number and middle name.
To update Rina's last name, work phone number, and middle name, you must create a source file (CSV) with these attributes and import it using import management. However, in this scenario, to update Rina's phone number, you must provide the work phone country code and work phone number in your CSV file.
|
Attribute Name |
Value |
|---|---|
|
ResourcePartyNumber |
|
|
WorkPhoneCountryCode |
+1 |
|
RawWorkPhoneNumber |
510-599-7487 |
You can import the source data file.
-
Go to .
-
Click Create Import Activity in the Manage Imports page.
-
In the Enter Import Options page, provide a name for the import activity, and select Resource from the Object drop-down list.
-
Select the CSV file in the File Name field, and click Next.
-
The source and target attributes are automatically mapped in the Map Fields page. Review and edit the mappings if required.
-
Check the file for unmapped columns or data format issues by clicking Validate Data. Click Next.
Note:Validation errors, if any, are displayed on the Mapping Validation screen. If you get warnings about unmapped columns, then you can ignore these columns and proceed to submit the import job. Validations are for informational purposes and applicable only for low-volume imports.
-
Review the import details on the Review and Submit page, and click Submit when you're ready.
-
Navigate to Resource Directory and search for Rina in the Search section.
Rina's email address is updated and visible in the resource pages, such as the resource directory.