Add a List to the Redwood Sales Dashboard

On the Sales Dashboard, data can be rendered in a list format. You can add a new list to the Sales Dashboard using one of the predefined lists available for use. Or, add a new list that pulls its data from a custom saved search. This topic illustrates a simple example.

What Lists Can You Add?

The below list components are already available for the Sales Dashboard. You can add these components to any custom Sales Dashboard layout, as needed.

  • My Appointments saved search list

  • My Favorite Opportunities saved search list

  • My List

  • My Open Leads saved search list

  • My Open Opportunities saved search list

  • My Open Tasks saved search list

  • My Overdue Tasks saved search list

  • My Team's Open Leads saved search list

  • My Team's Open Tasks saved search list

  • My Team's Overdue Tasks saved search list

If none of these lists meet your needs, then you can also define a custom saved search and then add it as a new list to the Sales Dashboard.

Prerequisites

  1. Create the custom saved search and share it with the job roles who view the dashboard. Create Saved Searches for the Sales Organization.

  2. Capture the UUID of the saved search. You'll use the UUID when adding the table to the Sales Dashboard in Visual Builder Studio.

    For details see the topic How can I find the UUID for a saved search in Sales in the Redwood User Experience?

  3. Duplicate a Sales Dashboard layout so that you can modify it.

    See Configure Redwood Sales Dashboard Layouts.

Display the Custom Saved Search as a List in the Sales Dashboard

Let's add a list to a dashboard layout for a sales representative.

Before you start, duplicate the Sales Representative - My ToDo's Content dashboard layout as described in Configure Redwood Sales Dashboard Layouts so that you have a layout that's ready to modify. Once that's done, move on to these steps:

  1. On the Properties pane for the Sales Representative - My ToDo's Content (Copy) layout, click the + Add Section icon > + New Section.

    This screenshot illustrates how to add a component to a layout.

  2. In the Create Section dialog, in the Title field, enter My Team's Open Tasks, and click OK.

    Note: The title is the name of the component, not how the component will appear at runtime on the dashboard. The runtime title comes from the panel component that you add to the dashboard.

    The newly added section is added to the bottom of the layout. Use the Move Up arrow to move the new section to the desired location.

    This screenshot illustrates how to reposition a component in a dashboard layout.
  3. Click the My Team's Open Tasks link.

    The template editor opens.

  4. Click the Code button.

    This is a screenshot of the Code button.

    Your new My Team's Open Tasks section displays with empty placeholder template tags.

    This screenshot illustrates the empty template tags.

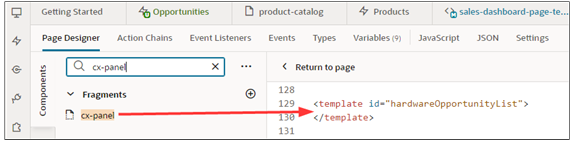
  5. On the Components palette, in the Filter field, enter cx-panel.

  6. Drag and drop the cx-panel fragment to the template editor, between the template tags.

    This screenshot illustrates how to drag a fragment to the template editor.

  7. Add the following parameters to the fragment code so that the code looks like the below sample:

    <template id="myTeamsOpenTasks">
      <oj-vb-fragment name="oracle_cx_fragmentsUI:cx-panel" class="oj-flex oracle-cx-fragmentsUI-cx-fragment-full-height" bridge="[[ vbBridge ]]">
          <oj-vb-fragment-param name="resource" value='[[ {"name": "activities", "primaryKey": "ActivityId", "puid": "ActivityNumber","endpoint": "cx" } ]]'></oj-vb-fragment-param>
          <oj-vb-fragment-param name="query" value='[[ [{"type": "savedSearch", "params": [{"key": "queryUuid", "value": "8168e14c-3e70-4357-afa4-b8617eaf23bb" }]},
                                                        {"type": "qbe", "params": [{"key": "RecordSet", "value": "RECORDS_SUBORDINATES_OWN" }]},
                                                        {"type": "qbe", "params": [{"key": "ActivityFunctionCode", "value": "TASK" }]},
                                                        {"type": "qbe", "params": [{"key": "StatusCode", "operator": "in", "value": ["NOT_STARTED","IN_PROGRESS","ON_HOLD"] }]},
                                                        {"type": "qbe", "params": [{"key": "DueDate", "operator": "gte", "value": "now/d" }]},
                                                        {"type": "qbe", "params": [{"key": "DueDate", "operator": "lte", "value": "now/d+30d" }]}] ]]'></oj-vb-fragment-param>
          <oj-vb-fragment-param name="sortCriteria" value='[[ [{"attribute": "DueDate","direction": "asc" }] ]]'> </oj-vb-fragment-param>
          <oj-vb-fragment-param name="style" value="[[ 'dashboard' ]]"></oj-vb-fragment-param>
          <oj-vb-fragment-param name="title" value="[[$page.translations.salesHubBundle['listofMyTeamsOpenTasks']]]"></oj-vb-fragment-param>
          <oj-vb-fragment-param name="panelCardLayoutId" value="[[ 'taskDashboardCardLayout' ]]"></oj-vb-fragment-param>
    </oj-vb-fragment>
    </template>

    In your fragment code, be sure to replace activites, ActivityId, and ActivityNumber with the appropriate values for your object name, primary key, and puid.

    Also, replace the queryUuid value with the saved search's UUID value. Review the values for the "query," "sortCriteria," and "title" parameters, and adjust as necessary.

    This table describes some of the parameters that you can provide for a list.

    Parameters for Dashboard List

    Parameter Name

    Description

    resource

    Specify resource details for the saved search, including object name, primary key, puid, and endpoint.

    query

    Include criteria for querying the data.

    sortCriteria

    Specify how to sort the data.

    title

    Specify the title of the table. This title displays on the dashboard at runtime.

  8. Test the modified dashboard layout by previewing your application extension.

    1. Click the Preview button to see your changes in your runtime test environment.

      This is a screenshot of the Preview button in Visual Builder Studio.
    2. The resulting preview link will be:

      https://<servername>/fscmUI/redwood/cx-sales/dashboards/sales-dashboard

    3. Change the preview link as follows:

      https://<servername>/fscmUI/redwood/cx-sales/application/container/dashboards/sales-dashboard
  9. Save your work by using the Push Git command.

    Navigate to the Git tab, review your changes, and do a Git push (which does both a commit and a push to the Git repository).

    This screenshot illustrates how to use the Push Git command.

Resource Details for Sales Objects

Here's a list of resource details for common Sales objects. Use the details below for the list fragment's "resource" parameter.

Resource Details for Sales Objects

Object

Resource Details

Account

[[ {"name": "accounts", "primaryKey": "PartyId", "puid": "PartyNumber", "endpoint": "cx" } ]]

Contact

[[ {"name": "contacts", "primaryKey": "PartyId", "puid": "PartyNumber", "endpoint": "cx" } ]]

Lead

[[ {"name": "leads", "primaryKey": "LeadId", "puid": "LeadNumber", "endpoint": "cx" } ]]

Opportunity

[[ {"name": "opportunities", "primaryKey": "OptyId", "puid": "OptyNumber", "endpoint": "cx" } ]]

Appointment

[[ {"name": "activities", "primaryKey": "ActivityId", "puid": "ActivityNumber", "endpoint": "cx" } ]]
Note: The distinction between a list of appointments vs. tasks is made via the filter in the underlying saved search.

Task

[[ {"name": "activities", "primaryKey": "ActivityId", "puid": "ActivityNumber", "endpoint": "cx" } ]]
Note: The distinction between a list of appointments vs. tasks is made via the filter in the underlying saved search.

Custom

[[ {"name": "Objectname_c", "primaryKey": "Id", "puid": "Id", "endpoint": "cx-custom" } ]]

Add a My List Component

In addition to adding lists, you can also add a My List component to the Sales Dashboard. The My List component includes data from all objects. For example, My List can include data from both opportunities and leads.

To add a My List component, the steps are the same as adding a list, but the fragment code is different. Add the following fragment code so that the code looks like the below sample. (The template name can be whatever you select.)

<template id="myList">
<oj-vb-fragment name="oracle_cx_fragmentsUI:cx-heterogeneous-list"
    class="oj-flex oracle-cx-fragmentsUI-cx-fragment-full-height" bridge="[[ vbBridge ]]">
    <oj-vb-fragment-param name="query" value="[[ [{type: 'qbe', params: [{key: '_userRelevantItems', value: true}]}]  ]]"></oj-vb-fragment-param>
    <oj-vb-fragment-param name="style" value="[[ 'dashboard' ]]"></oj-vb-fragment-param>
    <oj-vb-fragment-param name="title" value="[['My List']]"></oj-vb-fragment-param>    
    <oj-vb-fragment-param name="entities" value="[[ ['accounts','contacts','leads','opportunities'] ]]"></oj-vb-fragment-param>
</oj-vb-fragment>
</template>

In your fragment code, be sure to update the values in the "entities" and "title" parameters, as necessary.

Add a Revenue List Component

You can also add a revenue list to the Sales Dashboard.

To add a revenue list, the steps are the same as adding a list, but the fragment code is different. The fragment code includes a "child" parameter.

Add the following fragment code so that the code looks like the below sample. (The template name can be whatever you select.)

<template id="revenueList">
<oj-vb-fragment name="oracle_cx_fragmentsUI:cx-panel" class="oj-flex oracle-cx-fragmentsUI-cx-fragment-full-height" bridge="[[ vbBridge ]]">
    <oj-vb-fragment-param name="resource" value='[[ {"name": "opportunities", "primaryKey": "OptyId", "puid": "OptyNumber", "endpoint": "cx" } ]]'></oj-vb-fragment-param>
    <oj-vb-fragment-param name="child" value='[[ {"name": "ChildRevenue", "primaryKey": "RevnId"} ]]'></oj-vb-fragment-param>
    <oj-vb-fragment-param name="query" value='[[ [{"type": "savedSearch", "params": [{"key": "queryUuid", "value": "73b21b33-db08-4327-bf30-88c3c9e0f70d" }]}] ]]'></oj-vb-fragment-param>
    <oj-vb-fragment-param name="extensionId" value="{{ 'oracle_cx_salesUI' }}"></oj-vb-fragment-param>
    <oj-vb-fragment-param name="style" value="[[ 'dashboard' ]]"></oj-vb-fragment-param>
    <oj-vb-fragment-param name="title" value="[['Revenue']]"></oj-vb-fragment-param>    
    <oj-vb-fragment-param name="panelCardLayoutId" value="[[ 'dashboardCardLayout' ]]"></oj-vb-fragment-param>
  </oj-vb-fragment>
</template>

In your fragment code, be sure to replace the queryUuid value with the saved search's UUID value and update the "title" parameter.