Maintain Your Personal List of Saved Searches
While each business object has its own list of saved searches, you can designate only one saved search as your personal default.
This is the saved search that you see each time you open Workspace or the appropriate work area. Each business object comes with its own saved searches, which you can manage as described in the following steps.
The next section is for non-administrative users only. Only administrators can assign saved searches to different roles and assign default saved searches to different user roles. For more information, see the Saved Search Setup section in the Implementation Reference guide
Manage Your Personal List of Saved Searches
From the Workspace UI selector:
-
Select the business object.
From the same menu select Manage Saved Searches.
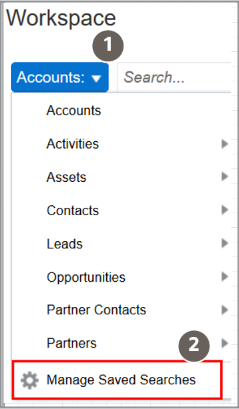
Here's a screenshot of the list of business objects that appears when you click the selector. The image highlights the Manage Saved Searches task, the last selection on the list.
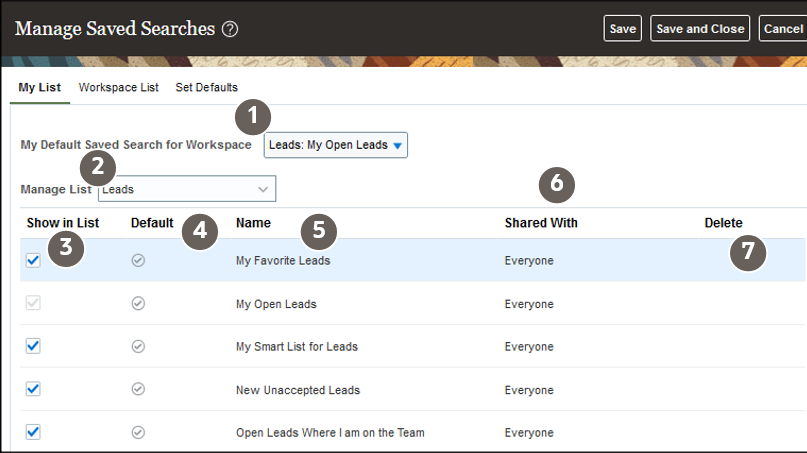
The following screenshot shows an example of the Manage Saved Searches window as seen by users. Here's a table that describes the columns highlighted in the screenshot by callouts.
Callout Number
Column Name
Description
1
My Default Saved Search for Workspace
This is your personal default saved search. You can keep the default saved search assigned by the administrator, or change the saved search to a different one contained in the drop-down list.
2
Manage List
The business object containing the saved searches you're managing. For example, by selecting Accounts for Manage List, saved searches based on the Account business object are displayed. You can quickly switch between saved searches across objects. Once a new object is selected, saved searches related to that object are immediately displayed.
3
Show in List
The saved search appears in the list of saved searches only when this option is selected. While you can't delete lists provided by Oracle, you can hide them by deselecting the Show in List option.
4
Default
Each salesperson can specify one saved search for each object as their personal default. You see the results of your personal default saved search when you open work areas powered by Adaptive Saved search, including those in CX Sales Mobile in the Redwood User Experience. The personal default saved searches don’t apply to the Workspace work area, as Workspace always opens to the default saved search you select in the My Default Saved Search for Workspace field.
5
Name
You can rename your own personal saved searches here. However you can't rename other saved searches, such as those created or assigned by an administrator.
6
Shared With
You can view but can't change the values here.
7
Delete
You can only delete your own personal saved searches. You can't delete saved searched provided by Oracle or an administrator.
-
Update the saved searches. You can:
-
Rename personal saved searches you created
-
Hide save searches from your personal list, by deselecting Show in List.
-
-
Click Save and Close when you're done.