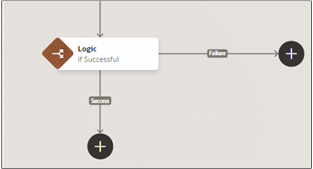
Add a Logic Node for Failure Paths

Add a logic node after a step to branch the orchestration to the failure path or to take it back to the main success path. For example, you can add a logic node to a call task, so that you can ask the salesperson to try again in a couple of days if they don't reach the customer the first time. You can then add a Logic node to the follow-up call task. If the second call is a success, you can take the salesperson back to the success path.

Important: For tasks, you can create a failure path only on those tasks that include a smart action that can be evaluated by the application. This includes all of the communications actions, including call and send email. You can't branch into a failure path for tasks that require the salesperson click the Completed button to complete the step or for tasks that show or update information, for example.
  1. Click Add on the step where you want to add the Logic node and select Logic.
  2. Click Add (round plus sign) on the horizontal failure path and add the basic information on the failure step.
    Portion of a diagram showing an added logic step.
  3. Unless you're adding the logic step between two steps, add the success step by clicking Add (round plus sign) below the logic step.
  4. On the Logic node, click the Actions menu (three dots) and select Edit Properties.
  5. Expand the Success Criteria section and enter success criteria if the step permits it. For example, you may consider the call appointment a success when the salesperson specifies Successful in the Outcome field..
    Important: You can't enter success criteria in the logic node unless you already added the success and failure steps.

    The Next Step on Success and Next Step on Failure fields display the names of the steps the logic node is linked to.

    Field Description
    Next Step on Success The next step that the orchestration displays of the success criteria are met or the salesperson clicked Completed. If you are working in the diagram, then the success step is already populated.
    Next Step on Failure The step that's activated when the current step doesn't meet the success criteria by the due date and any grace period.
  6. Manual steps (steps that require salespeople to take action) make it possible for you to:
    • Prevent salespeople from skipping a step by turning off Allow skipping this step option. Turning off this option removes the Skip button from the UI for the step.
    • Evaluate the success criteria you entered even when salespeople click the Completed button, by turning on the Evaluate success criteria when marked as completed option. If the criteria aren't met, then the orchestration goes to the next step on failure.
  7. Click Save.