Prerequisite Setups for Sales Products
Before you set up and use sales products, ensure that your environment has completed the prerequisite setups discussed in this topic.
Create a Location
You must create a location for your organization so that you can select it when you create the item organization. However, if you have already set up locations as part of your initial setup with another cloud service, then you don't need to perform this step.
-
Sign in as a setup user and go to the following in Setup and Maintenance:
-
Offering: Sales
-
Functional Area: Sales Catalog and Products
-
Show: All Tasks
-
Task: Manage Locations
-
-
Click Create.
-
In the Location Information region Name field, enter any name. For example,
HQ. -
Enter any combination of letters or numbers without spaces in the Code field. For example,
HQ. -
You don't need to change the other values.
-
Click Submit.
The application displays a warning informing you that the request will be submitted.
-
Click Yes.
-
Click OK to close the confirmation message.
Create Item Master and Ensure Setup of Location
Sales products functionality relies on the item master organization, the organization that holds the definitions of all products your company plans to sell. Therefore, before you can use products in your catalog, you must set up a location and then an item master organization.
For more information, see the related topics and these guides:
-
Oracle Applications Cloud Understanding Enterprise Structures guide
-
Oracle SCM Cloud Implementing Product Management guide
-
Oracle SCM Cloud Using Product Master Data Management guide
-
Sign in as a setup user and go to the following in Setup and Maintenance:
-
Offering: Sales
-
Functional Area: Sales Catalog and Products
-
Task: Manage Item Organizations
-
-
On the Manage Item Organizations page, click Create (the plus icon).
-
Enter any name in the Name field, for example,
Vision Item Master.You must select this name when setting the system profile option Sales Products Item Organization in a separate and related task. This name is visible only during setup.
-
In the Organization field, enter any combination of up to 18 uppercase letters and numbers, for example,
VISION.You must enter this name in the separate and related setup task: Manage Spoke Systems.
-
In the Name field in the Location region, click the down arrow and select Search from the list.
The Search and Select: Location Details window appears.
-
In the Name field, enter the name of the location you created.
-
Click Search.
-
Select the organization name and click OK.
-
On the Create Item Organization page, click Next.
-
On the Manage Item Organization Parameters page, make sure the organization name you entered (
Vision Item Master) is selected in the Item Master Organization list. This selection establishes the organization as the item master. -
In the Starting Revision field, enter a number. For example,
1. Again, your entry doesn't matter. -
Click Save and Close.
-
Click Done.
Ensure Setup of Units of Measure
Units of measure (UOMs) are standard definitions for product measurements; therefore, you must set up UOMs. If UOMs are already set up as part of your company's existing setups, then you can skip this step.
Setting up UOMs involves creating the larger UOM classes (or categories), as well as the UOMs themselves. For example:
-
If you're selling consulting services where you charge by the hour and minute, then you set up Time as the UOM class and Hour and Minute as UOMs.
-
If you're selling goods that are priced by the box and by the unit, you set up Quantity as the UOM class and Box and Each as the UOMs.
-
If you're selling and pricing goods by the meter, then you set up Dimension as the UOM class and Meter as the UOM.
-
Sign in as a setup user and go to the following in Setup and Maintenance:
-
Offering: Sales
-
Functional Area: Sales Catalog and Products
-
Task: Manage Units of Measure
-
-
Create the class for the unit of measure:
-
Click Manage UOM Classes.
-
On the Manage UOM Classes page, set up each class:
-
Click Add, (the plus sign icon in Search Results).
-
Enter the class code (no spaces permitted), class name, and optional description.
For example, for quantity, enter
QUANTITYas the Class Code,Quantityas the Class Name. -
Enter a code (three-character limit) and name for the smallest unit you're selling in the UOM Code and Base UOM Name fields.
For example, for the class Quantity, enter
Eaas the UOM Code andEachas the Base UOM Name.Salespeople use your entry in the name field for entering opportunity quantities.
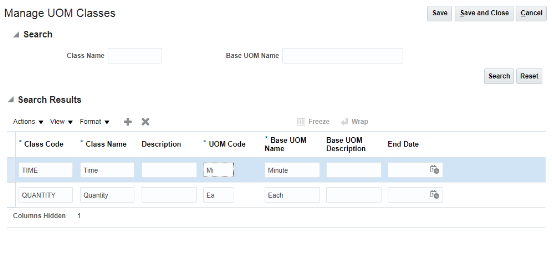
Here's a screen shot of the Manage UOM Classes page:
-
-
-
Click Save and Close.
-
You created the smallest unit of measure for each class. Now create any additional units of measure for each class:
-
On the Manage Units of Measure page, click Add, (the plus sign icon) in Search Results.
-
Enter the code (maximum of three characters) and the name of the unit of measure.
For example, if your smallest unit of measure for the class Time was Minute, then create Hour as another unit of measure if your organization charges by the hour.
-
Select a class from the Class Name list.
-
-
Click Save.
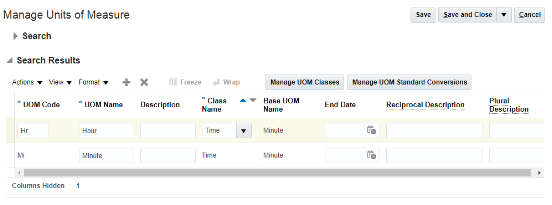
Here's a screen shot of the Units of Measure page with Hour and Minute units of time measure:
-
Click Manage UOM Standard Conversions.
-
On the Manage UOM Standard Conversions page, enter the conversions for each of the additional units of measure you created:
-
Enter the UOM name, for example,
Hour, and click Search. -
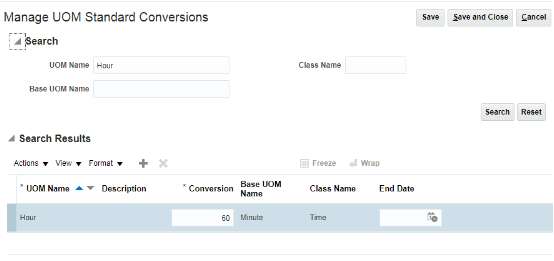
Enter the conversion. For Hour, enter
60to indicate there are 60 minutes in the hour.Here's a screen shot of the Manage UOM Standard Conversions page showing the conversion for the hour unit of measure.
-
-
After you enter all of the conversions, click Save and Close.
Specify the Item Master Organization for Sales Products
You must set the Sales Products Item Organization system profile option to the item master organization you just created.
-
Sign in as a setup user and go to the following in Setup and Maintenance::
-
Offering: Sales
-
Functional Area: Sales Foundation
-
Task: Manage Administrator Profile Values
-
-
In the Profile Display Name field, enter
Sales Products Item Organization. -
Click Search.
-
Click the name of the profile option in the search results.
-
In the Profile Value field, select the item master organization you created from the list.
-
Click Save and Close.
Identify the Item Master Organization as the Source of Import Data
You must specify the item organization as the default source of the import data using the Manage Spoke Systems task. Spoke systems (also called source systems) identify the source of import data.
-
Open the Manage Spoke Systems task from the implementation project. Alternatively, you can search for the task by name in the Setup and Maintenance work area. (You must use the side-panel search because the task isn't in the Sales offering.)
The Manage Spoke Systems page appears. You can ignore any error message you receive regarding read permissions.
-
In the Name column in the Search Results region, click the Product Information Management Data Hub link.
-
On the Edit Spoke System: Product Information Management Data Hub page, Import Options tab, select the item master organization name you created earlier from the Default Organization list. For example,
VISION.Here's a screen shot of the Edit Spoke System: Product Information Management Data Hub page highlighting the location of the Default Organization field: 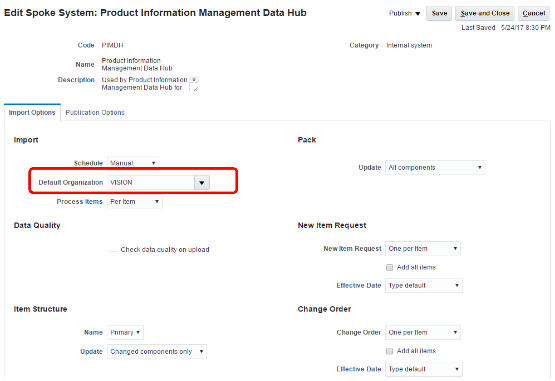
-
Click Save and Close.
-
Click Done.