Integrate Order Management with Accounts Receivable
Specify how Order Management sends charges and charge lines to Oracle Accounts Receivable.
This topic uses example values. You might need different values, depending on your business requirements.
Summary of the Set Up
-
Edit integration algorithm.
-
Manage service mapping.
-
Enable feature.
Edit Integration Algorithm
-
Make sure you have the privileges that you need to administer Order Management.
- Go to the Pricing Administration work area.
-
Click Tasks, then, under Order Management Configuration, click Manage Algorithms.
-
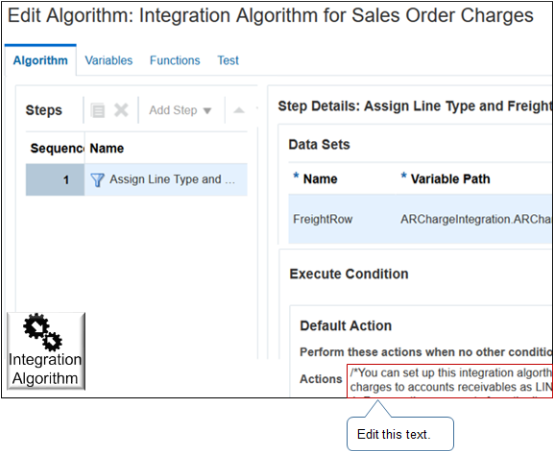
On the Manage Algorithms page, click Integration Algorithm for Sales Order Charges.
-
On the Edit Algorithm page, in the Step Details area, in the Execute Condition area, in the Default Action area, locate the code in the Default Actions window.
-
Click Edit immediately to the right of the Actions window.
Notice the text that Actions contains.
/*You can set up this integration algorthim so it uses accounts receivable to calculate tax on the shipping charge. To do this, you must interface taxes and charges to accounts receivable as LINE and not as FREIGHT. Do this: 1. Remove the comments from the lines below. 2. Publish your integration algorithm. 3. Use the Manage Service Mappings page to map your integration algorithm to service InvoiceService. If an integration algorithm already maps to InvoiceService, then do not map your your integration algorithm to InvoiceService. Instead, incorporate steps from your integration algorithm into the integration algorithm that already maps to InvoiceService. */ //FreightRow.LineType = ChargeRow.ChargeApplyTo == "SHIPPING" ? "LINE" : FreightRow.LineType //FreightRow.InventoryItemId = ChargeRow.ChargeApplyTo == "SHIPPING" ? '<Replace with Freight Inventory Item Id>' : null -
Remove the commented instructional text, remove the two forward slashes (//) from this code, then add the line and Id details for your shipping line:
//FreightRow.LineType = ChargeRow.ChargeApplyTo == "SHIPPING" ? "LINE" : FreightRow.LineType
//FreightRow.InventoryItemId = ChargeRow.ChargeApplyTo == "SHIPPING" ? '<Replace with Freight Inventory Item Id>' : null
where
-
LINE. Specifies the shipping line where you're requesting Receivables to calculate tax on the shipping charge.
-
<Replace with Freight Inventory Item Id>. Specifies the Item Id of the freight inventory item that Receivables will use to calculate tax.
You can also add a description.
For example, here's some code that specifies to use item 123456789.
FreightRow.LineType = ChargeRow.ChargeApplyTo == "SHIPPING" ? "LINE" : FreightRow.LineType
FreightRow.InventoryItemId = ChargeRow.ChargeApplyTo == "SHIPPING" ? '123456789' : null
As an option, you can specify other attributes. For details, see Include Price, Discounts, and Shipping Charges in Your Payloads.
-
-
Click Save and Close.
-
On the Manage Algorithms page, click Actions > Publish.
Manage Service Mapping
You use the Manage Service Mappings page to map your integration algorithm to the InvoiceService service.
If you already set up an integration algorithm that maps to InvoiceService, then don't map your integration algorithm to InvoiceService. Instead, incorporate steps from your integration algorithm into the integration algorithm that already maps to InvoiceService. For details about how to map your integration algorithm to InvoiceService, see Use Extensible Flexfields to Integrate Order Management with Other Oracle Applications.
Manage service mapping.
-
Create a sand box. For details, see Create a Sandbox So You Can Edit Service Mappings.
-
In the Tasks pane, under Order Management Configuration, click Manage Service Mappings.
-
On the Manage Service Mappings page, click FulfillmentIntegration.
-
Set up the source for the interface line.
-
Click Sources.
-
Click the row that contains InvoiceSource in the Source column.
-
In the Entity Mappings list, click the row that contains ARChargeInterfaceLine in the Entity column.
-
In the Attribute Mappings list, add these attributes.
-
InventoryItemId
-
LineType
-
-
-
Set up the service for the interface line.
-
Click Services.
-
Click the row that contains InvoiceService in the Service column.
-
In the Entities list, click the row that contains ARChargeInterfaceLine in the Entity column.
-
In the Attribute list, add these attributes.
-
InventoryItemId
-
LineType
-
-
-
Set up the source for the charge.
-
Click Sources.
-
Click the row that contains InvoiceSource in the Source column.
-
In the Entity Mappings list, click the row that contains Charge in the Entity column.
-
In the Attribute Mappings list, add an attribute.
Attribute
View Object Attribute
ChargeApplyTo
ChargeAppliesTo
-
-
Set up the service for the charge.
-
Click Services.
-
Click the row that contains InvoiceSource in the Service column.
-
In the Entities list, click the row that contains Charge in the Entity column.
-
In the Attribute list, add an attribute.
Attribute
Value
Attribute
ChargeApplyTo
-
Click Save and Close.
-
Enable Feature
Enable the Invoice option in the Enable Custom Payloads for Downstream Integration feature. For details, see Get Started with Integrating Order Management with Other Oracle Applications.