Overview of Setting Up Extensible Flexfields in Order Management
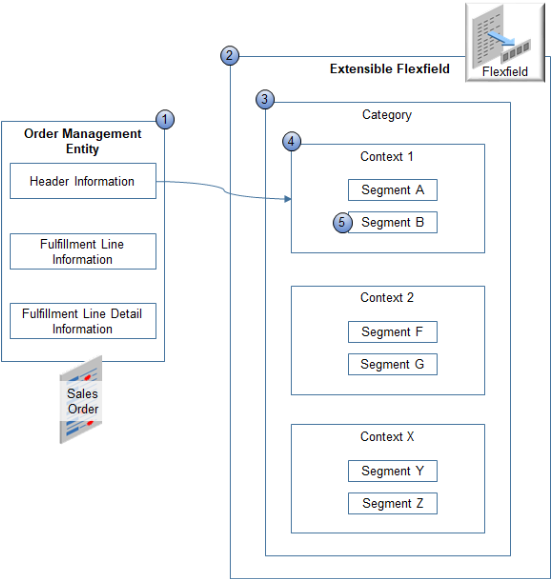
Use a hierarchy to determine how to display an extensible flexfield in the Order Management work area.
Here's the hierarchy.
Note
-
Order Management Entity. The top-level object in the hierarchy. You can specify an entity.
-
Header Information. Store details about the order header.
-
Fulfillment Line Information. Store details about the order line while order fulfillment processes the order line.
-
Fulfillment Line Detail Information. Store details that the fulfillment system provides when you don't typically store these details on the fulfillment line.
-
-
Extensible Flexfield. Each extensible flexfield includes categories, contexts, and segments.
-
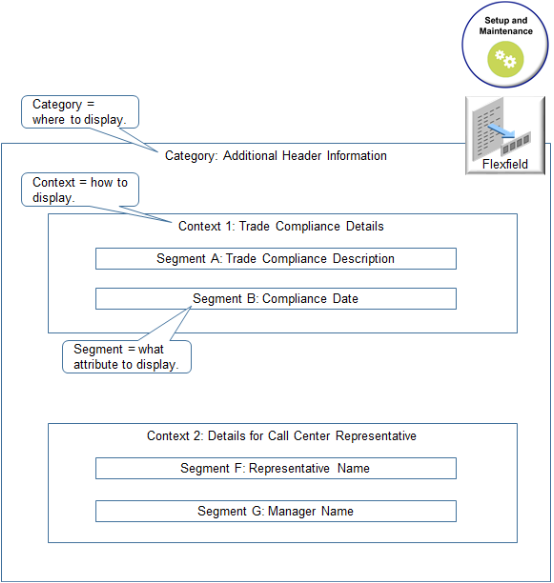
Extensible Flexfield Category. Organize your data into a category according to attributes that contain similar business data. Specify where to display the extensible flexfield in the Order Management work area, such as on the order header. You can use only one category for each entity.
-
Extensible Flexfield Context. Specify how to display the attribute. For example:
-
Specify criteria that determines the attribute to display.
-
Type of interface element that will display the attribute, such as text box or list of values.
-
Whether the Order Entry Specialist can view or edit the attribute.
-
Validation to do on the attribute.
-
Help text to display for the attribute.
-
Data type of the attribute.
-
Table column that stores the attribute.
You can specify one or more contexts in each category.
-
-
Extensible Flexfield Segment. Specify the attributes. An extensible flexfield segment is equivalent to a sales order attribute. Each context includes one or more segments that you can use to specify sales order attributes that store your data. You can specify one or more segments in each context.
Consider an example.
Note
-
Context1 stores details about trade compliance.
-
SegmentA references an attribute that stores the compliance description.
-
SegmentB references an attribute that stores the compliance date.
-
Context2 stores details about the call center representative who manages details about trade compliance.
-
SegmentF references an attribute that stores the representative name.
-
SegmentG references an attribute that stores the name of the person who manages the representative.
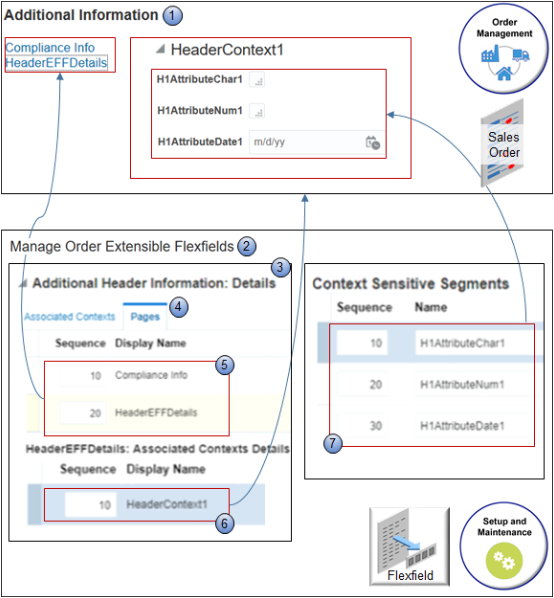
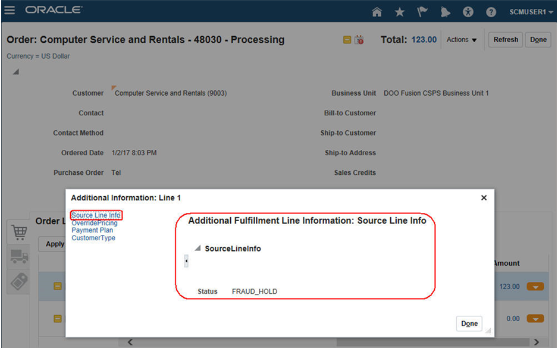
Here's an example that displays an extensible flexfield in the Order Management work area.
Note
-
Additional Information. A dialog that displays when you click Actions > Edit Additional Information on the sales order header in the Order Management work area.
-
Manage Order Extensible Flexfields. The setup page that you use in the Setup and Maintenance work area to set up an extensible flexfield.
-
Additional Header Information. Specifies the data to display and how to display it in Additional Information.
-
Pages tab. You use the Pages tab to specify each area where you want to display your extensible flexfield. In this example, the Pages tab specifies one area named
Compliance Infoand another area named HeaderEFFDetails. The example displays HeaderEFFDetails in the dialog. You can specify one or more areas, and you can specify one more contexts in each area.In this example, the Pages tab specifies
HeaderContext1andHeaderContext2. However, for brevity, the screen capture displays onlyHeaderContext1. The Sequence specifies the sequence to use when displaying these contexts in the area, with 1 displaying at the top, 2 below 1, 3 below 2, and so on. -
Sequence and Display Name for page. Specifies the name for each category that displays in the dialog. Sequence specifies the sequence to display the pages in the dialog. In the example, the Sequence is 10 for Compliance Info and 20 for HeaderEFFDetails, so the dialog displays Compliance Info first, then HeaderEFFDetails.
-
Sequence and Display Name for context. Specifies the name for each context that displays in the dialog. For example,
HeaderContext1organizes similar business data into a concise area of the dialog. -
Context Sensitive Segment. Specifies one ore more segments that display details for each attribute. The Sequence specifies the sequence to use when displaying segments in the area. You can specify these segments in each context:
-
20 character segments. You can use up to 150 characters for each character segment.
-
10 number segments.
-
Five date segments.
-
Five date and time segments.
-
Flexfield Categories Determine Where to Display Extensible Flexfields
You can display an extensible flexfield in different sections of the Order Management work area according to the flexfield category.
|
Flexfield Category |
Section in the Order Management Work Area |
|---|---|
|
DOO_HEADERS_ADD_INFO |
Order header |
|
DOO_FULFILL_LINES_ADD_INFO |
Fulfillment line |
|
DOO_FULFILL_LINE_DTLS_ADD_INFO |
General tab on the fulfillment line |
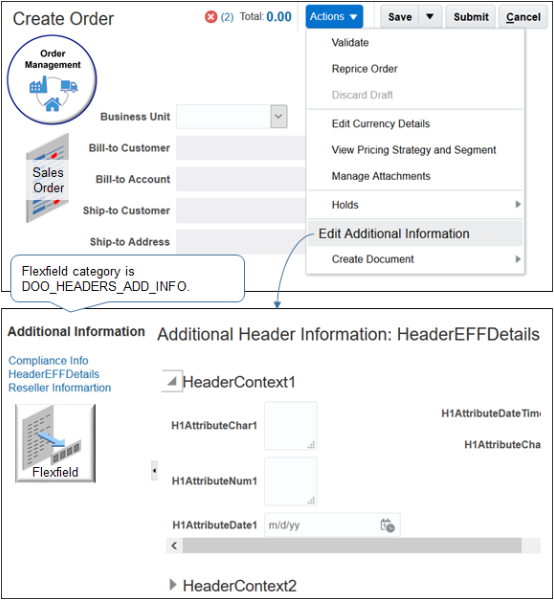
View Extensible Flexfields in a Sales Order According to Flexfield Category
- Go to the Order Management work area, then click Tasks > Create Order.
-
On the Create Order page, click Actions > Edit Additional Information.
The Additional Information dialog displays each extensible flexfield you create that references the DOO_HEADERS_ADD_INFO flexfield category. For example, HeaderEFFDetails is an extensible flexfield.
-
Click Cancel.
-
In the Order Lines area, search for an item, then click Add.
-
On the order line, click the down arrow, then click Edit Additional Information.
-
Click Submit, then copy the sales order number, such as 57025.
-
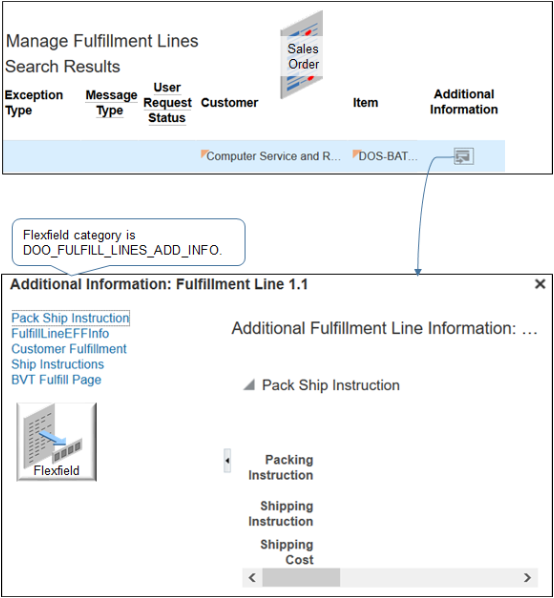
On the Overview page, click Tasks > Manage Fulfillment Lines.
-
On the Manage Fulfillment Lines page, search for your sales order.
-
In the Search Results, scroll to the far right, then click Additional Information.
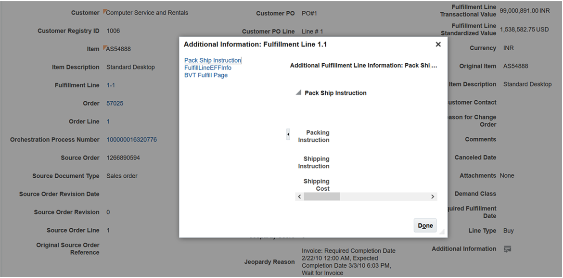
The Additional Information dialog displays the extensible flexfield you create that references the DOO_FULFILL_LINE_DTLS_ADD_INFO flexfield category. For example, Pack Ship Instruction is an extensible flexfield.
-
In the Fulfillment Line Details area, in the Attributes area, click General, scroll down, click Additional Information, then notice the dialog that displays.
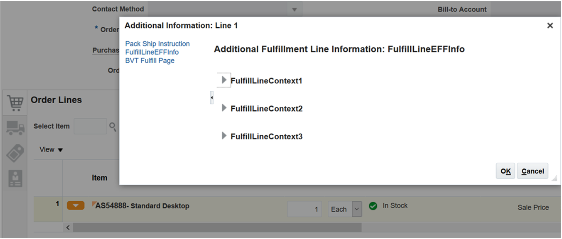
Another Example
Here's an Additional Information dialog that displays each extensible flexfield that references the DOO_FULFILL_LINES_ADD_INFO flexfield category. For example, FulfillLineEFFInfo is an extensible flexfield.
Order Management displays each extensible flexfield in an Additional Information dialog. Here's an example that displays the View Additional Information menu item on each order line on the Order Lines tab.
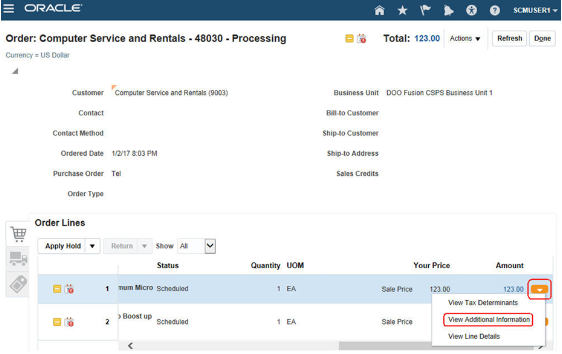
In this example, View Additional Information allows
the Order Entry Specialist to access the Source
Line Info extensible flexfield.
Overview of Your Setup
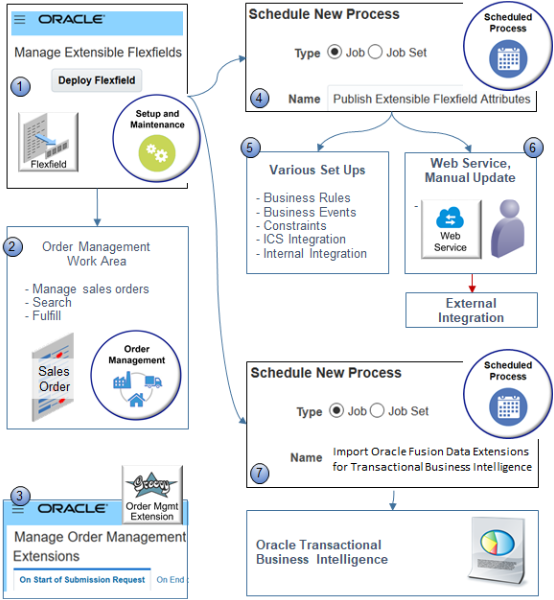
You do some or all of this set up, depending on your business requirements. It might be necessary to also do some of this flow when you update your extensible flexfield definition.
-
Manage Extensible Flexfields. Use the Manage Extensible Flexfields page in the Setup and Maintenance work area to define your extensible flexfield. Click Deploy Flexfield to make it available throughout the application and to other set up pages.
-
Order Management Work Area. Test your extensible flexfield. Depending on your setup, you create a new sales order, search for a sales order, use a fulfillment view, and so on. For example, use the Additional Information dialog when you create a new sales order to make sure your extensible flexfield displays and works as expected.
-
Manage Order Management Extensions. Use the Manage Order Management Extensions page in the Setup and Maintenance work area to add your extensible flexfield to an order management extension.
-
Schedule New Process. Use the Publish Extensible Flexfield Attributes scheduled process to make your extensible flexfield available to various parts of Order Management, other set ups in Oracle Applications, and integrations. This scheduled process updates the rule dictionaries in business rules, constraints, business events, Integration Cloud Service, and the service mappings that you use for an integration.
-
Various Set Ups. Here's where you can use your extensible flexfield.
Set Up
Description
Business Rule
Use your extensible flexfield in a business rule.
-
Pretransformation
-
Transformation
-
Posttransformation
-
Routing
-
Assignment
-
Line Selection Criteria
-
Branching Expression
-
Lead Time Expression
-
Compensation Pattern
-
Cost of Change
You can't use an extensible flexfield in an approval rule.
Business Event
Use an extensible flexfield to help determine when to use a business event, and the actions to take when you use it.
Constraint
Use an extensible flexfield to constraint a sales order attribute. Use a constraint to constrain an extensible flexfield.
Integration Cloud Service
Use an extensible flexfield with Integration Cloud Service to help achieve and manage an integration between Order Management and a technology or application.
-
Order Import
-
Order Information Service
-
Transportation Management
-
Global Trade Management
Integration with an Oracle Application
Use a service mapping to integrate with an Oracle application.
-
Shipping
-
Accounts Receivable
-
Purchasing
-
Receiving
-
-
Web Service. If you use one of these web services, then manually update your extensible flexfield definition in the web service payload.
-
CreateOrder
-
FulfillOrderService
-
FulfillmentResponseService
-
-
Schedule New Process. Use the Import Oracle Fusion Data Extensions for Transactional Business Intelligence scheduled process to make sure your extensible flexfield is available in the Subject Areas of Oracle Transactional Business Intelligence area. For details, see Overview of Flexfield Change Import.