Guidelines for Setting Up Extensible Flexfields in Order Management
Apply guidelines when you set up an extensible flexfield in Order Management.
- Unlike a descriptive flexfield, you can add as many segments as you need.
- Use the context to organize your business data into a concise area of the user interface element, such as a dialog.
- Organize your attributes into logical groups according to your display and usage requirements.
- Consider where an extensible flexfield might be useful in the order capture and order fulfillment lifecycle.
- An extensible flexfield that you add on the sales order header is independent of an extensible flexfield that you add on a fulfillment line. Order Management doesn't communicate or transfer values between them, even if you use the same name for each extensible flexfield. If you require dependence between them, then create an order management extension, then define dependence logic in the extension.
Create Segments and Contexts
If you are:
-
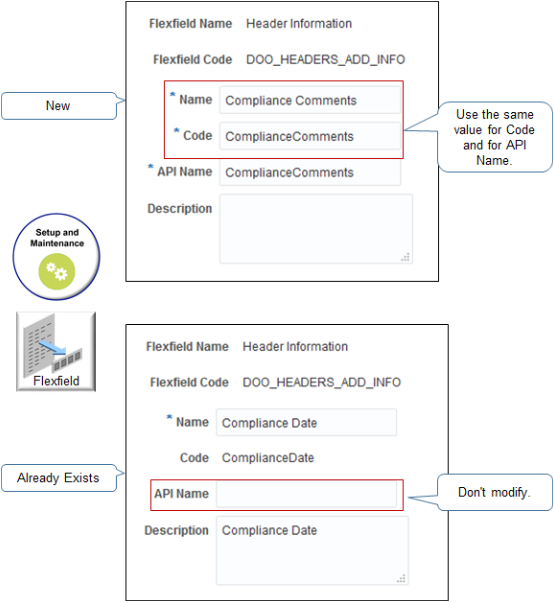
Creating a new segment. Use the same value for the Code attribute and the API Name attribute. This will simplify setup and maintenance. You use API Name throughout the setup, such as during integration setup, with web services, business rules, business intelligence, and so on. You can't modify Code or API Name after you create the segment.
-
Modifying a segments that already exists. Don't modify API Name. Extensible flexfield logic examines API Name. If its empty, then the logic uses the value in Code, so it isn't necessary to specify a value in API Name. If you do modify API Name, then your flexfield might fail with unexpected results at run time.
Note
-
Enter a unique code, name, and description for each segment. The Order Management work area doesn't display these values, so use whatever nomenclature is most helpful to you during setup and maintenance.
- You must not enable the Translatable option on the context. For details, see Set Up Extensible Flexfields in Order Management.
Nomenclature
Make sure the Name attribute and the Code attribute for each segment or context that you create uses the correct nomenclature:
-
Begin the name with a letter of the alphabet, A through Z.
-
Don't include more than one consecutive space character.
-
Don't include spaces in the Code attribute. Spaces will cause a run time error.
-
Make sure the name contains only letters and numbers, and only these special characters:
Character
Description
.
Period
-
Hyphen
Don't use an em dash or en dash.
_
Underscore
:
Colon
'
Single quotation mark
/
Forward slash
If you encounter an incorrect alias error when you run the Publish Extensible Flexfield Attributes scheduled process, then make sure your contexts and segments use the correct nomenclature.
Number of Attributes and Segments
The number of attributes and segments that you can add to the context depends on the data type that you set for the context.
| Data Type | Number of Attributes That You Can Add | Number of Segments That You Can Add |
|---|---|---|
| Varchar | 20 | 20 |
| Number | 10 | 5 |
| Date | 5 | 10 |
| Time | 5 | 10 |
You can add a maximum of 40 segments to each context.
Order Management doesn't limit how many contexts that you can add, but you must add only the minimum number of contexts that you need because each context can affect performance.
Create Order Management Extensions
Note
-
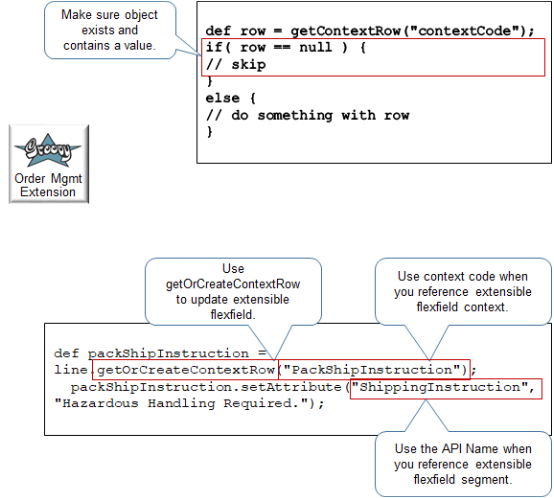
Include an If statement that makes sure each context and segment that your extension references exists and contains a value. If you don't check for missing objects and empty values, then your extension might fail with unpredictable results.
-
Use the getOrCreateContextRow method to create or update a value in an extensible flexfield. If the object doesn't exist, then this method creates it, so it isn't necessary to determine whether the object exists before you use this method to do an update. Use getContextRow to only get a row.
-
Use Context Code when you reference an extensible flexfield context.
-
Use API Name when you reference an extensible flexfield segment. If you don't specify API Name when you set up the extensible flexfield, then use Segment Code but with underscores ( _ ) instead of spaces ( ).
-
Your Groovy code must traverse the context and the segment to get all data from the extensible flexfield.
Here's an example that uses a
whilestatement to traverse all data.def complianceDetails = header.getOrCreateContextRow("ComplianceDetails"); complianceDetails.setAttribute("_ComplianceReason", "This has been set by pre submit extension."); def lines = header.getAttribute("Lines"); while( lines.hasNext() ) { def line = lines.next(); def inventoryItemId = line.getAttribute("ProductIdentifier"); def orgId = line.getAttribute("InventoryOrganizationIdentifier"); def item = getItem(inventoryItemId, orgId); String hazardous = item.getAttribute("HazardousMaterialFlag"); def packShipInstruction = line.getOrCreateContextRow("PackShipInstruction"); if( "Y".equals(hazardous) ) { // get details for fulfill line context PackShipInstruction packShipInstruction.setAttribute("_ShippingInstruction", "Hazardous Handling Required."); } }
Use Business Rules
If your fulfillment system needs data that the predefined attributes in a sales order don't provide, then use a value from an extensible flexfield as the criteria for setting the default value in some other sales order attribute.
Assume you set up an extensible flexfield named Sample Requested. Here are the values it can contain.
-
Complimentary
-
Charge
-
No Sample
You can create a transformation rule.
-
If the value is Complimentary or Charge, then add a fulfillment line for the sample item.
You can then set up a rule that populates price details for the sample lines according to whether the value is Complimentary or Charge.
Make sure you run the defaulting rule during one of these types of transformations when you process the transformation rule. You can't default an attribute value into an extensible flexfield.
|
Type of Transformation |
Description |
|---|---|
|
Pretransformation |
Use an extensible flexfield when some other transformation logic requires the default attribute value. For example, if you must use the defaulted attribute value to determine whether to add a free sample item during transformation, then define a pretransformation rule that sets the default value. |
|
Posttransformation |
Use Posttransformation when transformation must happen before you run your defaulting rule. For example, if you plan to add an item during transformation, and you also plan to use an extensible flexfield attribute on the order header to determine the defaulted value to set for the new fulfillment line. |
Use an extensible flexfield in a business rule. For details, see Identify Flexfield Contexts and Category Codes for Your Business Rules.
Import and Integrate
You can update an extensible flexfield on a closed fulfillment line or closed sales order only in the Order Management work area. You can't through import or integration, such as through file based data import, a web service, REST API, or Oracle Application Development Framework (ADF).
Import Source Orders
Apply guidelines when you use the order import template to import data for an extensible flexfield.
-
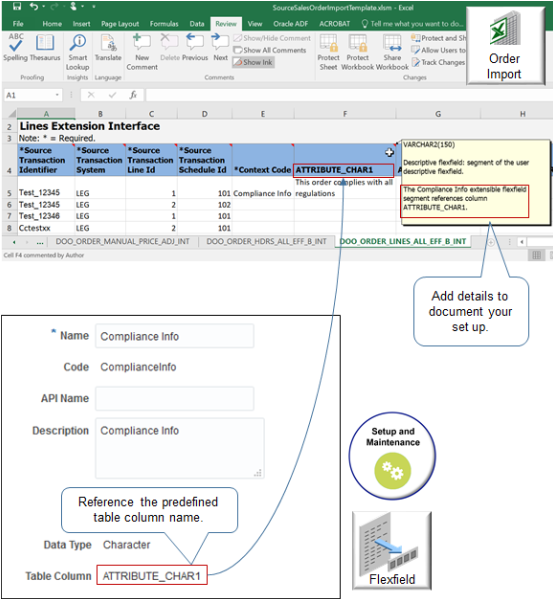
Assign the Table Column attribute of each segment so it references the correct column in the order import template.
-
Add a comment in Excel to document your set up.
-
Use the DOO_ORDER_HDRS_ALL_EFF_B_INT worksheet to capture extensible flexfield details for order headers.
-
Use the DOO_ORDER_LINES_ALL_EFF_B_INT worksheet to capture extensible flexfield details for fulfillment lines.
-
Use columns, such as ATTRIBUTE_CHAR1, to capture details for each attribute.
-
Don't modify worksheet names or column names. Instead, add a comment.
You can't add an extensible flexfield on an order line entity. You can add one only on the order header entity or the fulfillment line entity. The template uses the phrase DOO_ORDER_LINES, but it uses details that you add on the DOO_ORDER_LINES_ALL_EFF_B_INT worksheet to interact with extensible flexfields on the fulfillment line, not on the order line.
For details, see Import Orders Into Order Management.
This example illustrates how to set up the Compliance Info segment that
references the ATTRIBUTE_CHAR1 column.
Use Web Services to Import Extensible Flexfield Details
Add extensible flexfield details to the payload that Order Management uses to communicate with the web service.
-
Get an example payload. For details, see Example Web Service Payloads That Integrate Order Management.
A range of examples are available, such returns, coverage, configurations, and so on. These payloads include most of the sales order data that you require.
-
If you create your own payload, then create it according to the WSDL definition that the payload requires. For details, see Use Your Own Payload to Import Extensible Flexfields.
-
Run the Publish Extensible Flexfield Attributes scheduled process.
-
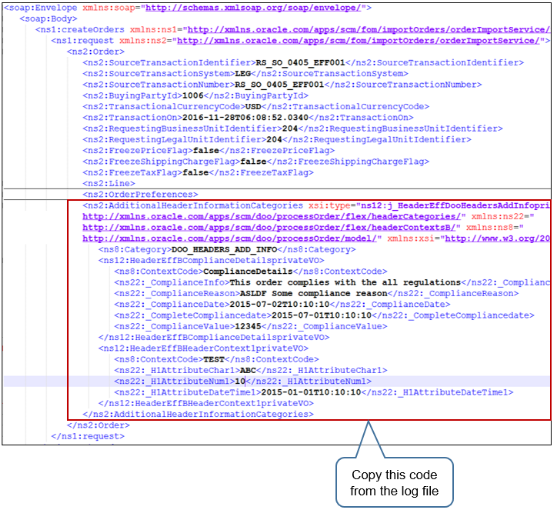
Copy extensible flexfield data from the log file that the scheduled process creates into the XSD file that contains your payload. Copy this data onto each object that requires extensible flexfield data. This approach helps to keep your channel system synchronized with the set up in Order Management.
-
Use the import service from Application Development Framework (ADF). Don't use the SOA (Service Oriented Architecture) import service.
Here's an example payload that copies one section of code from the log file into the XSD file.
For details, see Guidelines for Using Web Services to Integrate Order Management.
Integrate with Other Oracle Applications
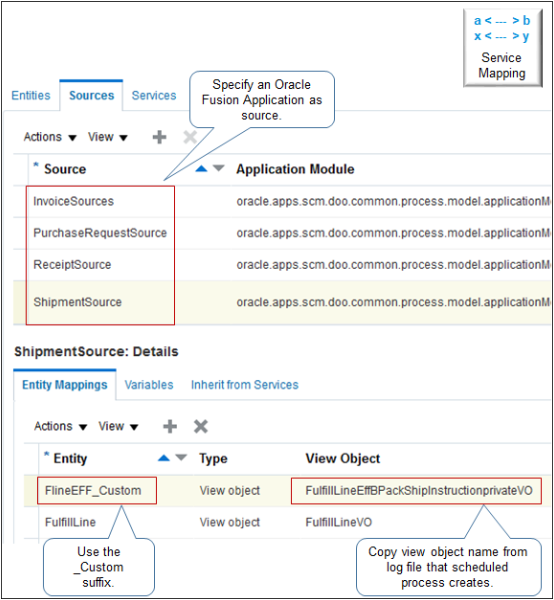
Use an extensible flexfield when you integrate with some other Oracle Application, such as Pricing, Receivables, Shipping, Receiving, or Purchasing. You set up a service mapping that's similar to a service mapping that you set up for Oracle Pricing. You use an extensible flexfield to store values that the service mapping requires.
Note
-
Copy the name of the view object from the log file. The service mapping uses the view object to get data from your extensible flexfield. Use the log file that the Publish Extensible Flexfield Attributes scheduled process creates.
-
Use the _Custom suffix when you define each new entity.
-
Use an integration algorithm to implement complex logic. For example, assume you must concatenate an item with the coverage that covers the item, add quantity, then store the results in a descriptive flexfield for Accounts Receivable. You would use an integration algorithm to implement this requirement.
Search for Extensible Flexfields in the Order Management Work Area
Assume you need to search an extensible flexfield on the 56794 sales order.
- Go to the Order Management work area.
- On the Overview page, Tasks > Manage Fulfillment Lines.
- Click Add Fields > Extensible Flexfield Category.
- Set the values.
Attribute Value Order 56794 Extensible Flexfield Category Equals Additional Fulfillment Line Information - Click Search.
- In the search results, scroll all the way to the right, then examine the extensible
flexfield attributes. They will have the names that you set up for the flexfield,
such as the context and category.
As an option, click View > Columns, then add or remove individual attributes from the search results.
- Click Save to save your search. This way, you can access your saved search the next time you need to see flexfield details.
Here's how you can search for flexfields on the sales order.
- Go to the Order Management work area.
- On the Overview page, click Tasks > Manage Orders.
- On the Manage Orders page, click Add Fields > Extensible Flexfield Category.
- Set the attributes.
Attribute Value Order 56794 Extensible Flexfield Category Equals Additional Header Information
Manage Change Orders
Note
-
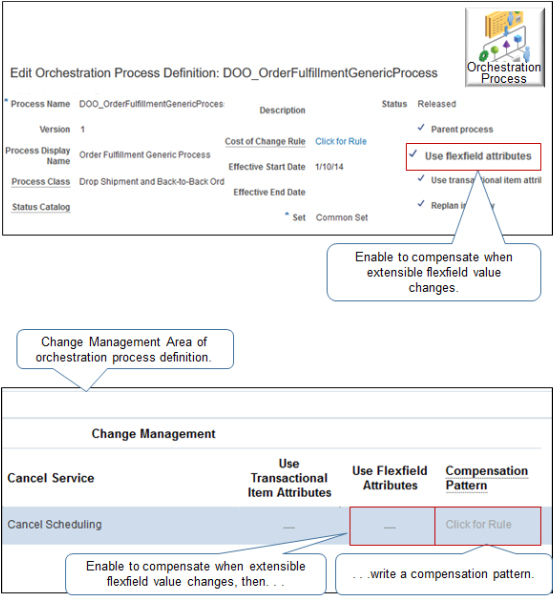
Identify your requirements for change management. For example, determine whether the orchestration process must compensate when you change the value in an extensible flexfield, and the action to take during compensation, such as scheduling, calling Accounts Receivable, and so on.
-
Compensate when a value that the orchestration process references changes.
-
Any extensible flexfield. Enable the Use Flexfield Attributes option on the header of the orchestration process definition.
-
A specific extensible flexfield. Enable the Use Flexfield Attributes option in the Change Management area of the orchestration process definition. Add it to the orchestration process step that references the extensible flexfield. Also define a compensation pattern on this step.
Use the compensation pattern to specify the action to do, such as Cancel, Create, Update, and so on, depending on the value that changes. You can configure your set up to send an update when a single value changes and to skip sending an update when other values change. This approach provides more detailed control regarding the compensation you do.
Here's an example compensation pattern.
pseudocode:
If segment3 changes, then cancel task x, and then recreate task x.
If segment4 changes, then do nothing.
If segment5 changes, then call an update service.
Examine a detailed code example. For details, see Compensate Sales Orders That Change.
-
To ignore changes to all extensible flexfield values, make sure Use Flexfield Attributes for each step in the Change Management area isn't enabled.
-
Change management ignores each change that the Order Entry Specialist makes to an extensible flexfield value that you set up on the sales order header.
Use Reports and Analytics
Modify Reports
Note
-
The Order Entry Specialist can use the Sales Order report when creating or viewing a sales order.
-
Add extensible flexfield data to the report.
-
Install Oracle Analytics Publisher Desktop,
-
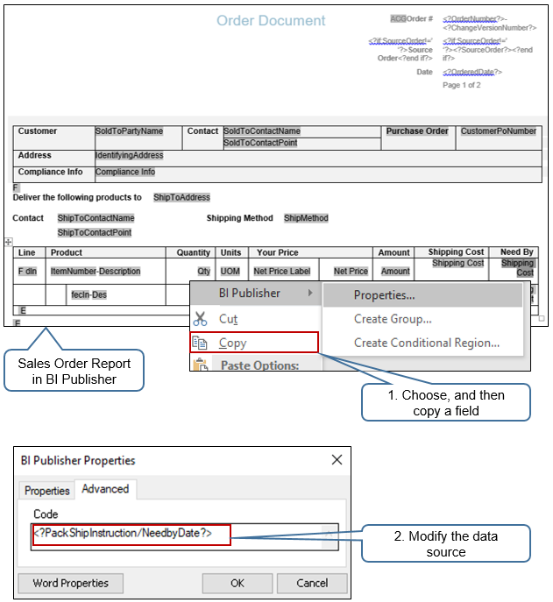
Use the Edit Sales Order Report action in Oracle Analytics Publisher. This action displays Sales Order Report in rich text format so you can modify it.
-
Right-click a field, then click Copy.
-
Use Oracle Analytics Publisher Properties to specify the source that the report uses to display data for the field.
Use this format.
<?context/segment?>where
-
context. Name of the extensible flexfield context.
-
/ (forward slash). You must use the forward slash between context and segment.
-
segment. Name of the extensible flexfield segment.
-
You must use a set of question marks ( ?? ) to enclose
context/segment. -
You must use a set of angle brackets ( < > ) to enclose the question marks.
For example, assume you set up an extensible flexfield that uses Context1 to store details about trade compliance, and SegmentA to store the compliance description. Here's the code you use.
<?Context1/SegmentA?> -
Modify Analytics
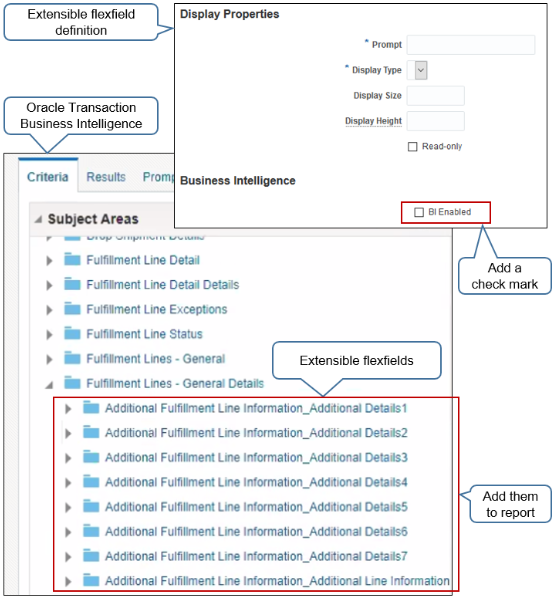
Oracle Transaction Business Intelligence (OTBI) provides analytic reporting. You can display extensible flexfield data in OTBI.
Note
-
Enable the BI Enabled option when you set up your extensible flexfield.
-
Run the Import Oracle Fusion Data Extensions for Transactional Business Intelligence scheduled process. This process updates OTBI so it displays your extensible flexfields in area Subject Areas in OTBI. For details, see Overview of Flexfield Change Import.
-
Add your extensible flexfields from Subject Areas into a report in OTBI.
-
Here's the format that OTBI uses.
Category_ContextFor example:
Additional Fulfillment Line Information_Additional Details1where
-
Additional Fulfillment Line Informationis the category -
Additional Details1is the context
-
And Yet More Guidelines
XML doesn't support a context name or segment name that begins with a number. So, if you begin the name of your context or segment with a number, then Order Management automatically prefaces the name with an underscore ( _ ) at run time. For example, if you name your context 1MyContext, then Order Management automatically renames it to _1MyContext.