Use Extensible Flexfields in Transformation Rules
Use a transformation rule to add or change data in a fulfillment line. The rule determines information to add or change according to details that already exist in the fulfillment order.
You will create a rule.
-
If Preferred customer places a sales order that includes AS54888 Desktop Computer on or before 01/01/2019 12:00 AM, then set Shipment Priority to High Priority, and add a free printer to the shipment.
Create a rule that references an extensible flexfield that stores loyalty details.
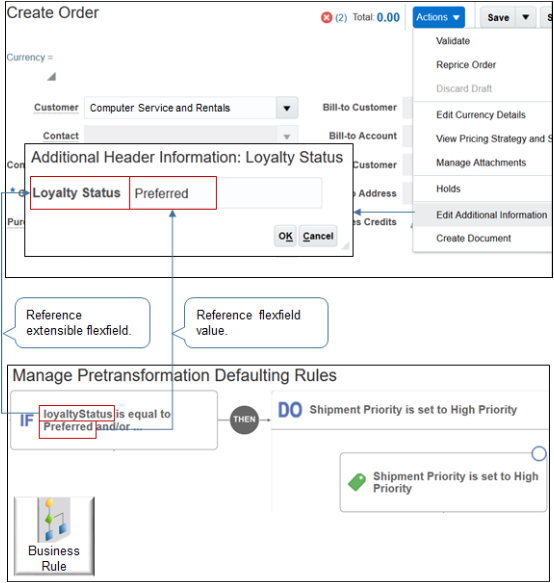
Summary of the Set Up
-
Create pretransformation rule.
-
Create product transformation rule.
-
Create posttransformation rule.
Assume you already created the Loyalty Status extensible flexfield.
For details, see Overview of Using Business Rules With Order Management.
This topic uses example values. You might need different values, depending on your business requirements.
Create Pretransformation Rule
Here's the rule you will create.
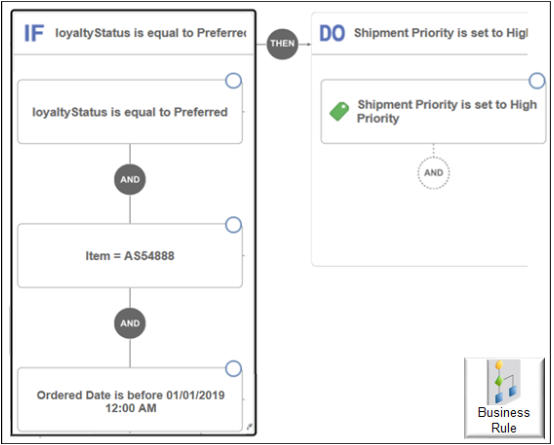
Do it.
-
Create the rule.
-
Go to the Setup and Maintenance work area, then go to the task.
-
Offering: Order Management
-
Functional Area: Orders
-
Task: Manage Pretransformation Rules for Sales Orders
-
-
On the Manage Pretransformation Defaulting Rules page, click Create New Rule.
-
Set the values.
Attribute
Value
Name
Expedite Shipping for Loyal Customer
Description
If loyal customer places a sales order that includes AS54888 Desktop Computer on or before promotion date, then add a free printer to the sales order.
-
-
Create the If statement.
-
Click in the IF area to expand it.
-
On the Attributes tab, expand Order Header > Header EFF Categories > Additional Header Information > Header Loyalty Status.
-
Click
Loyalty
Status
, drag it, then drop it into the IF area.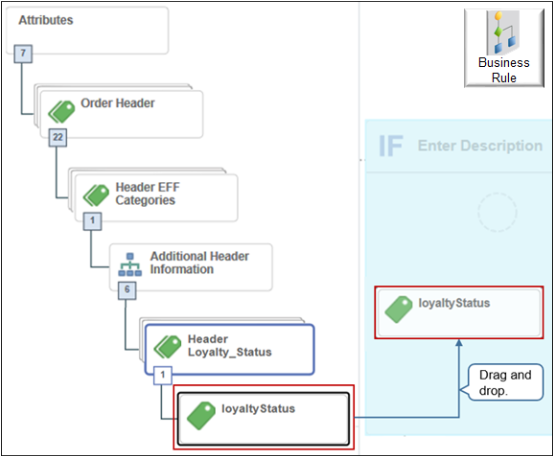
-
In the Create Condition dialog, set the operator to
Is Equal To. -
Enter
Preferred, then click OK.
-
-
Add the And condition for the computer.
-
Click And.
-
In the Create Condition dialog, enter
item, wait a moment, then click Item (Item Definition). -
Set the operator to
=. -
Click Search.
-
In the Search dialog, search for AS54888, then click OK.
-
-
Add the And condition for the date.
-
Click And.
-
In the Create Condition dialog, enter
ordered, wait a moment, then click Ordered Date (Order Header). -
Set the operator to
is before. -
Click Select Date and Time, set it to
01/01/2019 12:00 AM, then click OK > OK.
-
-
Create the Do statement.
-
Click Then > Do > New Action > Set a Value, then click .
-
In the Create Action dialog, enter
ship, wait a moment, then click Shipment Priority (Order Header). -
Click Search.
-
In the Search dialog, click Advanced > Search, then notice the dialog displays values you can set for this attribute.
This functionality helps make sure you specify a value that Order Management can use and understand for the attribute. For example, Shipment Priority can contain only alphabetic data.
-
In the Meaning list, click High Priority > OK > OK > Save and Close.
-
-
Activate and publish your rule.
Create Product Transformation Rule
Use the value in the Loyalty Status extensible flexfield as criteria to make other fulfillment changes, such as add a fulfillment line for the free printer.
Use attributes to set up the object hierarchy of the sales order.
|
Attribute Usage |
Hierarchy |
|---|---|
|
Determine whether customer is preferred according to the value of the Loyalty Status extensible flexfield on the order header. |
|
|
Use the InventoryItemId attribute on the fulfillment line to identify the computer. |
|
|
Use the OrderedDate attribute on the order header to identify the date. |
|
|
Add a new fulfillment line to the sales order for the printer. |
|
Create the Rule
-
In the Setup and Maintenance work area, go to the task.
-
Offering: Order Management
-
Functional Area: Orders
-
Task: Manage Product Transformation Rules
-
-
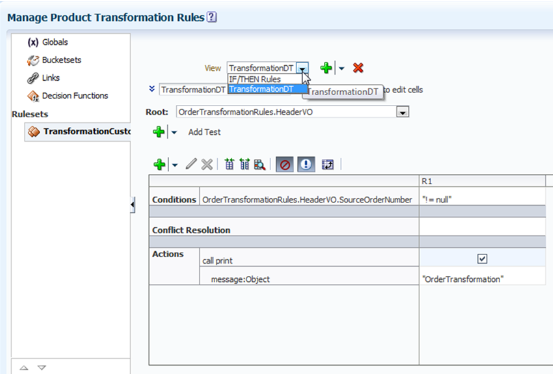
On the Manage Product Transformation Rules page, in the View list, click TransformationDT.
-
To the right of View TransformationDT, click down arrow > Expand > Add Rule > Properties, then set the values.
Attribute
Value
Name
Add Printer for Loyal Customers
Description
If loyal customer places a sales order that includes AS54888 Desktop Computer, on or before promotion date, then add a free printer to the sales order.
Effective Date
Always
Priority
Medium
Active
Contains a check mark
Advanced Mode
Contains a check mark
-
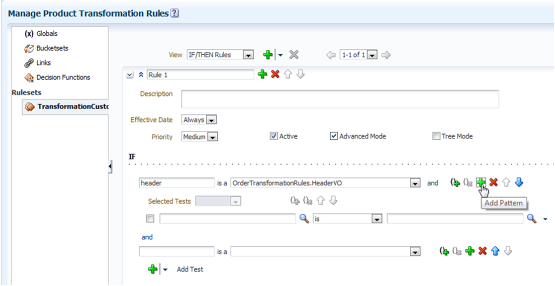
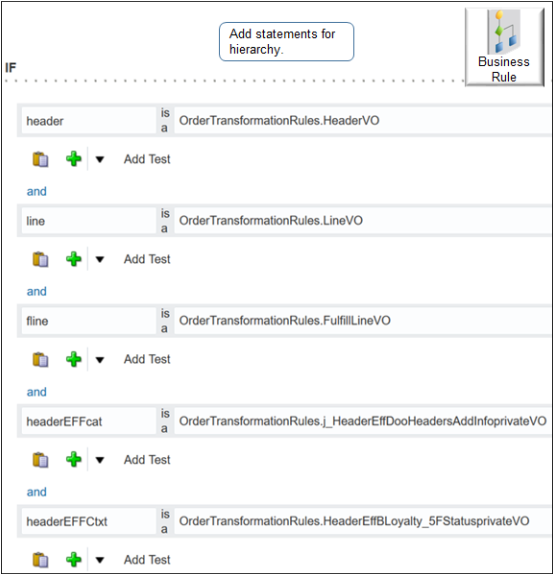
Click Add Pattern to add each pattern.
Pattern
Operand
Fact
header
is a
OrderTransformationRules.HeaderVO
line
is a
OrderTransformationRules.LineVO
fline
is a
OrderTransformationRules.FulfillLineVO
headerEFFcat
is a
OrderTransformationRules.j_HeaderEffDooHeadersAddInfoprivateVO
headerEFFCtxt
is a
OrderTransformationRules.headerEFFcat.HeaderEffBLoyalty_5FStatusprivateVO
Each pattern creates one level of the hierarchy.
For example, here's the rule that creates the first pattern, and the cursor is positioned to begin creating the second pattern.
Here's how your set up should look.
Create the Hierarchy
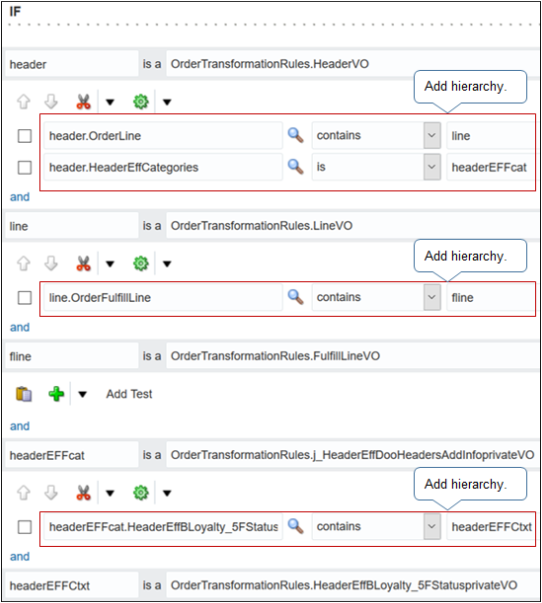
You will create this hierarchy.
header
  line
    fline
  headerEFFcat
    headerEFFctxt
To create the hierarchy, create a test for each patterns.
|
Parent Pattern |
Fact |
Operand |
Child Pattern |
|---|---|---|---|
|
header |
header.OrderLine |
contains |
line |
|
header |
header.HeaderEffCategories |
is |
headerEFFcat |
|
line |
line.OrderFulfillLine |
contains |
fline |
|
headerEFFcat |
headerEFFcat.HeaderEffBLoyalty_5FStatusprivateVO |
contains |
headerEFFCtxt |
To create a test, click Add Test (green icon underneath the pattern), then click Simple Test.
Create Test Criteria
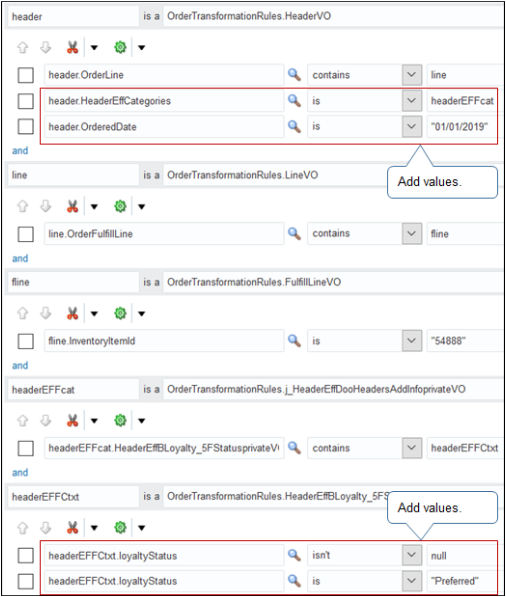
Create the test criteria that identifies AS54888 Desktop Computer. If you include optional attributes, then make sure you include a NOT NULL check for each optional attribute to avoid the NullPointerExceptions runtime error.
Create tests.
|
Pattern |
Fact |
Operand |
Value |
|---|---|---|---|
|
header |
header.OrderedDate |
is |
"01/01/2019" |
|
fline |
fline.InventoryItemId |
is |
"54888" |
|
headerEFFctxt |
headerEFFCtxt.loyaltyStatus |
isn't |
null |
|
headerEFFctxt |
headerEFFCtxt.loyaltyStatus |
is |
"Preferred" |
Create them in the same way you created tests when you defined the hierarchy. You must include the double quotation marks ( " ) as part of the value, where indicated. For example:
Create the Action
Create the action that adds a fulfillment line for the free printer.
-
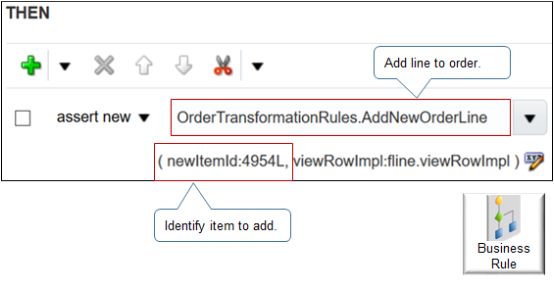
In the Then area, click Add Action > Assert New.
-
You must add a new fulfillment line, so enter
AddNew > OrderTransformationRules.AddNewOrderLine. -
In the Then area, click Edit Properties.
-
In the Properties dialog, set the values, then click OK.
Name
Value
newItemId
4954L
Assume 4954L identifies the printer.
viewRowImpl
fline.viewRowImpl
-
Make sure your set up looks like this.
-
Click Save and Close.
Create Posttransformation Rule
Order Management must add values to some fulfillment line attributes when it creates the fulfillment line for the printer. You use a posttransformation rule to add the values.
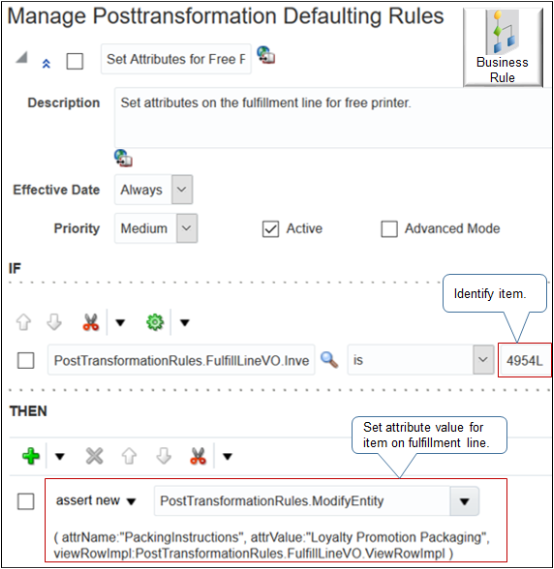
Here's the rule you will create.
Do it.
-
In the Setup and Maintenance work area, go to the task.
-
Offering: Order Management
-
Functional Area: Orders
-
Task: Manage Posttransformation Defaulting Rules
-
-
On the Manage Posttransformation Defaulting Rules page, click Add > Add Rule.
-
Click Properties, then set the values.
Attribute
Value
Name
Set Attributes for Free Printer
Description
Set attributes on the fulfillment line for free printer.
Effective Date
Always
Priority
Medium
Active
Contains a check mark
Advanced Mode
Does not contain a check mark
-
In the If area, create a statement.
PostTransformationRules.FulfillLineVO.InventoryItemId is 4954L -
Add the Then statement.
-
In the Then area, click Add Action > Assert New.
-
In the empty window, enter
modify, wait a moment, then click PostTransformationRules.ModifyEntity. -
In the Then area, click Edit Properties.
-
In the Properties dialog, set the values, then click OK.
Attribute
Value
attrName
"PackingInstructions"
attrValue
"Loyalty Promotion Packaging"
viewRowImpl
PostTransformationRules.FulfillLineVO.ViewRowImpl
-
-
Repeat step 4 for each attribute you must set.
-
Click Save and Close.
- Overview of Setting Up Extensible Flexfields in Order Management
- Patterns That You Can Use with Extensible Flexfields in Business Rules
- Overview of Using Extensible Flexfields in Order Management
- Overview of Using Business Rules With Order Management
- How Order Management Transforms Source Orders Into Sales Orders