2Employee Management
Employee Management
Working with Team Management
Team Management
Team Management provides managers with a self-service tool for performing employee changes and maintaining information about their employee-manager relationships.
In the Talent Browser, a manager can request a change for members of his team. The manager can either take an individual he sees on his team and request that he be managed by someone else, or request that someone who is not shown on his team be added to his direct reports. As part of this process, the manager can also update data about the employee.
Depending on the standard field configuration for team management, the manager can have the ability to edit an employee's manager, current job role, location and organization. These changes can be configured to require approval. In such cases, the approval workflow must also be specified as part of the configuration.
In the event that a manager would like to remove a direct report from his team but does not know the name of the new manager, he can simply leave the manager name blank. The HR administrator will be required to assign the employee a new manager in order to approve the request.
-
Add an employee from another team
-
Add a matrix manager
-
Change an employee's manager, thus moving the employee to another team
-
Change an employee's organization
-
Change an employee's location
-
Change an employee's job field
Each type of change can be set to require approval, but a justification is always required for a change to be processed.
All requested or rejected changes are indicated on the employee's card in the Talent Browser.
Adding an Employee to My Team
Adding an employee to My Team allows a manager to move an employee from another team to his own team.
Performance > [Navigation Bar] Talent Browser
On the required employee card, click the down arrow icon and select the Add Employee...
In the Employee Addition window, click the magnifying glass icon to display the People Selector.
Search for employees in your direct reports, your network or by a general keyword search.
In the list of corresponding employee names, click on the desired name to highlight it and click Select.
If needed, change the current organization, location and/or job field of the employee by clicking on the corresponding checkbox and then by clicking the magnifying glass icon to open the relevant selector.
Proceed for each change in the same manner as you did for the employee name selection.
If approval is required, the request to add the employee will be sent for approval, and then the new employee will be added to the proper manager, as designated in the request.
Removing an Employee from My Team
Removing an employee from my team allows a manager to remove an employee from his team and to move that employee to another team, if this information is known.
From the Talent Browser, locate the card of the employee you wish to remove from your team.
On the corresponding employee card, click the down arrow icon and select Request Employee Change...
You can also leave the Manager field blank if you do not know the name of the new manager.
In the Request Employee Change window, check the Manager option and click the magnifying glass icon to display the Employee Selector.
Search for employees in your direct reports, your network or by a general keyword search.
In the list of corresponding employee names, click on the desired name to highlight it and click Select.
If needed, change the current organization, location and/or job field of the employee by clicking on the corresponding checkbox and then by clicking the magnifying glass icon to open the relevant selector.
Requesting an Employee Change
Requesting an employee change consists in asking for an employee to be moved to another team or to change an employee's organization, location or job field information.
When you request to move an employee to another team, the job position might also be moved or left with the current manager, depending on the team management configuration.
The employee's card will display an information bar at the bottom indicating the requested change status. If a change request was rejected, a red indicator will be displayed, indicating that you need to view the rejection details to either acknowledge the rejection or to modify and resubmit the request. Once the change has been approved, the information bar disappears.
If no approval is required, the change will be done at that moment.
Once an employee is moved to another team, the new manager has full security rights to the employee's information and history. The old manager no longer has access to the employee or his history. The one exception to this rule is if the old manager still has open reviews related to the employee. In that case, the old manager is considered the review “author” and retains ownerships.
Once an employee change has been requested, it can be canceled if needed by the person who requested the change.
Canceling an Employee Change Request
Only change requests that require an approval can be canceled, and only by the user who has originally requested the change.
The change request is canceled and the change information bar on the employee's card no longer displayed.
Acknowledging a Rejected Employee Change
From the Talent Browser, locate the employee card showing a red indicator.
On the corresponding employee card, click the down arrow icon and select View Rejection Details.
In the Rejection Details window, do one of the following:
Click Acknowledge to accept the rejection and indicate that you've viewed the details.
-
Click Resubmit to display the Request Employee Change window and submit another request.
-
Click Close to do nothing.
If you selected Acknowledge or Resubmit the change information bar on the card disappears.
Team Management Fields
All user interface elements related to Team Management functions are presented in the following table. Each entry in the table includes an element, a description and the part of the application to which the element applies.
| UI Element | Description | Applicable to | Function |
|---|---|---|---|
| Approval is late | Filter option that displays approval requests that have not been looked, with a due date in the past. | Team Management | Approval Request Filters |
| Approval Status | Filter option that displays approval requests according to their approval status, which can be:
|
Team Management | Approval Request Filters |
| Assigned to | Filter option that displays approval requests that are assigned to a specific user. In the case of a change request, the approver is the assignee. | Team Management | Approval Request Filters |
| Changes Summary | Indication of the requested employee changes when related to a change in the organization, location, job field or job role. | Team Management | Approval Requests |
| Clear | Button that resets all filters to null. | Team Management | Approval Request Filters |
| Due Date | Date set automatically to the day following the date the change was requested. | Team Management | Approval Requests |
| Employee | Filter option that displays approval requests related to a specific employee. | Team Management | Approval Request Filters |
| Employee | Name of the employee for whom a change has been requested. | Team Management | Approval Requests |
| Initiating Manager | Name of the manager who requested the employee change. | Team Management | Approval Requests |
| Job Field | Filter option that displays approval requests related to a specific job field. | Team Management | Approval Request Filters |
| Job Role | Filter option that displays approval requests related to a specific job role. | Team Management | Approval Request Filters |
| Job Role | Option used to request the job role of an employee to be changed. | Team Management | Employee Change Requests |
| Justification | Text box used to enter the reason of the change, which is mandatory for the change request to be saved. | Team Management | Employee Change Requests |
| Location | Filter option that displays approval requests related to a specific location. | Team Management | Approval Request Filters |
| Location | Option used to request the location of an employee to be changed. | Team Management | Employee Change Requests |
| Managed by | Filter option that displays approval requests that were initiated by a specific manager. | Team Management | Approval Request Filters |
| Manager | Option used to request the manager of the employee to be changed when moving an employee to another team. Note that it is also possible to move an employee without specifying the manager when you want to remove an employee from your team but don't know yet where to move that employee. | Team Management | Employee Change Requests |
| New Manager | Name of the target manager when an employee is moved to another team. | Team Management | Approval Requests |
| Organization | Filter option that displays approval requests related to a specific organization. | Team Management | Approval Request Filters |
| Organization | Option used to request the organization of an employee to be changed. | Team Management | Employee Change Requests |
| Refresh | Button that executes the search based on the selected filters and displays the corresponding requests in the result grid. | Team Management | Approval Request Filters |
| Results Per Page | Drop-down list that allows you to select the number of approval requests to be displayed at once on a single page, the maximum being 40 per page. | Team Management | Approval Requests |
| Status | Approval status of the request, which can be Approval in Progress, Approved, Rejected or Not Approved (which occurs when the approval process was canceled). | Team Management | Approval Requests |
Working with Matrix Management
Matrix Management
Matrix management provides the ability to assign employees, for a specific period, to matrix or proxy managers that can participate in reviews, goals and any other tasks on behalf of the primary manager.
Matrix management is a technique of managing an organization (or, more commonly, part of an organization) through a series of dual-reporting relationships instead of a more traditional linear management structure. In its simplest form, a matrix configuration may be known as a cross-functional work team, which brings together individuals who report to different parts of the company in order to complete a particular project or task. Another example would be an employee who is managed by multiple supervisors, where the primary manager has named matrix managers for his employees. In all such cases, the matrix managers need to participate in the tasks related to the employees they were assigned, whether that be to write a performance review, approve a goal plan or even to assign development activities.
Allows managers to share their work responsibilities and administrative tasks with matrix managers who may act on their behalf.
Allows managers or HR administrators to appoint temporary resource managers. In case that a primary manager is unavailable or on a leave, their tasks and performance management functions may be conducted by the matrix manager.
Allows matrix managers to participate in performance management functions of employees who work in cross functional teams. It is important to note that to be entitled to participate in a review, matrix managers must also be made review collaborators.
Matrix managers are also added to the security relationships as matrix managers. In other words, matrix managers have both ownership and matrix manager security access.
A matrix manager can participate in various performance management processes such as reviews, goals, development plans, and succession plans. They may participate by conducting the tasks and actions of the primary manager or by directly providing input to these processes. However, for a matrix manager to edit or write an employee review, it must also be assigned as a review collaborator.
-
Delegated Employee View - This view of the organizational chart allows a matrix manager to view all employees that have been delegated to him, indicated by a dotted line. The delegated employee performance card indicates also the number of matrix managers each has.
-
Manage Matrix Management Relationships - Via the “Manage Matrix Manager” action, a user can appoint a matrix manager to all or some of his employees and assign his tasks. When managing matrix managers, managers can add or remove matrix managers they have assigned as well as view a list of the employees they have delegated to each matrix managers.
-
Task Delegation - When a manager chooses to delegate his tasks to the matrix manager, the tasks that would normally go to the primary manager are also be sent to the matrix manager, and therefore show in both the primary manager and the matrix manager's task list. The tasks that are delegated are those that are in relation to the delegated employees; for instance, tasks like network invitation sent to the primary manager would not be delegated to the matrix manager. Once the task is completed by either the original manager or one of the matrix managers, the task is considered complete and it is deleted from the task list.
Matrix Manager as Review Approvers - A matrix manager may be selected as an approver type in a review's approval workflow. In such a scenario, the matrix manager will be notified when a review reaches the approval stage in the workflow and will be able to approve/reject the review as desired.
-
Searching Amongst Delegated Employees - A user that has been named matrix manager can use the People Selector to search for people amongst their delegated employees.
There are various tasks and actions that a matrix manager may perform. In order for the matrix manager to receive tasks and complete the associated actions, the primary manager must have also delegated his tasks to matrix manager. Following is a table listing all the actions than can be performed by matrix managers versus those allowed to review collaborators.
| Task or Action | Tasks that can be done by a collaborator | Tasks that can be done by a matrix manager* |
|---|---|---|
| Write Employee Review (initial, rejected or restarted review) | Yes | No |
| Submit for Approval | No | Yes |
| Reopen for Approval | No | Yes |
| Decide on Approval | No | No (unless the matrix manager is defined as an approver in the review workflow or the original approver has delegated his tasks to this matrix manager) |
| Release Employee Review | No | Yes |
| Request Acknowledgment | No | Yes |
| Acknowledgment | No | No The matrix manager cannot acknowledge the review on behalf of the employee even if the "Allow manager to override employee acknowledgment" setting is active in review process definition. |
| Send Review Back to Employee | No | Yes |
| Cancel Review | No | No |
| Transfer Review | No | No |
| Manager Review Collaborators | No | No |
| Notified of task 'Write Employee Review' or 'Reopen for Approval' via Task List | Yes | Yes |
| Notified of task 'Submit for Approval', 'Release' , 'Request Acknowledgment' or 'Close' via Task List | No | Yes |
*Note that if a matrix relationship is created before review generation, the matrix manager is automatically added as a review collaborator and therefore be able to perform the tasks allowed to collaborators.
As long as the review is in a Draft status and not yet submitted for approval, and
If the review request configuration indicates that this action is possible (via the setting 'Allow Manager to Restart Review Workflow'
View, edit, and delete matrix management relationships created by managers, for any coverage area.
Create new matrix management relationships on behalf of managers, for any coverage area. The managers are in turn entitled to view, edit, and delete those matrix relationships created by the HR administrator.
Configuration
Matrix management functions are optional and must be configured with the proper settings and user permissions.
| Settings from | ||||
|---|---|---|---|---|
| Setting Name | Setting Description | Possible Values | Security Level | Setting Category |
| Matrix Management Enabled | Enables matrix management functionalities allowing a manager to delegate his tasks to another manager. |
|
Public | Matrix Management |
| Extended Matrix Management | Indicates if matrix manager relationships also apply to the direct reports of delegated employees. |
|
Public | Matrix Management |
| Maximum Number of Matrix Managers | Indicates the maximum number of matrix manager relationships that can be set for an employee. |
|
Public | Matrix Management |
| Maximum Number of Matrix Management Requests | Indicates the maximum number of matrix management requests a manager can have at the same time. |
|
Public | Matrix Management |
| Employee Change Matrix Management Behavior | Indicates how matrix manager relationships are handled when an employee changes manager. |
|
Public | Matrix Management |
In addition to the configuration settings, users need to have specific permissions granted to be allowed to perform matrix management functions.
| Permissions | |
|---|---|
| Permission Name | Setting Description |
| This permission grants the user access to the Talent Browser. This permission must be granted in conjunction with the appropriate View/Manage permission listed below. If a user has this permission, he will be entitled to perform matrix management requests; however, to perform delegated tasks, he will need, for each context, to have the View - If the user is a matrix manager or the Manager - If the user is a matrix manager permission. **If an organization wants to let the managers perform matrix management requests but not any employee change requests, the administrator needs to disable the editability of all Team Management Standard Fields (such as the manager, organization, location, and job role). |
|
|
|
This permission allows the user to view and/or manage performance reviews if designated as a matrix manager. |
|
|
This permission allows the user to view and/or manage goal plans if designated as a matrix manager. |
|
|
This permission allows the user to view and/or manage career plans if designated as a matrix manager. |
|
|
This permission allows the user to view and/or manage development plans if designated as a matrix manager. |
|
|
This permission allows the user to view and/or manage employee metrics if designated as a matrix manager. |
|
|
This permission allows the user to view and/or manage talent profiles if designated as a matrix manager. |
| This permission grants the user access to the HR Administration Tools. This permission, in conjunction with 'View as another employee' is required to allow an HR administrator to manage (create, view, edit, delete) matrix management relationships. |
|
| Performance > Team Management > Access Manage Matrix Manager | This permission is required for the logged in user to have the option available from their card in the Talent Browser. |
Aside from the configuration settings and permission, the matrix manager role has been added to the list of available roles in the Role Selector when setting the approvers of a review definition. Furthermore, the matrix manager can also be designated as a calibrator.
Viewing Your Delegated Employees
Set the scope to Direct Reports.
If you have delegated employees, they are displayed with dotted lines indicating the matrix management relationships.
Designating a Matrix Manager for an Employee
Performance > [Navigation bar] > More dropdown > Talent Browser
This action is only available for the connected manager, and only from his own performance card, which is the highest one in the hierarchy.
The matrix management relationship has been defined. The tasks occurring during the specified period will be send to both the original manager and the matrix manager, and will show in their respective task list.
Ending a Matrix Management Relationship
Performance > [Navigation bar]Talent Browser button
This action is only available for the connected manager, and only from his own performance card, that is the highest one in the hierarchy.
From your own performance card, select Manage Matrix Manager in the Go to menu.
In the Manage Matrix Manager window, select the matrix manager to remove and click the Minus icon.
Click Close.
The matrix manager will be removed, as well as all matrix management relationships that you had established.
Managing a Matrix Management Relationship on Behalf of a Manager
The user must be an HR administrator.
The user must have the permission .
The setting is set to Yes.
From the Taleo Performance home page, log in as the manager for whom you want to either view, create, edit or delete the matrix management relationship.
From the Talent Browser of that manager, open the Go to menu of the manager's performance card and select Manage Matrix Manager.
In the Manage Matrix Manager window, perform the desired action.
-
To assign a new matrix manager for this manager, click the Plus icon. In the Matrix Manager window, specify how long the matrix management relationship will be valid, indicate whether you want to delegate the tasks to this matrix manager and select the employees to be delegated to this matrix manager.
-
To view or edit an existing matrix management relationship, select the desired matrix manager and select View Details... from the contextual menu. Enter and save your changes if so required.
-
To remove a matrix manager, select the desired matrix manager and click the Minus icon.
-
Once you have completed your task, close the Manage Matrix Manager window.
The matrix management relationship task will be performed as requested and is automatically applied
HR Administrators Working with Employees
Filtering Approval Requests
Filtering approval requests allows HR administrators to sort pending succession plans, employee goal plans, performance reviews and employee change requests by approval status and to take action, by either rejecting, approving or canceling the approval.
All approval requests can be viewed by HR administrators as long as the approval request is pending, meaning that no action has been taken by any authorized approvers.
The Filter Results section will display the approval requests corresponding to the specified filters. The status bar of the page shows the number of displayed requests over the total.
When users enter the Performance Review Administration pages for the first time, no data is loaded. Users select their filters and click the Refresh the results icon to load only the data that they are interested in, thereby increasing performance. When these filters are set once, they are memorized within a single session. If the user navigates away from the page and comes back, the filters previously set will be preserved. If the user wants to clear the filters, selecting the Clear the filters icon will do so.
Once the filtered approval requests are displayed, you can approve or reject the request, cancel the approval process or even specify the target manager in the case of employee changes or to complete a currently pending step in the case of performance reviews.
Viewing Employee Change Request Details
Viewing the employee change details allows HR administrators to see the name of the person who requested the change, the subject and the reason of the change.
Filter the requests in order to view the employee for which you want to view request details.
In the result grid, click on the name of the desired employee,.
Once you have viewed the information, click Close to return to the result view.
Viewing Approval Details
Viewing approval details allows HR administrators to see the date the approval request was assigned and the date it is due, as well as the name of all possible approvers.
All approval requests can be viewed by HR administrators as long as the approval request is pending, meaning that no action has been taken by any authorized approvers.
Filter the requests in order to view the element for which you want to the approval details.
Next to the name of the desired element, click the down arrow icon to open the Go To menu and select the View Approval Details option.
The Approval Details window will display information about the approval, such as the assigned and due dates as well as all the possible approvers.
Once you have viewed the information, click Close to return to the result view.
Assigning a Target Manager
Assigning a target manager is a task that is done by an HR administrator when there is a request to move an employee from one team to another and the manager of the new team has not been specified.
For this task to be available, the change must be related to a team change where the new manager was not specified by the person who requested the change.
Filter the approval requests in order to view the change request for which you want to specify the new manager.
In the result grid, next to the name of the corresponding employee, click the right arrow icon to open the Actions menu and select Change the Target Manager.
In the Allocate a Manager window, click the lookup icon to select the new manager.
Once the manager is selected and its name is shown, click OK.
If the action was completed successfully, a confirmation message will display and you will have to click Close.
The name of specified manager now shows in the New Manager column.
Accepting an Approval Request
Accepting an approval request consists in basically performing the approval that has been requested.
To be able to decide on the approval, the approval must have been requested.
Once approved, the request is no longer displayed in the task list.
Rejecting an Approval Request
Rejecting an approval request corresponds to not accepting the approval that is requested.
To be able to decide on the approval, the element's approval must be in progress.
Filter the approval requests in order to view the element for which you want to reject the approval.
In the result grid, select one employee or more:
to reject the approval of only one element, click the right arrow icon next to the name of the desired element;
to reject the approval of multiple elements at once, check the desired elements one by one or check the corresponding column header to select all elements on the page.
From the Actions menu, select Decide on Approval.
In the Request Approval window, select Reject and enter any needed comments.
Click OK.
Once rejected, the approval request remains in the list but with a rejected status.
Canceling an Approval Request
Canceling an approval request consists in terminating the entire approval process as if it had never been assigned.
Once canceled, the approval request is no longer displayed.
Native Reports
Predefined reports can be run from within Oracle Taleo Performance, without the need to move to a different module or have special access. This enables reports to be quickly and simply generated on common subjects, such as goal plan status or performance review details. Native reporting lets managers report from within a module, where they simply select which employees they want to include in the report and what subject they want to report on, based on the available templates.
Beginning in Feature Pack 13C Native Reporting is based on the Oracle Business Intelligence Publisher (BI Publisher or BIP). The content of the delivered native reports has not changed from prior releases. Report layout may be slightly different due to the change in reporting technology. Customers are also able to create their own custom reports. The language selected at login determines which language the report is generated in. The report data displays in that login language, however, the language of the template reports are shown in the language they were originally created. The report labels display as designed in the report template. A separate report template must be created for each language if it is necessary for the report template and language to match. By default reports are available in Oracle Taleo Performance; however, they can also be emailed as attachments with additional configuration.
Delivered Reporting Templates
-
Goal Plan Status - Includes goal plan status information about the selected population. The report focuses on the plan status and approval date along with useful employee information such as their location and organization.
-
Development Plan Status - Similar to goal plan, except that it deals with development plans.
-
Review Status - Includes review status information about the selected population. It is useful for Employee Self-Assessment and Manager Evaluation statuses along with typical employee information.
-
Review History - Includes the historical performance review scores for the selected population. The report focuses on the goal score, the competency score, and the Overall Review Rating.
-
Performance Review Summary - Can include the review status, goal section score, and competency section score for a designated review cycle and review request.
-
Talent Profile - Provides a consolidated view of an employee's information such as their job, work history, skills and qualifications, performance, and development.
-
Organization Chart - Contains the organization charts for all the direct reports under the senior leader specified in the Select Employee(s) section of the Run a Report dialog. The report can provide a useful tool for compiling a talent book for the organization, although it is not an exact replica of the Talent Browser. If a manager has too many direct reports, not all nodes will be shown. It is recommended that each individual manager's organization chart report should be run separately to include all members. Note: This report is not modifiable by customers using the BI Publisher technology.
Customizing Reports and Templates
Listed below are a few of the entities within native reports that can be configured or customized.
-
Employee Status - Users can now include Employee Status in their reports. The Employee Status refers to the status in the SmartOrg user account. The possible statuses are New, Current or Former.
The Employee Status has been added to the following data models:
-
Employee Data Model
-
Talent Profile Data Model
-
Employee Manager Data Model
-
Position Manager Data Model
-
Coverage Area - Instead of having to select a population based on employee hierarchy, direct reports, for example, users can now run reports based on coverage areas, or OLF data. This extends the Native Reporting capability for users, especially the needs of HR Administrators to report across the organization against coverage area, (organizations, locations and job functions) to provide more flexibility analyzing specific population segments.
-
Successor Readiness - Prior to 15A, reports picked up only successors with a readiness value set. Now reports can also retrieve successors with a readiness value of Not Specified.
-
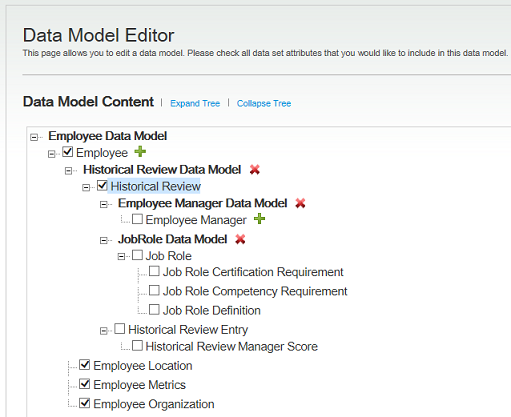
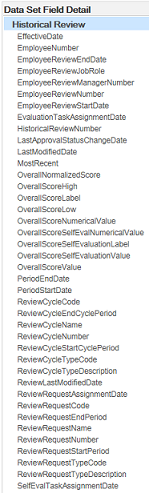
Historical Review - Administrators can create a custom data model that joins the Review History to the Employee base data model, exposing the Review History data for reporting.
-
Historical review scores are stored at the employee level, not at the review cycle level so users must select the group of employees first, then the review. For example, R&D, then Reviews 2011.
-
The employee’s OLF is not stored at the time of review generation, therefore, anyone who left R&D after the 2011 reviews were generated will not be included.
When you are granted permissions to access and generate reports the navigation bar at the top of the Performance application includes a Reports link. From any Performance module follow the link to open the My Reports dialog.
Also generate native reports from many other locations in Performance:
-
Advanced Search > Actions > Create Report
-
Advanced Search > Employee inline menu > Create Report
-
Talent Profile > More Actions Menu > Create Report
-
Talent Browser > Employee Card inline menu
-
Talent Browser > More Actions menu > Create Report
-
Review Hub > More Actions menu > Create Report
-
Review Hub > Employee inline menu > Create Report
-
Talent Pool > Talent Pool inline menu > Create Report
-
Talent Pool > More Actions menu > Create Report
-
Talent Pool > Talent Pool > Members > Employee inline menu > Create Report
-
People Search - Users can run reports directly from the People Search results, pre-populating the report filter with either the search result criteria or the search selections.
If users select all the employees from the search results and then select Run Report, they are presented with a pop-up prompting them to choose whether to run the report on the selected employees or all employees. The data displays up to 20 rows per page.
My Reports DialogThe My Reports dialog displays a list from which you can access previously generated report instances, for both delivered and custom reports. For each report instance the dialog presents the report Name, Number of employees included in the report, Request Date and Status. The count is the Number of Positions in the case of Positions and the Number of Talent Pools in the case of Talent Pools. For measurement reports the count is always shown as 0. If you want to generate a different report instance with different parameters, click the Run Report link at top of the dialog to open the Run a Report dialog. The Name field has a More Actions dropdown selector providing these options:
-
View - Use to view the report content in the specified output format.
-
Download report data - Use to download the report data in an XML file.Note: Not all users will have this option. This is configurable and the Access Report Data setting must be enabled at the user level for this option to display.
-
Delete - Use to delete the report instance from the list.
When you run a report and first come to the dialog box to open the report instance it may not yet be displayed. Click Refresh to prompt the report instance to display on the list.
Run a Report Dialog
The Run a Report dialog is accessed using the Run Report link on the My Reports dialog. It provides the ability to generate new report instances using different report parameters, for both delivered and custom reports. You can only select and run one population/report combination at a time.
The reports and report output types available to a you depends upon your organization's implementation. Configured group and role restrictions for report display are applied to the Run a Report dialog. Performance only loads permitted reports on your page.
The Organization Chart is available only in the PDF and PPT report output formats. A customizable data model is not available for the Organization Chart report, you cannot create a custom Organization Chart report.
The Run a Report dialog has five tabs grouping reports by employee population type (employees, positions, talent pools, reviews, goals). The following table lists the selection parameter values presented for each type.
| Category tab (entity type) | Selection Parameters |
|---|---|
| Employees |
|
| Positions |
|
| Talent pools |
|
| Reviews |
|
| Goals |
|
Running Reports
Running reports involves creating report instances which you subsequently send to the printer server for generation, and then viewing the reports via Taleo Performance or email.
Generating New Report Instances
New report instances can be generated from throughout the system, wherever you can access the My Reports dialog, and take the current context into consideration when initially setting the criteria for the report.
For instance, if you select New Report from the Talent Browser — which is set to display direct reports — then the Direct Reports option is preselected in the New Report window. The reports available to choose from are based on the main components of the system — development and goal plans, performance reviews along with review status and ratings history, talent profile — and will be bespoke for your organization. Reports are not generated on-demand. You may have to wait a number of minutes before you can view the report.
Running a Report Instance
You must have the Team Management > Access Reporting user type permission.
Your access to a given report may be further restricted by User Group or User Role configuration.
Depending on your system configuration you may open the report instance by clicking the hyperlinked report name on the My Reports dialog, or the report may also be emailed to you. In either case when you open the report it will be in the selected output format you chose on the Run Reports dialog.
Viewing Reports
Once you have generated a report and it has been run, you can view it from throughout Taleo Performance, anywhere the Reports link is available. Reports can also be configured to be emailed to whoever created them.
While the context you are in can affect the default options available when you want to generate a new report instance, regardless of where you access the My Reports dialog from, the report will display the same details.
When you receive a report via email you will receive a link to the report in Taleo Performance and you may also get an attached PDF. Whether an attachment is included is dependent on the PDF not exceeding the attachment file size limit. When you select the link (not the attachment) in the email you may be prompted to sign into Oracle Taleo Performance, but then the report will be displayed automatically, without the need for additional navigation. If the report expires before you access it, the report name is no longer clickable.
Large Profile Picture in Native Reporting.
Image format can be .gif, .jpg. or .png.
Image size is 256 x 256 pixels, passport style.
Some configuration is needed for the photo to display in the Talent Profile and for the user to be able to upload the photo for the Talent Profile.
Viewing Report Instances
You must have the Team Management > Access Reporting user type permission in Configuration. Your access to a given report may also be limited due to User Group or User Role report access permissions.
Navigation:
The report opens and you can choose to save it or print it.
Click Archived to display additional reports or click Run Again to rerun the report with the most current data.
After viewing, you can delete the report instance by selecting the Name field dropdown (the Down Arrow icon) and clicking Delete from the available options.
Employee Delete
The Employee delete feature provides the ability to filter, review, and delete former employees from the system as required by legal constraints in EMEA and other regions.
The Person Model
A person in the system can be composed of the following parts:
User Account – to access the system with granted permissions.
Candidate Account – to apply for jobs through the Career Section.
Profile – to store the common profile. Employee and Candidate share the same profile.
Employee – to store employee related data.
When a candidate is hired, he gets a user account and an employee associated to his profile:
As an employee, the profile is maintained through Taleo Performance Talent Profile
As a candidate, the profile is maintained through Recruiting and the Career Section.
Employee Delete Strategy
Employee Delete only removes employee specific data.
The Candidate account and common profile are left intact. This will allow the person to be rehired in the future. The person may remain in current pools or succession plans. The Candidate account can eventually be deleted as a distinct task if Recruiting is available in the system.
| Deleted |
Not Deleted |
|---|---|
| Employee Specific Data
|
Other Taleo Performance Data
Profile and Candidate Data
Talent Pools & Succession Plans
User Specific Data
|
Employee Delete Rules
Only terminated employees can be deleted.
Employee must not be owner manager of positions. A transfer of ownership is required prior deletion.
Employee must not be owner of talent pools. A transfer of ownership is required prior deletion.
Employee Delete Process
Employee delete is a three step process:
Employee termination
Deletion task creation
Task monitoring
Limitations
-
No archiving capabilities at this time.
-
The user account cannot be permanently deleted from the system.
User accounts are only virtually deleted but remain in the system.
The user account does not contain employee related data.
-
Products for which the data will not be automatically deleted by the Employee Delete task:
Learn
Evaluation Management
Assessment
Passport
Talent Exchange
Analytics
Any other external products integrated with Taleo