1Getting Started

Getting Started

    Accessing Taleo Performance

      Taleo Performance Login

      Three scenarios are supported for logging in to Taleo Performance depending on your status: a user with an employee record, a user with an employee record and an HR-Admin role, or an employee with no employee record but with an HR-Admin role.

      The status associated with your user name and password determines the scope of the tasks you can perform in Taleo Performance.

      • You have an employee record.

        If you are a user who has an employee record, the rights associated with your status allow you to access your own information (performance review, succession plan and goal plan). When logging in to the application, you gain access to your profile automatically.

      • You have an employee record and an HR-Admin role.

        By default, you have access to your profile automatically when you log in to the application; however, you can also see other employees’ information.

      • You have no employee record, but you have an HR-Admin role.

        Because you have no employee record, you have access only to other employees’ information. Consequently, you have to specify whose information you want to consult. When you log in to the application, the system requests you to enter the appropriate information.

        Logging In With an Employee Record

        Logging in to the application as a user who has an employee record enables you to gain access to your information (performance review, succession plan and goal plan).

        1. Select Taleo Performance from the product list window.

        2. If a Legal Agreement window displays, you will need to accept it to be able to continue.

          You can also select the Remember my selection option to prevent further display of this agreement on the current computer.

        3. From the User Sign In window, enter your user name and password. Click Sign In.

        4. Taleo Performance opens and displays the Employee Center.

          Logging In With an Employee Record and an HR-Admin Role

          Logging in to the application as a user who has an employee record and an HR-Admin role allows you to access your information (performance review, succession plan and goal plan) and the information about other employees in the organization.

          1. Select Taleo Performance from the product list window.

          2. If a Legal Agreement window displays, you will need to accept it to be able to continue.

            You can also select the Remember my selection option to prevent further display of this agreement on the current computer.

          3. In the User Sign In window, enter your user name and password. Click Sign In.

          4. Taleo Performance opens and displays the Employee Center.

            Logging In With No Employee Record But With an HR-Admin Role

            When you have no employee record but you have an HR administrator role, you must specify whose file you want to consult.

            1. Select Taleo Performance from the product list window.

            2. If a Legal Agreement window displays, you will need to accept it to be able to continue.

              You can also select the Remember my selection option to prevent further display of this agreement on the current computer.

            3. In the User Sign In window, enter your user name and password. Click Sign In.

            4. Taleo Performance opens.

              1. If the People Search dialog opens use it to navigate and select the employee whose records you want to work with.

              2. If the Employee Center opens use the Quick Search or Advanced Search on the upper right corner of the screen to navigate to and select the the employee whose records you want to work with.

            The Employee Center displays all the information available on the employee. All actions and security checks, however, are governed by the employee's rights and privileges. At any point, you can switch to another employee's file using the Search box on the upper right corner of the screen.

              Welcome Center

              The Welcome Center is a home page that is displayed to users immediately after they log in. It provides a "one-click" access to Oracle Talent Acquisition Cloud (OTAC) products.

              The Welcome Center contains an auxiliary navigation bar, a core navigation bar, a Quick Access panel, and a central panel.

              • The auxiliary navigation bar contains links to additional resources such as the online help, setup, and the Sign Out link.

              • The core navigation bar is a set of tabs that provide direct links to OTAC products. A user might have a tab for any or all of the following products: Performance, Recruiting, Compensation, Oracle Business Intelligence, Learn, and Configuration.

              • The Quick Access panel provides an alternative "one-click" access to the same products available in the core navigation bar. It also provides access to modules within products for example, Onboarding (Transitions), Scheduling Center, and to specific content such as a requisitions and candidate files.

              • In the central panel, customers can put information of interest to all product users. Alternatively, they can create distinct sets of information and associate an information set with a configuration profile.

              If the Welcome Center is enabled, it replaces the table of contents page.

                Taleo Performance Basics

                  Taleo Performance Home Page

                  The Taleo Performance main landing page presents a global navigation bar and the Employee Center. Its dashboard-like interface with panels or sections provides information on tasks assigned, network members, and goal progress. Screens within the system can be accessed with one click to add and update data.

                  The main landing page includes two main components of the Performance system:
                  1. The top navigation bar, which is present throughout the application, appears above all Performance modules.

                  2. The Employee Center, which is both a standalone page and the default landing page for Performance, can include Instructions, the My Tasks, My Goals and My Network sections.

                  Following is a brief overview of the landing page's components.

                  The image shows the Taleo Performance home page.

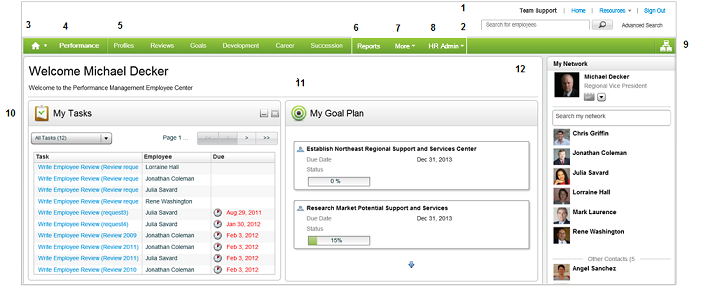
                  Figure: The Navigation bar displays above all of the Performance modules, including the Employee Center landing page.

                  Element Description
                  1 Auxiliary navigation bar provides access to various information, such as:
                  • Login username.

                  • Home link to return to product selection page (e.g. Recruiting, Configuration).

                  • Resources menu with links to user account information, online help and product version.

                  • Sign Out link.

                  2 Search For Employees box and Advanced Search link.
                  3 Home icon to return to product selection page (e.g. Recruiting, Configuration). Aids in cross-product navigation to access other Taleo applications in your organization's implementation.
                  4 Performance link provides access to return you to the Employee Center landing page from any of the modules in the application.
                  5 Navigation bar displays fixed at the top of the screen for all Performance modules (e.g. Profiles, Reviews, Goals). Provides links for quick access to the main modules and functions in your organization's implementation, requiring no more that two clicks to get to a module.
                  6 Reports link opens the My Reports dialog.
                  7 More dropdown menu provides overflow links to additional modules of Performance (e.g. Team Reviews, Feedback, Mentoring Center).
                  8 HR Admin dropdown menu provides links to function available to the HR Administrator role (e.g. All Reviews, Review Analytics, Team Management).
                  9 Talent Browser icon opens the Talent Browser module.
                  10 My Tasks section provides notification of tasks that have been assigned to you. The task list can be displayed by type, as well as be sorted by employee or due date. Each task entry provides a direct link to the page in the application that corresponds to the task.
                  11 My Goal Plan section provides a quick view of your goals and their completion status.
                  12 My Network section provides you with the ability to manage your network, including a pre-populated list of contacts.
                  Note: The applications, modules and features you have access to depends upon your organization's implementation and your access permissions.

                    Navigation

                    Taleo Performance provides an easy and intuitive navigation system to eliminate the numerous clicks and navigation steps required in traditional applications. You'll find this is more user-friendly than the traditional menu structure for navigating to information.

                    Navigation features in Performance include the following: a main navigation bar, object-based navigation menus, smart breadcrumbs, and deep linking.

                    Navigation Bar

                    The Navigation bar provides persistent links to the Welcome Center, the Employee Center main landing page, and the various Performance modules. It displays fixed at the top of the page for all Performance modules (e.g. Profiles, Reviews and Goals), providing a quick way to navigate between modules, and requiring no more than two clicks to get to a module. The Navigation bar includes the following features:
                    • Home icon - Provides cross-product navigation to access other Taleo applications (e.g. Configuration, Recruiting, Learn) in your organization's implementation.

                    • Performance link - Returns you to the Employee Center landing page from any of the other modules in the application.

                    • Main module links - Provides navigation to open the main modules of Performance (e.g. Reviews, Goals, Development, etc.). By default opens the employee's review, goal plan, etc.

                    • Reports link - Opens the My Reports dialog.

                    • More dropdown menu - Provides overflow links to additional modules and features in Performance (e.g. Team Reviews, Feedback, Mentoring Center, etc. ).

                    • HR Admin dropdown menu - Provides links to tools available to the HR Administrator role (e.g. All Reviews, Review Analytics, Team Management).

                    • Talent Browser button - Opens the Talent Browser module.

                    Note: The applications, modules and features you have access to depends upon your organization's implementation and your access permissions.

                    Object-based Navigation Menus

                    Objects in the system, such as employees or positions, have one-click navigation menus contextualized to reduce the amount of time spent navigating. For example, on the Performance Card you can access a Go To menu that allows you to navigate to various pages about that person. The navigable list includes the Talent Profile, Performance Review, Goal Plan, Career Plan and Job Position Profile. In many data grids one-click navigation allows you to navigate directly to information about a given employee by clicking a menu which expands when you click by the person's name.

                    Smart Breadcrumbs

                    Smart breadcrumbs are located at the top of the application modules and dynamically change as users navigate through the system. The smart breadcrumbs allow you to switch between actions similar to the object-based navigation. Managers can navigate between direct reports with a single click. Smart breadcrumbs also include buttons that return you to the Employee Center landing page.

                    Deep Linking

                    Deep linking provides the ability to use the back and forward buttons of supported web browsers. Pages can also be bookmarked, enabling you to quickly return to popular pages.

                      Browser History

                      The browser history links provide the ability to quickly return to a previously viewed page of Taleo Performance, by clicking its name in the list of history links or in the list of recently viewed pages.

                      The browser history feature is available in all Taleo Performance modules and provides a detailed name of the page previously viewed, so users can easily identify the page to be displayed.

                      The link names all start with the application name. The second part of the link name reflects the page title. If the information is specific to a user, the user name will be identified in the link name. In the same way, if the page is related to a specific period or view mode, those will also be part of the link name.

                      Following are a few examples of browser history links:

                      Window Name Browser History Link
                      Talent Profile Taleo Performance - Talent Profile - <employee name>
                      Journal Taleo Performance - Journal
                      Job Position Profile Taleo Performance - Job Position Profile
                      Job Role Profile Taleo Performance - Job Role Information - <job role name>
                      Goal Plan (in list mode) Taleo Performance - Goal Plan - <employee name> - <business period> - <tab name> List view
                      Competency Goal Details Taleo Performance - Competency Goal- <goal name>
                      Project List (in card mode) Taleo Performance - My Projects - Card view
                      Performance Review Taleo Performance - Performance Review - <employee name> - <review request> - <review element name> - Compare view
                      Archived Activities Taleo Performance - Development Plan - Archived Development Activities
                      Review Analytics Taleo Performance - HR Administration Tools - Review Analytics
                      Succession Plan (in timeline mode) Taleo Performance - Succession Plan - <job position name> - Timeline view
                      Talent Pool (in matrix mode) Taleo Performance - Talent Pool - <talent pool name> - <tab name> - Matrix view
                      Mentoring Center Taleo Performance - Mentoring Center
                        Accessing a Previously Viewed Page
                        1. In the tool bar of your browser window, open the list of recently viewed pages.

                        2. In the list of all the viewed pages, select the page that you wish to, return to or use the back and forward arrows to go back or forward one page at a time.

                        The browser displays the page selected.

                          Bookmarking a Page
                          1. Navigate to the page you want to add to your bookmarks (or favorites).

                          2. Choose the browser option to add a bookmark and choose the desired location.

                          The selected page will be added to your bookmarks (or favorites) and will allow you to quickly return to that page later one.

                            Accessing a Bookmarked Page
                            1. From your browser window, select the menu option that lists bookmarked (or favorite) pages.

                            2. Select the Taleo Performance page you wish to open.

                            3. If you are not already signed in, you will be presented with the Taleo login page to enter your credentials; otherwise, the desired page will be displayed. The selected page will open, directly if you are already signed in, or after having entered your credentials in the Taleo login page if you were not already signed in.

                            The selected bookmarked page is displayed.

                              Deep Linking

                              Deep linking provides the ability to use the back and forward buttons of supported web browsers, enabling you to quickly return to previously viewed pages.

                              Using the back and forward buttons of the browser means the internet browser behavior you expect to see is available when using Taleo Performance. This feature works at the higher module level, where different URLs are available, but does not differentiate between items within the module.

                              The following table lists features of Taleo Performance that support deep linking.

                              Deep Linking Support Levels
                              Page Module Component Support Level
                              Navigation bar - HR Admin Review Analytics Review Cycle Analytics Full Support
                              Review Request Analytics by Rating Full Support
                              Review Request Analytics by Status Full Support
                              All Reviews Performance Review Partial Support*
                              All Succession Plan Succession Planning Partial Support*
                              All Goal Plans Goal Plans Partial Support*
                              Team Management Team Management Full Support
                              All Development Plans Development Plan Partial Support*
                              Navigation bar - main modules Profiles General Full Support
                              Career Career Full Support
                              Job Role Profile Full Support
                              Job Role Details No Support
                              Search for Development Activities No Support
                              Create an Activity No Support
                              Development Development Full Support
                              Activity Details Full Support
                              Recommendations Full Support
                              Archived Development Activities Full Support
                              Reviews Review Full Support
                              Tabs No Support**
                              Goals List Mode Full Support
                              Time Line Mode No Support
                              Details Perspective Full Support
                              Living on the List Buttons No Support
                              General Full Support
                              Succession List Mode Full Support
                              Compare Full Support
                              Time Line No Support
                              Matrix No Support
                              Employee Center My Tasks General Full Support
                              My Goals General Full Support
                              My Network Network Contact List Full Support
                              Common View Pop-up Windows No Support
                              Performance Card Full Support
                              Context Box Home Button Full Support
                              People Selector Full Support
                              Module Selector Full Support

                              * Employee links are not supported.

                              ** Tabs are not supported, as they are contained within the page and cannot be separately linked.

                                Auxiliary Navigation Bar

                                The auxiliary navigation bar, located at the top right of pages, provides users with quick access to a collection of resources that they typically want to consult on occasion; resources not associated with a specific Taleo Enterprise product.

                                When enabled, the auxiliary navigation bar is available at all times for users to see and access.

                                The auxiliary navigation bar may contain the following elements (if enabled and if users were granted access to them):

                                Element Description
                                Home
                                • If you have access to multiple Taleo Enterprise products and you click Home, the Welcome Center is displayed.

                                • If you have access to Recruiting only and you click Home, the Recruiting Center front page is displayed.

                                • If you have access to Legacy Onboarding only and you click Home, the Legacy Onboarding WebTop front page is displayed.

                                • If you have access to Onboarding (Transitions) only and you click Home, the Onboarding (Transitions) Center front page is displayed.

                                • If you have access to Performance only and you click Home, the Employee Center front page is displayed.

                                • If you have access to Compensation only and you click Home, the Compensation Center (Rewards Planning) front page is displayed.

                                • If you have access to Configuration only and you click Home, the Configuration Center front page is displayed.

                                Resources May include:
                                • My Setup: Access to personal preferences.

                                • Training: Access to online training materials.

                                • e-Learning: Access to eLearning materials.

                                • Support: Access to Oracle Support.

                                • Help: Access to online help.

                                • About: Information about the product such as the version number and the build number that you need to provide to Oracle Support when you need to contact them.

                                Talent Grid Access to Solution Exchange and Knowledge Exchange. Taleo clients who use only Performance have access to Knowledge Exchange only.
                                Sign Out Terminates the session and you are automatically signed out of all Taleo products.
                                Configuration

                                The display of the auxiliary navigation bar is enabled by the following setting.

                                Setting Possible Values Default Value Location
                                Auxiliary Navigation Bar
                                • No

                                • Yes

                                Yes Configuration > [SmartOrg] Administration > Configuration Profile
                                Elements displayed in the auxiliary navigation bar depend on settings that were enabled and on permissions users were granted.

                                The following permissions are required to access the Talent Grid products:

                                User Type Permission Location
                                Access Knowledge Exchange Configuration > [SmartOrg] Administration > User Types > Grid > Knowledge Exchange
                                Access Solution Exchange Configuration > [SmartOrg] Administration > User Types > Grid > Solution Exchange
                                  Help Center

                                  The Help Center provides the standard online help for Taleo Performance. Access it from the Navigation toolbar at the top each page of the application. Click the Resources link and then select the Help Center option. The Help Center opens in a new window; providing a help content viewer with search, navigation and topic display capabilities. The Help Center feature is delivered enabled at implementation. There is no configuration required.

                                  The Help Center topic content is the same as that delivered in the PDF versions of the Taleo Performance User and Configuration Guides, the main difference being the Help Center content is accessible from within the application.

                                  Links to specific sections of the Help Center can be configured using the Customizable Online Help feature to display in the Supporting Tools pane of most Performance modules, providing a more contextual deployment of the standard content. This option is not available if you choose to use the Customizable Online Help feature to deploy your organization's own custom help content. For more information see Customizable Online Help and Supporting Tools.

                                    Supporting Tools

                                    The Supporting Tools feature displays as a pane on the right side of most modules of the Performance Application. It provides users quick access to Feedback, Fit Analysis or Attachments tools appropriate to the module or context. The Supporting Tools pane can also can be configured to display customizable online help; either your organization's own custom help content, or selected sections of the delivered, standard online help.

                                    Configuration of the default state of the Supporting Tools window (expanded or collapsed) is determined using the setting Supporting Tools Displayed by Default (in Configuration under the Global Settings category.) The setting controls the Supporting Tools window in all modules of Performance in which the window appears. When set to Yes the setting makes the Supporting Tools window open (or expanded) by default. When set to No the window is collapsed by default. No is the initial default value for this setting when the application is first opened. In either case the window also has an expand/collapse button that allows you to open or close the window as needed.

                                    For more information see Customizable Online Help and refer to the Taleo Performance Administration Guide for configuration instructions.

                                      Customizable Online Help

                                      The Customizable Online Help feature provides your organization the ability to present contextual, customizable online help to your users. Configuration settings allow you to contextualize the presentation of online help at the Performance module level (reviews, goals, feedback, etc.). For each module you'll have the ability to display your organization's own custom content. Users will access it through the right side Supporting Tools pane which displays for each module. With this feature you can make available to your users, from within the application, your organization's relevant help content; such as internal policies and procedures, forms, and help videos.

                                      Customizable Online Help Versus Standard Online Help.

                                      Customizable Online Help - Is created by your organization, with your own content on your website or server. You can configure your URLs into Performance to display content in the right side Supporting Tools pane.

                                      Note: It is the customer's responsibility to ensure their custom help is accessible to end-users if it is hosted on a server with restricted access.

                                      Standard Online Help - Is the default Oracle Taleo Standard Online Help content, which can be displayed from the Supporting Tools pane. It can be contextual in the sense the content provided can be at the level in the documentation relevant to the application module.

                                      Note: This is the same content as delivered in the main Help Center, the complete contents of which are accessible via the Resources link on the navigation toolbar at the top right of each page.

                                      For more information see Help Center.

                                      Display of Help in the Right Side Supporting Tools

                                      When activated in configuration, the right side Supporting Tools pane displays in the application module using a collapsible/expandable style.
                                      • When the pane is collapsed the Help button always displays below the Show Tools button, if both are enabled.

                                      • When the pane is expanded the Show Tools and Help display as tabbed frames, if both are enabled.

                                      Here are some tips about the sizing of the custom help display window:
                                      • The internal size of the HTML frame is adaptive to the window height and fixed in width to 177 pixels.

                                      • Some websites use code that prevents them from being embedded within another frame.

                                      • There are methods for creating web pages your organization can use to have your hyperlinks launch popup windows. These may present a better way to organize help content for display, such as having a main page of help topic links leading to separate popup pages for each help topic.

                                      For more information see Supporting Tools.

                                      The image shows Michael Decker's Talent Profile page with links to online help in the upper right toolbar and right side supporting tools.

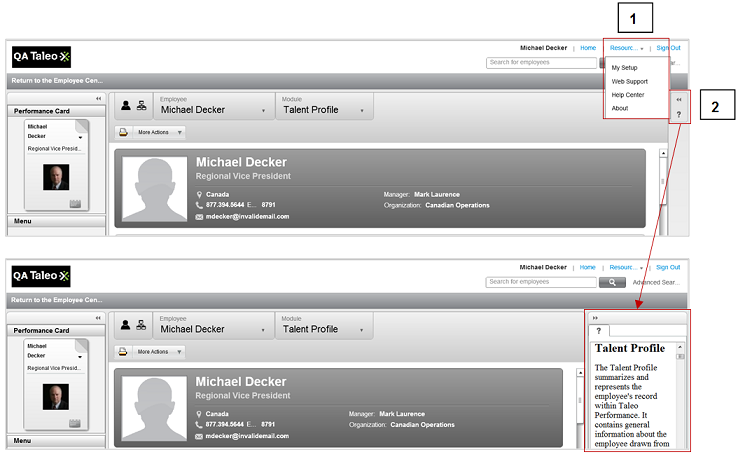
                                      Figure: Michael Decker's Talent Profile page with links to online help in the upper right toolbar and right side supporting tools.

                                      With respect to the figure immediately above:
                                      1. To access the entire Standard Online Help click Resources > Help Center.

                                      2. To access the customizable/contextual Help click the Help button or tab in the right side Supporting Tools pane.

                                      Configuring the Customizable Help Display

                                      For each Performance system module there are a pair of corresponding configuration settings: Activation and URL. With these settings, the right side Supporting Tools pane for each module can be configured to one of three display options:
                                      1. No Help Display - Use the Activation setting for a module to activate the display of the Help tab in the Supporting Tools pane. The default setting is No (false or deactivated).

                                      2. Customizable Online Help - Use the URL setting to display your organization's customized online help, by entering the URL path of the website where your content is stored into the applicable value field. Do this for each implemented language. This should be the path to the location where your policies, procedures, articles, video clips, etc. are accessible.

                                      3. Standard Online Help as a default - Use the URL setting to display the default Standard Online Help, by copying the default URL for each implemented module and language (from a list provided at the bottom of the configuration page), and pasting it into the applicable Value field.

                                      Customizable Online Help configuration settings are located at Configuration[Taleo Performance] Settings[Product Settings][Refine by] Category=Help. For more information refer to the Taleo Performance Administration Guide for configuration instructions.

                                      The following is an example of how the Customizable Online Help feature can benefit an organization:
                                      1. The administrator of an organization has an internal website with URL links to help documentation their organization has created for modules of the Performance application (Reviews, Talent Profile, Succession, etc.).

                                      2. The internal website also contains translations of this custom help content for all the languages they've enable in the Performance application, and the website is organized so content for each module and language combination is presented on separate HTML pages.

                                      3. Since the content is organized by module and by language, and the URL's to the website can be used to access the content via a popup window, the administrator configures the Performance application to display the URL links to the HTML pages, by module and by language.

                                      4. The organization's users now have access to its custom help content in the Supporting Tools pane, contextually relevant to each configured module and language.

                                        Employee Center

                                        The Employee Center is the landing page of the application. It presents a series of panes or sections that provide information relevant to the employee. In combination with the top Navigation bar they comprise the Performance Home page.

                                        The Employee Center has a configurable dashboard-like interface with up to four sections, providing information on general information, tasks assigned, goal progress and network contacts. Each of the sections in the Employee Center are designed as widgets that can be enabled and disabled by Administrators to customize the layout and look of each customer's landing page. The system dynamically optimizes the real estate of the full page by expanding the widgets that are selected. Screens within the system can be accessed with one click to add and update data. The four sections of the Employee Center are:

                                        • Instructions

                                        • My Tasks

                                        • My Goal Plan

                                        • My Network

                                        The image shows the four sections of the Employee Center: Instructions, My Tasks, My Goal Plan, My Network.

                                        For information on how to enable and disable Employee Center widgets, see the Oracle Taleo Performance Administration Guide for Feature Pack 15A onward.

                                        Instructions

                                        The Instructions widget provides a rich text editor that Administrators can use to easily enter special announcements, instructions, links to internal portals, graphics or other custom employee resources. There is one Instruction widget per zone; this is not customizable by OLF.

                                        My Tasks

                                        My Tasks provides the employee notification of tasks that have been assigned to them. The list of assigned tasks can be viewed based on task types, employee and those tasks that are past due. Each task provides a link to directly access the related task.

                                        Within My Tasks, the grid view is a collapsible/expandable window:
                                        • The All Tasks dropdown list displays (and group counts the total number of) the Task Types and Task Names contained therein.

                                        • The default view displays up to ten rows (tasks) with the following columns: Task name, Employee name and Due date.

                                        • Collapse the task grid to hide the information in My Tasks.

                                        • Maximize the grid to display up to 30 rows (tasks) with additional columns (Period/Cycle and Assigned).

                                        • Hyperlinked tasks in either the default or maximized view provide quick access to open the modules and records requiring action.

                                        • There is pagination if more tasks appear on the list than can fit on the available space.

                                        • The task list is sortable based on the column headers. By default the list shows tasks in the order received, newest on top. Sorting is one page at a time, so you should go to the maximized view if you need sorting capability because more rows appear in that view.

                                        My Goal Plan

                                        My Goal Plans provides a quick view of the employee's goals and their completion status. The section displays goal plans assigned to the logged-in user. It fits into the right hand section of a two-section area. Each goal plan displays a progress bar with a number showing the percent completed and a due date.

                                        My Network

                                        My Network provides the mechanism to manage the employee's network. It fits into the far right-hand section of the page. From top to bottom it displays the following features:
                                        • The Employee Card, including a dropdown menu containing general access to other modules for the employee, and the Snapshot Card.

                                        • The Search My Network feature, allowing you to filter the list contacts currently shown. If the My Network widget is disabled, Search My Network in the People Selector is also disabled.

                                        • A prepopulated list of your contacts. If you are a manager, you get: your manager, your peers, and your first-level direct reports. If you are an employee, you get: your manager and your peers. They are ordered in ascending alphabetical order, although the prepopulated list is sorted separately from the Other Contacts list. The prepopulated list is limited to the first 200 contacts in your network.

                                        • A list of Other Contacts that you have added to your network (using the Add Contact button).

                                        • Tags for filtering. These are not prepopulated tags. All tags are configured by the user, and users can create any tags they want. Tags can only be applied to Other contacts.

                                        Note: A person can only appear in one of the contact lists. Their image, if any is available, displays to the left of their name.
                                          Viewing Assigned Tasks

                                          Viewing assigned tasks from the My Tasks panel allows you to see all the tasks that have been assigned to you and that are not yet complete. You can filter the tasks by category or by those that are overdue.

                                          Performance > [Employee Center] > My Tasks

                                          1. In the My Tasks section, navigate to the desired task from the list.

                                            Use the All Tasks dropdown, or the page buttons, or sort on the column headers to reduce the list and help you identify the desired task.

                                          2. Click on the desired task.

                                          3. The system opens the module and record needed to fulfill the task.

                                            If you do not have the required user permissions to complete the task a message is displayed.

                                            Networking

                                            Networking is a critical component of Taleo Performance. It provides the ability for users to share data with people in their network for the purpose of gathering feedback and providing input that may impact their performance ratings. My Network is a section on the Employee Center that shows the list of individuals in the employee's current network.

                                            Networking provides the ability for users to share data with people in their network for the purpose of gathering feedback or for rating performance on specific items. Users can select others to be included in their network. For the purpose of performance reviews, managers will need to approve which network members are allowed to provide feedback.

                                            From the My Network section, a user can request feedback from one of their network members or they can choose to send unsolicited feedback to the employee.

                                            Users established in My Network are leveraged when requesting feedback in each of the products. For example, when developing succession plans, a manager can request a member of his network to provide feedback on the plan or on specific members of the plan.

                                            Network members can also be associated with tags that help identify them. A given network member can be associated with multiple tags. A list of tags allows the user to then quickly filter the members of their network by clicking on a single tag.

                                              Adding Network Contacts

                                              Taleo Performance > [Employee Center] > [My Network]

                                              1. In the My Network section click Add Contact to display the People Selector.

                                              2. Select In my direct reports to find contacts by drilling down through your direct reports or By keywords to search based on name, email and job title.

                                              3. Select the available employees name and click Select.

                                              4. Enter a message for the contact and click Done.

                                              A network invitation is sent to the recipient.

                                              The employee reviews the invitation and if they accept the invitation, the sender is added to the recipient's network list. Regardless of whether they accept, you can still send feedback about the person.

                                                Feedback

                                                The Feedback module offers employees and managers the ability to ask colleagues to provide input and insight about an employee. For example, an employee can request feedback on a goal plan or individual goals and then share that feedback with his or her manager during the performance review process. A manager can request feedback on an employee from co-workers or other managers that have interacted with the employee.

                                                Through feedback, Taleo Performance offers users the tools to provide information about an activity (such as a goal or review). It provides the flow of information back to an employee so that actual performance can be compared with planned performance. It works alongside networking to provide employees with the ability to create, maintain and leverage social networks for mentoring, coaching and learning.

                                                Feedback Terminology

                                                The following terms have specific, standardized meaning in relation to the Feedback module. They provide a foundation of consistent terminology for understanding and using Feedback Management.

                                                Term Description
                                                Approver The person who is requested to approve feedback (could be the same as Employee, Provider or Requester).
                                                Context The feedback subject, or type, indicating the focus of the feedback provided or asked for (e.g. Career Scenario, Competency, Development Activity, Employee Goal, General, Job Role).
                                                Employee The person who is the subject of the feedback, generally the person selected in the breadcrumbs at the top of the Feedback module page.
                                                Provider The person providing feedback (who could be the same as the Employee).
                                                Recipient The person who receives the feedback. If feedback is requested, the recipient is the same as the requester. Otherwise the recipient may be same as the provider, employee or direct manager.
                                                Requester The person requesting feedback (who could be the same as the Employee or Provider).

                                                Feedback Tools

                                                Generally, the feedback tools provided in Performance fall into two categories:
                                                1. The Feedback module functions distributed globally throughout the application. These are discussed in this section of the documentation.

                                                2. The Feedback page providing a consolidated view of a person's feedback. This is discussed in the two following sections of the documentation: Feedback Page and Results List.

                                                The Feedback module is accessed from many other modules in Performance, for the purpose of providing feedback to an employee. All feedback is entered in the system and stored in the Feedback module. Feedback that is given to the manager is kept private from the employee.

                                                Employee Center Quick Link

                                                On the Employee Center, the Feedback quick link on the left side pane replaces the Feedback Journal link available in previous releases.

                                                Go To Dropdown List

                                                The Go To dropdown list provides the user an option to open the Feedback page from these locations in the application:
                                                • Performance Card

                                                • Performance Reviews > Individual Employee

                                                • Search Results > Individual Employee

                                                • Succession Plan > Successor Name

                                                • Succession Plan Nomination Slate > Individual Employee

                                                • Talent Browser Talent Car

                                                • Talent Pools > Person Name

                                                • Talent Snapshot

                                                Feedback from the Supporting Tools

                                                Users can request feedback through the Supporting Tools pane on the right of the application. The Feedback supporting tool is associated with these modules of Taleo Performance:
                                                • Development Plan

                                                • Performance Review

                                                • Goal Plan

                                                • Succession Plan

                                                The configuration setting for the default state of the Supporting Tools window (expanded or collapsed)is determined using the setting named Supporting Tools Displayed by Default. It appears in Configuration > Global Settings. The setting controls the Supporting Tools window in all sections of Taleo Performance in which the window appears.

                                                When set to Yes the setting makes the Supporting Tools window open (or expanded) by default. When set to No the window is collapsed by default. No is the initial default value for this setting when the application is first opened. In either case the window also has an expand/collapse button that allows you to open or close the window as needed.

                                                Feedback from the Taleo Inbox

                                                From the Microsoft Outlook Inbox tool, users can request and capture feedback and supporting documents without logging into the application, when Taleo Inbox is also installed. That means most of the review content is already assembled at review time. Instead of writing the review, managers organize, compare, and synthesize the information.

                                                Feedback from the Task List

                                                Once users receive a feedback request, an entry is added to their Employee Center's task list. Then, if they want to provide feedback, they just open the task and they will be taken to the feedback reply screen. The feedback response form for goal, succession and career plans has been enhanced to provide additional and contextual details about the employee for whom feedback is requested to help the respondent to provide information. The feedback provider can also provide a rating for a goal.

                                                Provide Feedback Dialog

                                                In the Provide Feedback dialog the Feedback text entry box provides a maximum of 6,000 characters to accommodate more detailed and meaningful feedback. The entry area also has a character counter which dynamically displays, as you type, how many characters you have left or how many you are over the limit. The system allows you to continue typing once the 6,000 character limit is reached, but prevents you from sending the feedback when the number of characters is over the limit.

                                                Ask for Feedback Dialog

                                                When you use the Ask for Feedback button to request feedback about yourself or someone else, the system opens a dialog box allowing you to choose the person to request feedback from. The dialog also allows you to choose the Context of feedback requested (i.e. General, Career Scenario, Competency Goal, Development Activity, Employee Goal or Review). Depending upon the Context selected the dialog also allows you to specify whether the feedback is requested on all elements of the context or just specific ones. For example, you can ask for feedback for an entire career scenario or a specific career option within the scenario. Feedback requests do not expire. A feedback request cannot be canceled, but it can be rejected or deleted.

                                                Feedback - Available Actions from Other Contexts

                                                Feedback can be read, requested or provided from various locations in the application that is within specific contexts. The following table lists additional contexts where feedback actions are available:

                                                Module Available Actions Related message template for email notification
                                                My Tasks Reply to a feedback request. No email notification available
                                                My Network Send general feedback to the employee who's card is selected. No email notification available
                                                Send general feedback to the manager of the employee who's card is selected. No email notification available
                                                Feedback View received and sent feedback, and depending on configuration, also feedback about logged user. Email notification not applicable for viewing
                                                Provide general feedback about an employee, using a text entry area allowing up to 6,000 characters. No email notification available
                                                Request general or specific feedback about an employee or yourself, selecting the context and/or options within a context for feedback.
                                                • Standard notification for a feedback request.

                                                • Standard notification for a response to a feedback request.

                                                View pending feedback requests. Email notification not applicable for viewing
                                                Send Reminder for pending feedback requests. Email notification sent as well as new task in Task List.
                                                Print Feedback entries currently displayed in the Feedback page in a PDF format report. Email notification not applicable for printing the report
                                                Talent Browser Send general feedback to the employee who's card is selected. No email notification available
                                                Send general feedback to the manager of the employee who's card is selected. No email notification available
                                                Career Plan View general about the logged user and career plan feedback provided about the logged user's career plan. Email notification not applicable for viewing
                                                Request feedback about a career scenario or a specific career option.
                                                • Standard notification for career plan feedback request

                                                • Standard notification for career plan feedback response

                                                Development Plan View general feedback about the logged user and feedback provided about development activities in the logged user's development plan. Email notification not applicable for viewing
                                                Request feedback about a development activity in the logged user's development plan.
                                                • Standard notification for development plan feedback request

                                                • Standard notification for development plan feedback response

                                                Goal Plan View general feedback provided about the logged user and feedback provided about the goals or competencies in the goal plan of the logged user. Email notification not applicable for viewing
                                                Request feedback about the goals or competencies in the goal plan of the logged user.
                                                • Standard notification for employee goal feedback request

                                                • Standard notification for employee goal feedback response

                                                Performance Review View general feedback provided about the logged user and feedback provided about the items in the performance review of the logged user. Email notification not applicable for viewing
                                                Request feedback about items in the performance review of the logged user.
                                                • Standard notification for review feedback request

                                                • Standard notification for review feedback response

                                                Succession Plan Request feedback provided about the succession plan or about individual successors within the plan for the position of the logged user.
                                                • Standard notification for succession plan feedback request

                                                • Standard notification for succession plan feedback response

                                                Mentoring Center Send feedback to mentee (protege).
                                                  Feedback Page

                                                  The Feedback page is the central location where a user has a consolidated view of all feedback items received or provided, whether completed or pending. They can filter feedback items to be viewed by date range, provider and context. A user can also ask for general or specific feedback about themselves or another user, and provide general feedback about another user.

                                                  Breadcrumbs Navigation

                                                  The breadcrumbs navigation model is implemented on the Feedback page to standardize selection of the subject employee and navigation with other modules.

                                                  Breadcrumbs navigation is provided at the top of the Feedback page consistent with other Performance modules. The breadcrumbs display the current employee in effect. They provide you the ability to change the employee based on your security permissions and access. The Employee selected in the breadcrumbs determines the person who is the subject of, or involved in, the feedback items displayed in the Feedback module. The breadcrumbs also display the module you are currently working in (e.g. Feedback), and provides a selector allowing you to navigate to other modules in the system.

                                                  Employees only have access to feedback about themselves and all the feedback they provided. Managers have access to feedback about themselves and their direct reports. Feedback is not necessarily shown for everyone in your coverage area. The content displayed in the Feedback page's Results List also depends on the following:
                                                  1. The configuration of the "Enable Public Access to Feedback" setting (i.e. Private or Public).

                                                  2. Primary filter settings selected in the left hand panel; by date range, Provider or Context.

                                                  3. The tab view selected: Received or Provided.

                                                  4. The secondary filter button selected for the tab view: Completed, Pending or Total.

                                                  Performance Card

                                                  The top left side panel includes the Performance Card. The standard Performance Card is provided, consistent with the look and feel of other Performance modules. The content of the card is contextualized to reflect the employee selected in the breadcrumbs. A link to the Feedback module is added to the Performance Card, in all the modules the card is displayed.

                                                  Feedback Primary Filters

                                                  Primary filters are provided in the left side lower Filters pane. Filters are provided to set the parameters for data displayed in the Feedback module. Available filters are:
                                                  • Date Range

                                                  • Provider

                                                  • Context (Performance module or feature)

                                                  Note: Date range always defaults to one prior to the current date; populates feedback items received and sent within the specified range; and also populates pending feedback requests with the due date within the specified range.
                                                  The filters apply only to the selected view or tab on the Results List, meaning they apply separately to the feedback received or provided views. The following table describes the functions of the filters:

                                                  Filter Filter Option Description
                                                  Date Received/Sent From This filter is used to see feedback starting at this date. By default, the date that corresponds to one year before the current date is entered.
                                                  Date Received/Sent To This filter is used to see feedback ending at this date. By default, the current date is entered.
                                                  Provider This filter is used to see feedback provided by a specific person. If you are viewing Received feedback, the Provider field defaults to blank, meaning feedback from all providers is displayed. Otherwise, you may narrow down the list by selecting a provider. If you are viewing Provided feedback, the Provider field is auto-populated with your name.
                                                  Context This filter is used to see feedback in relation to a specific context, which is selected from a dropdown list. The possible contexts are: Career Scenario, Competency, Competency Goal, Custom Item (in review), Development Activity, Employee Goal, General, Job Role and Review.
                                                  Context Career Scenario To see feedback provided in response to feedback requests sent from career plans, in relation to career scenarios.
                                                  Context Job Role To see feedback provided in response to feedback requests sent from career plans, in relation to specific job roles in career scenarios.
                                                  Context General To see general feedback provided about employees, whether feedback was requested/provided from the Feedback page, My Network or a Performance Card in the Talent Browser.
                                                  Context Development Activity To see feedback provided in response to feedback requests sent from development plans, in relation to development activities.
                                                  Context Employee Goal To see feedback provided in response to feedback requests sent from performance reviews or from goal plans (Goals tab) in relation to employee goals.
                                                  Context Competency Goal To see feedback provided in response to feedback requests sent from goal plans (Competencies tab) in relation to competency goals.
                                                  Context Competency To see feedback provided in response to feedback requests sent from performance reviews in relation to competencies that are part of reviews , but not drawn from goal plans. When the competencies are imported in reviews from goal plans, they are referred to as 'competency goals'.
                                                  Context Review To see feedback provided in response to feedback requests sent from performance reviews.
                                                  Context Custom Item To see feedback provided in response to feedback requests sent from performance reviews about items that are customer specific.

                                                  Provide Feedback Toolbar Button

                                                  In the toolbar at the top left of the Feedback page, just below the breadcrumbs, the Provide Feedback button gives users the ability to send general feedback to other persons. When you click the Provide Feedback button the system first opens the People Selector dialog for you to choose the person(s) you want to provide feedback for. Once you select a person the Provide Feedback dialog opens. The Feedback text entry box allows for maximum of 6,000 characters to accommodate detailed and meaningful feedback. The entry area also has a character counter which dynamically displays, as you type, how many characters you have left or how many characters you are over the limit. Although the system allows you to continue typing once the 6,000 character limit is reached, a warning message displays if you try to send feedback that exceeds the limit. When you close the warning dialog your comments are still saved in the session and you can edit down the feedback until the count is under the limit. The system prevents you from sending the comments until the number of characters is reduced below the limit. When providing feedback, you also have the choice to send the feedback to another person for approval of the feedback.

                                                  Ask for Feedback Toolbar Button

                                                  Also in the toolbar at the top left of the Feedback page, the Ask for Feedback button provides users the ability to request general or specific feedback about themselves or another person. When you click the button the Ask for Feedback dialog opens. If you are the employee in the breadcrumbs navigation, then the dialog recognizes the request is for about yourself. If you want to ask for feedback about another person, use the breadcrumbs (Employee dropdown selector) to choose the person. The Ask for Feedback dialog also allows you to choose the person you want to ask to provide the requested feedback. The dialog allows you to specify the Context of feedback requested: General, Career Scenario, Competency Goal, Development Activity, Employee Goal or Review. Depending on the context selected the dialog displays an additional section allowing you to specify whether feedback is requested on all elements of the context or just specific ones. For example, you can request feedback for an entire career scenario or specific career options within the scenario.

                                                    Feedback Results List

                                                    The Feedback page's Results List is the central location where a user has a consolidated view of all feedback items received or provided, whether completed or pending. The feedback items you can view depends upon your permissions. The list presents feedback items in a grid having rows and columns, with a separate row for each feedback item. Columns are fields summarizing details about the feedback items. The grid provides immediate access to all feedback an employee has received about themselves and provided about other people, see what's pending and send reminders.

                                                    Feedback items presented in the Results List are subject to filtering by the following:
                                                    1. The configuration of the "Enable Public Access to Feedback" setting (i.e. Private or Public).

                                                    2. The employee selected in the breadcrumbs at the top of the page is the subject of the feedback.

                                                    3. The Date Range, Provider and Context filters in the left side Filters pane.

                                                    4. The Feedback view or tab selected (Requested or Provided).

                                                    5. The contextual or secondary filter button selected at the upper right of the Results list.

                                                    Received and Provided Tabs for Feedback Views

                                                    When you access the Feedback page, and the employee selected in the breadcrumbs is yourself, two default views are displayed for the Results List (Received and Provided). They are controlled by tabs with the same name at the top of the Results List. The tabs provide the ability to present feedback items in two separate views (Received and Provided), contextualizing the items displayed in the module. Both views display feedback items for My Feedback.
                                                    • Received - Displays received feedback received about yourself, solicited or unsolicited ; pending requests for feedback about yourself (requested by yourself or someone else); and requests for feedback about yourself (requested by yourself or someone else) that are pending approval.

                                                    • Provided - Displays all solicited and unsolicited feedback where you are the author: provided by yourself ; pending requests for feedback you were asked to provide; and feedback you provided that are pending approval.

                                                    Note: When the employee selected in the breadcrumbs is another employee (not yourself), the view in the Results list is for feedback items received about the other employee. No tabs are displayed at the top of the Results List.

                                                    Feedback Module Columns Based on Views

                                                    Fields (columns) displayed in the Results List are organized to put the focus on the employee selected in the breadcrumbs. The following fields (columns) are displayed in the list based on the view selected.

                                                    Tab (View) Fields (Columns)
                                                    Received Context, Provider, Rating, Feedback, Date, Status and Importance flag.
                                                    Provided Employee, Context, Requester, Rating, Feedback, Date and Status.
                                                    Note: The list can be sorted by any column, except the Feedback and Status columns, in ascending or descending order.

                                                    Contextual Secondary Filter Buttons

                                                    A group of three buttons (Completed, Pending and Total) are provided at the top right of the Feedback Results List. The buttons are visible in each of the two main views for the Results List (Received and Provided). They show counts of the number of lines in the journal for each of those categories. When clicked they serve as contextual or secondary filters within the selected view, displaying a subset or all of the line items in the view. The result set displayed in the list is reduced to line items meeting both the view criteria and the secondary filtering criteria of the chosen button. For example, if the view is set to Received, and you click the Completed button, the result set includes only those feedback items that are actually Received about yourself or a specified person, and not those items that are Pending.

                                                    Feedback Item Deletion

                                                    If feedback deletion is allowed through configuration, users will be entitled to remove received feedback from the Feedback results list.

                                                    Feedback Item Approval

                                                    If feedback approval is enabled the Status column indicates approval status. If the status is Rejected, the author of the feedback can make edits and resubmit the feedback for approval from the Feedback page. When approval is enabled, the Date field corresponds to the date the feedback is approved or rejected.

                                                    Visual Cues to Distinguish Pending Items on Feedback Journal

                                                    The Feedback Journal displays line items for pending feedback requests in italicized bold text to readily distinguish from received feedback items. Pending items which are past their due date display italicized red text in the Date field.

                                                    Send Reminder Option for Pending Items on Feedback Journal

                                                    Users have the ability to send a reminder for pending items from within the Feedback Journal. Right-click on the Feedback column for any pending item in the Results List and select the Reminder option to prompt the person about your feedback request. The person you send the reminder to receives both a message from you in their Employee Center's My Tasks list, and an email reminder.

                                                    View Feedback Received or Requested from within the Module

                                                    Use the Received tab to display requested or received feedback items, whether Completed or Pending. The Feedback column displays the first line of any completed feedback content, from directly within the Results List, without having to open the feedback item. Upon mouse over a tooltip displays more of the feedback item. View the entire contents of the provided feedback by choosing View Details from the Feedback action menu, or by selecting More in the tooltip window.

                                                    The Feedback column displays the text Pending for any requested feedback items awaiting a response or an approval. This serves as a visual cue that you can choose the Remind option from the Feedback column action menu and send a reminder to the person who needs to provide the feedback. Once a reminder is sent, the date of the reminder appears in the status column.

                                                    The image shows the Feedback module page indicating two methods to display feedback details.

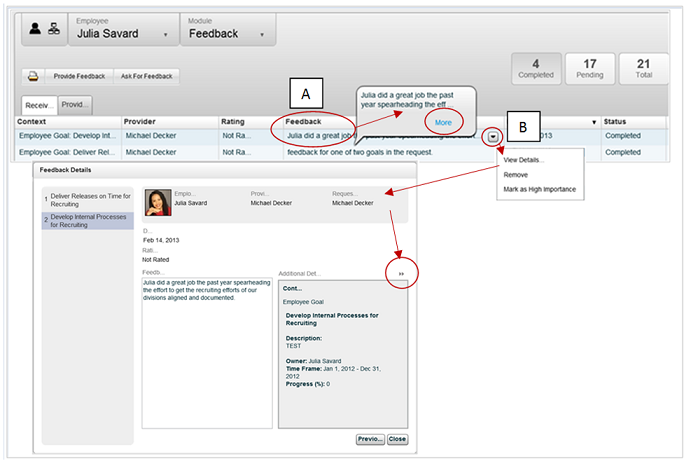
                                                    Figure: Feedback module page indicating two methods to display feedback details.

                                                    With respect to the figure immediately above:
                                                    • A. - The first line of feedback displays in the Feedback column. If the feedback is longer than the area provided, hover the cursor over the feedback and a popup tooltip provides more detail.

                                                    • B. - Another way to view feedback is to click on the contextual dropdown button and select View Details from the action menu. This opens the Feedback Details dialog. Within the Feedback Details dialog the Additional Details section can be collapsed to provide greater viewing area for Feedback.

                                                    View and Provide Feedback from within the Module

                                                    Use the Provided tab to display feedback provided, and requests for you or others to provide feedback, whether they are Completed or Pending. The Feedback column displays the first line of any completed feedback content, from directly within the Feedback module, without having to open the feedback item. Upon mouse over a tooltip displays more of the feedback item. View the entire contents of the provided feedback by choosing View Details from the Feedback column action menu, or by selecting More in the tooltip window.

                                                    When feedback is requested from you, but is not yet provided, the Feedback column displays a visual cue stating Pending. The Date column also displays Due and the date your feedback is due. These visual cues serve to alert you to follow the Feedback column action menu's Respond link and provide the requested feedback.

                                                    Provide Feedback Screen

                                                    When using the Provide Feedback screen, providers are prompted to use the People Selector dialog to select an employee. Once the Provide Feedback dialog is open, providers also have the ability to click the Change link to reopen the People selector, from where they can choose a different employee to provide feedback about, if desired.

                                                    When the "Enable Public Access to Feedback" setting is configured to Private, the Provide Feedback screen displays two checkboxes: Visible to Manager and Visible to Employee. When the setting is configured to Public, the two checkboxes are not displayed.

                                                    Suggestive Actions on Dialog Screens

                                                    For dialog screens such as Provide Feedback, Ask for Feedback and others, the button for the next logical prominent action is highlighted. This does not prevent you from executing other active actions.

                                                    Collapse Additional Details when Providing Feedback or Approval

                                                    When responding to a feedback request using the Feedback Details screen, or providing approval in the Feedback Approval screen, the user can collapse or expand the Additional Details field. This provides flexibility for increasing the edit area of the Feedback field, when needed.

                                                    In addition, when responding to a feedback request using the Provide Feedback dialog, the removal of the Due Date and Priority fields from the Overview screens provides more vertical room for increasing the height of the Feedback and Additional Details fields.

                                                    At the bottom of these dialog screens a series of buttons (Save, Previous, Next, Send and Cancel) are provided to advance and return through the editing and approval processes.

                                                      Filtering Feedback Items on the Feedback Page
                                                      The feedback items you can view on the feedback page are subject to:
                                                      • the configuration of the "Enable Public Access to Feedback" setting (i.e. Private or Public).

                                                      • the employee selected in the breadcrumbs at the top of the page.

                                                      For more information refer to Feedback Results List..

                                                      Performance > [Navigation bar] > More dropdown > Feedback

                                                      1. You can view feedback items in the results list in one or more views: received or provided. Use the tabs at the top of the results list to select a view.

                                                      2. To further filter the feedback items displayed in the Results List, use the primary filters in the left side Filters pane: Date From/To, Provider, Context.

                                                        When no filters are defined, the list shows all feedback for the selected view: received or provided.
                                                        Note the filters apply to one view at a time only (i.e. to the feedback received or provided.
                                                        • To clear all default filters, click the Eraser icon.

                                                        • Once filters have been selected, click the Refresh icon for the feedback journal list of entries to be updated according to your filter options.

                                                      3. If you want to further filter the entries displayed in the journal, use the three secondary filter buttons (Complete, Pending and Total) provided at the top right of the results list.

                                                        The buttons show counts of the number of lines in the results list for each of the categories. When clicked they serve as secondary filters within the view, providing a subset of the line items in the view. The result set displayed in the journal is reduced to line items meeting both the view criteria and the secondary filtering criteria of the chosen button.

                                                      The feedback result list will show all feedback items corresponding to your various private/public access, employee selection, tab/view, primary filter and secondary filter options.

                                                        Viewing All Feedback You Received
                                                        The feedback items you view on the feedback page are subject to:
                                                        • the configuration of the "Enable Public Access to Feedback" setting (i.e. Private or Public).

                                                        • the employee selected in the breadcrumbs at the top of the page must be yourself.

                                                        For more information refer to Feedback Results List..

                                                        Performance > [Navigation bar] > More dropdown > Feedback

                                                        On the Feedback page, select the Received tab at the top of the results list.

                                                        The results list displays feedback received about yourself, solicited or unsolicited ; pending requests for feedback about yourself (requested by yourself or someone else); and requests for feedback about yourself (requested by yourself or someone else) that are pending approval.
                                                          Viewing All Feedback You Provided
                                                          The feedback items you view on the feedback page are subject to:
                                                          • the configuration of the "Enable Public Access to Feedback" setting (i.e. Private or Public).

                                                          • the employee selected in the breadcrumbs at the top of the page must be yourself.

                                                          For more information refer to Feedback Results List..

                                                          Performance > [Navigation bar] > More dropdown > Feedback

                                                          On the Feedback page, select the Provided tab at the top of the results list.

                                                          The results list displays solicited and unsolicited feedback provided where you are the author: provided by yourself; pending requests for feedback you were asked to provide; and feedback you provided that are pending approval.
                                                            Viewing All Feedback about a Direct Report
                                                            The feedback items you view on the feedback page are subject to:
                                                            • the configuration of the "Enable Public Access to Feedback" setting (i.e. Private or Public).

                                                            For more information refer to Feedback Results List..

                                                            Performance > [Navigation bar] > More dropdown > Feedback

                                                            In the breadcrumbs at the top of the page, the Employee selection defaults to yourself. Click the dropdown button and set the employee to one of your direct reports.

                                                            When the employee selected in the breadcrumbs is another employee (not yourself), the view in the Results list is for feedback items received about the other employee. No tabs are displayed at the top of the Results List.
                                                              Sorting Feedback in the Results List
                                                              The feedback items you can view on the feedback page are subject to:
                                                              • the configuration of the "Enable Public Access to Feedback" setting (i.e. Private or Public).

                                                              • the employee selected in the breadcrumbs at the top of the page.

                                                              For more information refer to Feedback Results List..

                                                              Performance > [Navigation bar] > More dropdown > Feedback

                                                              1. To sort the list of feedback items according to a given column, you only need to click on the column header to sort in a ascending or descending order.

                                                                It is possible to sort by all column, except by Feedback and Status.
                                                              2. To reverse the order, click again on the same column header.

                                                              Feedback will be sorted by the selected column, across all results list pages.

                                                                Providing General Feedback from the Talent Browser

                                                                Performance > [Navigation bar] > Talent Browser button

                                                                1. From an employee's performance card, select the down arrow to display the Go To menu.

                                                                2. Select Send Feedback to the Employee or Send Feedback to the Manager, depending on the desired recipient.

                                                                3. In the Provide Feedback dialog enter your feedback in the text box and format the text as needed.

                                                                  The text entry area allows for a maximum 6,000 characters. A counter lets you know how many characters you have left or are over the limit. Once you have reached the limit you can continue typing and editing, but the system will not allow you to save if the count is over the limit.
                                                                4. Optional. In the Approval section you can select an approver, if desired.

                                                                5. When input is complete, click Send.

                                                                  Providing General Feedback from My Network

                                                                  General feedback is not related to any specific context and can be sent without having received a request for it.

                                                                  Performance > [My Network]

                                                                  1. From the My Network panel, the feedback actions are available from the pull-down menu adjacent to each name.

                                                                  2. You can select Send Feedback to the Employee or Send Feedback to the Manager, depending on the desired recipient.

                                                                  3. In the Provide Feedback dialog enter your feedback in the text box and format the text as needed.

                                                                    The text entry area allows for a maximum 6,000 characters. A counter lets you know how many characters you have left or are over the limit. Once you have reached the limit you can continue typing and editing, but the system will not allow you to save if the count is over the limit.
                                                                  4. Optional. In the Approval section you can select an approver, if desired.

                                                                  5. When input is complete, click Send.

                                                                    Providing General Feedback from the Feedback Page

                                                                    Feedback provided via the Feedback page is always unsolicited and not related to any specific context. Unsolicited feedback provided from the Feedback page can only be sent to the person the feedback is about and the manager of that person.

                                                                    Performance > [Navigation bar] > More dropdown > Feedback

                                                                    1. In the Feedback page click Provide Feedback.

                                                                    2. In the People Selector, select the person about whom you want to provide feedback and click Select.

                                                                    3. In the Provide Feedback dialog enter your feedback in the text box and format the text as needed.

                                                                      The text entry area allows for a maximum 6,000 characters. A counter lets you know how many characters you have left or are over the limit. Once you have reached the limit you can continue typing and editing, but the system will not allow you to save if the count is over the limit.
                                                                    4. Optional. In the Approval section you can select an approver, if desired.

                                                                    5. When input is complete, click Send.

                                                                      Replying to a Feedback Request from My Tasks

                                                                      Feedback needs to have been requested for an item for a user to be able to reply.

                                                                      Performance > Employee Center > My Tasks
                                                                      1. In My Tasks panel, use the selector to choose the Feedback Request category.

                                                                      2. Click on the appropriate task to select and highlight it.

                                                                      3. In the reply form, click Start.

                                                                      4. For each item in the feedback request:

                                                                        1. Provide your feedback in the comment box.

                                                                        2. Provide a rating if requested by the sender.

                                                                        3. Enter an approver if appropriate.

                                                                      5. Use the Next and Previous buttons to navigate to other items in the feedback request.

                                                                      6. When feedback has been provided for all requested items, save the provided information and click Finish and Send.

                                                                      The feedback is sent to the person who requested it and an email notification will be sent to that person if such notification was set to be sent. The feedback request task is also removed from My Tasks.

                                                                        Replying to a Feedback Request from Results List

                                                                        Feedback needs to have been requested for an item for a user to be able to reply.

                                                                        Performance [Navigation bar] More dropdown Feedback
                                                                        1. Click the Provided tab to populate feedback items for that view into the Results List.

                                                                        2. Click the Pending button.

                                                                          The results list is pared down to just pending feedback requests.
                                                                        3. Select the appropriated feedback item.

                                                                        4. In the Feedback column for the item click the dropdown list and select Respond from the Action menu.

                                                                        5. In the reply form, click Start.

                                                                        6. For each item in the feedback request:

                                                                          1. Provide your feedback in the comment box.

                                                                          2. Provide a rating if requested by the sender.

                                                                          3. Enter an approver if appropriate.

                                                                        7. Use the Next and Previous buttons to navigate to other items in the feedback request.

                                                                        8. When feedback has been provided for all requested items, save the provided information and click Finish and Send.

                                                                        The feedback is sent to the person who requested it and an email notification will be sent to that person if such notification was set to be sent. The feedback request task is also removed from My Tasks.

                                                                          Removing Feedback from the Feedback Page

                                                                          Removing feedback is only possible when the setting Allow Feedback Deletion has been set to Yes. When allowed, the Remove action is available; otherwise, it's not.

                                                                          Feedback can only be removed from the Received feedback view. It cannot be removed from the Provided view.

                                                                          Performance > [Navigation bar] > More dropdown > Feedback

                                                                          1. In the Feedback page, select the Received tab/view.

                                                                          2. As needed, refine the list by using the available filters and sort in order to locate the feedback to delete.

                                                                          3. Once the feedback item is found, click the dropdown list in the Feedback column and select Remove from the Action menu.

                                                                          4. Click Yes to confirm the action.

                                                                          The feedback will be removed from the list of received feedback in the Results List. If you are entitled to view feedback about yourself or about your direct reports coming from anybody, the feedback will only be removed from your list of received feedback, therefore preventing a feedback sent or received by someone else from being deleted from your Feedback page.

                                                                          Both the sender and the recipient must remove a feedback from their received views for it to be removed from both person's received views.

                                                                            Flagging Feedback as Important

                                                                            Performance > [Navigation bar] > More dropdown > Feedback

                                                                            1. On the Feedback page, select the Received tab at the top of the results list.

                                                                              The results list displays feedback received about yourself, solicited or unsolicited ; pending requests for feedback about yourself (requested by yourself or someone else); and requests for feedback about yourself (requested by yourself or someone else) that are pending approval.
                                                                            2. Locate the feedback item you want to flag as important, click the dropdown button in the Feedback column, and select Mark as High Importance from the Action menu.

                                                                            A red flag will display in the Important column for the selected feedback item.

                                                                              Requesting General or Specific Feedback from Feedback Journal
                                                                              • Feedback requested via the Feedback page can be requested specifically about a context (category) of information (General, Career Scenario, Competency Goal, Development Activity, Employee Goal or Review).

                                                                              • Requesting feedback from other employees in the organization can enable you to make a better evaluation of an employee's proficiency regarding a goal, a competency or a custom item and help you make a decision regarding a development activity to undertake.

                                                                              Performance > [Navigation bar] > More dropdown > Feedback

                                                                              1. In the Feedback page, click Ask for Feedback.

                                                                                In the Ask for Feedback dialog the name of the person who you want to request feedback about displays at the top. The Change link displays to the right of the name.
                                                                              2. If you want to request feedback about a different person, click Change to open the People Selector dialog and select the person.

                                                                              3. In the Ask for Feedback dialog select the person who you want to provide the feedback.

                                                                              4. Use the Context selector to indicate whether the feedback requested is general or specific for a particular context: General, Career Scenario, Competency Goal, Development Activity, Employee Goal or Review.

                                                                                You can also specify a certain option within a context, where items are available. For example, within a Career Scenario you can limit the feedback to a particular career option.
                                                                              5. Specify a due date as well as the priority level for the feedback.

                                                                              6. In the comment box, edit the default message and format the text if as needed.

                                                                              7. When input is completed, click Send.

                                                                              The recipients will receive a feedback request in their My Tasks panel. Also, an email notification will be sent if such notification was configured.

                                                                                Feedback Report

                                                                                Employees and managers are able to print the Feedback results list, including pending feedback requests, to a PDF format Feedback report. Employees are able to generate a Feedback report for themselves, while managers can generate reports for themselves and their employees.

                                                                                Feedback Report Content Determined by Journal View Context

                                                                                Printing the Feedback Report

                                                                                When you click the Print Button on the toolbar at the top of the Feedback page, feedback items currently displayed in the selected view are printed to a PDF format report. The Feedback report captures the information available within the context of the Feedback page and results list at the time you run the report. The feedback you see depends on the filters applied to generate the results list:
                                                                                1. The configuration setting Enable Public Access to Feedback.

                                                                                2. The employee selected in the breadcrumbs at the top of the page.

                                                                                3. The view selected (Received or Provided).

                                                                                4. The primary filters selected: Date Range, Provider and Context.

                                                                                5. The secondary filter selected at the top of the journal list (Complete, Pending and Total).

                                                                                The generated PDF version of the feedback report can be viewed online, printed, or saved to a local machine using the functionality of your chosen browser. Saved copies can be attached to other sections of Taleo Performance; such as Reviews and Goal Plans.

                                                                                Feedback Report Output

                                                                                The first page of the printed Feedback report includes the name, photo and contact details of the person printing the feedback. At the upper right the print date format is fixed and always displays the timezone of the print server, which may not match your timezone. The main body of the Feedback report provides information about feedback items that is context sensitive to the settings for the Feedback page when you printed the report. When you are printing a view that includes pending feedback, it will display a separate entry for each person who has been sent a feedback request. For example, if ten people are sent feedback requests on a single subject at the same time, and eight of them are still pending, the report will include individual entries for each of those eight people.

                                                                                The following table shows how the fields that display in the Feedback report are determined contextually, depending upon the view selected for the results list.

                                                                                View setting (tab at the top of the results list) Feedback Report Title (in Feedback report) Feedback Section Fields (in Feedback report) Pending Section Fields (in Feedback report)
                                                                                Received Feedback Received About Context, Provider, Rating, Feedback. Date, Status, Importance Flag. Context, Rating, Provider, Feedback.
                                                                                Provided Feedback Provided By Employee, Context, Requester, Rating, Feedback, Date and Status. Context, Rating, Provider, Feedback.
                                                                                  To Print a Feedback Report
                                                                                  • You want to print feedback items listed in the Feedback page's results list.

                                                                                  • You must apply appropriate selection and filtering values to the Feedback page such that feedback items display in the results list. Otherwise, no entries will populate the Feedback report.

                                                                                  Performance > [Navigation bar] > More dropdown > Feedback

                                                                                  1. Click the Printer icon on the Feedback page toolbar.

                                                                                    The Feedback report is contextual, the system includes only the feedback entries you see on the results list at the time you print the report.
                                                                                    The system generates a PDF format report of the entries in the journal view and displays the report on the screen.
                                                                                  2. Use your browser's Save and Print functions to download a copy of the report to a local machine, or print a copy of the report, respectively.

                                                                                  A PDF is generated, which can be saved or printed.

                                                                                    Print Feedback Report Scenarios

                                                                                    The following table provides examples of view and filter selections for common feedback report scenarios.

                                                                                    Scenario View Selector Filter Setting
                                                                                    Print all received feedback about yourself. Received You are the employee selected in the breadcrumbs.
                                                                                    Print all provided feedback by yourself. Provided You are the employee selected in the breadcrumbs.
                                                                                    Print all received feedback about one of your employees. Received The employee selected in the breadcrumbs is another employee. Use secondary filter button Total.
                                                                                    Print all feedback requests you have sent that are pending. Provided You are the employee selected in the breadcrumbs. Use secondary filter button Pending.
                                                                                      Feedback Approval

                                                                                      This allows feedback to be reviewed and approved before being sent to recipients.

                                                                                      Feedback approval consists of the following:
                                                                                      • approval can be requested when responding to a feedback request or when providing unsolicited feedback

                                                                                      • the person providing feedback has the option to select anyone as the feedback approver

                                                                                      • requesting feedback creates an approval task for the approver, subsequently rejecting feedback creates a resubmit task for the provider

                                                                                      • notification of feedback approval and rejection tasks can be displayed in Taleo Inbox

                                                                                      • selecting an approver is optional, not selecting one sends the feedback directly to the recipient

                                                                                      Configuration

                                                                                      Configuration > [Taleo Performance] Settings
                                                                                      Name Description
                                                                                      Enable Feedback Approval Enables feedback approval functionality in the system. It controls if the approver selector and details are displayed in the feedback form and if the Status column is displayed in the Sent view of the Feedback Journal. It also controls the approval workflow mechanism. Disabled by default.

                                                                                      The following message templates are used for feedback approval.

                                                                                      Configuration > [Taleo Performance] Message Templates
                                                                                      Type Description
                                                                                      Standard notification for feedback approval completion This is used when the approver has made a decision on the feedback. If it is approved, it is sent to the recipient. If it is rejected, the feedback author can update the feedback and resubmit it for approval.
                                                                                      Standard notification for a feedback approval This is used to notify someone they have been asked to approve feedback.

                                                                                      These message template variables are used to identify the employees and subjects of the feedback approval.

                                                                                      Configuration > [Taleo Performance] Message Templates
                                                                                      Variable Description
                                                                                      {Feedback.FeedbackAuthorName} This is the approver who is providing approval of the feedback request.
                                                                                      {Feedback.RequesterName} This is the person who is providing feedback and making the request to have it approved.
                                                                                      {Feedback.SubjectEmployeeName} This is the subject of the feedback. It can be an employee or it can be an object, such an employee goal or development activity.
                                                                                        To Get Feedback Approved

                                                                                        Enable Feedback Approval configuration setting is activated.

                                                                                        1. From My Network, Go To menu, Supporting Tools, or the Feedback Journal choose to send unsolicited feedback about an employee, or from My Tasks select a feedback request.

                                                                                        2. After entering feedback, click the Magnifying Glass icon for the Approver field and select who should receive the feedback.

                                                                                          When providing feedback for a module, such as a performance review, you must first select Approval from the left-side menu.

                                                                                        3. Click Send and an approve feedback request is sent to the approver.

                                                                                        4. From their tasks list, the approver selects the Approve feedback request to display the feedback.

                                                                                        5. If the feedback is acceptable, the approver clicks Approve Feedback and the feedback is sent to the recipients.

                                                                                        6. If the feedback isn't acceptable, the approver can add comments and click Reject Feedback to create a Review Feedback Rejected task for the sender.

                                                                                          The feedback is not sent to the recipient.
                                                                                          When approving feedback for a module, such as a goal plan, first Approval must be selected from the left-side menu.
                                                                                        7. Select the task to access the feedback and view the rejection reason to learn why it was rejected, then make the required changes and return to Step 3 to continue the process.

                                                                                          You can resubmit the feedback to a different approver.
                                                                                          Feedback Deletion

                                                                                          The Feedback Deletion feature provides customer system administrators having the Integrator role the ability to remove feedback comments and ratings from Performance that are deemed inappropriate, inaccurate or not adhering to organizational communication and feedback policies. Feedback deletion is done with the Taleo Connect Client (TCC), using an addition to the Performance PIP (product integration pack).

                                                                                          Introduction.

                                                                                          Inappropriate or inaccurate feedback may be entered into Performance by end-user "providers" of feedback. The administrator may perform feedback deletion as needed, or as a regularly scheduled task (for example 3-4 times per year). The deletion process involves the administrator performing an export of feedback content to a CSV file. Since providers often enter feedback content using a rich text editor field, the exported content can contain HTML formatting code that makes it hard to read the content in the CSV file. This formatting code must be removed upon export for the administrator to be able to read the feedback content.

                                                                                          The system administrator uses the TCC to perform the following steps:
                                                                                          1. Use TCC to export the feedback content to a CSV file and run a transformation to cleanse the CSV file of rich text formatting code.

                                                                                          2. Use Excel to select rows in the CSV file for removal, and then use the TCC to run an import operation to delete them from the production database.

                                                                                          While Feedback Removal allows users to prevent certain feedback content from being visible in the application, Feedback Deletion removes feedback content from the database. For details on how to perform feedback deletion see the Oracle Taleo Performance Administration Guide.

                                                                                            Talent Profile

                                                                                            The Talent Profile summarizes and represents the employee's record within Taleo Performance. It contains general information about the employee drawn from the employee's user account; as well as metrics, review history, compensation, competency, employee, education, work experience, certification and job preference information. Generally the sections of the talent profile are highly configurable. Custom sections can also be configured by system administrators and added to the Talent Profile.

                                                                                            User types, Visibility Groups and Access to the Talent Profile

                                                                                            The Talent Profile is intended to be viewable by the employee and their managers. Depending on configuration they will be able to see all or some of the available fields in the Talent Profile sections. Depending upon the implementation employees will have the ability to edit some of the information presented in their profile.

                                                                                            User Types

                                                                                            A user's access to Talent Profile sections is subject to user type permissions security. There are the following Talent Profile-related user type functional domains:
                                                                                            • Employee Metrics: Access to employee metrics and user-defined employee metrics and access to the General section.

                                                                                            • Employee Profile: Access to Talent Profile standard and custom sections.

                                                                                            • Performance Review: Access to Review History and General Sections.

                                                                                            • Compensation: Access to Compensation and General Sections.

                                                                                            Visibility and Availability Groups

                                                                                            A visibility group is simply a subset of the employees in your organization. For example, you might want to define a group for American senior executives. The visibility group would be defined using Location equals USA, and Job Level equals Senior Executives.

                                                                                            The Visibility and Availability Groups feature, configured in the Talent Profile Layout pages, provides a second tier of security at the Talent Profile section level. Visibility groups work in addition to the User Type permissions security, which takes precedence. The visibility group configurations allow an administrator to further restrict access to talent profile sections. Sub-sections inherit the section security. Visibility groups can be applied in all Talent Profile section configurations, with exceptions for General and Competencies:
                                                                                            • The General section has no section level availability configuration, as it is always available. It also does not support the control of section visibility, nor does it have field level visibility configuration.

                                                                                            • The Competencies section does have section level availability configuration, but not section visibility control. Competencies do have role-based, field level visibility configuration.

                                                                                            For more information about configuring User Types and Visibility Groups see the Oracle Taleo Performance Administration Guide.

                                                                                            Viewing and Editing the Talent Profile
                                                                                            The following represents a general business process overview for viewing and editing the Talent Profile:
                                                                                            1. Prerequisite - The sections of the Talent Profile are configured by the HR Administrator. The configuration for your organization's implementation determines which sections and fields are displayed and/or editable by the manager or the employee.

                                                                                            2. Open the Talent Profile (Navigation bar > Profiles).

                                                                                            3. An employee's Talent Profile can be viewed and printed by the employee and managers.

                                                                                            4. When viewed by the employee, much of the information shown in the Talent Profile can be edited by the employee; except for the information shown under the General, Compensation and Review History sections.

                                                                                            5. When viewed by the employee's direct or high-level manager, metric information is also available on the Talent Profile and can be edited as needed.

                                                                                            Sections in the Talent Profile

                                                                                            The following sections, listed here with default name and order, are available to display in the Talent Profile. When a section is configured to be displayed in the Talent Profile, a corresponding link for the section displays in the left side menu.

                                                                                            Section Name Available Actions
                                                                                            General View, Change Photo, Print
                                                                                            Metrics View, Expand/Collapse, Show History, Edit, Save/Cancel, Print.
                                                                                            Review History View, Print
                                                                                            Compensation View, Print.
                                                                                            Competencies View, Expand/Collapse, Edit, Add/Delete, Save/Cancel, Print, Filter by Current Job Role or All.
                                                                                            Employee Information View, Expand/Collapse, Edit, Save/Cancel, Print.
                                                                                            Education View, Expand/Collapse, Edit, Add/Delete, Save/Cancel, Print.
                                                                                            Work Experience View, Expand/Collapse, Edit, Add/Delete/Move in Order, Save/Cancel, Print.
                                                                                            Certification View, Expand/Collapse, Edit, Add/Delete/Move in Order, Save/Cancel, Print.
                                                                                            Job Preference View, Expand/Collapse, Edit, Add/Delete/Move in Order, Save/Cancel, Print.
                                                                                            Attachments View list, Expand/Collapse, Add/Delete, Print list.
                                                                                            Succession Plans View.
                                                                                            Custom Create a custom section populated with standard and user-defined fields to meet your business needs.

                                                                                            Printing the Talent Profile

                                                                                            Print the content displayed in the Talent Profile using the Print button located on the Actions toolbar, just above the General section. When printing a talent profile you can select which sections to include, with the exception of the General section which is always included. The sections available to be printed are dependent on your permissions. Print output is dependent upon what you can see in the Talent Profile, and what you have selected in the print dialog when printing is initiated. The selected sections will be printed in the same order as seen in the Talent Profile.

                                                                                            General Section

                                                                                            The Talent Profile's General section provides a visual header for the Talent Profile. It is a partially configurable section, you can customize six of the fields in the General section. The General section is unique in that it is divided into two subsections by a horizontal, thin gray line.

                                                                                            The region above the line contains elements which are not configurable (i.e. Current Job). The region is generally not editable by the user, with the exception they can upload an employee photo there.

                                                                                            The region below the line contains elements which are configurable (e.g. location, contact and organization information). The region below the line is always 50/50 Split into two columns, this is not a configurable attribute. Up to 6 fields may display below the gray line. None are editable by the user.

                                                                                            The General section is available and visible for all users. Availability and visibility configuration of this section is not provided.

                                                                                            The General section is the one section of the Talent Profile always included when you print a profile.

                                                                                            Employee Image in the General Section

                                                                                            Beginning with Feature Pack 12C a larger image size is displayed in the General section. It is 256 x 256 pixels, larger than in the Performance Card. The larger image will not display automatically for users migrating from a prior Feature Pack. By default the larger image is shown as a silhouette, as employee photos from prior implementations are in smaller size. Employee photos need to be re-imported in order to have them shown on the General section.

                                                                                            Note: There are several ways to get the larger employee images to display on the General Section:
                                                                                            • Manually update a photo within the user's General section.

                                                                                            • Update a photo through a user's SmartOrg user account.

                                                                                            • Use the Taleo Connect Client (TCC) to batch load employee photos.

                                                                                            Metrics Section

                                                                                            The Metrics section provides the employee's metrics information. Content displayed includes employee review and goal ratings and supporting employee metrics. The metrics display is for the managers of the employee. The section is editable for some fields.

                                                                                            Customizable Employee Metrics Use in the Talent Profile

                                                                                            Only activated employee metric values are available in the Talent Profile's selection lists. However, the metric values previously used in employee records are not automatically changed even though certain values may be deactivated in Configuration.

                                                                                            Users can view metrics history in the Talent Profile by clicking the More Actions button at the top of the Metrics section. The actions list provides the following options:
                                                                                            • Nominate for Position

                                                                                            • Show History

                                                                                            • Create Report

                                                                                            When the user selects the Show History option, the Metrics History dialog provides options for the following employee metrics:
                                                                                            • Review Rating

                                                                                            • Potential

                                                                                            • Risk of Loss

                                                                                            • Promotability Readiness

                                                                                            • Reassignment Candidate

                                                                                            • Competency Rating

                                                                                            • Goal Rating

                                                                                            • Impact of Loss

                                                                                            Potential, risk of loss and promotability readiness are customizable.

                                                                                            Metric History Tracking

                                                                                            At the top of the Talent Profile page is a toolbar including a Print button and a More Actions menu. An option provided in the print dialog is to select Metric Show History and include it in Talent Profile print output. (Navigation: Performance > Employee Center > Navigation bar > Profile > Header section > Print button.)

                                                                                            The More Actions menu includes a Show History option. Selecting this option opens the Metrics History dialog, where you can set the system to show history for selected employee metrics.

                                                                                            Review History Section

                                                                                            The employee review history data displayed on the talent profile can include the date, manager, overall review rating, goal rating, and competency rating. This section is not editable. Details can come from the last five completed reviews. Values are taken from the historical review table, so active reviews cannot be included. The rating values are based on the corresponding metric rating model and displayed according to the Metric Rating Display setting. For instance, a metric rating model that uses names (Poor, Average, Good) and numeric values (1, 3, 5) coupled with a rating display value In text and numeric format would display ratings such as Average - 3.

                                                                                            Note: The most recent Review Rating entry in the Review History Section will match the Last Focal Review Rating in the General Section, if it is displayed. Other ratings displayed in the General Section do not align with Review History section ratings.

                                                                                            In the Review History section configuration all the review history-related fields are selected to set them to "Displayed" by default. The administrator has the option of unselecting any or all of them to make them "Not Displayed".

                                                                                            Compensation Section

                                                                                            The Compensation section displays the employee's compensation history data. Content displayed includes current salary, and bonus and stock awards. This section is not editable by the user.

                                                                                            Competency Section

                                                                                            The Competency section is editable. Users can view, add, remove and rate competencies for themselves directly into this section. Users can also filter competencies to show all competencies or just those competencies related to their current job role. The section displays competency data for various areas such as Behavioral, Job-Specific and Language. The ability to view and edit competencies in this section is dependent on section configuration and your specific user type permissions. The user type relates to the talent profile that is viewed. The same user will have different user type access to employee competency settings, depending on that user's relationship to the user whose talent profile they wish to view. It is important to note that these competency specific user types do not relate directly to the standard user types as defined in SmartOrg.

                                                                                            For example, when Michael Decker views his own talent profile, he is accessing it as an employee and the competency settings for an employee user type apply. When he views the talent profile of Renee Washington, who is one of his direct reports, he is accessing it as a manager and the competency settings for a manager user type apply. Chris Baker reports directly to Renee Washington, so if Michael Decker was to view his talent profile it would be as a high level manager and the corresponding competency settings are applied.

                                                                                            When adding a new competency in the Talent Profile, the Competency Selector dialog enables you to search for the competency using keywords. Filters are also available to assist in searching the list of competencies, depending upon configuration. If competencies in the section are configured to be grouped by Type, then the available filter options are Group and Category. If competencies are configured by Group, the available filter options are Type and Category.

                                                                                            Employee Information Section

                                                                                            The Employee Information section provides general employee information; such as their current position. The section is editable.

                                                                                            Education Section

                                                                                            The Education section provides employee education information; such as Institution, Program, Educational Level, Start and Graduation Date. The section is highly editable by the employee. They can add, remove and edit records. If LinkedIn Integration is enabled employee's can import LinkedIn profile information to this section.

                                                                                            Work Experience Section

                                                                                            The Work Experience section provides employee job history information; such as employer, job title, start and end date, supervisor information, and tasks and achievements. The section is highly editable by the employee. They can add, remove and edit records. If LinkedIn Integration is enabled employee's can import LinkedIn profile information to this section.

                                                                                            Certification Section

                                                                                            The Certification section provides employee certification information; such as certification, certification number, expiration date, organization, location, etc. The section is highly editable by the employee. They can add, remove and edit records. If LinkedIn Integration is enabled employee's can import LinkedIn profile information to this section.

                                                                                            Job Preference Section

                                                                                            The Job Preference section provides employee job preference information; such as for jobs, work locations and organizations. The section is highly editable by the employee. They can add, remove and edit records.

                                                                                            Attachment Section

                                                                                            The Attachments Section provides a place for employees to attach supporting documents. They can add and remove attachments. The system adds the Attached By person and Date to the display. HR Administrators can also add information to employee profiles on their behalf by attaching documents to their Talent Profiles using TCC. This feature helps organizations that want to import attachments including, but not limited to, resumes and cover letters, performance reviews from another system, and journal articles.

                                                                                            The Talent Profile must be configured to allow attachments, and Administrators must make the attachment section visible in the Talent Profile if they want users to have visibility to that section. TCC allows for 1 MB per attachment and allows 10 different file types.

                                                                                            For more information on how to attach files using TCC, refer to the Oracle Taleo Enterprise Integration Taleo Connect Client User Guide, Feature Pack 15A.

                                                                                            Succession Plans

                                                                                            The Succession Plans section displays as a table with the following columns: Job Position, Incumbent, Readiness and Interim Replacement. The list of Succession Plans included in the table are dependent upon the logged in user's security permissions. A message displays at the bottom of the table indicating how many of the Succession Plans are displayed due to security restrictions. For example, a message may state, "Currently 9 our of 12 succession plans are visible based on your permission."

                                                                                            Configuration

                                                                                            Printing Talent Profiles

                                                                                            There are no specific configuration settings. Overall talent profile settings and user permissions control what can be displayed and subsequently printed.

                                                                                            Employee Review History

                                                                                            The settings under Review History can only be set to displayed. They cannot be set to editable. If no Review History fields are displayed the section is hidden.

                                                                                            Configuration > [Taleo Performance] Administration > [Employee Management] Talent Profile Section Configuration
                                                                                            Name Description
                                                                                            Properties
                                                                                            Maximum number of historical reviews Indicates how many reviews are included on the Talent Profile, displaying the data as configured in the Review History section. These are performance reviews that have a status of closed and are available from the historical review table. Select a value between 1 and 5. The default is 3.
                                                                                            Review History
                                                                                            Effective Date The date on which the review was closed and the score added to the historical review table.
                                                                                            Manager The name of the manager who owns the review.
                                                                                            Review Rating Overall review rating score given by the manager for the review. The value is based on the final score of the review, which uses the 'Review Rating' Metric Rating Model setting to determine the available values. It is formatted based on the Metric Rating Display setting.
                                                                                            Goal Rating Review rating score for only the Goal section of the review. It is possible this value could be empty, while there is still an overall review rating score. The value is based on the final goal score, which uses the 'Goal Rating' Metric Rating Model setting to determine the available values. It is formatted based on the Metric Rating Display setting.
                                                                                            Competency Rating Review rating score for only the Competency section of the review. It is possible this value could be empty, while there is still an overall review rating score. The value is based on the final competency score, which uses the 'Competency Rating' Metric Rating Model setting to determine the available values. It is formatted based on the Metric Rating Display setting.

                                                                                            Succession Plan List Table

                                                                                            Configuration > [Taleo Performance] Administration > [Talent Profile Management] Talent Profile Layout > Details > Add Fields
                                                                                            Name Description
                                                                                            Standard Field Group field type and Succession Plan List field The configuration settings chosen here within the Administration pages displays as a table in the user interface.

                                                                                            As with any field that displays review scores in the Talent Profile, if values are not available based on the combination of rating model and metric display rating, then Not Available is displayed for that field.

                                                                                            The view permission for Performance > Reviews must be enabled for users to be able to see the review history.

                                                                                              To Edit a Talent Profile

                                                                                              Performance > Employee Center > [Navigation bar] Profile (for your own Talent Profile)

                                                                                              Performance > Employee Center > [Navigation bar] Profile > [Smart Breadcrumbs] Employee (if you are a manager change to profile for another employee)

                                                                                              Performance > Employee Center > [Navigation bar] Talent Browser button > Select an employee (if you are a manager) > Select Talent Profile

                                                                                              1. In the Talent Profile, use the Menu on the left, or the scroll bar on the right, to go to the section you want to modify and click Edit.

                                                                                                Depending on your user permissions, some sections may not be editable. The General, Review History and Compensation sections are generally not editable by anyone, with the exception of the employee photo in the General section.
                                                                                              2. Click Edit to update the section details:

                                                                                                • In the General section, hover your mouse over the employee photo and click the Change Photo popup link to upload a different employee photo.

                                                                                                • In the Metrics section, click Edit and you can modify standard and custom metric values.

                                                                                                • In the Competencies section, the Competency Selector enables you to immediately search for a competency using keywords, or you can refine your search by filtering the Type, Group and Category before you enter keywords. The filters refresh the results automatically, while you must select Go to search by keywords. From the Development Activity column you can create and assign activities by clicking the Right Arrow icon.

                                                                                                • In the Employee Information section, the values are custom user-defined values and can include a number of different types, such as check boxes, drop-down lists and date fields.

                                                                                                • In the Education, Work Experience and Certification sections, you can add, edit and remove entries. You can also reorder them. If LinkedIn Integration is enabled, you can import LinkedIn profile information into these sections of the Talent Profile.

                                                                                                • In the Job Preferences section, you can change details such as: your willingness to move, which disciplines you would like to work in, which locations you would work at. Do this using a combination of drop-down lists, free text fields and selectors.
                                                                                                  Note: When selecting and saving the Organization, Location and Job Fields in this section, the parent values in a hierarchy are not displayed in the list when specific leaf values are also selected. When only a parent value is selected and saved, it is displayed in the list. For example, if the three locations Canada, Canada - British Columbia, and United States are selected; only two are displayed, Canada - British Columbia and United States. The parent value Canada is omitted from the list because a leaf of Canada is selected.
                                                                                                • For the Attachments section, see To attach files.

                                                                                              3. Click Save at the section-level as you complete edits on each section.

                                                                                              4. Repeat steps 2 - 3 as needed for additional section edits.

                                                                                              All changes made to the Talent Profile information will be displayed to the employee and reflected in other integrated Taleo applications, as described by Talent Master Profile.

                                                                                                To Print a Talent Profile
                                                                                                Taleo Performance > Navigation bar Profile
                                                                                                1. Click the Printer icon on the toolbar just above the General section.

                                                                                                2. In the Print Options dialog select the checkbox for each section you want included. The General section is always included. You can also opt to include Metrics History in the print output.

                                                                                                  The dialog displays checkboxes for those sections your configuration displays in the Talent Profile. While the order of the sections in the print dialog may be different than in the user interface, when printed the sections will match what is displayed in Taleo Performance. You cannot select to print only part of a section.
                                                                                                3. Click Print.

                                                                                                A PDF is generated,which can be printed or saved. It includes the selected sections, company logo, employee photo, generation date, and page numbers.

                                                                                                  LinkedIn Integration

                                                                                                  The Talent Profile can be integrated with LinkedIn, to allow an employee's LinkedIn profile information to be imported to and used in the Work Experience, Education and Certification sections of their Talent Profile.

                                                                                                  Importing LinkedIn Data to a User's Talent Profile

                                                                                                  The “Import from LinkedIn” option is only available to the owner of the Talent Profile, and only when the Enable LinkedIn Integration and Talent Profile Settings configurations are set up. The option displays as a button available on three Talent Profile sections: Work Experience, Education and Certifications. It displays alongside text stating "Last Import on [Datestamp]".

                                                                                                  LinkedIn Information Available for Import

                                                                                                  You can selectively import information from LinkedIn fitting the Work Experience, Education and Certification sections of the Talent Profile. The information available for import from LinkedIn is:
                                                                                                  • Work Experience: Other Function Position, Other Employer Position, Start date Position, End date Position, Current Job Position, Achievements Position.

                                                                                                  • Education: Other Institution Education, Other Program Education, Start date Education, End date Education.

                                                                                                  • Certifications: Other Certification, Number/ID Certification, Issue Date Certification, Expiration Date Certification.

                                                                                                    To Import LinkedIn Information
                                                                                                    • LinkedIn Integration must enabled by Support.

                                                                                                    • Customer must enter LinkedIn API keys in Talent Profile Properties configuration.

                                                                                                    • Employee must have LinkedIn profile information entered in LinkedIn.

                                                                                                    Performance > [Employee Center] > [Navigation bar] > Profile
                                                                                                    1. If LinkedIn Integration is enabled and configured you will see the Import from LinkedIn button at the header level for the Work Experience, Education and Certification sections.

                                                                                                    2. Click the Import from LinkedIn button from within the context of one of the desired sections (e.g. within Work Experience).

                                                                                                    3. You are prompted by a legal disclaimer. Click Yes to agree with the disclaimer and proceed.

                                                                                                      The legal disclaimer is a reminder about the need to close your login session in LinkedIn, even after you have logged out of Oracle Taleo Performance. Otherwise your LinkedIn account remains open for a period of time, leaving it vulnerable to the next user who logs onto the machine. The legal disclaimer and LinkedIn authentication dialog only display once for a login session.
                                                                                                    4. When prompted for LinkedIn authentication, enter your LinkedIn login information and click OK.

                                                                                                    5. The Add dialog displays all the LinkedIn profile information/records for the section you are working from (e.g. Work Experience).

                                                                                                      For example, if you are working from the Talent Profile's Work Experience section, the dialog is named "Add Work Experience from LinkedIn", and it displays a list of the employers (work experiences) you previously entered into your LinkedIn account.
                                                                                                    6. To review the employment information click on each record name to view its detail information.

                                                                                                    7. To select a record(s) for import click the checkbox(es) to the left of each one.

                                                                                                      The Add button is activated when you select a record.
                                                                                                    8. Click Add to import the selected information from LinkedIn into the Talent Profile.

                                                                                                      LinkedIn information is transferred to your working Talent Profile section (e.g. Work Experience). section.
                                                                                                    9. Save your work when done.

                                                                                                      Note: Do not forget to log out of your LinkedIn session. You login authentication to LinkedIn lasts until your LinkedIn session is logged out.
                                                                                                      Talent Profile Fields

                                                                                                      Standard and Employee Metric type fields available for display in Taleo Performance's Talent Profile are presented in the following table, by alphabetical order of field name. Entries in the table include the name of the field, and a description. Many of the fields are available to be configured into more than one of the Talent Profile sections. The display of sections and fields in the Talent Profile are highly configurable. The fields you actually see are subject to your organization's implementation.

                                                                                                      Name Description
                                                                                                      Achievements Free-form text box indicating additional tasks and achievements. Tasks and Achievements in Taleo Performance.
                                                                                                      Anticipated Graduation Date Flag indicating that the anticipated graduation date is in the future.
                                                                                                      Bench Strength Metric that represents an enumeration value based on the number of successors in the succession plan for the position. Possible values are: None (no succession plan exists), Poor (no successor has been defined on the existing succession plan for the position), Average (there is 1 successor) and Good (there are 2 or more successors). This value is not editable in the Talent Profile.
                                                                                                      Bonus Amount and/or percentage of the bonus.
                                                                                                      Bonus Plan Name of the bonus plan.
                                                                                                      Can we Contact the Supervisor Flag that indicates whether it is possible to communicate with the supervisor to get further information.
                                                                                                      Certification Name of the certification. When adding a new certification, it must be selected from the Certification Selector.
                                                                                                      Certifications Section of the Talent Profile that presents the certifications of the employee.
                                                                                                      Competencies Sub-section of the Competencies section that lists behavioral competencies.
                                                                                                      Competency Rating Metric that indicates the competency rating on the last closed review, based on the review section configured to provide the basis for this rating.
                                                                                                      Competency Rating Review rating score for only the Competency section of the review. It is possible this value could be empty, while there is still an overall score. The value is based on the final goal score, which uses the 'Competency Rating' Metric Rating Model setting to determine the available values. It is formatted based on the Metric Rating Display setting.
                                                                                                      Critical Metric that indicates whether the position occupied by the employee is critical or not. This value comes from the Job Position’ s Criticality field in SmartOrg and is not editable in the Talent Profile. The position is considered critical when the Criticality field value in SmartOrg is 5; all other Criticality field values (1 to 4) represent a non-critical position.
                                                                                                      Current Position Current position of the employee, as defined in the employee's user account in SmartOrg.
                                                                                                      Current Review Status The status of the employee's current review, such as draft or complete.
                                                                                                      Current Salary Annual salary of the employee.
                                                                                                      Custom Metrics Section of the Talent Profile that shows any user-defined metric field.
                                                                                                      Development Activities Activities the employee engages in to develop their job skills.
                                                                                                      Development Overall Progress The overall progress of the employee's development plan, indicated as a percentage.
                                                                                                      Development Overall Progress The overall progress of the employee's development plan, indicated as a percentage.
                                                                                                      Education Section of the Talent Profile that presents education information about the employee.
                                                                                                      Education Level Level of education attained, selected from a list of defined levels.
                                                                                                      Education Level Education level preferred by the employee.
                                                                                                      Effective Date Date on which the new salary starts.
                                                                                                      Effective Date Date on which the bonus is being paid.
                                                                                                      Effective Date The date on which the review was closed and the score added to the historical review table.
                                                                                                      Email Email address of the employee at his current position.
                                                                                                      Employee Information Section of the Talent Profile that presents custom employee information.
                                                                                                      Employee Status Employee status preferred by the employee.
                                                                                                      Employee's Rating Rating given by the employee for the competency in the last focal review, that displays in the Talent Profile when the review is closed and the Update Talent Profile option is selected. The text value however is derived from the rating model associated to the specific behavioral competency. The display of this dimension in the Competencies section of the Talent Profile is based on a setting defined in the administration application. The rating can be edited if so configured in the administration application.
                                                                                                      Employer Name of the employer. When adding a new work experience, the employer must be selected from the Employer Selector.
                                                                                                      End Date End date for the job function.
                                                                                                      Experience Number of years of experience in the particular competency, which can only be defined and edited by the employee. The display of this dimension in the Competencies section of the Talent Profile is based on a setting defined in the administration application. The rating can be edited if so configured in the administration application.
                                                                                                      Expiration Date Date the certification expires.
                                                                                                      Ext. Phone extension of the employee at his/her current position.
                                                                                                      Gap Analysis Score The difference between the recommended rating for each competency in a job role and the rating the employee has for each competency.
                                                                                                      General Section of the Talent Profile that presents general information about the employee.
                                                                                                      Goal Rating Metric that indicates the goal rating on the last closed review, based on the review section configured to provide the basis for this rating.
                                                                                                      Goal Rating Review rating score for only the Goal section of the review. It is possible this value could be empty, while there is still an overall score. The value is based on the final goal score, which uses the 'Goal Rating' Metric Rating Model setting to determine the available values. It is formatted based on the Metric Rating Display setting.
                                                                                                      GPA Field that indicates the Grade Point Average, that is the mathematical calculation of where an average of the grades falls on a defined scale. For example, the value could be 3.44 out of 5.
                                                                                                      Graduation Date Date the education was completed and the employee graduated.
                                                                                                      Grant Date Date on which the stocks will be vested.
                                                                                                      Grant Type Type of stock.
                                                                                                      Has Development Plan Metric that indicates whether the employee has a development plan or not.
                                                                                                      Impact of Loss Metric that indicates how important the employee is in their job function.
                                                                                                      Increase Amount and/or percentage of the salary increase.
                                                                                                      Increase Type Type of salary increase.
                                                                                                      Incumbent - Succession Plan List table The name of the person currently in the position. If vacant, this is blank. This value comes from the Succession Plan of the employee and is not editable in the Talent Profile.
                                                                                                      Institution Name of the educational institution. When adding a new education, the institution must be selected from the Institution Selector.
                                                                                                      Interest Level of interest in the particular competency, which can only be defined and edited by the employee. The display of this dimension in the Competencies section of the Talent Profile is based on a setting defined in the administration application. The rating can be edited if so configured in the administration application.
                                                                                                      Interest in International Assignment Willingness to work abroad.
                                                                                                      Interim Replacement Metric that indicates if an interim replacement has been set for the position occupied by the employee. This value comes from the Succession Plan of the employee and is not editable in the Talent Profile.
                                                                                                      Interim Replacement - Succession Plan List table Whether or not this employee is the interim replacement named for the position. This value comes from the Succession Plan of the employee and is not editable in the Talent Profile.
                                                                                                      Issue Date Date the certification was issued.
                                                                                                      Job Fields Job fields of interest, including category, function and specialty.
                                                                                                      Job Function Name of the job function. When adding a new work experience, the job function must be selected from the Job Field Selector.
                                                                                                      Job Level Job level preferred by the employee.
                                                                                                      Job Position - Succession Plan List table Position within a Succession Plan that the employee is denoted as a possible successor. This value comes from the Succession Plan of the employee and is not editable in the Talent Profile.
                                                                                                      Job Preferences Section of the Talent Profile that presents the employee's work preferences. These preferences are defined by the employee and can later be used by managers to find successors according to preferences via the Advanced Search options.
                                                                                                      Job Type Job type preferred by the employee.
                                                                                                      Languages Sub-section of the Competencies section that lists language competencies.
                                                                                                      Last Review Rating Overall rating of the employee's last completed performance review.
                                                                                                      Last Update The date when the employee last made a change to their goal plan.
                                                                                                      Last Used Indication of the last time the particular competency was used, which can only be defined and edited by the employee. The display of this dimension in the Competencies section of the Talent Profile is based on a setting defined in the administration application. The rating can be edited if so configured in the administration application.
                                                                                                      Location Location of the work place of the employee, as defined in the employee's user account in SmartOrg.
                                                                                                      Locations Locations of interest, including country, state/province, region and city.
                                                                                                      Manager Name of the employee's direct manager, as defined in the employee's user account in SmartOrg.
                                                                                                      Manager The name of the manager who owns the review.
                                                                                                      Manager's Rating Rating given by the manager for the competency in the last focal review, that displays in the Talent Profile when the review is closed and the Update Talent Profile options is selected. The text value however is derived from the rating model associated to the specific behavioral competency. The display of this dimension in the Competencies section of the Talent Profile is based on a setting defined in the administration application. The rating can be edited if so configured in the administration application.
                                                                                                      May we contact the supervisor? Flag that indicates whether it is possible to communicate with the supervisor to get further information.
                                                                                                      Metrics Section of the Talent Profile that presents employee metrics. This section is only seen by managers for their direct reports.
                                                                                                      Name Name of the competency that can be added by the employee or drawn from the employee's last focal review when the Update Talent Profile option is selected.
                                                                                                      New Salary Amount of the new salary, that is the current salary plus the increase.
                                                                                                      Number of Activities The number of development activities in the employee's development plan.
                                                                                                      Number of Career Scenarios Number of career scenarios the employee has in their career plan.
                                                                                                      Number of Succession Plans This metric indicates the number of succession plan this person is part of.
                                                                                                      Number of Successors Number of successors included in the succession plan for the employee.
                                                                                                      Number/ID Course number or ID associated with the certification.
                                                                                                      Organization Name of the organization responsible for providing the certification.
                                                                                                      Organization Organization where the employee works, as defined in the employee's user account in SmartOrg.
                                                                                                      Organizations Organizations of interest, including company, section, department and division.
                                                                                                      Other Certification Field used to specify a certification that is not in the list provided in the Certification Selector.
                                                                                                      Other Employer Field used to specify an employer that is not in the list provided in the Employer Selector.
                                                                                                      Other Institution Field used to specify an education institution that is not in the list provided in the Institution Selector.
                                                                                                      Other Job Function Field used to specify a job function that is not in the list provided in the Job Field Selector.
                                                                                                      Other Program Field used to specify an education program that is not in the list provided in the Program Selector.
                                                                                                      Overall Progress The overall completion percentage for each of the goals in the employee's goal plan.
                                                                                                      Phone Phone number of the employee at their current position.
                                                                                                      Potential Metric that indicates the potential of an employee, that is editable by the manager and not visible to the employee.
                                                                                                      Preferred Job Preferred job fields of the employee, selected from those available within the organization. Includes category, function and specialty.
                                                                                                      Preferred Location Preferred locations of the employee, including country, state/province, region and city.
                                                                                                      Preferred Organization Preferred organizations of the employee, including company, section, department and division.
                                                                                                      Proficiency Level of expertise an employee has in regards to a particular competency. The display of this dimension in the Competencies section of the Talent Profile is based on a setting defined in the administration application. The rating can be edited if so configured in the administration application.
                                                                                                      Program Name of the education program. When adding a new education, the program must be selected from the Program Selector.
                                                                                                      Promotability Readiness Metric that indicates how much time is required for the employee to be ready for a promotion, that is editable by the manager and not visible to the employee.
                                                                                                      Readiness Value used to indicate when the employee will be ready to be placed into a job position in a Succession Plan. This value comes from the Succession Plan of the employee and is not editable in the Talent Profile.
                                                                                                      Reassignment Candidate Metric that indicates if the employee is available for reassignment, that is editable by the manager and not visible to the employee.
                                                                                                      Replacement Name When there is an interim replacement for the employee, this metric shows the name of the replacement.
                                                                                                      Review Rating Metric that indicates the review rating the employee received on the last closed performance review.
                                                                                                      Review Rating Overall review rating score given by the manager for the review. The value is based on the final score of the review, which uses the 'Review Rating' Metric Rating Model setting to determine the available values. It is formatted based on the Metric Rating Display setting.
                                                                                                      Review Status
                                                                                                      Risk of Loss Metric that indicates the probable risk level of losing the employee, that is editable by the manager and not visible to the employee.
                                                                                                      Schedule Work schedule preferred by the employee.
                                                                                                      Show Field that provides the ability to select the competency information type to be displayed. You can choose to display General information (such as Proficiency, Experience, Last Used, Interest) or Rating information (that being the Manager and/or the Employee's Rating).
                                                                                                      Skills Sub-section of the Competencies section that lists technical competencies.
                                                                                                      Start Date Date the education started.
                                                                                                      Start Date Date the job function started.
                                                                                                      Status Overall status of the employee's current goals.
                                                                                                      Still in Position Flag that indicates that the employee in still working in the related position. Most commonly, this flag is used when the end date is not specified.
                                                                                                      Stock Grant Number of stocks.
                                                                                                      Supervisor's Email Email of the supervisor for the related job function.
                                                                                                      Supervisor's Name Name of the supervisor for the related job function.
                                                                                                      Supervisor's Phone Phone number of the supervisor for the related job function.
                                                                                                      Supervisor's Title Title of the supervisor for the related job function.
                                                                                                      Target Bonus Amount and/or percentage of the bonus that was targeted.
                                                                                                      Tasks and Achievements Free-form text box indicating any other task and achievement.
                                                                                                      Total Not-vested Stock Total number of stocks that are not yet vested.
                                                                                                      Willing to Relocate Employee's willingness to move to a different location.
                                                                                                      Willing to Travel Percentage of time an employee is willing to travel for their job.
                                                                                                      Work Experience Section of the Talent Profile that presents information about the work experience of the employee.
                                                                                                      Work Experience Section of the Talent Profile that presents the employee's work experience.
                                                                                                      Work Phone Number Phone number of the employee at their current position.
                                                                                                      Work Phone Number and Extension Phone number and extension of the employee at their current position, in a single field.
                                                                                                      Work Experience Section of the Talent Profile that presents the employee's work experience.
                                                                                                      Years in Industry Number of years of experience in the same industry, for the current position.
                                                                                                      Years in Industry Number of years of experience in the same industry, for the current position. Same value as the one presented in the Job Preferences section.
                                                                                                      Years in Management Number of years of management experience.
                                                                                                      Years in Management Number of years of management experience. Same value as the one presented in the Job Preferences section.
                                                                                                        Deleting Rated Competencies

                                                                                                        Typically employees or managers cannot delete a competency from the Talent Profile once it has been rated, but HR Administrators are able to do so. The correct user type permissions are required and certain administration settings must be enabled.

                                                                                                        Configuration

                                                                                                        The table shows permissions for deleting a competency from the Talent Profile.

                                                                                                        User Type Permission
                                                                                                        Name Description
                                                                                                        Performance > Employee Profile > View & Manage High level view and manage permissions are required to be able to select and delete competencies in the Talent Profile.
                                                                                                        Performance > Team Management > Access administration tools This permission is required to indicate the user is an HR administrator.

                                                                                                        These settings must be enabled.

                                                                                                        Configuration > [Taleo Performance] Administration > [Talent Profile Management] Talent Profile Layout > Talent Profile Section - Competencies
                                                                                                        Name Description
                                                                                                        Remove competencies This setting is required to display the Minus icon.
                                                                                                        Display competency section in Talent Profile This setting is required for the Competencies section to be displayed in the Talent Profile.
                                                                                                          To Delete Rated Competencies from the Talent Profile

                                                                                                          User must be an HR Admin with view/manage access to talent profiles.

                                                                                                          User must have the Talent Profile Competency Configuration settings, Remove Competencies and Display competency section in Talent Profile enabled.

                                                                                                          1. Access the Talent Profile of the employee.

                                                                                                          2. Select Competencies from the menu.

                                                                                                          3. Select the name of the competency to delete and click the Minus icon.

                                                                                                            If a message is displayed, click OK to confirm deletion.

                                                                                                          The competency is deleted from the talent profile and is also deleted from any development activities it is associated with.

                                                                                                            Showing Compensation Data in Taleo Performance

                                                                                                            Compensation history data can be configured to display within Taleo Performance.

                                                                                                            The talent model includes compensation data elements so that compensation data may be displayed within the Taleo Performance application. This compensation data can come from Taleo Compensation or from an external HRMS/ERP system.

                                                                                                            The compensation history data is displayed according to metric configuration, availability, and user security access in the following areas:
                                                                                                            • Talent Profile - Displays compensation history data.

                                                                                                            • Performance Snapshot Card - Displays compensation data in the Compensation section of the snapshot card.

                                                                                                            • Talent Browser - Displays salary, bonus, and stock information for employees.

                                                                                                            When compensation history data is available, and the related metric has been configured to display, the following information is provided in Taleo Performance, when available:
                                                                                                            • Employee's current salary

                                                                                                            • Employee's salary increase, new salary and effective date

                                                                                                            • Employee's bonus amount, bonus plan, target bonus amount and effective date

                                                                                                            • Employee's stock grant amount, total non-vested stock and grant date

                                                                                                            Compensation history is available from Taleo Compensation through an integration. If Taleo Compensation is activated in the zone and the integration is configured, the system will automatically transfer all compensation history data into SmartOrg on a daily basis. If Taleo Compensation is not activated, the client can use the standard integration tools to transfer the data from an outside ERP system.

                                                                                                            Configuration

                                                                                                            The following permissions must be granted to individual users to view or manage the Compensation History Data feature in Taleo Performance.

                                                                                                            User Type Permission
                                                                                                            Name Location
                                                                                                            View Compensation Data Configuration > [SmartOrg] Administration > User Type > User Account >Compensation>Compensation>Compensation Data
                                                                                                            Manage Compensation Data Configuration > [SmartOrg] Administration > User Type > User Account >Compensation>Compensation>Compensation Data

                                                                                                            Available Compensation Metrics
                                                                                                            Name Location
                                                                                                            Compensation - Current Salary Configuration > [Taleo Performance] Administration > [Employee Management] Metrics Configuration
                                                                                                            Compensation - Salary Increase Configuration > [Taleo Performance] Administration > [Employee Management] Metrics Configuration
                                                                                                            Compensation - Target Bonus Configuration > [Taleo Performance] Administration > [Employee Management] Metrics Configuration
                                                                                                            Compensation - Non-vested Stock Configuration > [Taleo Performance] Administration > [Employee Management] Metrics Configuration
                                                                                                              Talent Master Profile

                                                                                                              Using a single core person model to support Candidate and Employee Data, the Taleo application allows the transformation of candidates to employees. This is supported in concert with an organization's HRMS/ERP system, which will play an intermediary role in this process to allow the assignment of an Employee ID.

                                                                                                              By using a single person model for all records, any updates by an organization's HRMS system are visible both in the candidate's file seen in Taleo Recruiting and from Taleo Performance. All data is shared from the same data source. This also means that if an employee updates his/her record from the Talent Profile in Taleo Performance by adding certifications or additional educational information, this information is also updated on that person's candidate record visible in Taleo Recruiting. The reverse is also true, if an employee updates his/her profile by applying to a newly opened internal position on a career site. These additions also serve to augment this candidate's employee profile.
                                                                                                                Multi-Language Display of Shared Profile Data

                                                                                                                Users can select which language their shared candidate and employee profile data is displayed if multiple profiles in multiple languages exist. This allows Talent Users to continue to access and enrich their profiles as they move between having a Candidate Profile within Recruiting to having a Talent Profile within Performance Management.

                                                                                                                The definition of an active profile is standardized between Recruiting and Performance to mean the last updated profile. This logic is shared between Recruiting's Candidate profile and Performance's Talent Profile and Career modules resulting in the common Talent User. There are three common profile data areas; Work Experience, Education and Certifications. All three common profile data areas will display the same language and will synchronize on data refresh whenever the user switches the language in either Work Experience, Education or Certifications. After switching the language using the dropdown menu, only the content data from the matching profile version will refresh. The remaining labels stay within the context of the application login language.

                                                                                                                The default dropdown value indicates the active profile. This dropdown can be changed, and the newly selected language will persist during the session. When logging out and entering a new session, the default language will revert back to the active profile's language. If the Talent User has only one profile, the language dropdown does not display.

                                                                                                                Snapshot Card

                                                                                                                When the language is changed in the Talent Profile, that language is also displayed on the Snapshot card. The language cannot be changed on the Snapshot card itself, but a Tooltip with hover text is provided with the following message, "You can switch the profile language displayed from within the Talent Profile."

                                                                                                                Native Reporting

                                                                                                                There is a Profile data set for Native Reporting under the Talent Profile Data Model domain to report on Work Experience, Education and Certifications for all employees' profiles. This data is available and reportable for all available profiles in all languages, not just the active profile.

                                                                                                                Note: As a best business practice, employees and managers are encouraged to keep all profiles up to date now that they will all be exposed in the Talent Profile. Updates made to Work Experience, Education and Certifications in the Talent Profile, given the user has permissions to update, will be reflected in the corresponding Candidate Profile.
                                                                                                                  Employee Photo Upload

                                                                                                                  Instead of having to use the Configuration module or Taleo Connect Client for uploading photos, employees can upload a photo for themselves.

                                                                                                                  Larger Photo Image in the Talent Profile

                                                                                                                  A large size employee photo image (256 x 256 pixels) can be displayed in the Talent Profile's General section. The larger photo image is also used in the header section of Native Reports. Elsewhere in the system, such as on the Talent Card, the photo is resized to a smaller image (48 x 48 pixels).

                                                                                                                  At migration the system will not automatically display photos from implementations prior to Feature Pack 12C. By default the larger photo will be shown as a silhouette, as photos from earlier implementations are smaller in size. In this case employee photos will need to be re-imported in order to have them display on the General section.

                                                                                                                  Note: There are several ways to get the larger employee photo images to display on the General section:
                                                                                                                  • Manually update a photo within the user's General section.

                                                                                                                  • Update a photo through the user's SmartOrg account.

                                                                                                                  • Use the Taleo Connect Client (TCC) to batch load employee photos.

                                                                                                                  Employee Upload of Photo Image

                                                                                                                  From the Talent Profile General section, an option is available to browse to a photo in your local network and upload it to Taleo Performance. You can upload .gif, jpg, and .png files. In instances where a photo isn't a passport style photo, and you upload a portrait orientated photo, the system will attempt to crop the top part of the photo and display it, while with a landscape photo it will crop the center of the photo and display it.

                                                                                                                  Configuration

                                                                                                                  Requires one Talent Profile setting and ensuring that the correct user type permissions are enabled.

                                                                                                                  Configuration > [Taleo Performance] Administration > [Talent Profile Management] > Talent Profile Properties
                                                                                                                  Name Description
                                                                                                                  Allow Employee to Upload Photo This is required to have the Change Photo option available when you hover over an employee photo. Whether you can change your photo, or other employee's photos, depends on you user permissions.

                                                                                                                  Configuration > [SmartOrg] Administration
                                                                                                                  Name Description
                                                                                                                  [Users]User AccountsSelect a User Type and AccountEmployee Information sectionEdit An administrator can upload an employee photo from this setting.
                                                                                                                  [Users] User TypesFunctional Domain=PerformanceEmployee Profile Edit Permissions=Manage You can assign Manage access for different types of users, and this permission is required to see the Change Photo option and be able to upload a photo.
                                                                                                                    To Upload an Employee Photo

                                                                                                                    You must have user type permissions for editing talent profiles, and talent profile configuration settings for uploading photos must be enabled.

                                                                                                                    1. Access the talent profile for the employee whose photo you want to change.

                                                                                                                    2. Hover your mouse over the photo and click the Change Photo popup.

                                                                                                                      If you have accessibility features enabled, you will click the Change Photo... button beside the photo.
                                                                                                                    3. Browse to the photo you want to upload, select it and click Open.

                                                                                                                      Supported file types are .gif, .jpg, and .png.

                                                                                                                    The photo is resized to 256 x 256 pixels by the system and displayed in the General section of the talent profile. Elsewhere in the system where employee photos are displayed, such as in the Talent Card, they are resized to a smaller image size, 48 x 48 pixels.

                                                                                                                    If you do not like the results of the employee photo upload, you should resize the image on a local machine to have equal width and length, and then re-upload it. You can also delete the photo, replacing it with a generic silhouette.

                                                                                                                      Talent Snapshot

                                                                                                                      This provides the ability to view key employee information from different modules in the same place.

                                                                                                                      It is accessible via the Talent Snapshot icon throughout the system. This includes areas such as the Talent Browser, Network panel, Search results, Talent Pools, Succession Plans, and Performance Review list.

                                                                                                                      Employee management configuration settings for metrics, along with user type permissions, control access to Snapshot information.

                                                                                                                      The following metrics are displayed in the Talent Snapshot, all four of which are customizable:
                                                                                                                      • Potential

                                                                                                                      • Risk of Loss

                                                                                                                      • Impact of Loss

                                                                                                                      • Promotability Readiness

                                                                                                                      Selecting View Org Chart will display the person as the top node in the Talent Browser.

                                                                                                                      For information on the details for each module, see the corresponding sections in the Help Center or Taleo Performance user guide.

                                                                                                                      The Talent Snapshot summary provides information on the following:

                                                                                                                      Talent Snapshot Contents (except Performance Card)
                                                                                                                      Section Included Information
                                                                                                                      Employee Information Manager, Current Position, Direct Reports, Work Experience, Education. When available, the first five direct reports, first work experience entry, and first education entry are displayed automatically.
                                                                                                                      Goal Plan Overall goal plan (total goals, goals aligned to manager, overdue goals, overall progress, approval status, last updated date), Employee goals (name, alignment, progress, due date).
                                                                                                                      Development Plan Overall dev plan (total activities, overdue and completed activities, approval status, last updated date), development activities (name, progress, due date).
                                                                                                                      Succession Plan Overall succession plan (total number of successors, total number of nominations, bench strength, successors list, approved, last updated date). This section also includes Employee metrics (Potential, Risk of Loss, Impact of Loss, Promotability Readiness), Position metrics (Critical Position), and Succession metrics (Interim Replacement and Number of Succession Plans). A pop up with detailed Succession Plan information displays if the Number of Succession Plans is hovered over. The metrics can be displayed even if no succession plan is available.
                                                                                                                      Career Plan Overall career plan (current job, scenario steps, gap analysis for each step indicating competencies required for the job). You can switch between scenarios and each one can display the current job and the first two steps of the plan.

                                                                                                                      Performance Snapshot Card

                                                                                                                      The Performance snapshot card contains data on the employee's current salary and compa-ratio, along with data on the last three closed focal performance reviews and compensation periods. The data that is displayed is impacted by your user type permissions and whether you have compensation data.

                                                                                                                      At a minimum, the Performance Review Ratings display one value per review period for the Overall score of the review. It may also contain Goal section and Competency section scores depending on your review configuration. The most recent review values displayed are the same as those found in the Metrics section of the Talent Profile. For more details on how ratings scores are derived and displayed, see the Taleo Performance Review Ratings Orientation Guide.

                                                                                                                      Compensation data can be brought into Taleo Performance via an integration with Taleo Compensation or by importing data from a third-party system using Taleo Connect Client (TCC). Regardless of which, batch data import jobs should be scheduled regularly to ensure the most up to date compensation data is displayed. For integration details, see the Taleo Compensation and Performance Integration Guide.

                                                                                                                      While the compensation data values available to both the snapshot and talent profile are the same, they are displayed differently. The talent profile only displays information when it is available and only displays the most recent individual values. The snapshot card displays NA when there is no information and displays values based on yearly totals and availability.

                                                                                                                      Note: Performance and compensation data are independent of each other, therefore it is possible the periods displayed for each will differ.

                                                                                                                      Performance Card Contents
                                                                                                                      Subject Description
                                                                                                                      Current Salary This value is taken from the compensation history table. Depending on when the compensation data was last updated, it is possible this is not your actual current salary.
                                                                                                                      Compa-ratio This value is taken from the compensation history table. Depending on when the compensation data was last updated, it is possible this is not your actual current compa-ratio.
                                                                                                                      Performance Review Ratings
                                                                                                                      Overall Displays the Overall review rating based on the Employee - Review Rating value kept in the historical review table for the indicated review period. All scores are for completed and closed review periods. No active scores are included.
                                                                                                                      Goals Displays the rating for the Goals section of the review. This is based on the Employee - Goal Rating value kept in the historical review table for the indicated review period. All scores are for completed and closed review periods. No active scores are included.
                                                                                                                      Competencies Displays the rating for the Competencies section of the review. This is based on the Employee - Competency Rating value kept in the historical review table for the indicated review period. All scores are for completed and closed review periods. No active scores are included.
                                                                                                                      Review Comments When you select an overall rating, review comments associated with it are displayed here. If no comments exist, the score is not a clickable link.
                                                                                                                      Compensation History
                                                                                                                      Salary Increase These values come from the compensation salary history table associated with the effective date displayed on the card. The Taleo Enterprise SmartOrg Data Dictionary provides details on compensation elements.
                                                                                                                      Bonus Award These values come from the compensation bonus history table associated with the effective date displayed on the card. As currencies are displayed for both this value and Salary Increase and multiple currencies are not supported within the same aggregated period, you should use the same currency whenever possible.
                                                                                                                      Stock Granted These values come from the compensation stock history table associated with the effective date displayed on the card.
                                                                                                                      Configuration

                                                                                                                      There are no specific Taleo Performance configuration requirements for this feature; however, you must have the following View user type permissions and configuration settings to display the data. There is no information available messages are displayed to users without appropriate permissions.

                                                                                                                      If Taleo Compensation is activated in the zone, the integration should have been configured to automatically transfer compensation history data on a regular basis. If Taleo Compensation is not activated, the client can use Taleo Connect Client (TCC) to transfer compensation data from an outside ERP system.

                                                                                                                      User Type Permission
                                                                                                                      Snapshot Section Required Permission
                                                                                                                      Employee Information
                                                                                                                      • Employee Profile - required to display Work Experience and Education details. Manager, Current Position, and Direct Reports are always displayed.

                                                                                                                      Goal Plan
                                                                                                                      • Goal Plans - required to display the entire section.

                                                                                                                      Development Plan
                                                                                                                      • Development Plans - required to display the entire section.

                                                                                                                      Succession Plan
                                                                                                                      • Succession Plans - required to display plan details.

                                                                                                                      • Employee Metrics - required to display metrics.

                                                                                                                      Career Plan
                                                                                                                      • Career Plans - required to display the entire section.

                                                                                                                      Performance Review Ratings
                                                                                                                      • [Performance] Performance Reviews - required to display the entire Performance section.

                                                                                                                      Compensation History
                                                                                                                      • [Compensation] Compensation Data - required to display the entire Compensation section and also the current salary and compa-ratio data.

                                                                                                                      Configuration > [Taleo Performance] Administration > [Employee Management]
                                                                                                                      Settings Description
                                                                                                                      Metrics Configuration Affects what is displayed in the Metrics section of the Succession Plan snapshot card.
                                                                                                                        To view an Employee's Snapshot

                                                                                                                        You must have user type permissions for the specific modules to see the information associated with them. If you do not have the permissions, the sections are not displayed.

                                                                                                                        Click the Talent Snapshot icon.

                                                                                                                        The Employee Information section is displayed. Click the Double Right Arrow icon to change sections. Click View Org Chart to see the employee displayed as the top node in the Talent Browser. Click the Down Arrow icon to display the Go To menu.

                                                                                                                          Attachments

                                                                                                                          Files can be attached to Performance Reviews, Goal Plans, and the Talent Profile. This enables employees to include documents that are not kept in Taleo Performance, in support of their achievements and progress for reviews and plans, such as projects plans, implementation scorecards, or client feedback. Native reporting output files can also be attached to reporting correspondence. "Attachment" settings are globally applied to all types of attachments, including report attachments used in native reporting correspondence.-

                                                                                                                          The files are associated with the highest level object, such as the overall goal plan itself and not a specific employee goal. Attachments can be viewed by anyone who has view access to the object (goal plan, review, talent profile), while manage access is required to attach files. Only employees can attach files to their goal plans and performance reviews. Like other events, adding and removing attachments is included in the object's history.

                                                                                                                          As a basic service you can attach up to ten files to an object, with a maximum file size of 1mb, depending on system configuration. If you have already reached your maximum number of attachments you will need to delete a file before a new one can be uploaded. Once a file has been attached it can be updated, but you must save the file locally, make your changes, and then re-upload it. A wide range of file types are supported, but those available to you will depend on your organization's implementation.

                                                                                                                          Note: If the file restrictions change over time, it is possible some existing attachments will be for file types and file sizes that are no longer allowed.

                                                                                                                          Supported File Types
                                                                                                                          Type (Extension) Type (Extension)
                                                                                                                          Word (.doc, .docx) Text (.txt)
                                                                                                                          HTML page (.htm) Word Perfect (.wpd)
                                                                                                                          HTML page (.html) Excel (.xls, .xlsx)
                                                                                                                          Portable Document Format (.pdf) Zip (.zip)
                                                                                                                          Rich Text Format (.rtf) OpenOffice Writer (.odt)
                                                                                                                          Configuration

                                                                                                                          Clients must request activation of this feature. This feature should not be activated until Taleo has analyzed the impact it may have on the client's system.

                                                                                                                          Apart from Attachment Enabled, the General Configuration settings do not need to be configured unless you want to change the default values for the list of supported files or the size and number of files that can be attached.

                                                                                                                          Configuration > [Taleo Performance] Settings
                                                                                                                          Name Description
                                                                                                                          Attachment Enabled Protected setting. Taleo Support must enable this setting. By default this setting is disabled. When enabled, attachment functionality is available for goal plans, performance reviews, and talent profiles, with the constraints of the other attachment settings applied.

                                                                                                                          Configuration > [General Configuration] Settings
                                                                                                                          Name Description
                                                                                                                          Attachment Format Filter Public setting. By default all supported file types can be uploaded. You can add and remove file types from the list as required.
                                                                                                                          Attachment File Maximum Number Protected setting. The maximum number of files that a user can attach to an object is 10.
                                                                                                                          Attachment File Maximum Size Protected setting. The maximum size for each uploaded file is 1 MB.
                                                                                                                          Block Macros in Attachments Public setting. The system will scan the attachments for macros. Files containing macros will not be updated.

                                                                                                                          After configuring the global settings, specific attachment options must be enabled for goal plans and the talent profile. Reviews also require the Performance Reviews > Manage - If this user is one of the authors user type permission.

                                                                                                                          Configuration > [Taleo Performance] Administration
                                                                                                                          Name Location
                                                                                                                          Allow File Attachments
                                                                                                                          • [Goal Management] Goal Plan Templates > Goal Plan Name > [Properties]

                                                                                                                          • [Employee Management] Talent Profile Section Configuration > [Properties]

                                                                                                                          • [Performance Reviews] Review Cycles > Review Cycle Name > [Review Requests] Request Name > [Settings]

                                                                                                                            To Attach Files to the Talent Profile

                                                                                                                            You must be the owner of the object to which you are attaching files.

                                                                                                                            [Navigation bar]Profile

                                                                                                                            1. Scroll to the Attachments section and click Add.

                                                                                                                            2. Click Browse, select the file you want to upload and then click OK.

                                                                                                                              The dialog lists the allowed file types and you can only select from them. You should enter a comment to help identify the purpose of the file, especially if it is not clear from the filename.

                                                                                                                            The file is added to the Attachments section and includes the filename, comments, who it was attached by, and the date it was attached.

                                                                                                                            You can view the file by clicking the filename and delete it by clicking the Right Arrow icon and selecting Delete.

                                                                                                                              To Attach Files to Goal Plans and Reviews

                                                                                                                              Only employees can attach files to their plans and reviews. Managers cannot attach files.

                                                                                                                              1. Go to the Goal Plan or Performance Review and clickthe Tools icon to expand supporting tools.

                                                                                                                              2. Select the Attachments ribbon and click Add.

                                                                                                                              3. Click Browse, select the file you want to upload and then click OK.

                                                                                                                                The dialog lists the allowed file types and you can only select from them. You should enter a comment to help identify the purpose of the file, especially if it is not clear from the filename.

                                                                                                                              The file is added to the Attachments section and includes the filename, comments (which you can mouse over to display them in their entirety), who it was attached by, and the date it was attached. The file is attached at the goal plan level — not individual goals — and at the review level — not individual review items.

                                                                                                                              You can view the file by clicking the filename and delete it by clicking the Down Arrow icon and selecting Delete.

                                                                                                                                Automatic Reminders

                                                                                                                                The configuration capability to set up automatic reminders allows users to set up reminders for each review action within a given workflow defined for performance reviews. System Administrators can set review process reminders at any or all of the individual review step/action levels. Whereas notifications are triggered by workflow events and are static, reminders are configurable and provide the ability to send users emails to promote task accomplishment. The reminders contain deep linking and allow the employees to go directly into their performance reviews from within the email.

                                                                                                                                Example. The performance review cycle for the current year has been configured and assigned to all employees within an organization. Notification emails have been sent to all the employees once the writing self-assessment tasks have been assigned. Reminder emails have been configured at a bi-weekly occurrence starting from the date the self-assessment task have been assigned, with reminders ceasing once the tasks have been completed. Julia receives an email notification stating that her review self-assessment is due by March 31, 2013. Julia clicks the link contained within the reminder email that brings her directly to her review self-assessment. She works for a couple hours on her self-assessment, but then needs to move on to another task. Julia gets brought onto a new project and completely forgets about completing her performance review. Because the reminder emails have been configured to be sent bi-weekly, Julia receives an email reminder again containing the link to her performance review. She completes her self-assessment just in time for her one-on-one with her manager. Because Julia has completed her tasks, the email reminders cease.

                                                                                                                                Note: In the case that a review is transferred, the review reminders will be sent out to the new employee and conversely the reminders to the previous employees will cease. When a review request or review cycle is duplicated, all the information is copied, which includes notifications and reminders.
                                                                                                                                Note: One of the potential impacts is the large number of emails potentially generated by reminders; one email per task is sent. Until we implement summary emails, managers with large spans of control could get large volumes of email if a reminder is configured for those tasks like "Write Employee Review." To provide a remedy, a warning message is provided in the Administration pages. Also, the System Administrators are able to deactivate the reminder if the number of emails becomes cumbersome.
                                                                                                                                Configuration

                                                                                                                                For more information on setting up and configuring automatic notifications, refer to the Oracle Taleo Performance Cloud Service Administration Guide, "Correspondence and Feedback Administration".

                                                                                                                                Prerequisites

                                                                                                                                • Taleo Performance has been set up with Performance Reviews.

                                                                                                                                • The performance review cycle for the current year has been configured and assigned to all employees.

                                                                                                                                • Notification emails have been sent to all the employees and employee tasks have been assigned.

                                                                                                                                  Summary Emails

                                                                                                                                  Multiple task notifications can now be aggregated into a single email.

                                                                                                                                  Summary emails provide Managers and HR Administrators with a single email that includes deep links to their pending tasks. Instead of receiving a single email for each pending task reminder, a summary email can now be sent that categorizes and quantifies tasks within the Performance Management module. Each of these categories contain a link that takes the user to the login page and then directly to the relevant module to complete the task. The summary emails are automatically updated as the tasks are completed. For example, if a notification is configured to get sent weekly and a Manager completes 7 out of 9 Review tasks, the summary email sent the following week will only list 2 pending Review tasks. If a user has no tasks pending, the summary email will not get sent.

                                                                                                                                  Manager and HR Admin task types that are supported:

                                                                                                                                  • Review Approval

                                                                                                                                  • Review Workflow

                                                                                                                                  • Goal Plan Approval

                                                                                                                                  • Succession Plan Approval

                                                                                                                                  • Development Plan Approval

                                                                                                                                  • Feedback Approval

                                                                                                                                  Note: There are other task types available for non-Managers and non-HR Administrators, however, summary emails support only Manager and HR Admin task types. All other employees will receive standard notification emails, not summary emails.

                                                                                                                                  As with existing notification functionality, System Administrators configure the notifications by selecting/creating the message template, determining which tasks should be triggered, and how often the email will be sent. First, Administrators create or select the message template to be used in the summary email. The Standard notification for summary email template is available for summary emails along with the Available Variables to support summary emails.

                                                                                                                                  The appropriate variables must be selected in this template in order to select the corresponding tasks in the summary email in the next step. For example, if you want to include Review Approval tasks in the summary email, the {Summary-Email.PendingReviewApprovalTaskLink} variable must be selected in the template. Next, the parameters of the email are configured in the Global Configuration Summary Email Editor which is found in the Performance Management Configuration > Global Configurations > Summary Emails.

                                                                                                                                  The image shows the Summary Email Editor with the six available Summary Email Task Types selected.

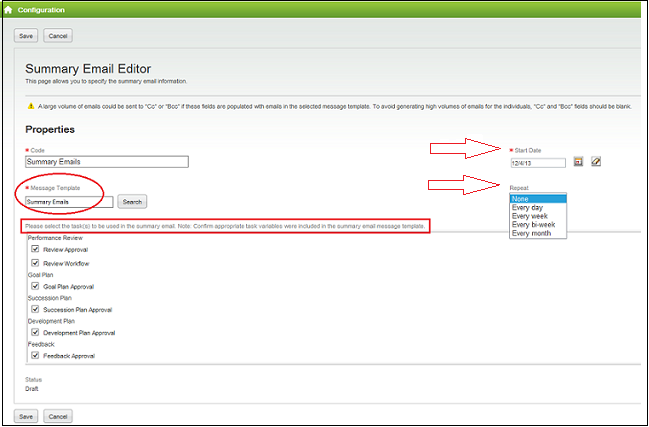
                                                                                                                                  In the example above, all 6 available Summary Email Task Types have been selected. Each time a summary email reminder goes out, it will aggregate each of these task types and include the links to take users directly to the incomplete tasks. At this time 6 is the maximum number of separate summary emails that may be activated at one time. Each task type can be used only once in summary emails. For example, if Succession Plan Approval is selected for use on 1 summary email, then it is not available for use in another summary email; they are mutually exclusive. This tends to be sufficient as most tasks are cycle dependent.

                                                                                                                                  The following image is an example of a summary email.

                                                                                                                                  The image shows an example of a summary email.

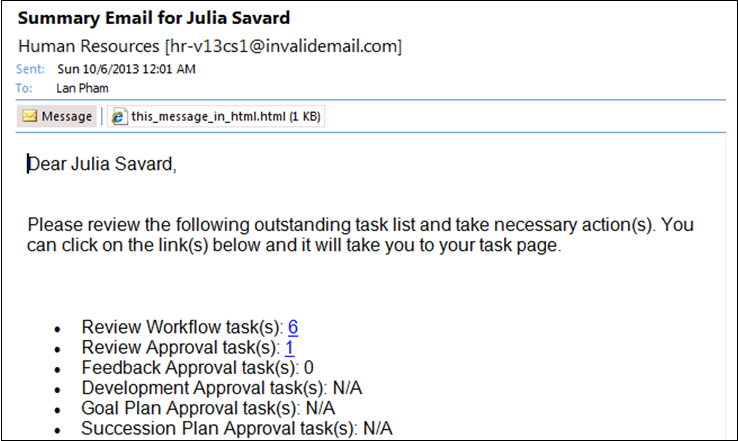
                                                                                                                                  For more detailed information on setting up and configuring notifications, including Summary Emails, please refer to the Oracle Taleo Enterprise Oracle Taleo Performance Cloud Service Administration Guide, "Correspondence and Feedback Administration" Release 13C or later.

                                                                                                                                  Configuration

                                                                                                                                  One global configuration setting to support summary emails is available.

                                                                                                                                  User Type Permission
                                                                                                                                  Name Location
                                                                                                                                  Summary Emails Taleo Performance > Configuration > [Taleo Performance] > Administration > [Global Configurations] > Summary Emails
                                                                                                                                    Flexibility for Message Sensitivity Level

                                                                                                                                    Each notification and email message sent by Oracle Taleo Enterprise can be set to a specific sensitivity level. This feature applies to messages sent from the Recruiting Center, Evaluation Management, Onboarding (Transitions), Legacy Onboarding, Performance, and SmartOrg.

                                                                                                                                    Each notification and email message can have its own sensitivity level. A "Sensitivity" drop-down menu was added to the message template editor. A system administrator could, for example, configure specific messages as being Private (such as messages sent to internal candidates) while keeping a Normal sensitivity level on other messages.

                                                                                                                                    Configuration

                                                                                                                                    A global setting controls the sensitivity level of messages sent by Oracle Taleo Enterprise products. This setting provides the sensitivity levels supported by Microsoft Outlook (Confidential, Normal, Personal, Private).

                                                                                                                                    Setting Description Default Value Location
                                                                                                                                    Mail Sensitivity Sensitivity of email messages sent from the system.

                                                                                                                                    Possible values are:

                                                                                                                                    • Confidential

                                                                                                                                    • Normal

                                                                                                                                    • Personal

                                                                                                                                    • Private

                                                                                                                                    Normal Configuration > [General Configuration] Settings

                                                                                                                                    System administrators can now override this global setting by configuring the sensitivity level of specific email messages. This is done via the message template editor, by using the new "Sensitivity" drop-down menu.

                                                                                                                                    Five sensitivity levels are available:

                                                                                                                                    • Default

                                                                                                                                    • Normal

                                                                                                                                    • Private

                                                                                                                                    • Personal

                                                                                                                                    • Confidential

                                                                                                                                    Selecting the "Default" sensitivity level means that email messages sent using this message template will use the sensitivity level defined in the "Mail Sensitivity" global setting.

                                                                                                                                      Comment Field Capabilities

                                                                                                                                      The Comment field capabilities are standardized across the Review, Goal, Business Goal, Feedback and Development modules.

                                                                                                                                      Whether a user is completing their Goal Plan or Performance Review, or a number of other tasks, they are encouraged to provide detailed comments throughout different steps in the processes. When entering a comment, the comment pop-up window displays which provides the following capabilities:

                                                                                                                                      • Rich text formatting

                                                                                                                                      • Spell check

                                                                                                                                      • Character limit increase (ranging from 200-4000)

                                                                                                                                      • Character number limit countdown

                                                                                                                                      • Resizing

                                                                                                                                        Talent Browser

                                                                                                                                        The talent browser provides managers and executives with a flexible, real-time view into their organization.

                                                                                                                                        Some of the talent browser's functionality includes:
                                                                                                                                        • viewing multiple levels with panning, zooming and a mini-organization chart map, for easy navigation

                                                                                                                                        • using the scope options, for viewing multiple levels or just direct reports

                                                                                                                                        • drilling down into the org chart layers, for focusing on specific business units and groups

                                                                                                                                        • filtering by general information, customizable employee metrics, and goal association, for highlighting employees that meet specific criteria

                                                                                                                                        • accessing an employee's snapshot, to have instant access to their key data

                                                                                                                                        • organizational summary card, providing a roll-up view into the metrics for an entire business unit

                                                                                                                                        Customizable Metrics Use in the Talent Browser

                                                                                                                                        The following metrics are displayed in the Talent Browser when Metrics is selected from the General selector, all three of which are customizable:
                                                                                                                                        • Potential

                                                                                                                                        • Promotability Readiness

                                                                                                                                        • Risk of Loss

                                                                                                                                        Configuration

                                                                                                                                        By default, all users should have access to the Talent Browser.

                                                                                                                                        Configuration > [Taleo Performance] Settings
                                                                                                                                        Name Description
                                                                                                                                        Maximum Number of Nodes in the Talent Browser Controls how many employee cards can be displayed at one time, between 50 and 200. The default is 100.

                                                                                                                                        User Type Permission
                                                                                                                                        Name Description
                                                                                                                                        Performance > Team Management > Access... Controls access to More Actions > Team Summary. This prevents employees from seeing organizational information for levels above their place in the organizational hierarchy.

                                                                                                                                          Using the Talent Browser

                                                                                                                                          You can use the talent browser features to focus in on specific employees or parts of your organization.

                                                                                                                                            Filtering the Talent Browser

                                                                                                                                            Filters are important for focusing your view when you have oversight into a large workforce.

                                                                                                                                            Managers can use filters to build talent-related queries and see the results in the talent browser. Those cards that match the filter criteria will be highlighted. Filters are logically grouped into sections and each section can be expanded or collapsed.

                                                                                                                                            Filter queries apply AND logic, not OR. For instance, if a manager chooses Potential =High and Risk of Loss=High, it will highlight those employee cards that match both criteria. If someone is Medium Potential with High Risk of Loss, their card is not highlighted.

                                                                                                                                              To Filter the Talent Browser
                                                                                                                                              Performance > [Navigation bar] > Talent Browser button
                                                                                                                                              1. Select the Right Arrow icon beside a filter section to expand it.

                                                                                                                                              2. Set the filters as required.

                                                                                                                                              3. Click the Refresh icon and the employees that match the filters are highlighted in the talent browser.

                                                                                                                                                To reset the filters, click the Eraser icon.

                                                                                                                                              Matching employee cards are shaded. For matching cards that are not in the current view, you can see which are shaded via the mini-organization chart.

                                                                                                                                                Talent Browser Filters List

                                                                                                                                                In addition to the standard filters, the Employee Custom Metrics section will display any configured custom metrics.

                                                                                                                                                Filter Description Section
                                                                                                                                                Review Cycle This includes a set list of review cycles. Performance Reviews
                                                                                                                                                Review Request The review request is dependent on the review cycle. Performance Reviews
                                                                                                                                                Manager The direct manager of the employee. If Include All Reports is selected then all indirect reports are also included. Employees
                                                                                                                                                Organization The business unit the employee is associated with, as indicated by the Organization field in the Talent Profile. Employees
                                                                                                                                                Location Where the employee works, as indicated by the Location field in the Talent Profile. Employees
                                                                                                                                                Job Field Relates to the Job Preferences > Job Fields section in the Talent Profile. Employees
                                                                                                                                                Job Level This value is associated with the employee's job role. Employees
                                                                                                                                                Willing to Travel This filter checks if the employee has indicated they are willing to travel in the Job Preferences section in the Talent Profile. The filter only checks if the value is a zero or greater, so an employee willing to travel 5% of the time is highlighted to the same degree as an employee willing to travel 25% of the time. Employees
                                                                                                                                                Willing to Relocate This relates to the Job Preferences setting of the same name. Employees
                                                                                                                                                Interest in International Assignment This relates to the Job Preferences setting of the same name. Employees
                                                                                                                                                Competencies Any one competency in the system can be selected as filter criteria. Employees
                                                                                                                                                Critical Position This checks whether the employee's position has been marked as critical. Employee Metrics
                                                                                                                                                Risk of Loss This checks whether the employee has been identified as potentially wanting to leave the company and the filter can be set for medium or high risk of loss. Employee Metrics
                                                                                                                                                Potential This checks whether the employee has been identified as having potential and the filter can be set for medium or high potential employees. Employee Metrics
                                                                                                                                                Readiness for Promotion Readiness for promotion is indicated by a range months and the filter enables you to select a specific number of months. Employee Metrics
                                                                                                                                                Review Rating This relates to the Metrics > Employee > Review Rating value in the Talent Profile. Employee Metrics
                                                                                                                                                Goal Rating This indicates the completeness of the employees current goal plan. This relates to the Metrics > Employee > Goal Rating value in the Talent Profile. Employee Metrics
                                                                                                                                                Competency Rating This relates to the Metrics > Employee > Competency Rating value in the Talent Profile. Employee Metrics
                                                                                                                                                Years in Management Number of years of management experience. Employee Metrics
                                                                                                                                                Years in Industry Number of years in the same industry as the current position. Employee Metrics
                                                                                                                                                Goal Overall Progress Slider is used to select the progress percentages you want to search between. This searches for active goal plans for the current business period. This relates to the Metrics > Goal > Overall Progress value in the Talent Profile. Employee Metrics
                                                                                                                                                Development Overall Progress Slider is used to select the progress percentages you want to search between. Development
                                                                                                                                                Has development plan Checks if the employee has a development plan. This does not need to be selected to use the Overall Progress filter. Development
                                                                                                                                                Business Period The time frame in which a goal should be completed. This option limits the employee goals available to those associated with the business period and must be selected to enable the employee goals filter. On it' own this cannot be used as a filter. Goals
                                                                                                                                                Employee Goals The goals available are those of the logged in user. Changing the employee at the top of the tree does not impact which goals are available. Filtering on employee goals highlights employees who have this goal or are aligned to it. Goals
                                                                                                                                                  Setting the Scope

                                                                                                                                                  Scope determines the level at which the talent browser is viewed and you can choose between displaying direct reports, direct reports plus an additional level, or the entire organization.

                                                                                                                                                  When viewing direct reports, you see your own employee card at the top with all direct reports below it. If you choose to view all reports, the entire organization is displayed in the talent browser. Initially the scope is applied to the logged in user, but if you drill down, the scope is applied to that employee.

                                                                                                                                                  For example if scope is set to direct reports, in your initial view you see yourself at the top, along with only your direct reports. If you select one of your direct reports, that direct report becomes the top level of the talent browser and only their direct reports are displayed below them.

                                                                                                                                                  Attention: Scope must be set at Direct Reports for delegated employees to be displayed and to use the Show Openings option.
                                                                                                                                                    To Set the Scope of the Talent Browser
                                                                                                                                                    Performance > [Navigation bar] > Talent Browser button

                                                                                                                                                    From the middle toolbar option, select whether to view All Reports, Direct Reports, or Directs Reports + One Level for the currently selected user.

                                                                                                                                                    The talent browser is updated to display the appropriate level and card details information.

                                                                                                                                                      Navigating the Talent Browser

                                                                                                                                                      The talent browser provides multiple ways to navigate to the employees you want to view:

                                                                                                                                                      • zoom and unzoom by using available GUI options or your mouse wheel

                                                                                                                                                      • drag and panning around the talent browser using a mouse

                                                                                                                                                      • the mini-organization chart, which can be used for panning or for orientating yourself in a large organization

                                                                                                                                                      • refocus button to return you to the default view, based on the scope and filter criteria

                                                                                                                                                      • Management Bar provides breadcrumbs to show where the person who is currently the top node in the Talent Browser sits within the organization. The breadcrumbs can be used to change who you are viewing as the top node, by moving either vertically (your superiors) or horizontally (your immediate superior's direct reports and your colleagues). While you can view anyone in your organization via the breadcrumbs you can only see details beyond their manager, current position, and direct reports, if you have the required user permissions.

                                                                                                                                                      Note: The talent browser can display a maximum of 200 employees and will render complete levels until it hits the threshold of 200. It will not display part of a level. For example, if half-way through the fourth level 200 employees is reached, the org chart will display three levels and those with reports underneath them will have a number on the bottom of their card indicating the remaining employees. The minimum value is 50 and the system default is 100 employees.
                                                                                                                                                        To Navigate the Talent Browser
                                                                                                                                                        Taleo Performance > [Navigation bar] > Talent Browser button
                                                                                                                                                        1. To change the zoom level, click the enclosed Plus icon or the enclosed Minus icon, use the mouse wheel, or click the appropriate gray Minus icon icon to go directly to that level of the org chart.

                                                                                                                                                          The current level is indicated by the blue Minus icon icon.
                                                                                                                                                        2. To drag the org chart, click and hold the mouse button, which displays the Hand icon.

                                                                                                                                                          If you want to reset the talent browser, click the enclosed X icon and it returns to the top level.
                                                                                                                                                        3. To view superiors and their direct reports, you can click their name in the Management Bar breadcrumbs.

                                                                                                                                                          If you select one of the employees, they assume the top level in the Talent Browser.
                                                                                                                                                        4. To use the mini-organization chart map, click the Diagonal-Up-Left Arrow icon and click and hold the mouse button to drag the org chart.

                                                                                                                                                          The Multi-Directional Plus icon cursor indicates you are within the map and you can click the Diagonal-Lower-Right Arrow icon to close the map view. Hovering over the bottom right corner displays the resize icon Diagonal 2–Way Directional Arrow icon, you can subsequently click the mouse and use it to change the zoom level.

                                                                                                                                                        5. When available, click the number at the bottom of an employee's card to make that person the top of the org chart and to display their direct reports and subsequently click the Up Arrow icon to move one level back up the org chart.

                                                                                                                                                          You can also click the Up Arrow icon to make that person the top of the org chart and view their direct and indirect reports, when they are not already the top node in the org chart.

                                                                                                                                                          Viewing Employee Information

                                                                                                                                                          The talent browser includes talent card information, a team summary of the employees in the org chart, and also enables you to access a specific employee's details.

                                                                                                                                                          The team summary provides information from the perspective of the current manager at the top of the org chart. The information is useful for gaining an at-a-glance look into the health of a part of the company. It displays totals for all of the employees under the manager, including the manager. Drilling down to lower-level managers will display only their specific team.

                                                                                                                                                          Note: You cannot access team summary information for business units alongside or above your own. In these instances the option is not displayed.

                                                                                                                                                          The toolbar — which displays General by default — can be used to select which employee details are displayed in the employee talent card. This includes info such as, goal progress, succession planning and employee metrics. The employee cards will display critical position and matrix management icons. From the employee's card you can go to their specific module information.

                                                                                                                                                            To View Employee Information

                                                                                                                                                            Team Management > Access user type permission to display Team Summary option

                                                                                                                                                            Performance > [Navigation bar] > Talent Browser button

                                                                                                                                                            1. Click the left toolbar button to select which talent card details to display in the talent browser.

                                                                                                                                                              Within each level, the employees are sorted by last name.
                                                                                                                                                            2. Click Team Summary to display the summary information for all of the organization that sits below the manager currently displayed at the top of the org chart.

                                                                                                                                                              The information that can be displayed is fixed, so even if your organization does not use a certain module, its section will still be displayed.

                                                                                                                                                            3. Click the Talent Snapshot icon on the performance card to display the snapshot, which provides key employee data.

                                                                                                                                                            4. To then go to an employee's specific module or complete an action, click the Down Arrow icon on the performance card and select the required option.

                                                                                                                                                              Working with Requisitions and Positions

                                                                                                                                                              If you are a manager with open requisitions and vacant positions, you can access them from the Talent Browser.

                                                                                                                                                              If Taleo Performance is integrated with Taleo Recruiting, you can view requisitions you are an owner of and create new requisitions. Only requisitions for the logged in user can be accessed. For instance, you cannot select one of your direct reports and view their requisitions. When you create a new requisition you are taken to Taleo Recruiting.

                                                                                                                                                              Unlike requisitions, you can view open positions for your reports, along with your own.

                                                                                                                                                              Note: You must have scope set to Direct Reports to be able to view open requisitions and positions.
                                                                                                                                                                To View Your Open Requisitions

                                                                                                                                                                You must have the required access to Taleo Recruiting.

                                                                                                                                                                You must have scope set at Direct Reports.

                                                                                                                                                                The requisition is open and you are an owner.

                                                                                                                                                                Performance > [Navigation bar] > Talent Browser button
                                                                                                                                                                1. Select Show Openings.

                                                                                                                                                                  Your open requisitions are listed, displaying the title, ID, recruiter, open date, total candidates, and total ACE candidates.
                                                                                                                                                                2. Click the title to display the requisition or click the number of total candidates to display the candidates list.

                                                                                                                                                                  You are taken to Taleo Recruiting.

                                                                                                                                                                3. From Taleo Recruiting, select the House icon and select Performance to return to Taleo Performance.

                                                                                                                                                                  To Create a Requisition

                                                                                                                                                                  You must have the required access to Taleo Recruiting.

                                                                                                                                                                  Performance > [Navigation bar] > Talent Browser button
                                                                                                                                                                  1. Select More Actions > Create Requisition and the Requisition Wizard is displayed.

                                                                                                                                                                    You are taken to Taleo Recruiting to create the requisition. To ensure the requisition will be included in your Talent Browser open requisition list you must be an Owner. For details on creating a requisition, see Requisition Management in the Taleo Recruiting User Guide.

                                                                                                                                                                  2. From Taleo Recruiting, select the House icon and select Performance to return to Taleo Performance.

                                                                                                                                                                    To View Vacant Positions

                                                                                                                                                                    You must have the scope set at Direct Reports and there must be vacant positions.

                                                                                                                                                                    Performance > [Navigation bar] > Talent Browser button
                                                                                                                                                                    1. Select Show Openings.

                                                                                                                                                                      The vacant positions for the person currently at the top node of the org chart are displayed.
                                                                                                                                                                    2. Click the Down Arrow icon and select View job profile.

                                                                                                                                                                      The position profile is displayed, including the description, competencies, and certification information.

                                                                                                                                                                    3. Select the Up Arrow icon to return to the Talent Browser or select [Module] Succession Plan to view plan details.

                                                                                                                                                                      Managing Employees from the Employee Card

                                                                                                                                                                      You can use the options on the employee card to initiate and complete tasks.

                                                                                                                                                                      Depending on user permissions and the modules you have activated for your system, you can initiate the following actions from the employee card:
                                                                                                                                                                      • Snapshot - From the snapshot you can see general employee information: Snapshot.

                                                                                                                                                                      • Team management - This provides self-service features for making employee changes and maintaining employee-manager relationships: Team Management.

                                                                                                                                                                      • Request mentoring - A mentor is assigned when a manager requests a mentor for one of his reports, which automatically establishes the mentoring relationship between the selected mentor and mentee: To Assign a Mentor.

                                                                                                                                                                      • Sending feedback - General feedback is not related to any specific context and can be sent without having received a request for it: To Provide General Feedback.

                                                                                                                                                                        Talent Search

                                                                                                                                                                        Talent Search provides a consistent, user-focused, robust method for finding employees and candidates. It consists of a persistent keyword search box for keyword searches and an advanced search, which combines keywords and employee parameters. Faceted search enhances the existing search capabilities of Taleo Performance providing users with dynamic and refined search results. Facets guide the user through a search providing continuous available search options and results.

                                                                                                                                                                        Note: When customizable employee metrics are made inactive they are not searchable; only active values show up in facets.

                                                                                                                                                                          Using Talent Search

                                                                                                                                                                          You can use Talent Search to find employees and candidates, either via a centralized search or from within modules, and add them to succession plans, talent pools, and requisitions.

                                                                                                                                                                            Searching for Talent

                                                                                                                                                                            Searching for talent involves either a keyword search or an advanced search.

                                                                                                                                                                            A keyword search enables you to find employees by entering keywords that search through fields associated with employees, such as name, address, employee number, or job title. If you subsequently select More search options you are taken to advanced search. From the search results page you can access an employee's Talent Profile, Goal Plan, or other module used in your system. Employee search results are presented as facets, providing dynamic and refined search results that guide users through a search providing continuous available search options and results.

                                                                                                                                                                            Note: You can also use the Go To menu to view an employee as the top node in the Talent Browser. This is useful for HR Administrator and Support users who may be outside of the hierarchy they are trying to view.

                                                                                                                                                                            Running an advanced search expands on the same keyword search, by enabling you to add employee metrics to the search criteria. You can also choose whether to search for employees or candidates; however, facets are only available for employee searches. From the Advanced Search page you can customize which fields and competencies are to be used as search criteria. People with the Employee Status of Former Employee are excluded from search results.

                                                                                                                                                                              To run a keyword search
                                                                                                                                                                              1. Enter keywords in the search box and click the Magnifying Glass icon.

                                                                                                                                                                                Matching employees are displayed in the Search Results page. To search for candidates you must click More search options or Advanced Search and run an advanced search.
                                                                                                                                                                              2. You can select multiple employees to display the Actions menu or click the Right Arrow icon to display the Go To menu for that employee.

                                                                                                                                                                              You can now add employees to modules or view their details.

                                                                                                                                                                              From the Search Results page you can click More search options to go to the Advanced Search page. You can then select Clear Entries to remove previous search criteria and Add or Remove Fields to customize the available search criteria.

                                                                                                                                                                                To run an advanced search
                                                                                                                                                                                1. Click Advanced Search.

                                                                                                                                                                                2. Select whether you want to search for employees or candidates.

                                                                                                                                                                                  This changes the available search criteria, as not all search fields are applicable to candidates.

                                                                                                                                                                                3. If you want to change the available search criteria, click Add or Remove Fields to select which fields can be used for the advanced search.

                                                                                                                                                                                  While you can select which specific standard fields to include, with user defined fields you can only select the entire group. The search criteria available is affected by your employee profile and employee metrics user permissions.
                                                                                                                                                                                4. Enter keywords.

                                                                                                                                                                                  This is the same as those available with a keyword search.
                                                                                                                                                                                5. Enter values for the custom search criteria.

                                                                                                                                                                                6. Click Search and matching people are displayed on the Search Results page.

                                                                                                                                                                                You can now add employees to modules or view their details. Selecting multiple people displays the Actions option.

                                                                                                                                                                                From the Candidate Search Results page you can click Modify Search to return to the Advanced Search page and change your existing criteria. From the Employee Search Results page you can click More search options to return to the Advanced Search page and change your existing criteria. You can then select Clear Entries to remove previous search criteria.

                                                                                                                                                                                  Understanding Search Behavior

                                                                                                                                                                                  The Talent Search features include:

                                                                                                                                                                                  • Extension of the Competency facet to include Manager Competency Rating sub-facet; ability for managers to view employee's competency ratings.

                                                                                                                                                                                  • Intuitive path to navigate back to the search results page.

                                                                                                                                                                                  • Extended functionality of the keyword search that provides search suggestions while entering a keyword.

                                                                                                                                                                                  • Ability to search for a range of values.

                                                                                                                                                                                  Competency Manager Rating

                                                                                                                                                                                  The thought behind the Competency Manager Rating facet is that all users should have the ability to see that someone possesses a particular competency, but only users with the appropriate security permissions should be able to view the Manager ratings for that competency. When permitted users select one or more competencies, a list of Manager Competency Ratings displays for each competency selected as sub-facets. The full rating scale displays for each competency and each scale may be different depending on customer configuration. The default display lists the top 10 competencies. If more than 10 are needed, users can add more by selecting Add.

                                                                                                                                                                                  Note: Because Competency is a public facet and Competency Rating is a secure facet, the total count for the Competency Rating facet may not add up to the count displayed for the corresponding Competency facet. Competency Name displays with public counts; Competency Rating displays with secure counts.
                                                                                                                                                                                  Return to Search Results

                                                                                                                                                                                  Taleo Performance provides an intuitive link to guide users back to their Search Results page. By selecting Back to Search Results users are taken back to the Search Results page with the entered keyword, all selected facet values and advanced search criteria preserved. Users may return from 1 level deep into navigation. For example, if a user navigated to the Talent Profile of employee found in the initial search, they can select Back to Search Results and be taken back to the Search Results page. However, if from the Talent Profile users then navigated to the Career Plan, the return path will be lost; this is indicated by the absence of the Back to Search Results link in the ribbon of the application.

                                                                                                                                                                                  Users may return to their original search results from the following pages:

                                                                                                                                                                                  • Talent Profile

                                                                                                                                                                                  • Goal Plan

                                                                                                                                                                                  • Performance Review

                                                                                                                                                                                  • Career Plan

                                                                                                                                                                                  • Development Plan

                                                                                                                                                                                  • Talent Browser

                                                                                                                                                                                  Suggested Input

                                                                                                                                                                                  The functionality of the keyword search has been extended to provide users search suggestions as they enter text. The suggestion input is triggered after users enter at least 3 characters. The 5 most popular matches are displayed as a list that users may select from, or ignore by continuing to type.

                                                                                                                                                                                  Note: Suggestion are based on keywords. This is why entering "Mic" may bring up both Michigan and Michelle.

                                                                                                                                                                                  Range of Values Search

                                                                                                                                                                                  To allow users to broaden search capabilities when using numeric and date fields in Advanced Search criteria, a range of values can now be specified within User - Defined fields. For example, it may be useful to search for the salary range of an employee as it is unlikely that a user would know the exact salary of someone. Or, perhaps a range of start dates would be more useful and return more search results than searching for a single, exact date.

                                                                                                                                                                                  Users must enter From and To values to specify the range desired. New User-Defined fields can be created in the Taleo Performance Administration pages, added to Advanced Search, and then searched.

                                                                                                                                                                                  Note: Searching for a range of values is supported as an Advanced search only; not a Keyword search.

                                                                                                                                                                                  Faceted Search Results

                                                                                                                                                                                  After performing a keyword or advanced search for employees, faceted search options are available on the subsequent search results page. Each facet displays a name, list of choices, and population counts for each choice. Facet values are displayed in descending order determined by the number of items in each facet; the facet values with the highest population count gets displayed first. Each time a facet is used, facet population counts and search results are automatically updated. All facet population counts are updated, except for the selected facet which retains its previous choices. Each facet displays a maximum of 5 values by default; users can add values as needed.

                                                                                                                                                                                  Note: Although you can perform a blank keyword search, entering search criteria ensures results are returned quickly.

                                                                                                                                                                                  There are two types of facets: public and secure. The concept behind having public and secure facets is the same as viewing an employee's Talent Profile. Organizational information, such as location, organization, and competencies is information that should be accessible to all, while review ratings, potential, and other metrics should be restricted to employee's managers and HR administrators. While access to the facets varies depending on the user, which facets are available is not configurable.

                                                                                                                                                                                  • Public Facets:

                                                                                                                                                                                    • Organization

                                                                                                                                                                                    • Location

                                                                                                                                                                                    • Job Role

                                                                                                                                                                                    • Competency Name (name only; not rating)

                                                                                                                                                                                  • Secure Facets: , Manager Competency Rating (presented as a sub-facet of the Competency facet), Potential - values activated/deactivated in Configurable Metrics, Risk of Loss - values activated/deactivated in Configurable Metrics
                                                                                                                                                                                    • Review Rating - this is the same value as the Talent Profile Metric, Employee Rating

                                                                                                                                                                                    • Manager Competency Rating - presented as a sub-facet of the Competency facet

                                                                                                                                                                                    • Potential - values activated/deactivated in Configurable Metrics

                                                                                                                                                                                    • Risk of Loss - values activated/deactivated in Configurable Metrics

                                                                                                                                                                                  Public facet values are displayed in a flat manner. This means that even though there can be a hierarchical, nested nature to the facet choices, they are displayed alongside one another. For instance, if an employee's location was Paris, France, the Location facet would list Paris and France as separate choices and not have the city, Paris, nested under the country, France.

                                                                                                                                                                                  As secure facets are controlled by user type permissions, typically the population counts displayed in the secure facets will be lower than the counts for the public facets. For example, if a manager searched on their own name, the search results would display the manager and the manager's direct reports. When the manager selected the Potential secure facet, the total choices would be one less than the total amount of choices for the Organization facet because the manager does not have user type permissions to view their own metrics.

                                                                                                                                                                                  As well as secure facet results, the availability of the secure facets themselves are controlled by user type permissions. Typically managers and HR Administrators will be able to see secure facets, while employees will not.

                                                                                                                                                                                  Example of Initial Keyword Search Results: Henry Stevenson's keyword search on savard, displays Julia Savard and all of her direct reports, which includes Henry. The public facets display corresponding values for all of the employees that were returned by the search. Because of the flat manner in which the facet choices are displayed, this includes listing Canada and Quebec separately. As Henry is currently a matrix manager for two of the employees in the search results, his user permissions give him access to only their secure facet values. This is why the population count is only two, when seven people were returned by the search.

                                                                                                                                                                                  The image shows an example of an initial keyword search results.

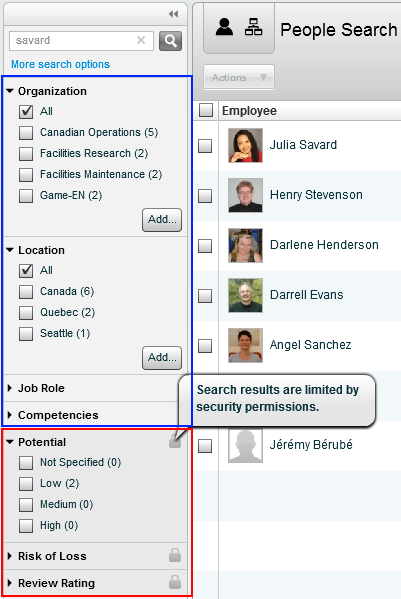
                                                                                                                                                                                  Example of Faceted Search Results: When Henry selects the Potential > Low secure facet, all of the facets — except the one he just selected — are updated along with the search results list.

                                                                                                                                                                                  The image shows an example of a faceted search results.

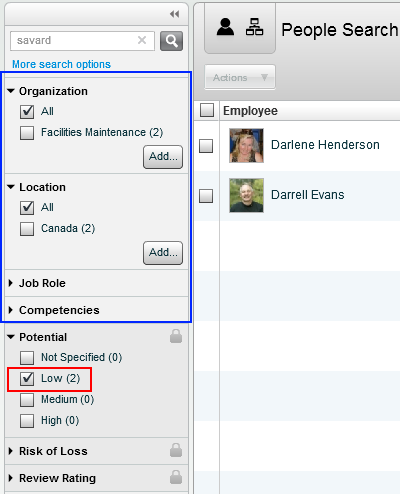
                                                                                                                                                                                  Keyword Search Fields

                                                                                                                                                                                  The Personal Information fields from a user's account and some Talent Profile fields in which text can be entered, such as Education, Work Experience and Certification details, are checked when running a keyword search.

                                                                                                                                                                                  Note: When you run a keyword search using a location, it uses the address details from the user account's personal information. This can be different from the Location field in the Talent Profile and the Current Location in the Search Results. Also, when searching on a job title, which comes from the personal information, it may be different than the position name on the user's Talent Card and Talent Profile.

                                                                                                                                                                                  Keyword fields
                                                                                                                                                                                  First Name Certification - certifications chosen from the selector
                                                                                                                                                                                  Last Name Other Certification - certifications entered manually
                                                                                                                                                                                  Username - name used to login Institution - place of study chosen from the selector
                                                                                                                                                                                  Job Title Other Job Title
                                                                                                                                                                                  Email Address Other Institution - places of study entered manually
                                                                                                                                                                                  Manager Program - programs chosen from the selector
                                                                                                                                                                                  Location Other Program - programs entered manually
                                                                                                                                                                                  Current Position Zip Code
                                                                                                                                                                                  Organization Job Function - job entered manually
                                                                                                                                                                                  Country Employee Number
                                                                                                                                                                                  Competency Name - this is only the name and does not include the description Other Employer - company entered manually
                                                                                                                                                                                  City State
                                                                                                                                                                                  Employer

                                                                                                                                                                                  Configuration

                                                                                                                                                                                  These existing rating settings are used for the Ratings facet, along with the Talent Profile metric Employee Rating.

                                                                                                                                                                                  Configuration > [Taleo Performance] Settings
                                                                                                                                                                                  Name Description
                                                                                                                                                                                  Review Rating Metric Rating Model Indicates the rating model used to determine the available values for the Employee – Review Rating metric.
                                                                                                                                                                                  Metric Rating Model Rounding Defines what value the employee ratings are rounded to.
                                                                                                                                                                                  Metric Rating Display Defines how the rating scale is displayed; as percentage, numeric, text, and so on.
                                                                                                                                                                                  Show the 'Fit' Column in Person Search Result Controls whether the Fit column is displayed in search results. The default value is No.
                                                                                                                                                                                    Adding Employees to Modules

                                                                                                                                                                                    From the search results list, employees can be added to talent pools, succession plans, and requisitions.

                                                                                                                                                                                    You can add employees to succession plans, talent pools, and Taleo Recruiting requisitions, depending on which modules you have access to, are responsible for, and have been enabled for your system. When accessing the Go To menu, you do not see all of the items in the system, just those you can directly work with.

                                                                                                                                                                                    While you can add multiple employees to a module at one time, you can only add them to a single module at a time.

                                                                                                                                                                                      To add employees to modules

                                                                                                                                                                                      Talent search and each of the three modules must be enabled.

                                                                                                                                                                                      You must have completed a search and have a list of employees.

                                                                                                                                                                                      You must have Common > Pool > Manage for talent pools

                                                                                                                                                                                      Taleo Performance > Search Results
                                                                                                                                                                                      1. To add a single employee from the Employee column, click the Right Arrow icon to display the Go To menu and proceed to step 3.

                                                                                                                                                                                      2. To add multiple employees, select the check boxes for each employee you want to add and click Actions and the Down Arrow icon and proceed to step 3.

                                                                                                                                                                                      3. Choose the appropriate module:

                                                                                                                                                                                        • Add to succession plan - select the plan, sorting by any of the columns if required, and click Select.

                                                                                                                                                                                        • Add to talent pool - select the pool, which..., and click Select.

                                                                                                                                                                                        • Add to requisition - select the requisition, which includes the recruiter column that references the person with access to Taleo Performance and Taleo Recruiting, and click Select.

                                                                                                                                                                                      4. Click Yes in the confirmation message box to confirm you want to add the employees.

                                                                                                                                                                                      The employees are added to the module.

                                                                                                                                                                                        Searching in Context

                                                                                                                                                                                        Talent searches can be initiated from within Succession Plans and Talent Pools, from where people can be added directly to the current plan or pool.

                                                                                                                                                                                        When in a Succession Plan or Talent Pool, choosing to add people displays the People Selector, while choosing Advanced Search displays full Talent Search options. When the results of an advanced search are displayed, you can add people directly to the current plan or pool, along with being able to add them to another module or requisition.

                                                                                                                                                                                          To run a Talent Search in a Succession Plan
                                                                                                                                                                                          Taleo Performance > [Navigation bar] Succession
                                                                                                                                                                                          1. Select the required employee to display their plan.

                                                                                                                                                                                          2. Click the Plus icon and select Open Advanced Search.

                                                                                                                                                                                            Selecting Add Person displays the People Selector.

                                                                                                                                                                                          3. Select the criteria you want to use to filter your results and click Search.

                                                                                                                                                                                          4. To add a single person from the Employee column, click the Right Arrow icon to display the Go To menu and select Add to current succession plan.

                                                                                                                                                                                          5. To add people, select the checkboxes for each person you want to add and click Actions, the Down Arrow icon and select Add to current succession plan.

                                                                                                                                                                                            If one of the people selected is already a plan member, the Add to current succession plan option is not available.

                                                                                                                                                                                          The people are added to the succession plan as unranked successors. You can return to the plan by clicking the Up Arrow icon.

                                                                                                                                                                                            To run a Talent Search in a Talent Pool
                                                                                                                                                                                            [Navigation bar] > More dropdown > Talent Pools
                                                                                                                                                                                            1. Select a talent pool to display the Members tab.

                                                                                                                                                                                            2. Click the Plus icon and select Open Advanced Search.

                                                                                                                                                                                              Selecting Add Members, displays the People Selector.

                                                                                                                                                                                            3. Select the criteria you want to use to filter your results and click Search.

                                                                                                                                                                                            4. To add a single person from the Employee column, click the Right Arrow icon to display the Go To menu and select Add to current pool.

                                                                                                                                                                                            5. To add people, select the checkboxes for each person you want to add and click Actions , the Down Arrow icon and select Add to current pool.

                                                                                                                                                                                              If one of the people selected is already a pool member, the Add to current pool option is not available.

                                                                                                                                                                                            The people are added to the pool. You can return to the pool by clicking the Up Arrow icon.

                                                                                                                                                                                              Understanding Keyword Boolean Operators

                                                                                                                                                                                              To search effectively, it is important to understand the behavior of boolean operators.

                                                                                                                                                                                              Operator Description
                                                                                                                                                                                              Wildcards

                                                                                                                                                                                              When you enter words for keyword search, the system treats the search term as if it has wildcard characters added before the first and last character. For instance, searching for smith would be treated as if it was entered as *smith* and returns matches such as naismith, smithers and wordsmithery.

                                                                                                                                                                                              When this behavior is applied to search terms using AND, OR, NOT, it takes the whole as if it was a single search term. This means that wildcard characters are placed in front of the first letter in the first word and after the last letter in the final word. For instance, searching for son AND ste returns matches such as Karson Stewart and Alan Stephenson. Using son OR ste returns those results, as well as Emily Jackson, Madison White, and Steven Brown.

                                                                                                                                                                                              Attention: When there is no space between your search terms and an operator, you must explicitly enter the * wildcard character. For instance, if your search was (ara OR Jenkins) OR (Dec) it could return Gordon Jenkins and Isabelle Martin. If you then searched for (*ara or Jenkins) OR (Dec*) it could return Gordon Jenkins, Isabelle Martin, Barbara Simmons, and Michael Decker.
                                                                                                                                                                                              AND

                                                                                                                                                                                              By default, words are linked (transparently) by the AND operator and results are the same as including it or wrapping a search term in double quotes. For instance, Arthur Vandele, Vandele AND Arthur, and "Arthur Vandele" all return the same results.

                                                                                                                                                                                              OR

                                                                                                                                                                                              The OR operator enables more expansive searches than the default AND behavior. People containing any of the terms are returned in the search results.

                                                                                                                                                                                              NOT

                                                                                                                                                                                              The NOT operator excludes specific keywords from the search. If you want to exclude multiple terms you can either add multiple NOT operators, such as Smith NOT Michael NOT Gab, or use parentheses, such as Smith NOT (Michael or Gab*).

                                                                                                                                                                                              Double quotes

                                                                                                                                                                                              Double quotes are used to search for a specific set of keywords, such as "Arpad Budapest Analyst" will only return people that have those three words associated with their profile. It behaves in the same manner as using multiple ANDs, with the exception that the first and last characters do not automatically have wildcard operators attached to them.

                                                                                                                                                                                              Parentheses

                                                                                                                                                                                              Search queries enclosed in parentheses are performed before other operations and enable more complicated searches. Effectively you can create mini searches that are combined into larger queries.

                                                                                                                                                                                              For example, you could put the search for name, location, and job title into three parenthetical searches within a larger search, such as (*son OR *sen) AND (Copenhagen or Malmo) AND (Analyst).