22Recruiting Center Layout Configuration
Recruiting Center Layout Configuration
General Layout
Home Page and User Interface Elements Configuration
| Element | Description | Configuration |
|---|---|---|
| Auxiliary Navigation Bar | The auxiliary navigation bar is the bar located at the top right of pages. If enabled, it is available at all times for users to see and access. The auxiliary navigation bar may contain the following elements (if enabled and if users were granted access to them):
|
The auxiliary navigation bar is displayed when the Auxiliary Navigation Bar setting is set to Yes. (Configuration > [SmartOrg] Administration > [Users] Configuration Profiles). When set to No, the Home and Sign Out links are still displayed. Elements displayed in the auxiliary navigation bar depends on settings that were enabled and on permissions granted to users. The following permissions are required to access the Talent Grid products: Access Knowledge Exchange, Access Solution Exchange (Configuration > [SmartOrg] Administration > [Users] User Types > Grid > Knowledge Exchange). |
| Core Navigation Bar | The Recruiting Center core navigation bar provides access to specific recruiting features. The core navigation bar may contain the following elements (if enabled and if users were granted access to them):
|
The core navigation bar is displayed when the Core Navigation Bar setting is set to Yes (Configuration > [SmartOrg] Administration > Configuration Profiles). When set to No, only the Recruiting tab is displayed. |
| My Setup | The My Setup feature is available in the auxiliary navigation bar under Resources. It gives access to the user's personal preferences. | The My Setup link is displayed to users if the Auxiliary Navigation Bar setting is set to Yes (Configuration > [SmartOrg] Administration > Configuration Profiles).
To modify their preferences, users must be granted the following permissions:
|
| Training | The Training link is available in the auxiliary navigation bar under Resources. It gives access to online training materials. | The Training link is displayed to users if the Training Section URL setting is set to Yes (Configuration > [SmartOrg] Administration > Configuration Profiles). The Auxiliary Navigation Bar setting must also be is set to Yes (Configuration > [SmartOrg] Administration > Configuration Profiles). |
| eLearning | The eLearning link is available in the auxiliary navigation bar under Resources. It gives access to eLearning materials. | The eLearning link is displayed to users if the eLearning Section URL setting is set to Yes (Configuration > [SmartOrg] Administration > Configuration Profiles). The Auxiliary Navigation Bar setting must also be is set to Yes (Configuration > [SmartOrg] Administration > Configuration Profiles). |
| About | The About link is available in the auxiliary navigation bar under Resources. It provides information regarding service pack, version, legal statement regarding IP protection. | The About link is displayed to users if the About Link in Auxiliary Menu setting is set to Yes (Configuration > [SmartOrg] Administration > Configuration Profiles). The Auxiliary Navigation Bar setting must also be set to Yes (Configuration > [SmartOrg] Administration > Configuration Profiles). |
| Web Support | The Web Support link is available in the auxiliary navigation bar under Resources. It gives access to Web Support. This link only works for users who are authorized Web Support users. | The Web Support link is displayed to users if the Display Web Support Link in Auxiliary menu setting is set to Yes (Configuration > [SmartOrg] Administration > Configuration Profiles). Furthermore, the Web Support feature must be activated by Oracle Support. If only the above setting is set to Yes, users will not have access to Web Support even though the link will still be present. The Auxiliary Navigation Bar setting must also be set to Yes (Configuration > [SmartOrg] Administration > Configuration Profiles). |
| Talent Grid | The Talent Grid link is available in the auxiliary navigation bar. It gives direct access to the Solution Exchange and Knowledge Exchange. | The Auxiliary Navigation Bar setting must be set to Yes (Configuration > [SmartOrg] Administration > Configuration Profiles). The following permissions must be granted:
|
| Search Widget | This is the search tool allowing users to perform quick candidate search, specific candidate search and quick requisition search. | The search widget is displayed to users if the Search Widget setting is set to Yes (Configuration > [SmartOrg] Administration > Configuration Profiles). |
| Advanced Search | The Advanced Search link is available at the top right hand corner of pages, just beside the search widget. It allows users to search for candidate files using an array of criteria that are different than the ones used in the quick search function. | The search widget is displayed to users if the Advanced Search Links setting is set to Yes (Configuration > [SmartOrg] Administration > Configuration Profiles). The Access advanced search but find external candidates only permission must be granted (Configuration > [SmartOrg] Administration > User Types > Recruiting > Search). |
| Search Queries | The Search Queries link is available at the top right hand corner of pages, just beside the search widget. A search query is an advanced candidate search that has been saved in order to be used repetitively and potentially shared with other users. | The search widget is displayed to users if the Advanced Search Links setting is set to Yes (Configuration > [SmartOrg] Administration > Configuration Profiles). The Access advanced search but find external candidates only permission must be granted (Configuration > [SmartOrg] Administration > User Types > Recruiting > Search). |
| Center Stage | A center stage is what users see in the center panel when they first log into the Recruiting Center. | The center stage is configured via the Center Stage feature (Configuration > [Recruiting] Administration > Center Stage). |
| Page Header | A header text can be displayed at the top of all pages of the application. | The Recruiting Header Text setting allows the activation of the page header (Configuration > [SmartOrg] Administration > Configuration Profiles). |
| Page Footer | A footer text can be displayed on the home page of the application. | The Center Stage Footer Text setting allows the activation of the page footer (Configuration > [SmartOrg] Administration > Configuration Profiles). |
| Welcome Title | The welcome title is displayed to users when they first log in into the application. | The Center Stage-Welcome Title setting allows the activation of the welcome title (Configuration > [SmartOrg] Administration > Configuration Profiles). |
| Separator Line | The line separating the Welcome title from the main content of the center stage. | The Center Stage-Separator Line setting allows the activation of the separator line (Configuration > [SmartOrg] Administration > Configuration Profiles). |
| Communications Channel | The Communications channel is located in the supporting tools panel on the right. The Communications channel allows the display of useful information to users when they first log into the Recruiting Center. | See Communications Channel Configuration. |
| Color Theme | A theme is a set of colors used for body text, headings, links within an application. | The theme color is selected using the Default Theme setting (Configuration > [General Configuration] Settings). Users must be granted the Access the "Preferences" section in 'My Setup' menu permission to overwrite the theme you selected (Configuration > [SmartOrg] Administration > User Types > Recruiting > Other). |
| Logo | A logo can be displayed in the upper left corner of Recruiting and Taleo Performance pages. | The Organization Logo setting is used to upload a logo (Configuration > [General Configuration] Settings). |
| Selected Item Color | This is the color displayed when selecting elements in the user interface. | The selected item color is selected using the Selected Item Default Color setting (Configuration > [General Configuration] Settings). Users must be granted the Access the "Preferences" section in 'My Setup' menu permission to overwrite the theme you selected (Configuration > [SmartOrg] Administration > User Types > Recruiting > Other). |
| Online Tour | Short clips describing essential user interface elements. When enabled, these tours are available in the Clips tab, located in the supporting tools panel on the right. | The Online Clips setting controls what is displayed as online tours in the Recruiting Center. By default, standard online tours are displayed to users (Configuration> [Recruiting] Settings). The Online Clips - HTML Customized URL setting is used to insert the URL for an organization customized online tours. For this setting to work, the Online Clips setting must be set to "HTML Customized". (Configuration> [Recruiting] Settings). The Taleo Recruiting Online Clips URL setting is used to indicate the URL to access Recruiting online tours. For this setting to work, the Online Clips setting must be set to "Taleo Standard (default)". (Configuration> [Recruiting] Settings). |
Welcome Center
Welcome Center
The Welcome Center is a home page that is displayed to users immediately after they log in. It provides a "one-click" access to Oracle Talent Acquisition Cloud (OTAC) products.
The Welcome Center contains an auxiliary navigation bar, a core navigation bar, a Quick Access panel, and a central panel.
The auxiliary navigation bar contains links to additional resources such as the online help, setup, and the Sign Out link.
The core navigation bar is a set of tabs that provide direct links to OTAC products. A user might have a tab for any or all of the following products: Performance, Recruiting, Compensation, Oracle Business Intelligence, Learn, and Configuration.
The Quick Access panel provides an alternative "one-click" access to the same products available in the core navigation bar. It also provides access to modules within products for example, Onboarding (Transitions), Scheduling Center, and to specific content such as a requisitions and candidate files.
In the central panel, customers can put information of interest to all product users. Alternatively, they can create distinct sets of information and associate an information set with a configuration profile.
If the Welcome Center is enabled, it replaces the table of contents page.
Taleo Learn in the Welcome Center
Taleo Learn is a platform designed to enable organizations to deliver and track structured curriculum and learning events tied to compliance, regulatory, job role and onboarding requirements. Users can access Taleo Learn via the Welcome Center.
Users can access Taleo Learn directly from the Welcome Center core navigation bar or the Quick Access panel without logging into Taleo Learn. When users want to return to the Welcome Center, they can click Home on any Taleo Learn page.
Access to Learn is granted or rescinded via a user type permission in SmartOrg. Learn user types can be assigned to Oracle Talent Acquisition Cloud (OTAC) users via user type permissions in SmartOrg. See Welcome Center - Settings and Permissions.
Prior to Feature Pack 11B, if a user had (Taleo Performance) development plan user permissions and the Learn and Development modules were enabled, the link to Taleo Learn was displayed. Now a specific Learn user permission must be associated with a user before the person can access the My Learn link.
Configuring the Welcome Center
The configuration of the Welcome Center consists of the following steps.
Enabling the Welcome Center
The Manage settings and central configuration user type permission is required.
Locate and click Display Welcome Center.
Click Edit.
Make a selection by clicking the corresponding radio button.
Click Save.
Specifying the Default Welcome Center Content
The Manage settings and central configuration user type permission is required.
Locate and click the Welcome Center Content setting.
Click Edit.
Click Search next to the Value field.
Click the radio button next to the item you want to designate as the default Welcome Center content page.
Click Select.
Click Save.
The content page you selected is displayed to users who do not have one assigned to their configuration profile.
Creating the Welcome Center Content
The Manage settings and central configuration user type permission is required.
An item corresponding to the content page you created is displayed in the Welcome Center Content Pages list. You can create several content pages. You can then specify which one will be used by default
Assigning Welcome Center Content to a Configuration Profile
The following user type permissions are required: Manage settings and central configuration and Manage configuration profile.
Create a new configuration profile or click the code of an existing configuration profile in the Configuration Profiles list.
Click the Welcome Center Content link in the Configuration Profiles list.
Click Edit.
Click Search and select the radio button that corresponds to the content page you want to display to users who have been assigned the configuration profile.
Click Select.
Click Save.
Return to the Profile page and click Save to save your change.
The system will show the Welcome Center content you selected to users who have this configuration profile whenever the Welcome Center is displayed.
Welcome Center - Settings and Permissions
The following settings and permissions are used for the Welcome Center functionality.
| Setting | Description | Default Value | Location |
|---|---|---|---|
| Display Welcome Center | Controls whether or not the "Welcome Center" is displayed.
|
Yes |
Configuration > [General Configuration] Settings |
| Welcome Center Content | Indicates which customized content and layout to use in the Welcome Center. The setting enables you to specify the content of the Welcome Center panel displayed by default i.e. displayed to users who do not have specific content assigned to their configuration profile. If the Display Welcome Center setting is enabled and you provide no information for the Welcome Center Content, the system displays information provided by Oracle Support. | Configuration > [General Configuration] Settings |
| User Type Permission | Description | Location |
|---|---|---|
| Access Learn as a default user | This provides standard user access to Learn. This enables users to see LearnCenter pages and learning content. All sub permissions (in Learn) except View Course Offline are automatically selected. The user can also use the Com Center. | Configuration > [SmartOrg] Administration > [Users] User Types > Learning > Learn |
| Access Learn as a supervisor | This provides Learn supervisor access which typically provides manage access in Learn to users, user communications, completion certificates, assignments, enrollments, development plans, goals, and reports. | Configuration > [SmartOrg] Administration > [Users] User Types > Learning > Learn |
| Access Learn as an administrator | This provides Learn administrator access, typically enabling users to manage LearnCenter configuration options and set up courses. | Configuration > [SmartOrg] Administration > [Users] User Types > Learning > Learn |
| Access Learn as user 1, user 2, user 3 | These are custom user types, which must be aligned with custom user accounts in Taleo Learn by Oracle Support. | Configuration > [SmartOrg] Administration > [Users] User Types > Learning > Learn |
Center Stage
Recruiting Center Home Page
The Recruiting Center home page is the page that users see when they click the Recruiting tab.
The home page provides key information and links to underlying functionalities. The home page can be customized by system administrators to meet specific needs. Depending on the user logging into Recruiting, the information displayed in the home page varies.
There are three default home pages:
-
Recruiter
-
Hiring Manager
-
Hourly Manager
System administrators can modify these default home pages. They can also create brand new home pages or duplicate existing ones.
The home page can contain channels, links and lists.
Channels display status-oriented data about a user's activities. When clicking the links on the channels, users can access information on requisitions, candidates, or job offers. The following channels can be displayed:
Candidates
Offers
Legacy Onboarding
Requisitions
Tasks
New Hire
Pre-Hire
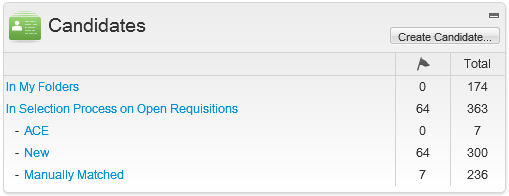
A channel always includes a list of elements as well as the number of items associated to each element. The elements on the list are clickable and bring users to a more detailed area of the application, for example the candidate list, requisition list, etc. The elements on the list are also dependent on the value selected in the "Show information for requisitions" filter.
The number in the following two columns work as follows:
The number in the Items Requiring Attention column (flag) is specific to you (not to your user groups). It represents the number of items that are new or have been updated by another user since you last viewed them. For example, if you approve your own requisition, a "new" task is added to your Ready for sourcing tasks, and the number in this column for Ready for sourcing element increases by one.
The number in the Total column represents the total number of items including new, previously viewed, and updated. For example, if you choose your user name in the Show list and Ready for sourcing appears in the Tasks channel, the number in the Total column represents the total number of your requisitions that are ready for sourcing.
Channels are updated immediately after login, or when selecting the "Show information for requisitions" filter, or anytime a user returns to the home page, or when clicking the Refresh button.
Links redirect users to another part of the application. The following links are available:
Create a Requisition
Legacy Onboarding Process
Search for candidates
View Candidates
View Requisitions
Onboarding (Transitions)

A mini requisition list can be available in the home page. This mini requisition list allows users to access a candidate list directly from the home page without having to go through the standard requisition list page. This mini requisition list can contain up to four columns of summary information about each requisition, including the number of candidates. It can also display up to 30 requisitions (the ones with the most recent submission activity). This mini requisition list is used by default with the Hourly Manager home page.
The home page displays a Refresh button to allow users to update all the channels with the latest numbers. The Refresh button is only present when there is a channel that needs to be refreshed with dynamic content. For example, if only links are present on the home page, the Refresh button will not be present.
Information in the home page may be displayed as follows:
-
Single column: Channels, links, and lists are displayed in one single column.
-
Two columns: Channels, links, and lists are displayed in two columns. System administrators can choose which column and the order in which each widget will appear in that column.
-
Two columns with header: Channels, links, and lists are displayed in either the header or one of the two columns, as specified by system administrators when placing the widgets.
Configuring the Center Stage
The center stage configuration consists of the following steps.
Creating a Center Stage
The Center Stage Configuration user type permission is required.
The Mini Requisition list and the Requisitions channel cannot be put in the same center stage.
Click Create.
Provide a code and a name.
Indicate if you want a single-column layout, a two-column layout, or a two-column layout with header.
Click Save.
Click Edit next to Channels and Links.
Click Add.
Select the desired channels and links.
Click Select.
If necessary, indicate in which columns you want to display the elements.
Indicate in which row you want to display the elements.
Click Save.
The newly created center stage appears in the Center Stages list. The information displayed in the central pane of the home page is configured as specified.
Activating the center stage.
Activating a Center Stage
The center stage must have the inactive or draft status.
The Center Stage Configuration user type permission is required.
Click on the name of a center stage.
Click Activate.
The center stage appears as active in the Center Stages list.
Associating a Center Stage to a Configuration Profile
The Center Stage must be created.
Click a configuration profile.
Click the Center Stage Configuration setting.
Click Edit.
Select a center stage in the Value field.
Click Save.
The center stage is selected for the configuration profile and a configuration profile is tied to each user. Consequently, depending on the user logging in the Recruiting Center, the information displayed in the central pane of the home page will differ.
Creating a Welcome Title
Click a configuration profile.
Click the Center Stage-Welcome Title setting.
Select Yes.
Click Save.
If you want to have a different Welcome title, contact Oracle Support.
In the SmartOrg Configuration Profiles feature, activate the Center Stage-Welcome Title setting.
The word Welcome followed by the name of the user signing in will be displayed to the user when logging in the Recruiting Center. It is possible to modify the word Welcome; contact Oracle Support for details.
Adding a Separator Line
A center stage must be created and activated.
Click a configuration profile.
Click the Center Stage - Separator Line setting.
Click Edit.
Select Yes.
Click Save.
A line is added between the Welcome title and the content of the center stage.
Center Stage - Other Configuration Tasks
Deleting a Center Stage
The Center Stage Configuration user type permission is required.
The center stage must be inactive.
Click Delete next to the center stage.
The center stage is permanently deleted from the database.
Duplicating a Center Stage
The Center Stage Configuration user type permission is required.
Click on the name of a center stage.
Click Duplicate.
Provide a code and a name.
Indicate if you want a single-column layout, a two-column layout, or a two-column layout with header.
Click Save.
Click Edit next to Channels and Links.
Click Add.
Select th desired channels and links.
Click Select.
If necessary, indicate in which columns you want to display the elements.
Indicate in which row you want to display the elements.
Click Save.
The newly created center stage appears in the Center Stages list.
Deactivating a Center Stage
The Center Stage Configuration user type permission is required.
The center stage must have the Active status.
Click on the name of the center stage.
Click Deactivate.
The center stage appears as inactive in the Center Stages list. The center stage is no longer available in SmartOrg when associating a center stage to a configuration profile or user account.
Modifying a Center Stage Properties
The Center Stage Configuration user type permission is required.
Click on the name of a center stage.
Click Edit next to Properties.
Modify the fields as required.
Click Save.
Adding Channels and Links to a Center Stage
The center stage must be in the inactive or draft status.
The Center Stage Configuration user type permission is required.
Click on the name of a center stage.
Click Edit next to Channels and Links.
Click Add next to Channels and Links.
Select channels and links.
Click Select.
Click Save.
When a user associated to that center stage will access the Recruiting Center, the channels and links will appear.
Ordering channels and links as well as columns in the center stage.
Ordering Channels and Links in a Center Stage
The center stage must be in the Inactive or Draft status.
The Center Stage Configuration user type permission is required.
Click on the name of a center stage.
Click Edit next to Channels and Links.
Specify the row order of each channel and link.
Click Reorder.
Click Save.
When a user associated to that center stage will access the Recruiting Center, the channels and links will be displayed in the new order.
Removing Channels and Links from a Center Stage
The center stage must be in the Inactive or Draft status.
The Center Stage Configuration user type permission is required.
Click on the name of a center stage.
Click Edit next to Channels and Links.
Click Remove next to the channels and links to be removed.
Click Save.
The channels and links will no longer appear in the Center Stage page. When a user associated to that center stage will access the Recruiting Center, the removed channels and links will no longer be displayed.
Setting the Layout of a Center Stage
The center stage must be in the Inactive or Draft status.
The Center Stage Configuration user type permission is required.
Click on the name of a center stage.
Click Edit next to Properties.
Select the desired layout.
Click Save.
The center stage is laid out in one or two columns, or in two columns with a header.
Organizing a Multicolumn Center Stage
The center stage must be in the Inactive or Draft status.
The Center Stage Configuration user type permission is required.
In the Center Stage Configuration page, click on the name of a center stage.
In the Center Stage page, click Edit next to Channels and Links.
In the Channel and Link Editor page, select a value in the Section drop-down list.
Click Save.
Channels and links appear in the home page either on the right or left hand side of the page.
Creating Custom Instructions for a Center Stage Channel
The text appearing under the name of a channel in the center stage can be customized. For example, for the View Candidates channel, the following text could be modified: "View detailed information about your candidates". Although no default text is supplied with the application, system administrators can send the text to Oracle Support who will then activate the text for the zone. For details, contact Oracle Support.
Communications Channel
Communications Tool
The Communications tool allows the display of useful information to Recruiting Center users.
Documentation Center: Contains a link to the latest What’s New which provides information on new features. A link to Customer Connect is also available.
Resource Center: Contains a link giving access to information about the hiring cycle, articles, research content, and more.
Support: Contains information to contact Oracle Support.
Configuring the Communications Channel
Many options exist to display or not the Communications channel to Recruiting Center users. For each configuration profile, customers can define the appropriate approach to take.
By deploying the Communications channel, you can display different information at different levels of customization to different user populations, depending on the level of information that needs to be shared with the groups of users.
Communications channel - Disabled
The Communications channel can be disabled and therefore not displayed in the Recruiting Center. Note that the online help and online tours still appear. For details, see Disabling the Communications Channel.
Communications channel - Default
The Communications channel can be displayed in the standard format which contains the following sections:
Support: Displays text to contact Oracle Support.
Documentation Center: Contains text as well as a Documentation link giving access to supporting information such as the latest release notes.
Resource Center: Contains text as well as a Resource Center link giving access to information about the hiring cycle, articles, research content, and more.
For the Customer Support section, you have the ability to enable the section and customize text for each configuration profile. Note that if the Customer Support section is enabled, but the Customer Support Text is empty, then the default text provided in the Customer Support String setting will be displayed. For details, see Customizing Text in the Customer Support Section.
For the Documentation Center section, you have to enable the Communication Channel: Documentation URL setting (Configuration > [Recruiting] Settings). This setting is used to enter the URL of the HTML page displayed when clicking the Documentation Center link in the Communications channel.For the Resource Center section, it is Oracle Support who enables the Taleo Resources Center URL protected setting (Configuration > [General Configuration] Settings). This settings used to enter the URL of the HTML page displayed when clicking the Resource Center link in the Communications channel.
Communications channel - Customized
The Communications channel can be customized by configuration profile.
A Customer Support section can be displayed. As for the default Communications channel, you have the ability to enable the section and customize text for each configuration profile. For details, see Customizing Text in the Customer Support Section.
The following elements in the Communications channel can be customized:
title
text
link
link tooltip
link URL
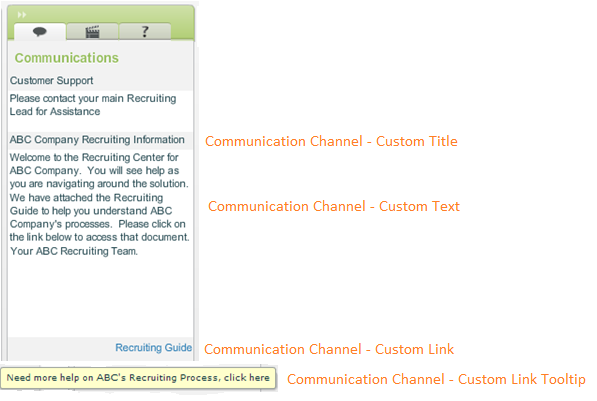
For details see, Customizing the Communications Channel.
Communications channel - HTML CustomizedYou have to specify the URL of the HTML page to be displayed in the Communications channel. For details, see Setting the URL for the HTML Customized Communications Channel.
Disabling the Communications Channel
Click on a configuration profile.
Click on the Communication Channel Mode setting.
Click Edit.
Select Disabled.
Click Save.
The Communications channel is disabled and is not displayed in the Recruiting Center.
You can also hide the Communications channel by not granting the Access external Web Sites permission. Note that when this permission is not granted to users, the Communications, Help, and Clips tabs will all be hidden.
Enabling the Default Communications Channel
Click on a configuration profile.
Click on the Communication Channel Mode setting.
Click Edit.
Select Default.
Click Save.
Customizing the Communications Channel
The Communication Channel Mode setting in the user's configuration profile must be set to Customized.
Setting the URL for the HTML Customized Communications Channel
The Communication Channel Mode setting in the user's configuration profile must be set to HTML Customized.
The HTML Customized mode requires that Flash Player be set in transparent/opaque mode.
Customizing Text in the Customer Support Section
The Communication Channel Mode setting in the user's configuration profile must be set to Default or Customized.
The Customer Support Section setting in the user's configuration profile must be set to Yes.
Click on a configuration profile.
Click on the Customer Support Text setting.
Click Edit.
Enter the desired text for each activated language.
Click Save.
The text is displayed in the Customer Support section of the Recruiting Center Communications channel.
Note that if the Customer Support section is enabled, but the Customer Support Text is empty, then the default text provided in the Customer Support String setting will be displayed.Communications Channel - Settings
| Setting | Possible Values | Default Value | Location |
|---|---|---|---|
| Communication Channel Mode |
|
Default | Configuration > [SmartOrg] Administration > [Users] Configuration Profiles |
| Communication Channel - Custom Link | Custom | Communication Channel - Custom Link |
Configuration > [SmartOrg] Administration > [Users] Configuration Profiles |
| Customer Support Section |
|
No | Configuration > [SmartOrg] Administration > [Users] Configuration Profiles |
| Communication Channel - Custom Link Tooltip | Configuration > [SmartOrg] Administration > [Users] Configuration Profiles | ||
| Customer Support Text | Configuration > [SmartOrg] Administration > [Users] Configuration Profiles | ||
| Communication Channel - Custom Text | Configuration > [SmartOrg] Administration > [Users] Configuration Profiles | ||
| Communication Channel - Custom Title | Configuration > [SmartOrg] Administration > [Users] Configuration Profiles | ||
| Communication Channel - HTML Custom URL | Configuration > [SmartOrg] Administration > [Users] Configuration Profiles | ||
| Communication Channel - Custom Link URL | Configuration > [SmartOrg] Administration > [Users] Configuration Profiles | ||
| Communication Channel: Documentation URL | Configuration > [Recruiting] Settings | ||
| Taleo Resources Center URL | Configuration > [General Configuration] Settings - Protected setting | ||
| Customer Support String | Configuration > [General Configuration] Settings |
Theme and Logo
Color Theme
The theme is the color used to highlight the core navigation bar in Oracle Talent Acquisition Cloud (OTAC) products.
Skyros Theme
The Skyros theme is available for OTAC products. The Skyros theme is the default theme for new customers. The Skyros theme provides a blue header. Because of the blue header, organization logos that have a white background are not recommended for use with this theme.
A product setting "Overlay Organization Logo" is available for use in conjunction with the Skyros theme. This setting only works with the Skyros theme. This setting is used to download a logo. Logos with a transparent background are required for this setting. Transparent PNGs are supported and recommended. The image dimensions cannot exceed 280 x 40 pixels.
For the best user experience, the logo used with the Skyros theme should be a light color, preferably white, with a transparent background.
| Setting | Default value at migration | Default value for new zone | Location |
|---|---|---|---|
| Overlay Organization Logo | OverlayCompanyLogo.png | OverlayCompanyLogo.png | Configuration > [General Configuration] Settings |
| Default Theme | Current | Skyros | Configuration > [General Configuration] Settings |
Other Themes
The following color themes are provided.
| Taleo (default) | Aqua | Sand |
 |
 |
 |
| Ice | Silver | Skyros |
 |
 |
|
A default theme is selected by system administrators. However, Recruiting Center users can modify the default theme in their user preferences (My Setup > Preferences tab).
Selecting a Default Theme
Only one color theme can be displayed per zone.
Click the Default Theme setting.
Click Edit.
Select the desired theme color.
Click Save.
Color selected for body text, headings and links is displayed to user.
Selecting the Skyros Theme
Logos with a transparent background are required for this setting. Transparent PNGs are supported and recommended. The image dimensions cannot exceed 280 x 40 pixels.
Only one color theme can be displayed per zone.
Click the Overlay Organization Logo setting.
Click Edit.
Select the desired logo.
Click Save.
Click the Default Theme setting.
Click Edit.
Select the Skyros theme color.
Click Save.
Giving the Permission to Overwrite the Selected Theme
Click a user type.
Click Recruiting.
Click Edit next to Other.
Select the Access the "Preferences" section in 'My Setup' menu permission.
Click Save.
Users having this user type will be able to overwrite the default theme in their user preferences.
Selected Item Color
Color displayed when selecting elements in the user interface.
The following colors are available:
Green
Soft blue (default)
Yellow
Blue (inverted)
Dark (inverted)
The Dark (inverted) color is a high contrast color scheme for visually impaired users.
A default color is selected by system administrators. However, Recruiting Center users can modify the default color in their user preferences (My Setup > Preferences tab).
Selecting the Selected Item Color
Only one color can be displayed per zone.
Click the Selected Item Default Color setting.
Click Edit.
Select the desired color.
Click Save.
Giving the Permission to Overwrite the Selected Item Color
Click a user type.
Click Recruiting.
Click Edit next to Other.
Select the Access the "Preferences" section in 'My Setup' menu permission.
Click Save.
Users having this user type will be able to overwrite the default selected item color in their user preferences.
Logo
A logo can be displayed in the upper left corner of pages.
A limit of one logo can be defined by zone. By default, the Taleo logo is displayed. Logo requirements are:
PNG format.
Maximum image size is 280 px by 40 px. A margin of 10 px is maintained (left, top, and bottom) outside the image box. An image with smaller dimensions is acceptable. However, it must not be stretched to fill the placeholder.
Alpha channel is required to support background transparency in the near future.
The image must be aligned horizontally to the left and vertically to the center within the placeholder.
Uploading an Organization Logo
A limit of one logo can be uploaded per zone.
The logo must be in a PNG format.
The maximum image size is 280 px by 40 px. A margin of 10 px is maintained (left, top, and bottom) outside the image box. An image with smaller dimensions is acceptable. However, it must not be stretched to fill the placeholder. The image must be aligned horizontally to the left and vertically to the center within the placeholder.
In the Refine by filter, select Name then type Organization Logo.
Click Refresh.
Click the Organization Logo setting.
Click Edit.
Click Browse to select the file containing the company logo.
Click Save.
Online Tour and Online Help
Online Help
The Recruiting Center offers comprehensive help about concepts or tasks to perform.
The online help is available in the Help tab located in the supporting tools panel in the right-hand side of all pages. When clicking the Help tab, a table of contents of available help topics is displayed. It is also possible to search the help database to locate specific subjects.
Displaying the Online Help in the Recruiting Center
If the path of the URL points to webtop800, you will need to click Reset before.
Click the Taleo Online Help URL setting.
Click Edit.
Enter the target URL to Recruiting Center online help.
Click Save.
Disabling the Online Help in the Recruiting Center
You can hide the Help tab by not granting the Access external Web Sites permission.
Online Tour
The Recruiting Center offers short clips describing essential user interface elements.
These online tours are short clips that present basic information about the design, navigation and certain features of the application. Each clip is no more than one minute in length to give users a quick way to get up to speed with how to use the product.
These tours are available in the Recruiting Center. When enabled, they are available in the Clips tab located in the supporting tools panel on the right.
By default, online tours designed by Oracle come with the product. Oracle reserves the right to add new online tours, modify existing tours or delete tours at any time without notice to customers.
The tab where these online tours are available is configurable. Customers may choose to disable the tab or replace the content with their own content linking to alternative learning materials for their end users.
All online tours have been built using Taleo Proficiency, Taleo's custom online learning tool for an ever changing environment. For customers choosing to create custom content using Taleo Proficiency, the standard online tour content can be purchased as starting material. Contact Oracle Support to learn more about Taleo Proficiency and/or purchasing the online tour content.
Online Tour Creation Guidelines
Customers should evaluate the content of the online tours to determine if it is appropriate given the context of their own deployment. For customers choosing to deploy their own custom online tours, here are some guidelines about what to consider when building this material:
Focus on the minimum information a new user needs to know in the first few hours of using the product. The concepts have to be focused; otherwise, the online tours will fail.
Keep each online tour under one minute in length so as to not lose the user's attention.
Retention of concepts is significantly improved if a user can try to do immediately afterwards what the online tour was explaining. Use the Taleo Proficiency "See It and then Try It" mode to let the user try what they have just seen.
Online tours are not eLearning tutorials. eLearning tutorials provide steps to achieve something. If you want to include true eLearning in the Online Tours section, we recommend that you clearly distinguish your online tours content from more in depth eLearning content, and present the online tours content first. Then, use the online tours to explain concepts and prompt users awareness of some issues. Use eLearning content to provide the additional details that are not in the online tour.
Neither online tours nor eLearning tutorials should be designed to "replace" user manuals or online help. These mediums are not useful for reference. They cannot be indexed or searched. Users tend not to reflect on information presented in video format, but to act on it. So present information in this medium that aligns with this format.
Uploading Default Online Tours
Click the Online Clips setting.
Click Edit.
In the Value list, select Taleo Standard (default).
Click Save.
Click the Taleo Recruiting Online Clips URL setting.
Enter the target URL to Taleo Recruiting online tours.
Click Save.
Uploading Custom Online Tours
Disabling Online Tours
Click the Online Clips setting.
Click Edit.
In the Value list, select Disabled.
Click Save.
Online tours will not be available in the Recruiting Center and the Clips tab will be hidden.
You can also hide the Clips tab by not granting the Access external Web Sites permission. Note that when this permission is not granted to users, the Communications, Help, and Clips tabs will all be hidden.Other Page Layout Elements
Creating a Page Header
You must first submit the desired text to Oracle Support. Text must be supplied for all active languages.
The text area supports up to 50 characters.
You can use basic HTML formatting such as color, bold, and italics. You cannot embed hyperlinks.
Click a configuration profile.
Click the Recruiting Header Text setting.
Select Yes.
Click Save.
The header text will be displayed at the top of all pages in the Recruiting Center.
Creating a Welcome Title
Click a configuration profile.
Click the Center Stage-Welcome Title setting.
Select Yes.
Click Save.
If you want to have a different Welcome title, contact Oracle Support.
In the SmartOrg Configuration Profiles feature, activate the Center Stage-Welcome Title setting.
The word Welcome followed by the name of the user signing in will be displayed to the user when logging in the Recruiting Center. It is possible to modify the word Welcome; contact Oracle Support for details.
Adding a Separator Line
A center stage must be created and activated.
Click a configuration profile.
Click the Center Stage - Separator Line setting.
Click Edit.
Select Yes.
Click Save.
A line is added between the Welcome title and the content of the center stage.
Creating Custom Instructions for the Forgot Password Message
Click the System Administrator Phone Number setting.
Click Edit.
Enter text in the Value field. This text will appear in the Forgot Password message that is displayed when a user makes a mistake at login.
Click Save.
About Window
The About window displays the following information:
service pack information (always displayed)
version information (always displayed)
legal statement regarding IP protection (displayed if setting enabled)
The legal statement is required mostly for Federal customers. The legal statement will appear as follows:
"Use, reproduction, or disclosure is subject to restrictions set forth in Subcontract No. [Subcontract Number(s)] with Taleo Corporation."
Configuration
To display a legal statement in the About window, a subcontract number must be entered in the following setting. Contact Oracle Support to enter or modify the value.
| Setting | Description | Default Value | Location |
|---|---|---|---|
| Subcontract Number | Enter the subcontract number of the agreement in regards to restrictions on use, reproduction or disclosure. | None | Configuration > [General Configuration] Settings |
Callout
A callout is a small window or bubble containing information on an element.
Callouts are available throughout the application. To see information contained in a callout, users must place their mouse over the element.
No configuration is required for the callouts. If a user has access to a specific area based on permissions and that area has a callout, the user will be able to see the callout. If there is content that the user cannot see based on the user's permissions and the callout behavior, the field label will be displayed, but the field will be blank. For example, if a user does not have the permission to see the name of internal candidates, the user will still have access to the callout, but the name will show as blank for internal candidates.The table presents callouts available in the product, fields available in each callout, where the callout is used, and if field security level and availability are taken into consideration.
| Callout | Fields in the Callout | Where the Callout is Used | Security Level/Field Availability Impact |
|---|---|---|---|
| Attendee Callout | First Name, Last Name, Home Phone, Cellular Phone, Work Phone, Email. | In the Schedule an Interview tool. | None |
| CSW Callout | Step Name, Step Information. | In the Change Step and Status screen of the requisition-specific candidate list. | None |
| Requisition Callout - Small | Requisition Title (with an hyperlink to the file), Requisition ID, Activated Languages, Activated Features (such as ACE Alert, Daily Recruiting Report, Urgent Need, Prevent Posting). | In the Requisitions list and Tasks list (in the Requisition column). For security reasons, the requisition callout on the Tasks list will show the callout. However, there will be no access to the requisition for all tasks that are in the Approve Requisition or Approve Offer status for any users. The user can get access to view a PDF of the requisition from within the Approval screen. | None |
| Requisition Callout - Large | Requisition Title (with an hyperlink to the requisition file), Requisition ID, Status, Recruiter, Status Details, Hiring Manager, Primary Location, Requisition Type, Hired Candidates, Offers Accepted, Activated Languages, Activated Features (such as ACE Alert, Daily Recruiting Report, Urgent Need, Prevent Posting), Department. | In the Requisition Selector of the Match Candidates to Requisitions feature, the Offers list (in the Requisition column), the Requisition Title on the Candidate Job Submission page, the Requisition Title on the Candidate All tab (when grouped by Requisition). | None |
| Candidate Callout | Candidate Name (with an hyperlink to the file), Home Phone, Cellular Phone, Work Phone, Email. | In the Tasks list (in the Candidate column), the Offers list (in the Candidate column), the Search Results list, the requisition-specific candidate list, the Candidates list, the candidate submission list. | Field security level permissions and field availability are taken into consideration. |
| Candidate Comment Callout | Comment content. | In the candidate file History tab. | None |
| Requisition Comment Callout | Comment content. | In the requisition file History tab. | None |
| Task Callout | Task name (with an hyperlink to the file), Task Type, Assignment Date, Owner. | In the Tasks list (in the Task column). | None |
| Task Comment Callout | Comment content. | In the Tasks list (in the Comment column). | None |
| Submission Active/Inactive Callout | Requisition Title (with an hyperlink to the file), Step/Status, Comment. | In the candidate card of the candidate file. | The requisition title viewing permission is ignored; only submissions the user can see will be listed. |
| List Format Callout | List format information. | In the Requisitions list, the Mini Requisition list, the requisition-specific candidate list, the All Candidate by Requisition list, the All Candidates by Folder list, the All Candidates by Offer list, the quick search results list, the advanced search results list, the candidate capture/possible duplicates list of automatically pooled candidates. | None |
| Message Template Callout | Message title, information, structure. | In the Send Correspondence feature, when selecting a message template. | None |
| Message Paragraph Callout | Paragraph title, preview of paragraph body (in active language). | In the Send Correspondence feature, when the message template selected contains many paragraphs. | None |
| Group Callout | User Name, Employee ID, Job Title, Email, Department. | In the Requisitions list, the Candidates list, the Offers list. | None |
| Create Candidate Callout | For job-specific submission: Selected Language, Selected Requisitions. For general profile: Selected Language, Folder location and name. | In the Create a Candidate feature. | None |
| Create Candidate Flow Description Callout | Create candidate flow title and description. | In the Create a Candidate feature when selecting a candidate file creation template. | None |
| Most Advanced Progression Status Callout | Requisition Title (with an hyperlink to the file if the user has the required permission), Requisition ID, Status, date when moved into that status. | In the Candidates list, in the Most Advanced Progression Status column. | If a user does not have the permission to see the Most Advanced Requisition, the hyperlink to the requisition will not be available. |
| Disqualification Question Explanation Callout | Disqualification Question Explanation Title, Disqualification Question Explanation Comment. | In the Disqualification Questions library (Detailed mode), the requisition file and the candidate submission. | None |
| User Information Callout | First Name, Last Name, Title (of user), ID (of user), Email Address, Work Phone Number, Extension, Fax Number. | In the User Selector available in the Share Candidate feature, Request Approval feature and Request Contribution feature. | None |
| Requisition Template Callout | Requisition Template Title, Job Code, Status, Requisition Type, User Group, Recruiter. | In the Requisition Template Selector when selecting a template for a requisition file. | None |
| Requisition Template List Callout | Requisition Template Title, Activated Languages. | In the Requisition Templates library. | None |
| Attachment Callout | Candidate Name, Job Specific Attachments, Other Attachments. | In the Candidates lists. | Users must have the Access Attachments tab permission to see the callout. |
| Primary Location Callout | Primary Location, Country, State/Province, Region, Address, City, Zip/Postal Code. | In the left pane of requisitions and requisition templates. | None |
| Screening Description Callout | Screening Description. | In the job submission Screening block. | None |