20Reporting
Reporting
Daily Recruiting Report
The daily recruiting report is an e-mail message that contains statistics on one or more requisitions.
Statistics available in the daily recruiting report are:
-
Global statistics: new applications, candidates in the database and the number of requisitions in the various stages of the hiring cycle.
-
Statistics on requisitions assigned to you (as the recruiter or owner): number of new candidates and number of posted requisitions.
-
Details on requisitions for which you are a recipient or interested team member: requisition title and status, number of candidates by status, and opening and closing posting dates.
Configuration
| User Type Permission | Location |
|---|---|
| View and manage the daily recruiting report | Configuration > [SmartOrg] Administration > User Types > Recruiting > Requisitions |
Custom Report Universe
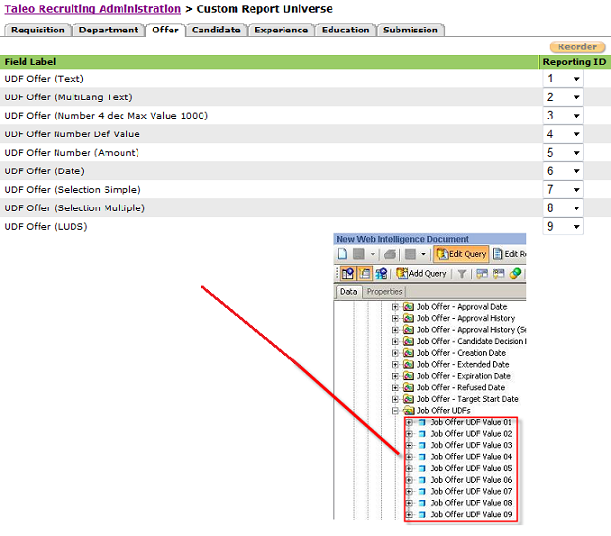
The Custom Report Universe is a tool that allows system administrators to view user-defined fields available in reports and to assign IDs for each field in the report.
The Custom Report Universe page displays user-defined fields that have been tagged to appear in reports. Fields are organized into categories that is Requisition, Department, Offer, Candidate, Experience, Education, and Submission. System administrators can assign a Reporting ID to up to 250 UDFs, making those UDFs available to be included in reports created with OBI Reporting.
Making a User-defined Field Available in Reports
In the Recruiting Administration menu, click on a field category.
In the fields page, click Show User-defined Fields.
Click on a user-defined field.
Click Edit Field Availability next to Properties.
Select the option Custom Report Universe.
Click Save.
The user-defined field appears in the Custom Report Universe page and can be assigning a Reporting ID to be used in reports.
Assigning a Report ID to User-defined Fields
In the Custom Report Universe page, under each tab, select the position of the field by selecting a number in the Reporting ID list.
Click Reorder.
In the report, fields will be displayed in the specified order.
Embedded Reporting
Recruiting customers can use Oracle Business Intelligence (OBI) Publisher technology to create reports on all their recruiting data. End-users are able to import, customize and run reports directly in the Recruiting Center.
In the Recruiting Center, the navigation bar displays a Reports link to users who have been granted permissions to access and generate reports. The Reports link gives access to:
Generated Reports
Scheduled Reports
Configuring Embedded Reporting
Recruiting customers can use Oracle Business Intelligence (OBI) Publisher technology to create reports on all their recruiting data. End-users are able to import, customize and run reports directly in the Recruiting Center.
With this feature, the Embedded Reporting server interacts with Oracle Business Intelligence (OBI) subject areas to extract reporting data, and with Oracle BI Publisher to execute and render pixel perfect reports. Report writers have the ability to create and deploy new reports for end users, and reports are viewed in Recruiting.
Different roles are involved to configure embedded reporting in Recruiting:
Oracle Support enables Embedded Reporting in the customer zone.
The system administrator configures and assigns user type permissions to users.
The report writer builds new data models and also develops, configures and deploys reports.
The main tasks when configuring Embedded Reporting are:
Creating a report definition category to group report definitions.
Creating a data model definition which consists in the following tasks:
This table shows a high level development process for reports.
| 1. Develop Data Model | 2. Develop Report | 3. Configure Report | 4. Deploy Report |
|---|---|---|---|
| Create queries. | Import XML data into report plugin. | Upload reports. | Test report in Recruiting. |
| Define query relationships. | Configure report tables and charts. | Associate report with data model. | Validate group and data security. |
| Create lists of values and prompts. | Format the reports. | Set report category. | Validate prompts work properly. |
| Validate data model by exporting data samples. | Define additional logic as needed. | Set report group security. | Validate fidelity various export formats. |
| Activate data model for use. | Validate report. | Set available export formats | Test using different users. |
| Activate report (publishes it to Recruiting). |
Important Information
This first release of the Recruiting Embedded Reporting feature is intended to set the foundation for the feature and to support conversion of content via 3rd party partners. The content development features are functional but new and complex, so intended towards early adopter users who are familiar with Oracle Business Intelligence (OBI) Publisher or Native Reporting report development only.
Enabling Embedded Reporting
To enable the Embedded Reporting feature, contact Oracle Support. Once the feature is enabled, a section called Embedded Reporting becomes available in the Recruiting Administration menu.
Granting Permissions for Embedded Reporting
The system administrator is responsible for granting the following reporting user type permissions.
| Permission | Description | Location |
|---|---|---|
| Access Embedded Reports | Users with this permission can access the Reports tab in the Recruiting Center. | Configuration > [SmartOrg] Administration > [Users] User Types > Recruiting > Other |
| Access Embedded Reporting Management | Users with this permission can access the Embedded Reporting Administration page available in the Recruiting Administration menu. | Configuration > [SmartOrg] Administration > [Users] User Types > Recruiting > Administration |
| Access Subject Area – Recruiting (Legacy) | Users with this permission can build reports using the converted Recruiting subject area. The Recruiting (Legacy) subject area is only available to clients who currently have BO. | Configuration > [SmartOrg] Administration > [Users] User Types > Reporting and Analytics > Oracle Business Intelligence |
| Access Subject Area – Recruiting | Users with this permission can build reports containing recruiting data. | Configuration > [SmartOrg] Administration > [Users] User Types > Reporting and Analytics > Oracle Business Intelligence |
| Access Subject Area – Administration | Users with this permission can build reports using the converted Administration subject area. | Configuration > [SmartOrg] Administration > [Users] User Types > Reporting and Analytics > Oracle Business Intelligence |
| Access all reportable data for Recruiting | Users with this permission can access all reportable data without being hampered by row level security restrictions. | Configuration > [SmartOrg] Administration > [Users] User Types > Report Data |
| Perform Administration Tasks | The BI administrator has all of the rights of the BI author. | Configuration > [SmartOrg] Administration > [Users] User Types > Reporting and Analytics > Oracle Business Intelligence |
| Author Content (BI Developer) | The BI developer has full fledged report, dashboard and agent authoring capabilities. | Configuration > [SmartOrg] Administration > [Users] User Types > Reporting and Analytics > Oracle Business Intelligence |
| View Reports and Dashboards | Users with this permission can view, refresh, and export content. No authoring rights exist. | Configuration > [SmartOrg] Administration > [Users] User Types > Reporting and Analytics > Oracle Business Intelligence |
The following permissions should be granted to report writers:
Author Content (BI Developer)
Access Subject Area – Administration - (optional)
Access Subject Area – Recruiting (Legacy) - (optional)
Access Subject Area – Recruiting - (optional)
Access Embedded Reporting Management
Access Embedded Reports
The following permissions should be granted to report viewers:
View Reports and Dashboards
Access Subject Area – Administration - (optional)
Access Subject Area – Recruiting (Legacy) - (optional)
Access Subject Area – Recruiting - (optional)
Access Embedded Reports
Creating a Report Definition Category
Categories are used to group report definitions.
Report definition categories are created by clicking the Report Definition Categories link in the Embedded Reporting Administration page (Configuration > Recruiting Administration > Embedded Reporting Administration > Report Definition Categories).
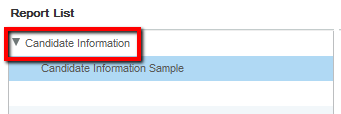
When creating a report definition category, the report writer provides a unique name. Report definition categories can be duplicated, edited, activated, deactivated, and deleted by the report writer. A category can have the Active or Inactive status. Once a category is Active, it can be used to group report definitions. An Active category cannot be deactivated if report definitions are associated to it.In the Recruiting Center, report definition categories appear in the Report List.
Creating a Report Definition Category
The Access Embedded Reporting Management user type permission is required.
Click Report Definition Categories.
Click Create.
Provide a unique name for the category.
Click Save.
Click Activate.
The report category is displayed in the Report Definition Categories list and its status is Active.
Creating a Data Model Definition
A data model definition contains a set of instructions to retrieve structured data to generate reports. It contains a list of parameters and data sets (or collection of reportable fields).
Data model definitions are created by clicking the Data Model Definitions link in the Embedded Reporting Administration page (Configuration > Recruiting Administration > Embedded Reporting Administration > Data Model Definitions).
Several steps are required to create a data model definition:
Defining the Properties of the Data Model Definition
The Access Embedded Reporting Management user type permission is required.
Click Data Model Definitions.
Click Create.
Provide a name and a description for the data model.
Defining a Data Set
The report writer defines data sets which are used for providing objects to insert into a report (report definition). A data set contains a SQL query which represents the logic to retrieve data from a single data source. The data set can use parameters in its logic.
When creating a data set, the report writer defines a name for the data set, selects the query type (logical or physical), writes the query, then validates the accuracy of the query before saving it. The intent of the validation is to make sure the query is executed by the system.
WHERE("Requisition Identification"."Req. Identifier" = (:req_id)
Defining a Data Set
The Access Embedded Reporting Management user type permission is required.
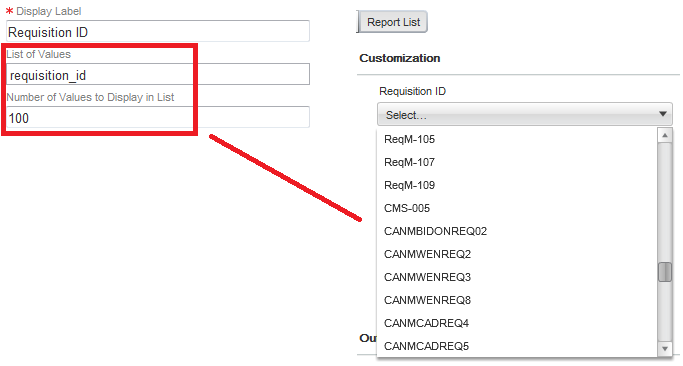
Creating a List of Values
The report writer creates a list of values that will appear in a selection list or drop-down list.
Two types of values are available:
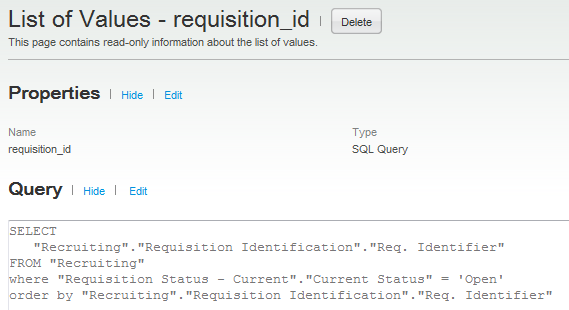
SQL Query: This will provide a dynamic list of values. The query will fetch the list from the database. For instance, if you want a selection list of requisition ID's, you would create a SQL query to get the list of requisition ID's.
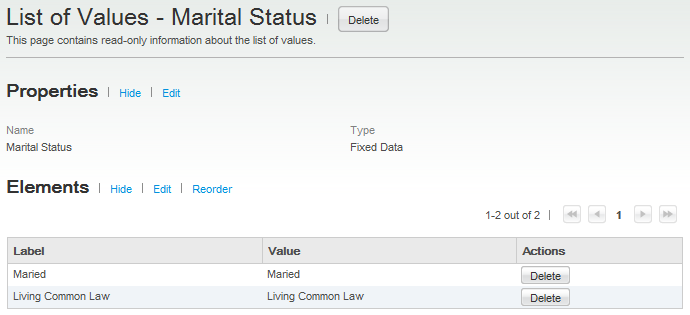
Fixed Data: This will create a static list of values that is not data dependent. For instance, marital status.
If selecting SQL Query, the report writer provides a name for the query, selects between a logical or physical query, writes the query, then validates the accuracy of the query before saving it. The intent of the validation is to make sure the query is executable by the system.
If selecting Fixed Data, the report writer provides a name then creates the different list elements that will be used in the query. The label is the name that appears in the Recruiting Center while the value is used in the query execution.
Creating a List of Values of Type SQL Query
The Access Embedded Reporting Management user type permission is required.
Creating a List of Values of Type Fixed Data
The Access Embedded Reporting Management user type permission is required.
Click Data Model Definitions.
Click on the desired data model definition.
Click Create next to List of Values.
Provide a name.
Select Fixed Data.
Click Save.
Click Edit next to Elements.
Enter a label and a value.
Click Add to create other elements.
Click Save.
Click Save.
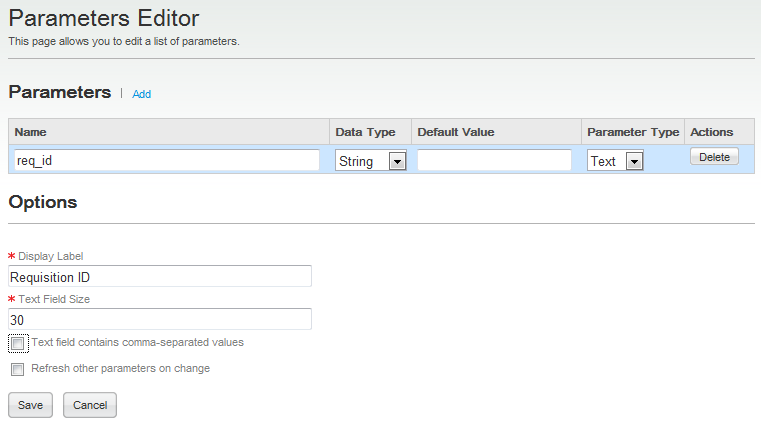
Defining Parameters
The report writer defines parameters that are used for customizations. Parameters are used as constraints to filter data for the report.
As an example, in order to avoid having the whole list of submissions from the system, the report writer could only have submissions done in Canada. In that case, there would be a parameter named Location from which to select Canada. When creating parameters, the report writer defines a name for the parameter, a data type, a default value (optional), a parameter type, and a display label (label appearing in the Recruiting Center Report List).
| Data type |
|
| Parameter type |
|
Depending on the data type and parameter type selected, the report writer may have other fields to complete.

Defining Parameters
The Access Embedded Reporting Management user type permission is required.
Click Data Model Definitions.
Click on the desired data model definition.
Click Edit next to Parameters.
Provide a name.
Select a data type. Possible values are: String, Integer, Float, Boolean, Date.
Provide a default value.
Enter a type of parameter. Possible values are: Menu, Text, Date.
Enter a display label. This label appears in the Recruiting Center Report List.
Enter the text field size.
In the Options section, provide any other required information.
Click Save.
Validating the Data Model Definition
The report writer validates the data model definition by getting a sample of the data model definition.
Report writers can get sample data directly from inside the Data Model Definition page and from the Data Model Definitions list by clicking the Get Sample button. (Configuration > Recruiting Administration > Embedded Reporting Administration > Data Model Definitions).
Two formats are available:
XML sample
HTML sample
When report writers select the HTML sample, data is presented in an HTML table which allows report writers to easily understand the data. In the HTML table, all the dataset attributes are always described in the first dataset. Connected datasets appear below each table. Each set of tables is unique to the first dataset records.
Samples of predefined sizes are available (10, 100, 1000, all records). The report writer must fill in any required parameter value before the sample is produced.
Activating the Data Model Definition
When the report writer is satisfied with the report, the data model definition is activated.
Activating the Data Model Definition
The Access Embedded Reporting Management user type permission is required.
Click Data Model Definitions.
Click on the desired data model definition.
Click Activate next to the name of the data model definition.
Producing the Report with Oracle BI Publisher
The report writer is responsible for gathering reporting requirements and building the report template. This is where the report writer gets to be creative and methodical to produce pixel-perfect reports for users.
The report writer uses the Oracle BI Publisher plug-in for Microsoft Word to build reports. This plug-in enables the report writer to import sample XML, view reports that are generated with data from the sample XML, and modify and create report templates directly inside of Microsoft Word. The Rich Text Format (RTF) also supports advanced formatting commands and layout options. RTF templates support a variety of output types, including: HTML, PDF, RTF and XLS.
Oracle BI Publisher can be downloaded at the Oracle BI Publisher download page. (http://www.oracle.com/ technetwork/middleware/bi-publisher/downloads/index.html)
The Oracle Fusion Middleware Report Designer's Guide for Oracle Business Intelligence Publisher is a useful guide to learn design reports. Refer to these chapters to obtain relevant information: "Creating RTF Templates Using the Template Builder for Word" and "Extended Function Support in RTF Templates". (http://docs.oracle.com/cd/E23943_01/bi.1111/e22254/toc.htm#BEGIN)
Another source of information is the Oracle XML Publisher Report Designer's Guide available on the Knowledge Exchange. Refer to sections 1, 2 and 5 to obtain relevant information. (http://knowledgeexchange.taleo.com/docs/DOC-5680)
The Oracle XML Publisher Report Designer's Guide is intended solely as a reference. Not all functionalities available in the guide are enabled in our implementation of BI Publisher.
Creating the Report Definition
A report definition is the association of a data model definition with one or many templates in order to describe the delivery of a report and its content. A report definition also provides a list of available format for output.
A report definition is created by clicking the Report Definitions link in the Embedded Reporting Administration page (Configuration > Recruiting Administration > Embedded Reporting Administration > Report Definitions).
When creating a report definition, the report writer provides a name and a description, selects a report definition category (optional) and a data model. The report definition must be linked to at least one template which consists of an RTF file containing the layout of the generated report (the template created with Oracle BI Publisher). The report writer must also select one or several available formats for the report definition: PDF, XSLX, RTF, HTML, EXCEL, XML, CSV. Supported file formats are summarized in the table.
| RTF | XLS (Excel) | XSL (XSL-FO) | |
|---|---|---|---|
| Yes | No | Yes | |
| RTF | Yes | No | Yes |
| XLSX | Yes | No | Yes |
| CSV | Yes | Yes | Yes |
| XML | Yes | Yes | Yes |
| Excel (mhtml) | Yes | Yes | Yes |
| HTML | Yes | No | Yes |
When creating report definitions, report writers should validate selected output formats according to the type of uploaded templates. If a report definition contains at least one template of XLS type, report writers should be prohibited from selecting any other output formats except Excel (mhtml), XML, and CSV.
The report writer can define the availability of a report definition based on user groups so that only desired users can access published reports.Creating the Report Definition
The Access Embedded Reporting Management user type permission is required.
Click Report Definitions.
Click Create next to Report Definitions.
Provide a name and a description.
Select a category where you want to put the report.
Select a data model.
Select a template file. This is the RTF file containing the layout of the generated report (the template created with Oracle BI Publisher).
Select one or several formats for the report.
Select a user group so that only desired users can access published reports.
Click Save.
Click Activate.
Importing Reports and Data Models
The Import Reports and Data Models feature provides customers with the ability to import 3rd party converted reports into the system.
This feature is intended to be utilized by 3rd party vendors who assist in Business Objects (BO) to Oracle Business Intelligence (OBI) conversions. It provides the client with an xdrz file that can import data models and report definitions.
Monitoring Scheduled Reports
System administrators can monitor reports that were scheduled to run to see if the reports have been executed or are still in the process queue and to make modifications to scheduled reports.
The Scheduled Reports Monitoring feature available under Recruiting Administration > Embedded Reporting allows you to see all scheduled reports. You can search for a particular scheduled report using these criteria:
Job Name: name of the job running the scheduled report.
Job Status: the job status can either be active or inactive.
Owner: user who scheduled the report.
Execution Status: possible values are Error, In Progress, Interrupted, Ready.
Executed After: reports executed on or after a certain date.
You can change the priority of a scheduled job by selecting Low, Medium or High on the Priority menu. You can deactivate existing jobs to stop any request that is currently executing and to prevent any further execution (note that a report inactivated by the system administrator cannot be activated). You can also delete existing jobs if you wish to remove the job from the system. Note that when a job is deleted, the history of the job is also deleted. You can consult the history of executed jobs and assign a higher priority to some jobs.
Monitoring Report Activities
System administrators can monitor report activities to get information when reports are run and to get detailed error information when reports fail.
In Recruiting, under Reports > Generated Reports > My Reports, the report user can click the Error link next to a report to obtain the Error ID. The user then provides the Error ID to the system administrator or Oracle Support so that they can obtain additional information about the failure.
In Recruiting Administration, under Embedded Reporting > Activity Monitoring, the system administrator or Oracle Support can enter the Error ID provided by the report user and view details about the report that failed.
Exporting Reports
Report developers can export reports for future reference.
In Recruiting Administration, under Embedded Reporting > Export Reports and Data Models, you can choose report definitions. The data model used in the report definition is automatically selected for the export. You can also choose individual data models. After clicking the Export button, an export.xdrz file is created and you can either open it or save it for future reference.