4Manage Landing Pages
Manage Landing Pages Module
Manage Landing Pages Module
Landing Pages Administration
Administrators create and maintain Landing pages in Sourcing as a means to present job search results, and other information about your organization and site. The URL link for a Landing page can be deployed by sharing in an email or on a social networking site.
Landing pages serve as focal points for candidates to find out more about similar positions. Additionally, they provide the benefit of Search Engine Optimization, attracting more users back to your site. Use Landing pages to target populations of prospects interested in jobs within a specific category or at a specific location. You can also create and share custom Landing pages with a combination of job category and location to attract candidates with special interests.
Enable Landing Pages
Administrators use the Landing Page Campaigns setting (located in the Campaigns section of Configuration) to enable Landing pages related functionality for campaigns in Sourcing. In the Site Builder configuration, Administrators can also toggle on and off the site specific settings for Landing pages.
-
Category - Displays the results of a job search based on a job category.
-
Location - Displays the results of a job search based on organizational locations at the city, state/province, or country level.
-
Custom (Combination) - Displays the results of a job search based on a combination of job category and location, as defined by a search.
Category Landing Pages
Category Landing page functionality for a site is enabled or disabled by an Administrator, from the Site Builder Configuration area, by toggling on and off the Category Landing Page setting.
Generates and stores the information for a Landing page for each job category. Each Category Landing page has a title, image area, and job search results for all job requisitions in that category.
Turns on the option for administrators to create Category Landing pages from the Job Search page, and deploy them for end-users to see.
If the setting is Off, it turns off the option for the Administrators to create and deploy Category Landing pages.
Administrators create Category Landing pages using the Create a Landing Page button from the Job Search page. Once a Category Landing page is published and deployed, Administrators can make edits and changes to it by clicking the Manage Landing Pages button on the Home and Promote Jobs pages.
Deployed Category Landing page links will take users to the corresponding Category Landing page.
Location Landing Pages
Location Landing page functionality for a site is enabled or disabled by an Administrator, from the Site Builder Configuration area, by toggling on and off the Location Landing Page setting.
Generates and stores the information for a Landing page for each country, state or province. Each Location Landing page has a title, image area, and job search results for all job requisitions at that location.
Turns on the option for Administrators to create these Location Landing pages from the Job Search page, and deploy them for end-users to see.
If the setting is Off, it turns off the option for the Administrators to create and deploy Location Landing pages.
Administrators create Location Landing pages using the Create a Landing Page button from the Job Search page. Once a Location Landing page is published and deployed, Administrators can make edits and changes to it by clicking the Manage Landing Pages button on the Home and Promote Jobs pages.
Deployed Location Landing page links will take users to the corresponding Location Landing page.
Custom Combination Landing Pages
Custom Combination Landing page functionality is always enabled. Administrators create Custom Combination Landing pages from the Job Search page, by first initiating a search on a category and location. Each Custom Combination Landing page has a title, image area, and job search results for jobs relevant to the category and location.
Administrators can deploy them for end-users to see. Deployed Custom Combination Landing page links will take end-users to the corresponding Custom Combination Landing page.
Once a Custom Combination Landing page is created and deployed, Administrators can make edits and changes to it by clicking the Manage Landing Pages button on the Home and Promote Jobs pages.
Configuration
Settings to enable Landing pages are listed in the following table.
| Settings | |
|---|---|
| Name | Location |
| Landing Page Campaigns | [Sourcing] Administrator login > [Home page] User Settings (Name) > Configuration > Campaigns > General |
|
[Sourcing] Administrator login > [Home page] User Settings (Name) > Configuration > Site Builder > Edit Site Settings > Category and Location Pages |
Location and Category Pages
Location Landing pages provide administrators the ability to promote jobs for organizational locations at the country or state/province level, and they attract job seekers with information about jobs in locations they are interested in. Category Landing pages provide administrators the ability to promote jobs for specific job categories, and they attract job seekers with information about jobs of a type they are interested in.
Enable Location and Category Landing Pages
Location and Category Landing page functionality is enabled or disabled by an administrator from the Sourcing Configuration area, in the Site Builder settings. When enabled, the system creates and stores the information for each Location and Category Landing page based on the locations and categories available for your organization's implementation.
Edit, Publish and Deploy Location and Category Landing Pages
-
Upload a new image or video to replace the standard image, by clicking the Gear icon.
-
Edit title and tagline text, by clicking the Pencil icon.
-
Use Tracking to view page performance analytics.
-
Use Preview to view a preview of changes to the page in another window.
-
Use Help to view information for editing the page.
-
Use Publish to make the Landing page viewable to end-users.
-
Use Copy Link to copy the Landing page URL.
-
Deploy the Location or Category Landing page by sharing the URL on social channels (e.g. Facebook, LinkedIn or Twitter) or in an email.
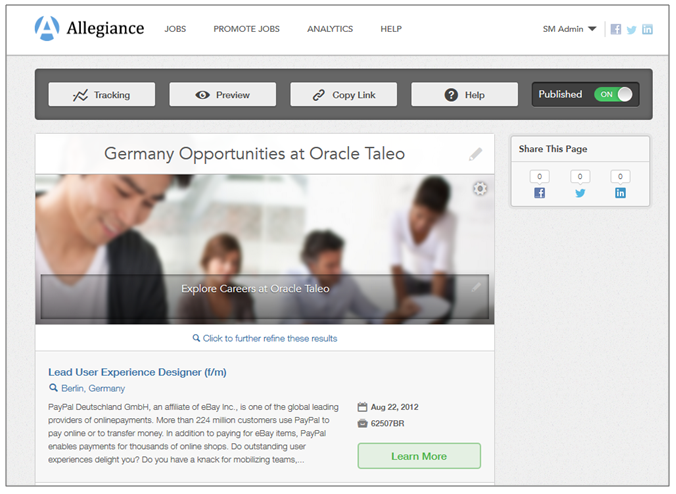
Figure: Administrator view of a Location Landing page for Allegiance job opportunities in Germany.
Once a Location or Category Landing page is published and deployed, administrators can make edits and changes to it by clicking the Manage Landing Pages button on the Home or Promote Jobs pages.
Candidate End User
-
Click the Alerts button to sign up for job alerts.
-
View any promotional materials (video or tagline text) about what it is like to work at the location.
-
View a list of jobs for the location.
-
Click the Search button to refine the search results and narrow down the list of jobs.
-
Follow links to learn more about listed jobs, and view the job description on the host Sourcing site.
Landing Page Editing Functions
| Function | Description |
|---|---|
| General Page Editing | A sample of the Landing page displays, with editing buttons to allow you to modify the content.
|
| Help | Click to open tooltips describing the editable fields on the Landing page. |
| Click to Further Refine These Results | Click to open the Job Selector page and refine the list of jobs to include in the Landing page. Working with the Job Selector page is the same as for ROD, SJD and TC jobs as described in the Promote Jobs chapter of this guide. |
| Preview | Click Preview to open, in a new window, a preview of the Landing page as front-end users would see it. Close the window when done. |
| Publish | Use the Publish toggle to enable or disable the specific Landing page you are working with. When On, the Landing page is visible to all users who follow a URL link to the page. When Off, the page is visible only to administrator users via Manage Landing Pages. |
| Copy Link | Click Copy Link to open a modal displaying the short-link URL for the Landing page. Click Copy Link a second time to copy the URL to clipboard. You can then paste it in an email or share via social channels. |
| Tracking | Click Tracking to open the Landing page's Performance page, and view analytics for the Landing page. |
Creating a Location or Category Landing Page
You must be logged in as an administrator.
End-users who follow the Landing page URL link can access and interact with the Landing page and your Sourcing site.
Use Tracking to view page performance analytics.
Custom Landing Pages
Custom Landing pages provide Administrators the ability to promote jobs based on a combination of job categories and locations, and attract job seekers with information about jobs specific to their interests.
Create, Edit, Publish and Deploy Custom Landing Pages
-
Use a custom template to provide a title and search.
-
Upload a new image or video to replace the standard image, by clicking the Gear icon.
-
Edit title and tagline text, by clicking the Pencil icon.
-
Use Tracking to view page performance analytics.
-
Use Preview to view a preview of changes to the page in another window.
-
Use Help to view information for editing the page.
-
Use Publish to make the Landing page viewable to end-users.
-
Use Copy Link to copy the Landing page URL.
-
Deploy the Custom Landing page by sharing the URL on social channels (e.g. Facebook, LinkedIn or Twitter) or in an email.
Once a page is published and deployed, administrators can make edits and changes to it by clicking the Manage Landing Pages button on the Home or Promote Jobs pages.
Candidate End User
-
Click the Alerts button to sign up for job alerts.
-
View any promotional materials (video or tagline text) about what it is like to work for the organization or location.
-
View a list of jobs specific to their interests and desired locations.
-
Click the Search button to refine the search results and narrow down the list of jobs.
-
Follow links to learn more about listed jobs, and view the job description on the host Sourcing site.
Recommended Practice
-
Target highly desired populations of job seekers (e.g. software developers for certain development centers).
-
Highlight different or unusual types of jobs (e.g. internships or campus recruiters).
-
Promote types of jobs only available in certain areas (e.g. healthcare and medical professionals in California).
Creating a Custom Landing Page
You must be logged in as an administrator.
End-users who follow the Landing page URL link can access and interact with the Landing page and your Sourcing site.
Use Tracking to view page performance analytics.
Managing an Existing Landing Page
You must be logged in as an Administrator.
[Sourcing] Administrator login > [Home page]As administrator you can use Tracking to open analytics and view activity statistics for the Landing page.