2WFM – Input Data
Input Data
There are two main inputs that go into WFM: User clock information and user activities performed on the warehouse floor. This data is then used by various reports in WFM.
The clock data is used to determine the time the user has spent in a physical or logical area, for example, total time spent in the facility, the time spent in a specific work area, time spent for a specific break or time spent on a work area activity.
User activities provide the task accomplished in terms of UOM and the time taken to achieve the task.
Clock Data
There are multiple ways in which users can be clocked in various entities:
- WFM Browser Clock View: Using WFM Clock view from the browser
- WFM RF Clock Views: Using WFM clock options on RF hand held device
- WMS RF Clock View: Using WMS clock option on RF hand held device
- External Systems: Interface user clock information from external time management systems
WFM Browser Clock View
Clock is a browser-based view that is typically used by a supervisor to clock users in and out of various entities. The person that has logged into the application and clocks other users is called the clocker. The clocker could either clock himself or clock other users.
Facility Clocking
In order to to clock users into or out of a facility, set Mode as “Facility” and select the appropriate facility from the Facility drop-down. Enter the login ID of the user in the User field and hit the clock-in or clock-out button as required.
Work Area Clocking
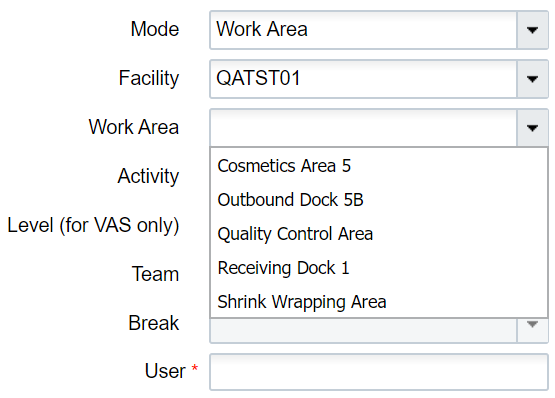
In order to to clock users into or out of a Work Area, set Mode as “Work Area”. Then select the appropriate facility from the Facility drop down and then the Work Area from the Work Area drop down. Enter the login ID of the user in the User field and hit the clock-in or clock-out button as required.
VAS Activities Clocking
When a user or a group of users (team) need to be clocked into or out of a certain VAS activity, set Mode as “VAS”. Select the appropriate facility from the Facility drop down, followed by the Work Area from the Work Area drop down. From the Activity drop down, Select the activity that the user or team need to work on. Select “user” or “team” (as required) from the Level drop down.Depending on the Level selection, enter either the login ID of the user in the User field OR select a team from the Team drop down. Next hit the clock-in or clock-out button as required.

Manual Activities Clocking
In order to clock a user into or out of a manual activity, set Mode as “Manual”. Select the appropriate facility from the Facility drop down, followed by the Work Area from the Work Area drop down. From the Activity drop down, select the activity that the user would be working on. Enter the login ID of the user in the User field and hit the clock-in or clock-out button as required.

Break Clocking
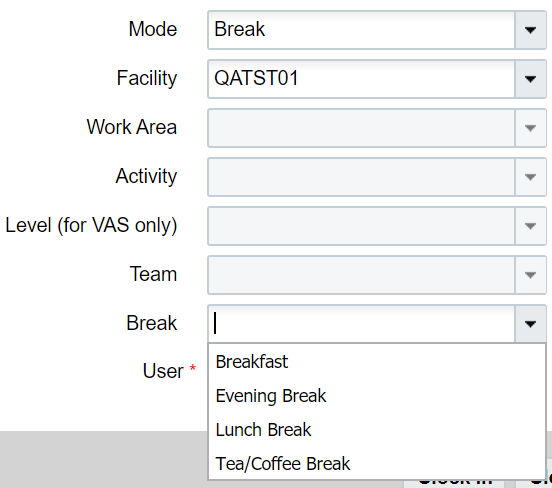
To clock a user into or out of a break, set Mode as “Break”. Select the appropriate facility from the Facility drop down, followed by the break from the Break drop down.Enter the login ID of the user in the User field and hit the clock-in or clock-out button as required.
WFM RF Clock Views
WFM offers multiple RF options for users to clock into and out of various entities while operating on the warehouse floor. The user logged into RF handheld is called the clocker. The clocker could either clock himself or clock other users.
RF CICO
Module: RF-Text: CICO (wfm)
In general, this RF screen provides options for clocking users in facility and work area and also inquire about users. Depending on the role of the user that has logged into RF handheld device, the options presented on selecting this RF screen varies as shown in pictures below:
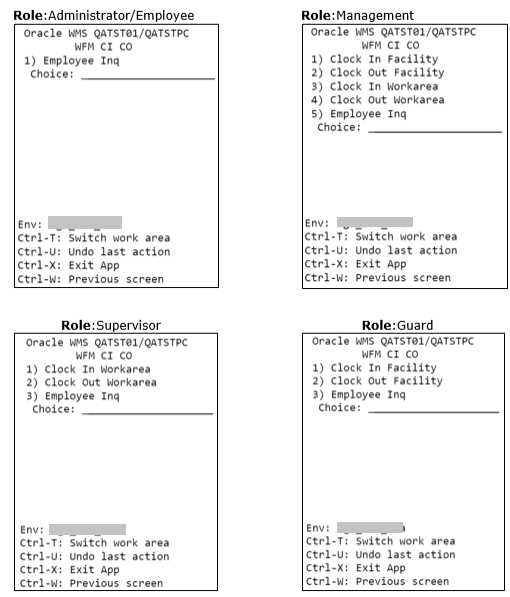
To summarize, only a user with Management role has access to all the options on this screen. A user with Guard role can only clock users at a facility level. A user with supervisor role can only clock users at a work area level. A user with Administrator or Employee role do not have the option to clock users either at the facility or the work area level. All users (regardless of role) have the option of inquiring about other users using the option Employee Inq.
Choosing any of the Clock In/Out options, presents you with the next screen where the user id has to be keyed in. As an example, if the “Clock In Facility” option is selected, the following screen shows up. Here the login id of the user that needs to be clocked into facility is keyed in.

Unlike Clock View in the browser, RF does not provide options for Facilities or Work Area. Instead the user is clocked into the Facility/Work Area that is marked as a default for the user.
Also, to clock a user into a Work Area, the clocker (logged in user) needs to have the same default Work Area as the user. If the clocker does not have the same default Work Area as the user being clocked in, the following error is encountered .

Ctrl-U: This control key can be used to undo the last action. For example, if a particular user was clocked into facility, hitting Ctrl-U button would mark the user as not clocked into facility.
RF VAS
Module: RF-Text: VAS (wfm)
This RF screen provides options to clock users (or a Team) in a VAS activity. Regardless of the role of the logged in user, the following options are presented on selecting this RF screen:

On selecting “Clock In Vas Team” or “Clock In Vas User”, all the VAS activities that have been configured in the logged in user’s default Work Area are displayed in the next screen.

After selecting an activity, the logged in user is taken to the next screen, which shows all the Teams that are eligible to operate in this Work Area.
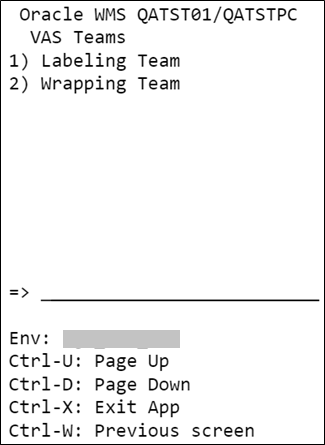
After selecting a team, the next screen varies, depending on the choice made on first screen. If “Clock In Vas Team” was selected, logged in user needs to confirm if the selected team can be clocked in. If “Clock In Vas User” was selected, the logged in user is prompted to enter the id of the user that needs to be clocked in.
Clock In Vas Team Clock In Vas User
Clocking in a team, clocks all the users of that team into the VAS activity.
If the clock out options are selected on main screen, the logged in user is prompted to enter either the id of the user or the team that needs to be clocked out. Clocking out a team, clocks out all the users of the team from that VAS activity. The team or user is clocked out from the last clocked in VAS activity.
RF Manual
Module: RF-Text: MANUAL (wfm)
This RF screen provides options to clock users in a Manual activity. Regardless of the role of the logged in user, the following options are presented on selecting this RF screen:

On selecting “Clock In Manual Activity”, all the manual activities that have been configured in the logged in user’s default Work Area are displayed in the next screen.

After selecting an activity, on the next screen, the logged in user is prompted to enter the id of the user that needs to be clocked in.
On selecting “Clock Out Activity” on the main screen, the logged in user is prompted to enter the id of the user that needs to be clocked out. The user is clocked out from the last clocked in manual activity.
RF Break CI
Module: RF-Text: Break CI (wfm)
This RF screen can be used for clocking in users into a break. Regardless of the role of the logged in user, the following options are presented on selecting this RF screen:

After selecting a break option, on the next screen the logged in user is prompted to enter the id of the user that needs to be clocked into the selected break.
RF Break CO
Module: RF-Text: Break CO (wfm)
This RF screen can be used for clocking out users from a break. Regardless of the role of the logged in user, the logged in user is prompted to enter the id of the user that needs to be clocked out.
The user is clocked out from the last clocked in break.
RF VAS or CICO
Module: RF-Text: VAS or CICO (wfm)
This RF screen acts as a one-stop screen that provides all the options that have been described in invidual RF screens above. Regardless of the role of the logged in user, the following options are presented on selecting this screen.

- Clock In/Out: Choosing this option takes you through the same screenflow as RF Cico.
- VAS: Choosing this option takes you through the same screenflow as RF VAS.
- Manual: Choosing this option takes you through the same screenflow as RF Manual.
- Start Break: Choosing this option takes you through the same screenflow as RF Break Cl.
- End Break: Choosing this option takes you through the same screenflow as RF Break CO.
- Employee Inq: Choosing this option takes you through the same screenflow as RF Employee Inq.
RF Employee Inq
Module: RF-Text: Employee Inq (wfm)
This RF screen does not provide any clock options but can be used to inquire about any user. The first screen prompts for a user and on keying in the id of a user, the last clock information about the user is displayed.

For example, in the screenshot above, the logged in user has requested information about test user42. The Employee Inq screen shows that the test user42 was last clocked into the “IRONING” VAS Activity by clocker test user 4 on July 13th at 03:37 am.
Note: Employee Inq is also available as an option in all other clock RF screens except the Break RF screens.
WMS RF Clock View
WMS provides a single RF option for user clocking. This option can only be used to clock in the fa Also, there are no validations against the requests using this screen. Any request made via this RF screen does not take into effect immediately. The clock information is captured and sent to WFM where the data is validated and users are then marked appropriately. It’s advisable to use this option only when a user is absolutely sure of the order in which he is making requests.
For example, a user who is not clocked into facility ideally cannot clock into any other entity. On a WFM RF Clock option and WFM Browser Clock view, this user will not be allowed to clock into other entities. However, when WMS RF option is used, the data is simply passed to WFM, where the validations are made and then the clock request could be either rejected or accepted. User is not aware of this status unless a supervisor views in the WFM Track Record View.
Following topic describes the options available on this RF screen.
RF Clock In and Clock Out User
Module: RF-Text: Clock In and Clock Out User
On selecting this RF screen, user is presented with the following options:

Selecting option 1 sends a “clock into current facility” request to WFM. Selecting option 2 sends a “clock out of current facility” request to WFM. The requests are validated and accepted/rejected in WFM.

Selecting option 3 prompts the user to key in the Work Area that he needs to be clocked into. WMS only validates if the Work Area is valid. WMS does not validate if the user is eligible for the keyed in Work Area. The request is captured and sent to WFM where data is validated and either accepted or rejected.
Selecting option 4 prompts the user to key in the Work Area from where he needs to be clocked out of. WMS only validates if the Work Area is valid. WMS does not validate if the user is eligible for the keyed in Work Area. The request is captured and sent to WFM where data is validated and either accepted or rejected.
External Systems
If a facility uses a time management system to capture user’s entry and exit into the warehouse, this information can be interfaced into WFM as a clock file. The clock file can also have break information assuming that users walk out the facility for breaks. Data in the clock file is interfaced into WFM Stage Track Record.
Details about the clock file and the interface that processes this file is described in the section - Input Interfaces.
Track Record
If users are clocked using WFM Browser Clock View or WFM RF Options, the clock information is captured and can be viewed directly in the Track Record view in WFM.

The fields that appear in this view are described below:
User: User that has been clocked.
Clocker: Personnel that has clocked the user. If the user has clocked himself, this field has same information as the User field.
Clock in/out: A value of IN indicates that the user has been clocked into the entity. A value of OUT indicates that the user has been clocked out of the entity.
Action Code: Indicates the entity in which the user has been clocked. This field supports values 1 through 4.
- 0 – Indicates Facility
- 1 – Indicates Work Area.
- 2 – Indicates Work Area Activity. This could be either a VAS activity or a manual activity.
- 3 – Indicates Break.
Shift: Indicates the shift that corresponds to the time at which user clocks into the facility.
Work Area: Indicates the Work Area in which user is clocked. This field is populated when Action Code is 1.
Activities: Indicates the Work Area Activities in which user is clocked. The activity could be either a VAS activity or a manual activity. This field is populated when Action Code is 2.
Team: Indicates the team that has been clocked for VAS activity. This field is populated when Action Code is 2 and a team has been clocked into a VAS activity.
Break: Indicates the Break in which user is clocked. This field is populated when Action Code is 3.
Date: Date and time at which the user is clocked.
This view does not provide a create option, hence new clock records cannot be created manually. However the view provdes update and delete options. In order to update or delete a record, you need to login as the clocker of that record. For example, in the picture above, in order to update or delete any record that has clocker as “KKALL01”, you need to login as “KKALL01”.
Stage Track Record
If users are clocked using the WMS RF Option or user clock file interfaced from external systems, the clock information is first written to Stage Track Record. A background process picks up this data, validates and then moves data to Track Record. Only records in “Ready” status are picked up for processing. This process is either triggered manually by using the run_process button on Stage Track Record view OR scheduled using the Scheduled Jobs view

The fields that appear in this view are described below:
Employee ID: Unique ID of the user. This corresponds to the ID in the User view.
CICO Type: Indicates the entity in which the user has been clocked. This field supports the following:
- F1 – Indicates clock-in to a Facility
- F2 – Indicates clock-in to a Break
- F3 – Indicates clock-out of a Break
- F4 – Indicates clock-out of a Facility
- F5 – Indicates clock-in to a Work Area
- F6 – Indicates clock-out of a Work Area
CICO Timestamp: Date and time at which the user is clocked.
Status: The following values are supported:
- Not Ready – Indicates that the record is not ready to be picked up yet by the background process.
- Ready – Indicates that the record is ready to be picked up by the background process.
- Processing – Indicates that the record is currently being processed by the background process.
- Processed – Indicates that the record has been processed sucessfully and moved to Track Record.
- Ignored – Duplicate records are marked as “Ignored”
- Cancelled – A record can be marked as cancelled. Cancelled records are not picked up by the background process
- Failed – Indicates that the record failed validations during processing. Such records have the Error Message field populated with the relevant text indicating the reason for failure .
Processing System: The following values are supported:
- M – Indicates that the data is interfaced by an external system. M is used when new clock data is interfaced to WFM.
- S – Indicates that the data is interfaced by an external system. S is used when existing clock data in WFM needs to be updated.
- W – Indicates that the user has been clocked using WMS RF option.
Error Message: This field is populated with the appropriate error message when the record fails data validations. After the required configurations are put in place (example, missing User OR Work Area), an administrator can reset the record by using the edit icon and change status to “Ready”. During the next process run, if the record processes successfully, this field is cleared.
Work Area: This field is populated with the Work Area when CICO Type is F5 or F6
run_purge: This button is used to manually trigger the purge process which purges old data from Stage Track Record.
User Activity Data
Since system and VAS activities are productive, the time taken to perform these activities and the measure of the activity performed (in relevant UOM) is required in WFM.
WMS Data
User activities performed using WMS RF options are called System Activities. The facility parameter WRITE_WMS_ACTIVITY_RECORDS controls the recording of these activities in WMS. If the facility parameter is to set to “Yes”, all user activities performed using WMS RF options are recorded in WMS. These records contain both the time taken as well as the measure of the activity performed. This data is extracted from WMS at regular intervals by the “WMS WFM Interface” scheduled via the Scheduled Jobs view. Data is consolidated and moved to WMS Activity Track view in WFM.
WMS Activity Track
As a first step “WMS WFM interface” validates the SKU line, User and WMS Transaction of each record that is moved from WMS to WFM. If all three values are configured in WFM, the status on the record is marked as “SUCCESS”. However, if any of the three values are not configured, the record fails and the appropriate “Unknown” field is populated. For example, if the SKU Line is not configured, the status on the record is marked as “ERROR” and the “Unknown SKU Line” field is populated with the SKU Line that was on the record. The begin and end time stamp capture the total time taken for the user to perform the activity. Nbr Pallets, Nbr LPNs and Nbr Units show the total quantity of Pallets, LPNs or units handled during the activity.

Daily Activity Track
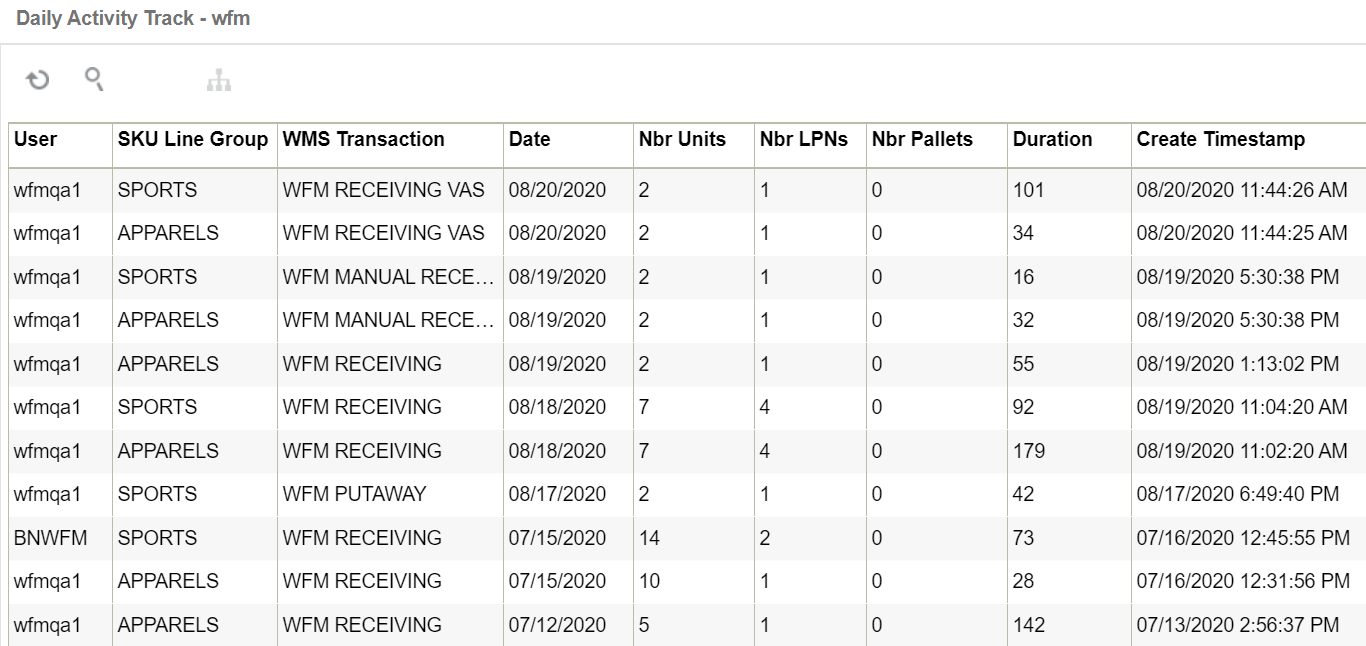
As a second step “WMS WFM Interface”, consolidates all the successful records in WMS Activity Track and moves to Daily Activity Track view in WFM. Similar transactions (for example, same user, same SKU Line Group and same Transaction) over a day are consolidated and written at a Daily level in this view.
VAS Data
VAS activities are captured as a two-step process in WFM. The first step is to clock the user in the relevant VAS activity. This records the time taken for the activity. Clocking into VAS activities is explained in Clock Data.
The second step is to capture the units (or relevant UOM) worked on during this time period. This is captured using the Daily VAS Track Browser view.
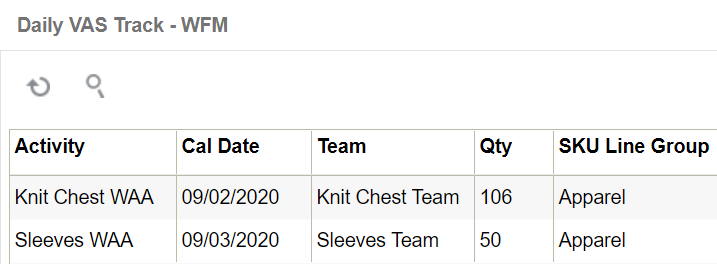
After the user or VAS team clocks into a VAS activity, the total quantity is captured by using the create button on Daily VAS Track view.