13.1.3 Creating Page Items

Create page items in Page Designer in either the Rendering tab or by adding an item from the Gallery.

13.1.3.1 Creating a Page Item from the Rendering Tab

To create a page item from the Rendering tab:

  1. View the page in Page Designer:
    1. On the Workspace home page, click the App Builder icon.
    2. Select an application.
    3. Select a page.
    Page Designer appears.
  2. If necessary, create a region to contain the item.
  3. In the Rendering tab, right-click the region to contain the item and select one of the following: or .
    • Create Page Item - This option creates a new item under Region Body.

    • Create Page Item Below - This option creates a new page item below the region.

    The Property Editor displays Page Item attributes. Attributes are organized in groups.

    To find a group or attribute, enter keywords in the Filter Properties field. The Property Editor displays the group or attributes. Or, you can click Go to Group and select the group.

  4. Edit the appropriate attributes in the Property Editor.

    Tip:

    To learn more about an attribute, select the attribute in the Property Editor and click the Help tab in the center pane.

  5. To save your changes click Save. To save and run the page, click Save and Run Page.

13.1.3.2 Adding a Page Item from the Gallery

To create a page item by adding if from the Gallery:

  1. View the page in Page Designer:
    1. On the Workspace home page, click the App Builder icon.
    2. Select an application.
    3. Select a page.
    Page Designer appears.
  2. If necessary, create a region to contain the item.
  3. In the central pane, click Layout and then the Items tab in the Gallery.
    Passing the cursor over an item displays a tooltip that describes it.
  4. Select an item and drag it to the appropriate location in the Layout tab.

    Tip:

    You also right-click the item, click Add To and select the appropriate location.

    The Property Editor displays Page Item attributes.

  5. Page Designer indicates what to do next. If there is an error, the Show Messages icon displays in the Page Developer toolbar.
    1. Click the Show Messages icon on the Page Designer toolbar.
      The Messages dialog displays errors that must be addressed.
    2. Select an error to highlight the associated attribute in the Property Editor.
  6. Edit the appropriate attributes in the Property Editor.

    Tip:

    To learn more about an attribute, select the attribute in the Property Editor and click the Help tab in the central pane.

  7. To save your changes click Save. To save and run the page, click Save and Run Page.

13.1.3.3 Creating a Static List of Values

One way to create a static list of values is to edit an item's List of Values definition. Note that this type of list of values is not reusable. As a best practice, create a list of values as a shared component whenever possible.

To create a static list of values:

  1. View the page in Page Designer:
    1. On the Workspace home page, click the App Builder icon.
    2. Select an application.
    3. Select a page.
    Page Designer appears.
  2. Create a new item from the Rendering tab or by adding it from the Gallery.
    The Property Editor displays the Page Item attributes. Attributes are organized in groups.

    Tip:

    To find a group or attribute, enter keywords in the Filter Properties field. The Property Editor displays the group or attributes. Or, you can click Go to Group and select the group.

  3. Edit the appropriate attributes in the Property Editor.

    Tip:

    To learn more about an attribute, select the attribute in the Property Editor and click the Help tab in the center pane.

  4. Under Identification:
    1. Name - Enter the name of this item. Item names must be valid Oracle identifiers. Oracle recommends that item names be no longer then 30 bytes so they can be used as bind variables in SQL Queries.
    2. Type - Select Select List.
  5. Under List of Values:
    1. Type - Select Static Values.
    2. Static Values - Click the Display1, Display2 button.
      In the Static Values dialog:
      • Display Value - Enter the Display Value for each entry.
      • Return Value - Enter the Return Value for each entry. If you do not include a Return Value, the return value equals the Display Value
      • Move Up and Move Down - Click the Move Up and Move Down arrow buttons to change the order.
      • Sort - To sort the list at alphabetically at runtime, expand the Sort region and enable Sort at Runtime.

      Tip:

      See the sections that follow to view examples.

    3. Click OK.
  6. Edit the remaining List of Values attributes as appropriate. To learn more about an attribute, select the attribute and click the Help tab in the central pane.
  7. To save your changes click Save. To save and run the page, click Save and Run Page.

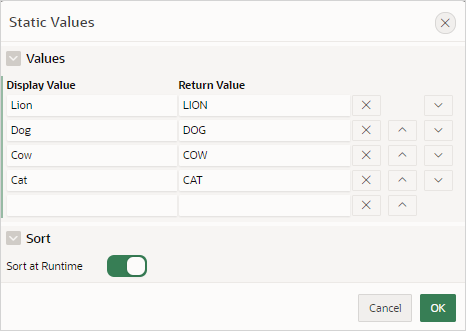
Example 13-1 Four Values Displayed in Alphabetical Order

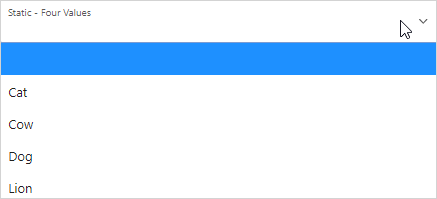
This example shows the Static Values dialog with four values defined: Lion, Dog, Cow, and Cat. The return value of each entry is capitalized. Sort at Runtime is set to On so that the list displays alphabetical order.
Description of static_four_values.png follows
Description of the illustration static_four_values.png

In a running application this select list would look similar to the following illustration.
Description of static_4_values_run.png follows
Description of the illustration static_4_values_run.png

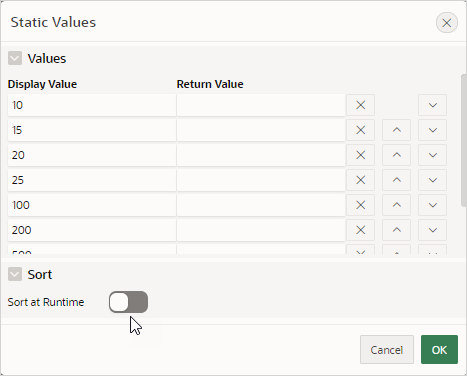
Example 13-2 Values Displayed in the Order Listed

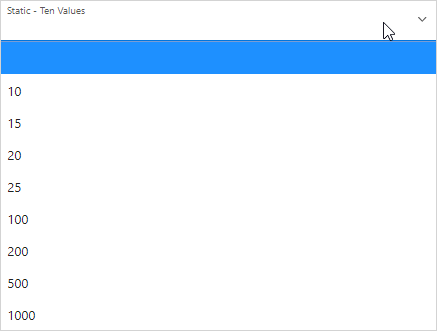
This example shows the Static Values dialog with ten values defined: 10, 15, 20, 25, 50, 100, 200, 500, 1000, and 10000 which display in the order listed. The return value of each entry equals the display value.
Description of static_10_values.png follows
Description of the illustration static_10_values.png

In a running application this select list would look similar to the following illustration.
Description of static_10_values_run.png follows
Description of the illustration static_10_values_run.png

Example 13-3 A List of Values with Having Both a Return and Display Value

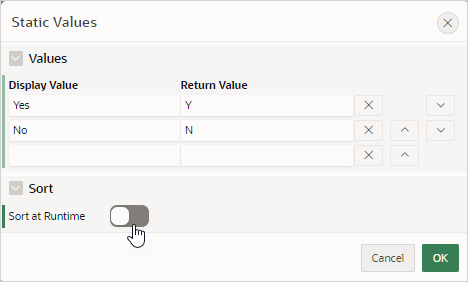
This example shows the Static Values dialog with two values defined. The first value has a Display Value of Yes and a Return Value of Y. The second value has a Display Value of No and a Return Value of N Sort at Runtime is set to Off to make sure Yes always displays first.
Description of static_display_return.png follows
Description of the illustration static_display_return.png

In a running application this select list would look similar to the following illustration.

Description of static_display_return_run.png follows
Description of the illustration static_display_return_run.png

13.1.3.4 Creating a Cascading List of Values

By creating a cascading list of values (LOV), one item on a page determines the list of values for another item. App Builder includes cascading LOV support for the following item types: Select List, Shuttle, Checkbox, Radio Group, Popup LOV, and List Manager.

You create a cascading LOV by creating two items. To populate the second item, you specify a Cascading LOV Parent Item when running the Create Item Wizard or by editing the item's attributes.

The following example demonstrates how to create two related select lists where the value of the first list populates the second.

To create a cascading list of values:

  1. Create the first item, P1_DEPTNO:
    1. Create a select list item.
    2. In the Property Editor, edit the attributes:
      • Identification: Name - Enter P1_DEPTNO

      • Identification: Type - Select Select List.

      • Label: Label - Enter Department

    3. In the Property Editor, edit the List of Values attributes:
      • List of Values: Type - Select SQL Query.

      • List of Values: SQL Query, enter:

        SELECT dname as d,
               deptno as r
          FROM dept
         ORDER BY dname
        
      • List of Values: Display Null Value - Select On.

      • List of Values: Null Display Value - Enter:

        - Select Department -
        
      • Accept the remaining defaults.

      • Click Save.

  2. Create the second item, P1_EMPNO:
    1. Create a select list item.
    2. In the Property Editor, edit the attributes:
      • Identification: Name - Enter P1_EMPNO

      • Identification: Type - Select Select List.

      • Label: Label - Enter Employee

    3. In the Property Editor, edit the List of Values attributes:
      • List of Values: Type - Select SQL Query.

      • List of Values: SQL Query, enter:

        SELECT ename as d,
               empno as r
          FROM emp
         WHERE deptno = :P1_DEPTNO
        
      • List of Values: Display Null Value - Select On.

      • List of Values: Null Display Value - Enter:

        - Select Employee -
        
      • Accept the remaining defaults.

      • Click Save.

  3. To save and run the page, click Save and Run Page.
    Two select lists appear. Making a selection in the Department select list, determines which individuals display in the Employees select list.

13.1.3.5 Creating a Shuttle Item on the Form Page in Page Designer

This section demonstrates how to create shuttle item type. In this example, you first create a report and form on the DEPT table that shows which employees are assigned to a given department. Then, you create a shuttle item that lists employees alphabetically to make it easier to assign employees to a department.

To create a shuttle item on a form:

  1. View the page in Page Designer:
    1. On the Workspace home page, click the App Builder icon.
    2. Select an application.
    3. Select a page.
    Page Designer appears.
  2. In Page Rendering, right-click region containing the form and select Create Page Item.
  3. In the Property Editor, edit the following attributes:
    1. Identification: Name - Enter the name of this item (for example, PX_EMP_LIST).
      Where PX in the item name (for example P2_EMP_LIST) indicates the page on which the item resides.
    2. Identification: Type - Select Shuttle.
  4. In the Property Editor, edit the List of Values attributes:
    1. List of Values: Type - Select SQL Query.
    2. List of Values: SQL Query, enter:
      SELECT ename, empno FROM emp ORDER BY 1
      
  5. In the Property Editor, edit the Source attributes
    1. Source: Type - Select SQL Query (return colon separated value).
    2. Source: Item Source Value - Enter the SQL Query that returns one or more rows to be used as the source for this item value. If the result contains multiple rows then the value from each row is formed into a single colon delimited value. For example:
      SELECT empno FROM emp WHERE deptno = :P8_DEPTNO ORDER BY ename
      
  6. To save your changes click Save. To save and run the page, click Save and Run Page.